
Auriol BASIC
Auriol Wireless Weather Station with Mold Alarm - Instruction Manual
Model: BASIC
1. Introduction
Thank you for choosing the Auriol Wireless Weather Station with Mold Alarm. This device provides accurate indoor and outdoor temperature and humidity readings, helps assess room climate, and features a mold alarm for a healthier living environment. Please read this manual carefully before use to ensure proper operation and longevity of your device.
2. Safety Instructions
- Keep the device away from extreme temperatures, direct sunlight, strong vibrations, and impacts.
- Do not immerse the device in water or other liquids. The outdoor sensor is splash-proof (IPX4), but not waterproof.
- Do not attempt to disassemble or modify the device. This will void the warranty.
- Use only the specified battery type (4 x 1.5 V AAA). Ensure correct polarity when inserting batteries.
- Remove batteries if the device will not be used for an extended period.
- Keep batteries out of reach of children.
- Dispose of batteries and the device according to local regulations.
3. Package Contents
Please check the package for the following items:
- 1 x Auriol Wireless Weather Station (Main Unit)
- 1 x Wireless Outdoor Sensor
- 4 x 1.5 V AAA Alkaline Batteries
- 1 x Instruction Manual

Image: The product packaging, illustrating the main weather station unit, the outdoor sensor, and indicating included batteries.
4. Product Overview
The Auriol Wireless Weather Station consists of a main display unit and a wireless outdoor sensor.
4.1 Main Unit (Display Station)

Image: The main display unit showing indoor and outdoor temperature and humidity, time, and climate assessment icons.
The main unit features a large LCD display that shows:
- Indoor temperature and humidity
- Outdoor temperature and humidity
- Time (radio-controlled)
- Room climate assessment (5 levels: too dry / dry / optimal / wet / too wet)
- Window opening/closing indicator
- Mold alarm indicator
- Alarm and snooze function indicators
It has a foldable stand for tabletop use and can also be wall-mounted.
4.2 Wireless Outdoor Sensor
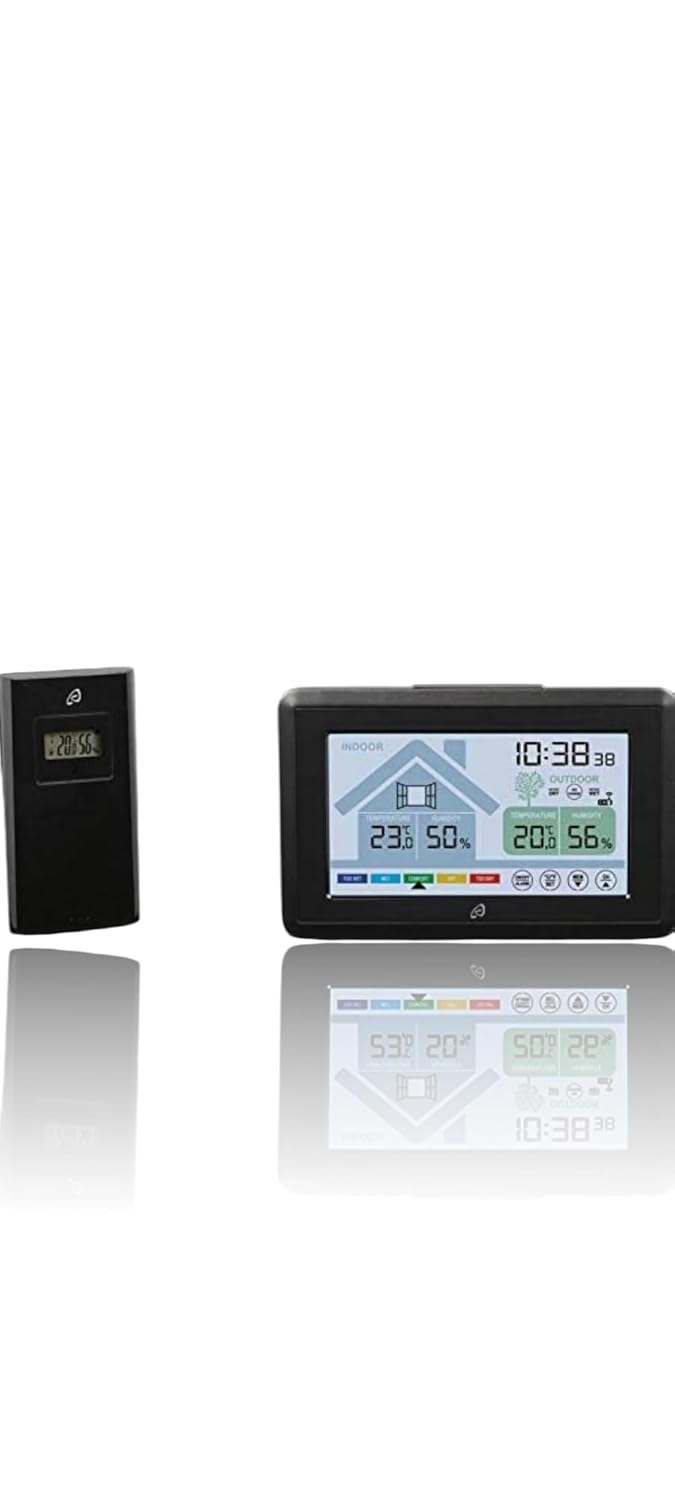
Image: The main unit and the compact outdoor sensor, which transmits data wirelessly to the main unit.
The outdoor sensor measures external temperature and humidity and transmits data wirelessly to the main unit. It is splash-proof (IPX4) and can be placed on a surface or wall-mounted. It has a range of up to 100 meters in open areas.
5. Setup
5.1 Battery Installation
- Open the battery compartment on the back of both the main unit and the outdoor sensor.
- Insert 2 x 1.5 V AAA batteries into the main unit and 2 x 1.5 V AAA batteries into the outdoor sensor, ensuring correct polarity (+/-).
- Close the battery compartments securely.
- The main unit will power on and begin searching for the outdoor sensor signal.
5.2 Sensor Placement
- Place the outdoor sensor in a shaded, dry location away from direct sunlight and rain to ensure accurate readings and prolong its lifespan.
- Ensure the sensor is within 100 meters (open area) of the main unit. Walls, metal structures, and other electronic devices can reduce the effective range.
- The outdoor sensor can be placed on a flat surface or mounted on a wall using a screw (not included).
5.3 Initial Synchronization and Time Setting
- Once batteries are inserted, the main unit will automatically attempt to synchronize with the outdoor sensor and receive the radio-controlled time signal (DCF77).
- This process may take a few minutes. Ensure both units are close to each other during initial setup.
- If synchronization fails, try repositioning the units or pressing the reset button (if available, check device for small hole) on both units.
- The time will automatically adjust for daylight saving time. Manual time setting is also possible if the radio signal is weak.
6. Operation
6.1 Display Information
The LCD display provides comprehensive information at a glance:
- Indoor/Outdoor Temperature & Humidity: Displays current readings for both environments.
- Room Climate Assessment: Icons indicate the current indoor climate in 5 stages: too dry, dry, optimal, wet, too wet. This helps you maintain a comfortable and healthy indoor environment.
- Window Opening/Closing Indicator: The display shows an icon suggesting whether to open or close windows to improve the indoor climate. It also indicates the planned room climate during ventilation.
- Mold Alarm: An alarm function alerts you to conditions conducive to mold growth.
- Time Display: Shows the current time, automatically set by radio signal. Can be switched between 12-hour and 24-hour format.
- Temperature Unit: Toggle between Celsius (°C) and Fahrenheit (°F) display.
6.2 Setting the Alarm Clock
The weather station includes an alarm clock with a snooze function.
- Press the "ALARM" button (or similar, refer to specific button labels on your device) to enter alarm setting mode.
- Use the "UP" and "DOWN" buttons to adjust the hour and minute.
- Press "ALARM" again to confirm and activate the alarm.
- When the alarm sounds, press any button (except snooze) to stop it, or press the "SNOOZE" button for a temporary pause.
6.3 Display Backlight
The main unit features a short-duration display backlight for easy viewing in low light conditions. Press any button to activate it.
6.4 Connecting Additional Sensors
The weather station supports connection of up to two additional wireless outdoor sensors (sold separately). Refer to the additional sensor's manual for pairing instructions. The main unit will display readings from all connected sensors.
7. Maintenance
- Cleaning: Wipe the device with a soft, dry cloth. Do not use abrasive cleaners or solvents.
- Battery Replacement: Replace batteries in both the main unit and outdoor sensor when the low battery indicator appears on the display. Always replace all batteries at the same time.
- Storage: If storing the device for an extended period, remove all batteries to prevent leakage. Store in a cool, dry place.
8. Troubleshooting
| Problem | Possible Cause | Solution |
|---|---|---|
| No outdoor temperature/humidity reading. |
|
|
| Incorrect temperature/humidity readings. |
|
|
| Time not setting automatically. |
|
|
| Display is dim or blank. |
|
|
9. Specifications
| Feature | Detail |
|---|---|
| Model | BASIC |
| Manufacturer | Auriol |
| Connectivity Technology | 433 MHz, 868 MHz |
| Power Source | Battery Powered (4 x 1.5 V AAA Alkaline Batteries included) |
| Display Type | LCD |
| Color | Black |
| Item Weight | 250 g |
| Package Dimensions | 15 x 10 x 6 cm |
| Measurement Accuracy | +/- 0.5 |
| Special Features | Window opening/closing display, connection for up to two additional external wireless sensors, Mold Alarm, Radio Clock, Alarm with Snooze |
| Outdoor Sensor Range | 100 m (open area) |
| Outdoor Sensor Protection | Splash-proof (IPX4) |
10. Warranty and Support
For warranty information and technical support, please refer to the contact details provided with your purchase or visit the official Auriol website. Keep your proof of purchase for warranty claims.
Related documentsBASIC


Ask a question about this manual
Ask about setup, troubleshooting, compatibility, parts, safety, or missing instructions. Manuals+ will review the question and use this page’s manual context to help answer it.