1. Important Safety Instructions
Please read all instructions carefully before using the appliance and retain them for future reference. Failure to follow these instructions may result in electric shock, fire, or serious injury.
- Electrical Safety: Ensure the voltage indicated on the appliance corresponds to your local mains voltage before connecting. Do not operate the appliance with a damaged cord or plug.
- Heat and Surfaces: The appliance surfaces become hot during use. Always use oven mitts or gloves when handling hot components. Do not touch hot surfaces directly.
- Placement: Place the appliance on a stable, heat-resistant surface, away from walls and other appliances to allow for adequate ventilation. Do not place near flammable materials.
- Water and Liquids: Do not immerse the appliance, cord, or plug in water or any other liquid. Do not use near water.
- Children: This appliance is not intended for use by children. Keep the appliance and its cord out of reach of children.
- Supervision: Never leave the appliance unattended while in operation.
- Maintenance: Refer to the "Maintenance and Cleaning" section for proper care. Do not attempt to repair the appliance yourself. Contact qualified service personnel.
- Intended Use: Use the appliance only for its intended household purpose as described in this manual.
2. Product Overview
The Karinear 20L XXL Hot Air Fryer is a versatile kitchen appliance designed for air frying, baking, roasting, toasting, and dehydrating. It features a spacious interior and intuitive controls.
2.1 Main Unit

Figure 2.1: Front view of the Karinear 20L XXL Hot Air Fryer, showcasing the control panel, viewing window, and handle.
The main unit houses the heating elements, fan, and control panel. The large viewing window allows you to monitor cooking progress without opening the door. The appliance is designed for efficient heat distribution to ensure even cooking.
2.2 Control Panel

Figure 2.2: Close-up of the control panel with three rotary dials for temperature, function, and timer, along with a power indicator light.
The control panel features three rotary dials:
- Temperature Dial: Adjusts cooking temperature from 100°C to 230°C.
- Function Dial: Selects cooking modes such as Air Fryer, Broil, Bake, Toast, Rotisserie, and Dehydrate.
- Timer Dial: Sets cooking time from 0 to 60 minutes.
- Power Indicator Light: Illuminates when the appliance is operating.
2.3 Accessories
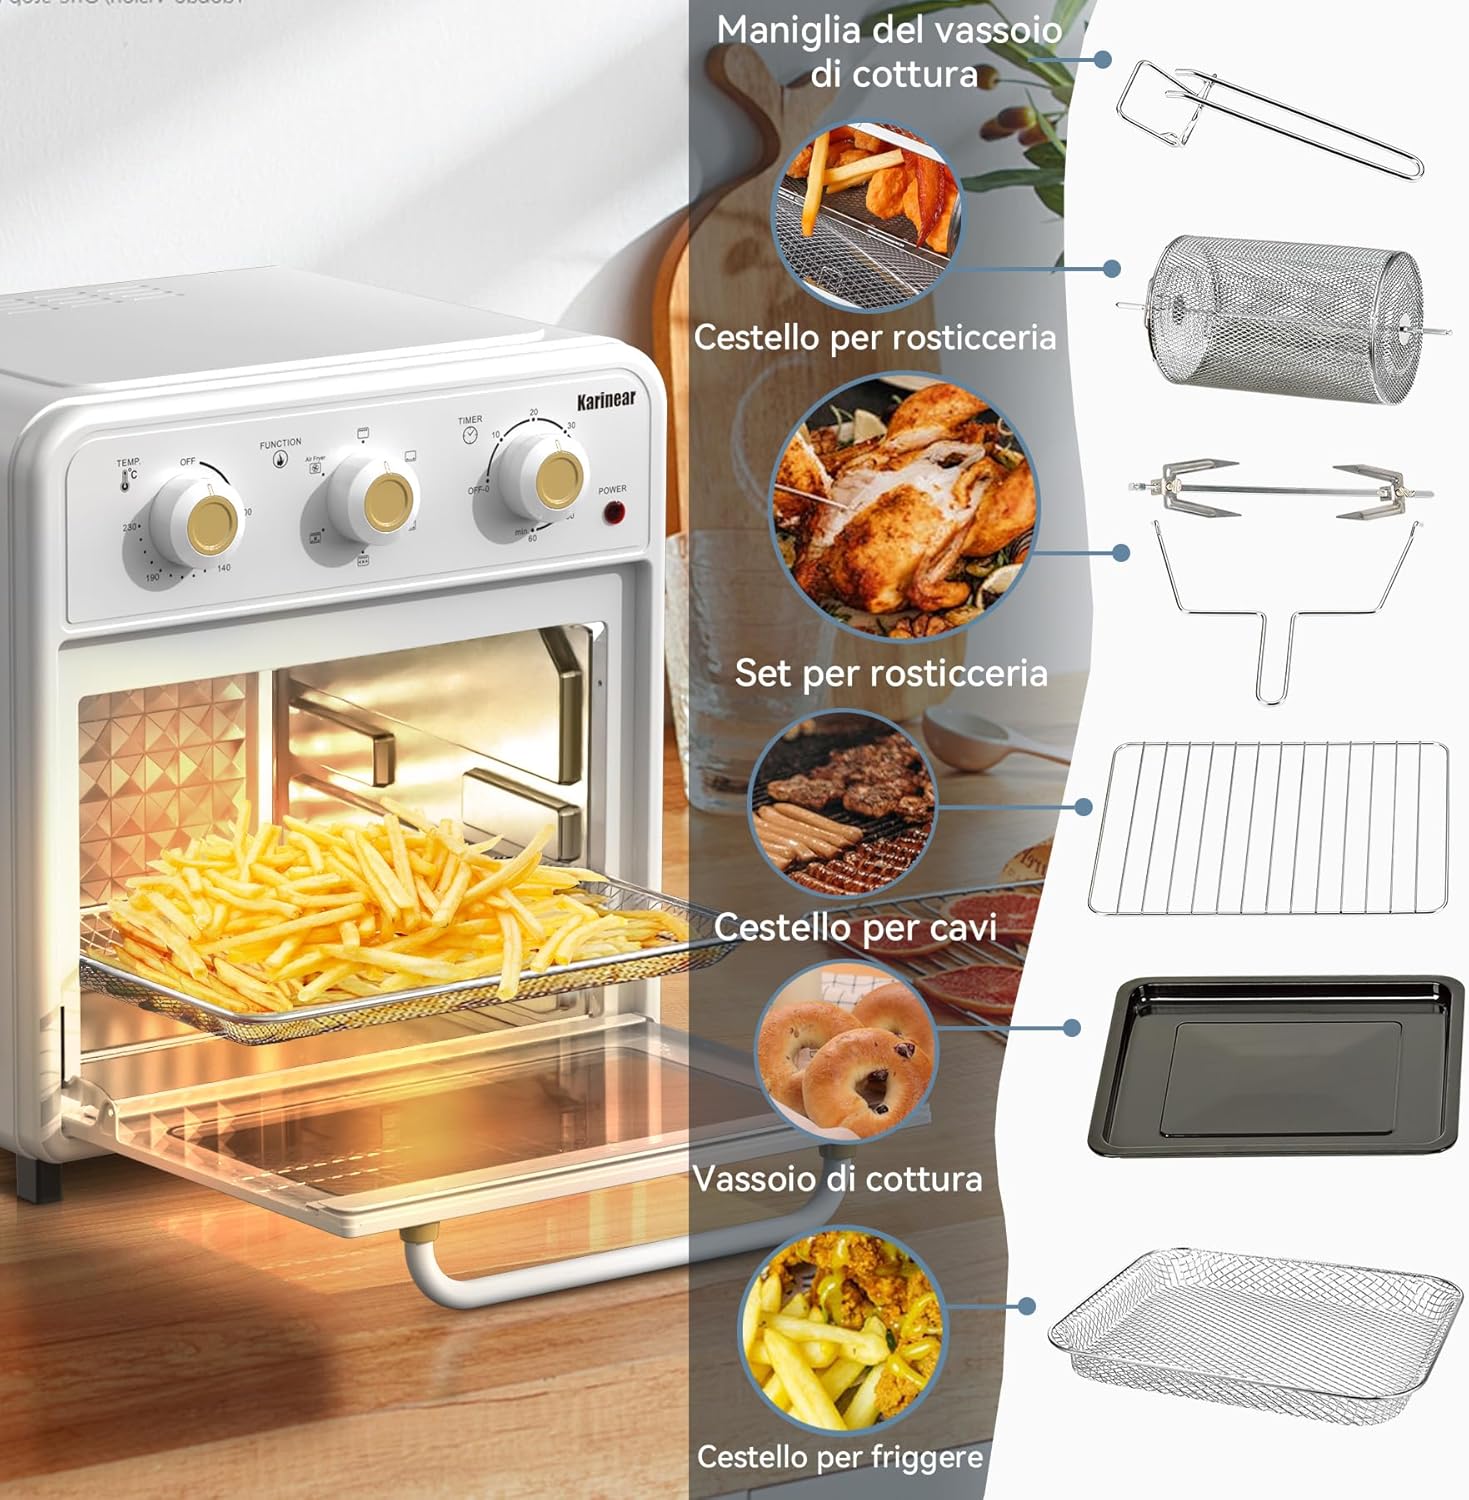
Figure 2.3: Various accessories included with the air fryer, such as a cooking tray handle, rotisserie basket, rotisserie set, wire rack, cooking tray, and frying basket.
The appliance comes with several accessories to enhance your cooking experience:
- Cooking Tray Handle: For safely removing hot trays and baskets.
- Rotisserie Basket: Ideal for tumbling small items like fries or nuts.
- Rotisserie Set: For roasting whole chickens or larger cuts of meat.
- Wire Rack: For baking, roasting, or dehydrating.
- Cooking Tray: For catching drips or baking items.
- Frying Basket: Specifically designed for air frying.
3. Setup
- Unpacking: Carefully remove the appliance and all accessories from the packaging. Retain packaging for future storage or transport if needed.
- Initial Cleaning: Before first use, wipe the exterior of the appliance with a damp cloth. Wash all removable accessories (cooking tray, wire rack, baskets, etc.) with warm, soapy water, rinse thoroughly, and dry completely.
- Placement: Place the air fryer on a flat, stable, heat-resistant surface. Ensure there is at least 10 cm (4 inches) of clear space on all sides and above the appliance for proper ventilation. Do not block any air vents.
- Power Connection: Plug the power cord into a grounded electrical outlet.
- First Use Burn-Off: It is recommended to run the appliance empty for about 15 minutes at 200°C (400°F) to burn off any manufacturing residues. A slight odor or smoke may be present during this process; this is normal. Ensure the area is well-ventilated.
4. Operating Instructions
This section details how to operate your Karinear Hot Air Fryer for various cooking functions.
4.1 Basic Operation
- Prepare Food: Place your food in the appropriate accessory (frying basket, wire rack, rotisserie set, or cooking tray).
- Insert Accessory: Slide the accessory into the desired rack position inside the air fryer.
- Close Door: Ensure the appliance door is fully closed.
- Set Temperature: Turn the Temperature Dial to your desired cooking temperature (100°C - 230°C).
- Select Function: Turn the Function Dial to the desired cooking mode (e.g., Air Fryer, Bake, Broil).
- Set Timer: Turn the Timer Dial to the required cooking time (0-60 minutes). The appliance will begin cooking, and the power indicator light will illuminate.
- Monitor Cooking: Use the viewing window to check on your food. For best results, shake or flip food halfway through cooking, especially for air frying.
- Completion: When the timer reaches zero, the appliance will automatically turn off and emit an audible signal. Carefully remove the cooked food using the cooking tray handle or oven mitts.
4.2 Cooking Functions

Figure 4.1: Visual representation of different cooking functions, including pizza oven, baking, toasting, rotisserie, and dehydrating.
- Air Fryer: Uses rapid hot air circulation for crispy results with little to no oil. Ideal for fries, chicken wings, and vegetables.
- Bake: For cakes, cookies, and other baked goods.
- Broil: For grilling and browning the top of food.
- Toast: For bread, bagels, and similar items.
- Rotisserie: For evenly roasting whole chickens or roasts using the rotisserie spit.
- Dehydrate: For drying fruits, vegetables, and making jerky at low temperatures over extended periods.
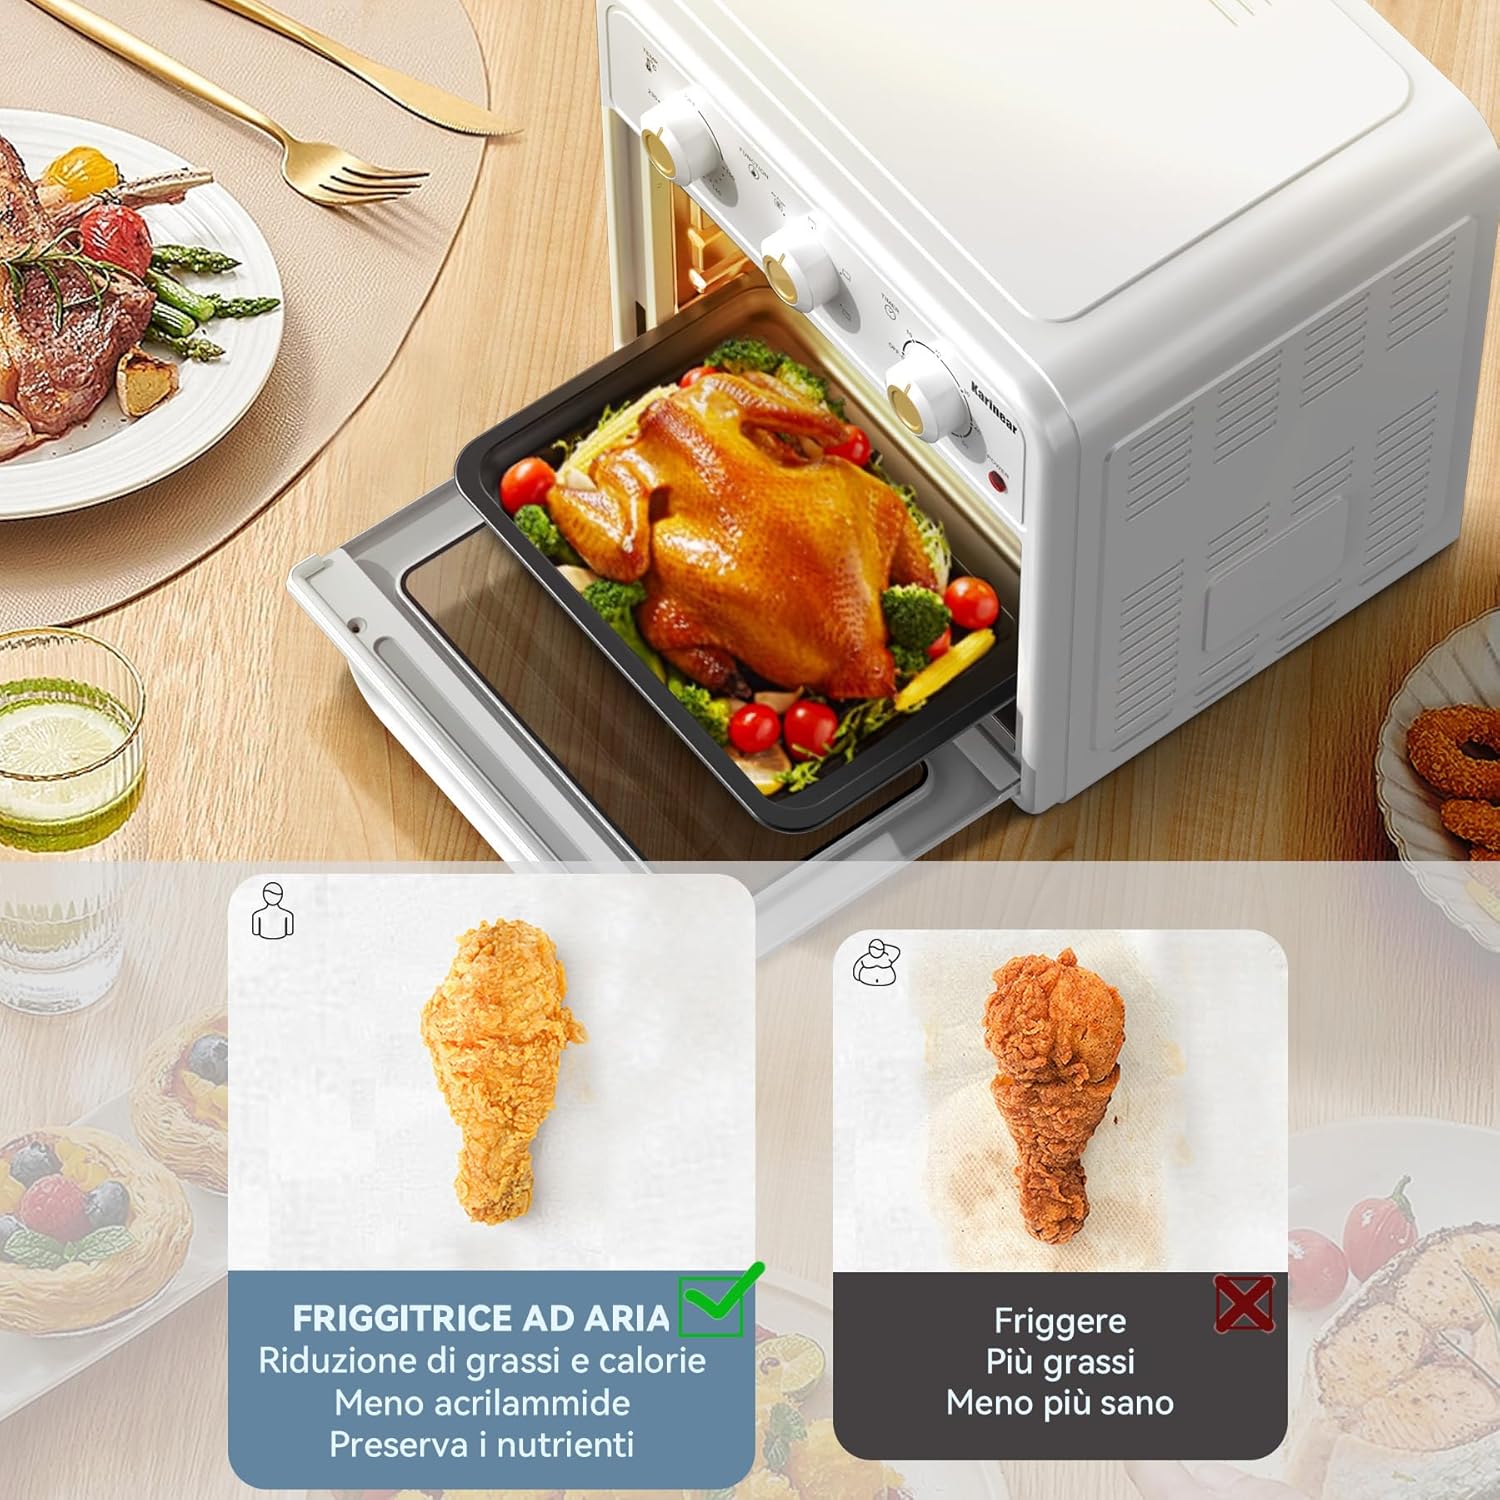
Figure 4.2: Comparison illustrating the benefits of air frying, such as reduced fat and calories, compared to traditional deep frying.
5. Cooking Guide
This guide provides general recommendations. Actual cooking times and temperatures may vary based on food quantity, density, and desired crispness.
5.1 General Tips
- Preheating: For best results, preheat the air fryer for 5-10 minutes at the desired temperature before adding food.
- Oil Usage: While air frying requires little to no oil, a light spray or toss with oil can enhance crispiness and flavor for some foods.
- Do Not Overfill: Avoid overcrowding the basket or rack. Cook in batches if necessary to ensure even cooking and browning.
- Shake/Flip: For even cooking, especially with smaller items like fries, shake the basket or flip the food halfway through the cooking time.
- Internal Temperature: Always ensure meat and poultry reach safe internal temperatures.
5.2 Capacity
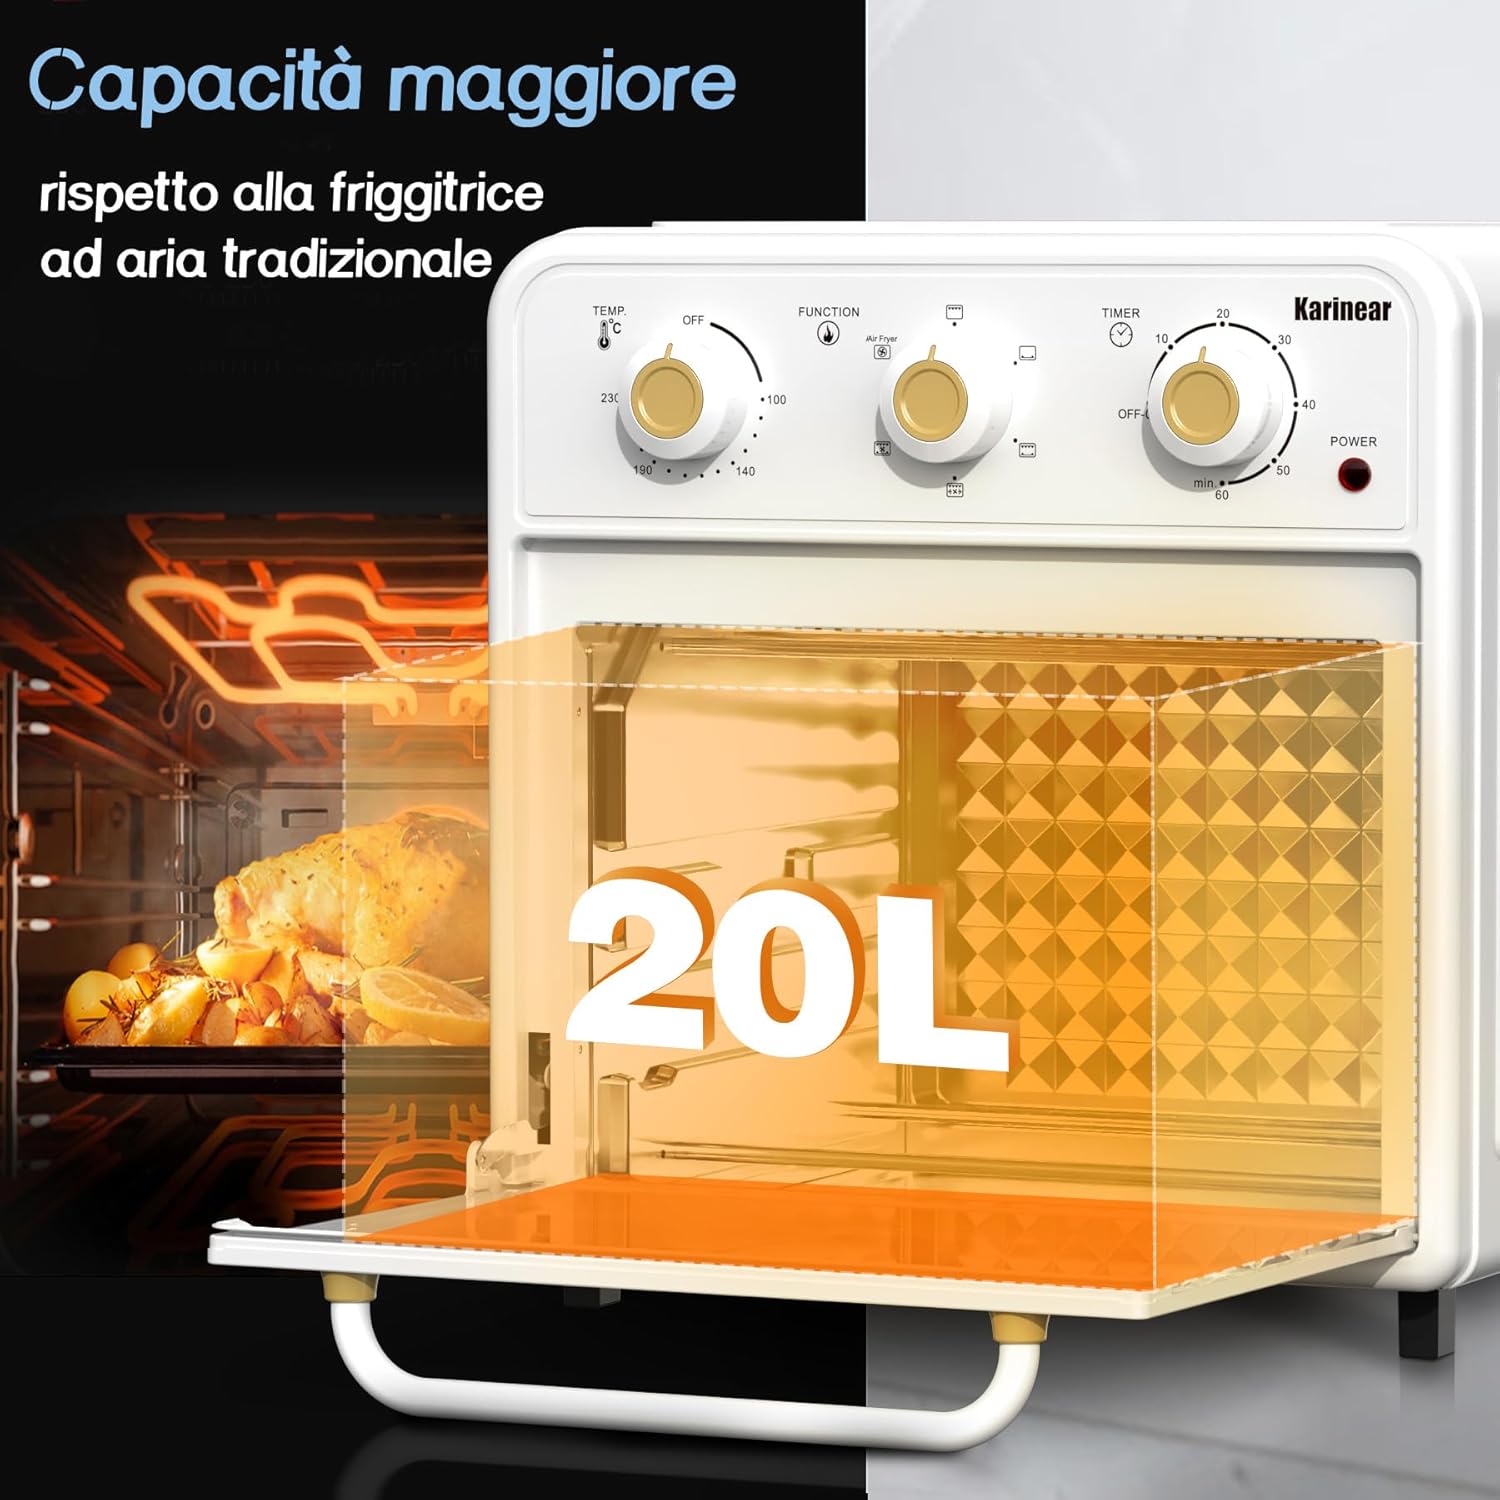
Figure 5.1: Illustration highlighting the generous 20-liter internal capacity of the air fryer, suitable for larger meals like a whole chicken.
With a 20-liter capacity, this air fryer can accommodate larger items such as a whole chicken, multiple servings of fries, or a small pizza, making it suitable for family meals.
6. Maintenance and Cleaning
Regular cleaning ensures optimal performance and extends the lifespan of your appliance.
- Unplug and Cool: Always unplug the appliance from the power outlet and allow it to cool completely before cleaning.
- Accessories: Wash all removable accessories (frying basket, wire rack, cooking tray, rotisserie parts) in warm, soapy water. For stubborn food residue, soak them before cleaning. Rinse thoroughly and dry completely before storing or reusing. Most accessories are dishwasher safe, but hand washing is recommended to prolong their life.
- Interior: Wipe the interior walls with a damp cloth and mild detergent. For baked-on food, a non-abrasive sponge or brush can be used. Avoid abrasive cleaners or metal scouring pads.
- Exterior: Wipe the exterior of the appliance with a soft, damp cloth. Do not use abrasive cleaners or immerse the main unit in water.
- Heating Elements: Gently clean any food residue from the heating elements with a soft brush after the appliance has cooled.
- Storage: Store the clean and dry appliance in a cool, dry place.
7. Troubleshooting
Refer to this section for common issues and their solutions.
| Problem | Possible Cause | Solution |
|---|---|---|
| Appliance does not turn on. | Not plugged in; power outlet malfunction; timer not set. | Ensure the power cord is securely plugged into a working outlet. Set the timer to the desired cooking duration. |
| Food is not cooked evenly. | Overcrowding; insufficient shaking/flipping; incorrect temperature/time. | Do not overcrowd the basket/rack. Shake or flip food halfway through cooking. Adjust temperature and time as needed. |
| White smoke coming from the appliance. | Grease residue from previous use; fatty food cooking. | Clean the appliance and accessories thoroughly after each use. For fatty foods, place a small amount of water in the drip tray to reduce smoke. |
| Food is not crispy. | Too much moisture; overcrowding; not enough oil (for some foods). | Pat food dry before cooking. Avoid overcrowding. Lightly spray or toss food with oil. |
If the problem persists after attempting these solutions, please contact customer support.
8. Specifications

Figure 8.1: Diagram showing the dimensions and key electrical specifications of the Karinear Hot Air Fryer.
| Feature | Detail |
|---|---|
| Brand | Karinear |
| Model Number | KNI-GR20DRAL-K |
| Capacity | 20 Liters |
| Power Output | 1800 Watts |
| Voltage | 220 Volts (typically 220-240V for this wattage) |
| Temperature Range | 100°C - 230°C |
| Timer | 0-60 minutes |
| Product Dimensions (L x W x H) | 37.6 cm x 35.7 cm x 38.7 cm (14.8 x 14.1 x 15.2 inches) |
| Package Dimensions | 48.4 cm x 43.5 cm x 41.6 cm |
| Package Weight | 9.59 kg |
9. Warranty and Support
For warranty information, product support, or service inquiries, please refer to the warranty card included with your purchase or contact Karinear customer service directly.
You can typically find contact information on the manufacturer's official website or through your retailer.
Online Support: Visit the Karinear Store on Amazon for more product information and support resources.


