
Karinear KNI-GR36BRAL-K
Karinear 36L XXL Air Fryer Mini Oven Instruction Manual
Model: KNI-GR36BRAL-K
1. Introduction
Thank you for choosing the Karinear 36L XXL Air Fryer Mini Oven. This appliance is designed to offer versatile cooking options, combining the functionalities of an air fryer, toaster, rotisserie, and oven in one compact unit. Please read this manual thoroughly before first use to ensure safe operation and optimal performance. Keep this manual for future reference.
2. Important Safety Instructions
When using electrical appliances, basic safety precautions should always be followed, including the following:
- Read all instructions before operating the appliance.
- Do not touch hot surfaces. Use handles or knobs.
- To protect against electrical shock, do not immerse cord, plugs, or the main unit in water or other liquid.
- Close supervision is necessary when any appliance is used by or near children.
- Unplug from outlet when not in use and before cleaning. Allow to cool before putting on or taking off parts.
- Do not operate any appliance with a damaged cord or plug, or after the appliance malfunctions or has been damaged in any manner.
- The use of accessory attachments not recommended by the appliance manufacturer may cause injuries.
- Do not use outdoors.
- Do not let cord hang over edge of table or counter, or touch hot surfaces.
- Do not place on or near a hot gas or electric burner, or in a heated oven.
- Extreme caution must be used when moving an appliance containing hot oil or other hot liquids.
- Always attach plug to appliance first, then plug cord into the wall outlet. To disconnect, turn any control to "off", then remove plug from wall outlet.
- Do not use appliance for other than intended use.
- Ensure adequate ventilation around the appliance during operation.
- The exterior surfaces of the appliance can become hot during use. Avoid direct contact.
3. Product Overview
3.1 Main Unit

Figure 1: Front view of the Karinear 36L XXL Air Fryer Mini Oven, showcasing its compact design and interior cooking space with food.
The Karinear 36L XXL Air Fryer Mini Oven is a versatile kitchen appliance designed for various cooking methods. It features a spacious interior, a transparent door for monitoring cooking progress, and intuitive rotary knob controls on the front panel.
3.2 Control Panel

Figure 2: Detailed view of the control panel, featuring three rotary knobs for temperature, function selection, and timer settings. A quick reference cooking guide is also visible.
The appliance is controlled via three rotary knobs:
- Temperature Knob: Adjusts the cooking temperature (e.g., 100°C to 230°C).
- Function Knob: Selects the desired cooking mode (e.g., Air Fry, Bake, Toast, Rotisserie).
- Timer Knob: Sets the cooking duration (e.g., 0 to 60 minutes).
3.3 Included Accessories
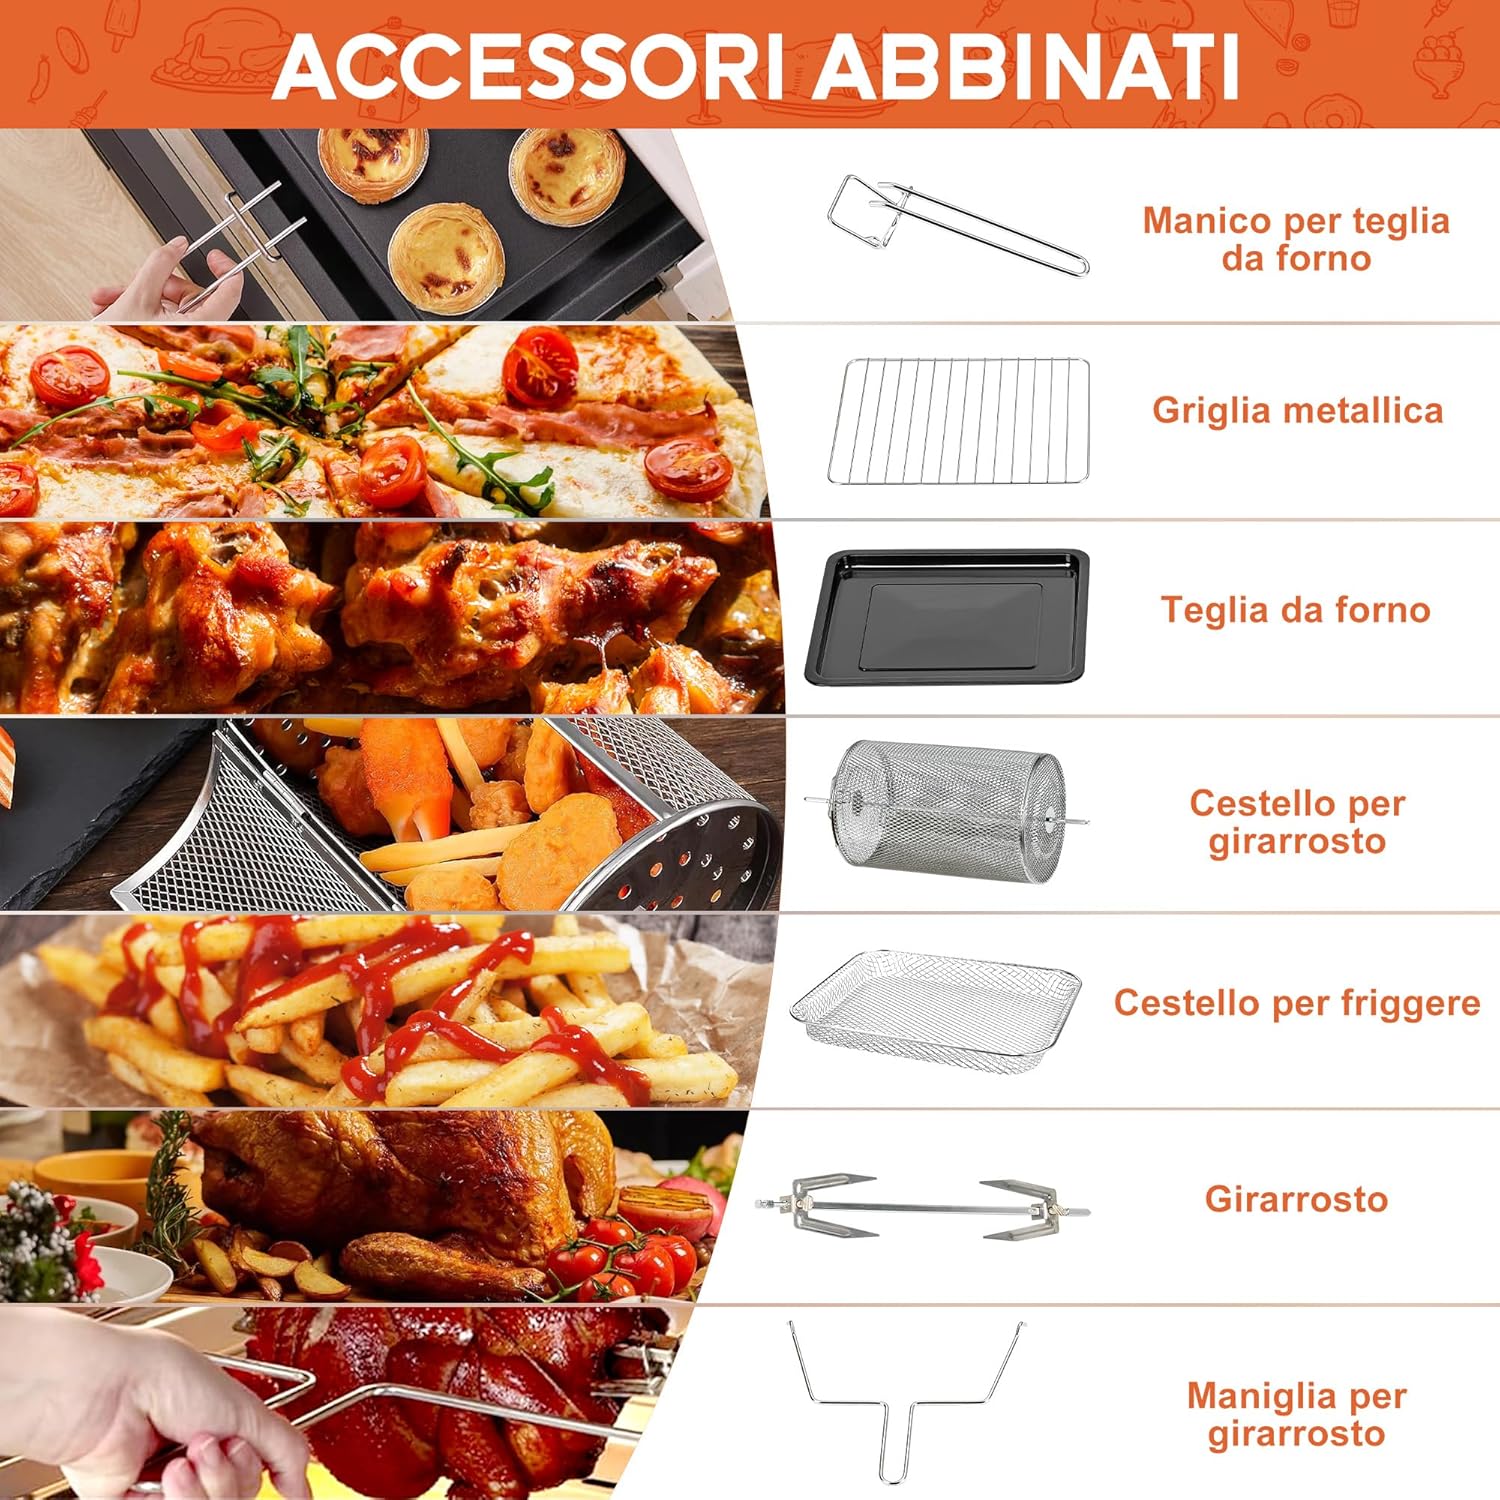
Figure 3: A visual guide to the various accessories provided with the oven, including a handle for the baking tray, metal grill, baking pan, rotisserie basket, air fry basket, rotisserie spit, and rotisserie handle.
The following accessories are typically included with your Karinear Air Fryer Mini Oven:
- Oven Rack
- Baking Pan
- Air Fry Basket
- Rotisserie Spit
- Rotisserie Handle
- Baking Pan Handle
4. Setup
4.1 Unpacking and Initial Cleaning
- Carefully remove the appliance and all accessories from the packaging.
- Wash all removable parts (oven rack, baking pan, baskets, rotisserie accessories) with warm, soapy water. Rinse thoroughly and dry completely.
- Wipe the interior and exterior of the main unit with a damp cloth. Do not immerse the main unit in water.
4.2 First Use Preparation
- Place the oven on a stable, heat-resistant surface with adequate clearance from walls and other appliances for proper ventilation.
- Plug the appliance into a grounded electrical outlet.
- Before cooking food, operate the oven empty for 15-20 minutes at 230°C. This helps to burn off any manufacturing residues and eliminate initial odors. Some smoke and odor are normal during this process. Ensure the area is well-ventilated.
- Allow the appliance to cool down completely after this initial run.
5. Operating Instructions
5.1 Understanding the 6-in-1 Functions
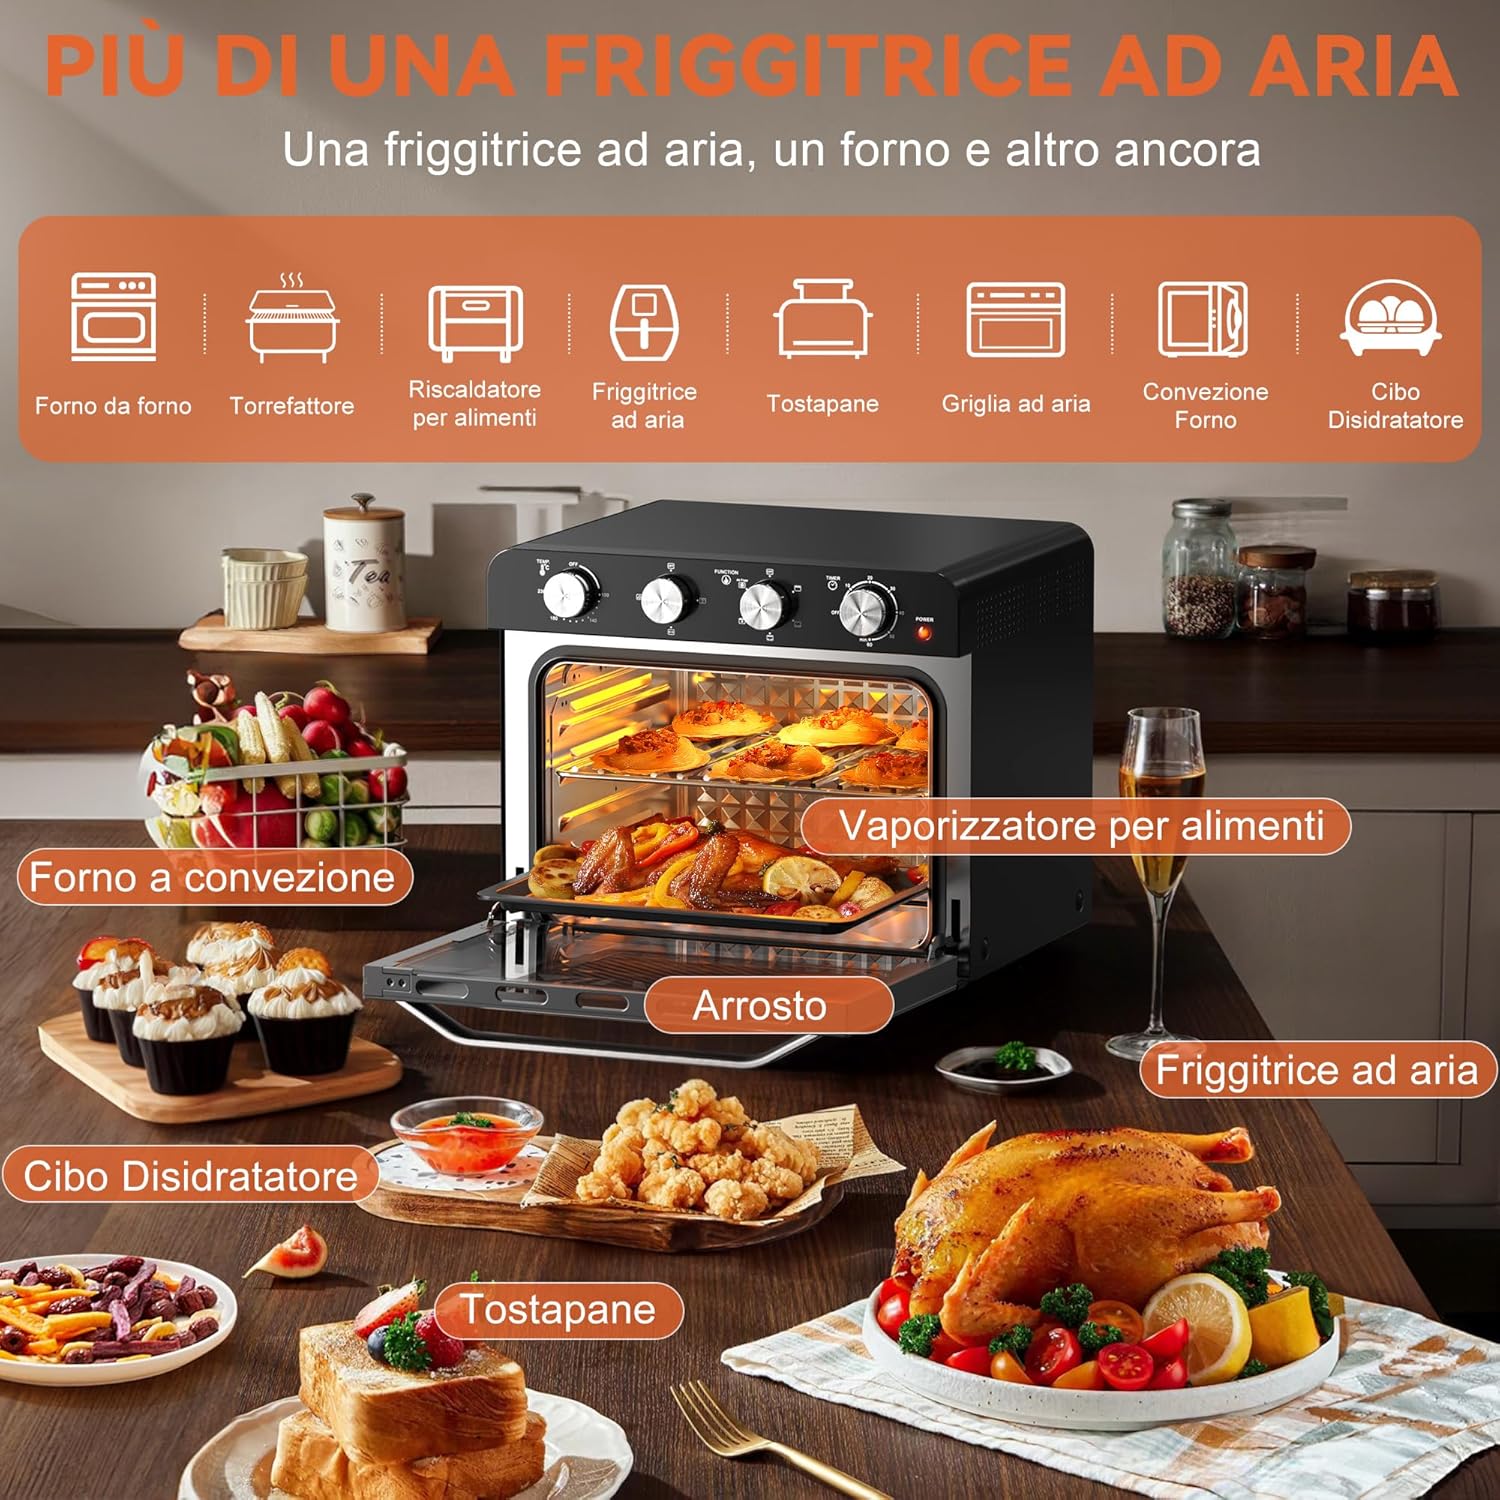
Figure 4: Visual representation of the multi-functional capabilities, including oven, food warmer, air fryer, toaster, air grill, convection oven, and food dehydrator.
Your Karinear Air Fryer Mini Oven offers six primary cooking functions:
- Air Fry: Utilizes 360-degree hot air circulation for crispy results with less oil. Ideal for fries, chicken wings, and other fried foods.
- Toast: Perfect for bread, bagels, and pastries.
- Bake/Oven: For traditional baking of cakes, cookies, and casseroles.
- Rotisserie: Allows for even roasting of whole chickens or larger cuts of meat using the rotisserie spit.
- Dehydrate: Low-temperature cooking for drying fruits, vegetables, and making jerky.
- Keep Warm: Maintains food at a serving temperature without overcooking.
5.2 General Operation Steps
- Prepare Food: Place your food on the appropriate accessory (oven rack, baking pan, air fry basket, or rotisserie spit).
- Insert Accessory: Carefully slide the accessory with food into the oven.
- Select Function: Turn the Function Knob to your desired cooking mode.
- Set Temperature: Turn the Temperature Knob to the required temperature (up to 230°C).
- Set Timer: Turn the Timer Knob to the desired cooking time (up to 60 minutes). The oven will begin heating.
- Monitor Cooking: The interior light allows you to monitor food without opening the door.
- Completion: The oven will automatically turn off and chime when the timer expires. Carefully remove food using oven mitts and the appropriate accessory handle.
Note on Preheating: This oven features rapid preheating, heating up to 75% faster than traditional ovens and cooking up to 30% faster. For best results, allow a few minutes for the oven to reach the set temperature before placing food inside, especially for baking or roasting.
5.3 Steam Technology
The integrated steam technology helps to lock in moisture, ensuring dishes are both crispy on the outside and juicy on the inside. This feature is particularly beneficial for roasting meats and gently cooking vegetables, enhancing flavor and texture.
6. Maintenance and Cleaning
Regular cleaning ensures the longevity and optimal performance of your appliance.
- Always unplug the oven from the power outlet and allow it to cool completely before cleaning.
- Removable Parts: Wash the oven rack, baking pan, air fry basket, rotisserie spit, and other removable accessories with warm, soapy water. Rinse thoroughly and dry completely. These parts are not dishwasher safe.
- Interior: Wipe the interior surfaces with a damp cloth and mild detergent. For stubborn food residues, a non-abrasive sponge can be used. Ensure the interior is dry before next use. The non-stick surfaces facilitate easier cleaning.
- Exterior: Wipe the exterior with a damp cloth. Do not use abrasive cleaners or scouring pads, as they may damage the finish.
- Heating Elements: Do not attempt to clean the heating elements directly. Any food splatters on them will typically burn off during operation.
Important: Never immerse the main unit, power cord, or plug in water or any other liquid.
7. Troubleshooting
| Problem | Possible Cause | Solution |
|---|---|---|
| Appliance does not turn on. | Not plugged in; power outlet malfunction; timer not set. | Ensure the power cord is securely plugged into a working outlet. Check if the timer knob is set to a cooking duration. |
| Food is not cooking evenly or taking too long. | Incorrect temperature/time settings; overcrowding the oven; heating elements not fully glowing. |
|
| Smoke or unusual odor during operation. | Food residue on heating elements; initial burn-off; fatty foods. |
|
| Interior rusting. | Improper cleaning or drying; exposure to moisture. | Ensure the interior is thoroughly dried after each cleaning. Avoid leaving moisture inside the oven for extended periods. Contact customer support if the issue persists despite proper maintenance. |
8. Specifications
| Feature | Detail |
|---|---|
| Brand | Karinear |
| Model Number | KNI-GR36BRAL-K |
| Capacity | 33 Liters (approx. 36L XXL designation) |
| Power | 1800 Watts |
| Voltage | 220 Volts (AC 220-240V, 50/60Hz) |
| Product Dimensions (L x W x H) | 48.6 x 42.9 x 42.3 cm |
| Item Weight | 15.6 Kilograms |
| Non-stick Coating | Yes |
| Automatic Shut-off | No (Timer function acts as shut-off) |
| Dishwasher Safe Parts | No |
9. Warranty and Support
For warranty information and customer support, please refer to the documentation provided at the time of purchase or contact Karinear customer service directly. Keep your proof of purchase for any warranty claims.
Ask a question about this manual
Ask about setup, troubleshooting, compatibility, parts, safety, or missing instructions. Manuals+ will review the question and use this page’s manual context to help answer it.