1. Introduction
Thank you for choosing the Tonfarb A20 Digital Voice Recorder. This device is designed for high-quality audio recording with advanced features such as PCM recording, automatic noise reduction, and voice activation. Its compact and durable design makes it ideal for various scenarios, including lectures, meetings, interviews, and personal notes. Please read this manual carefully to ensure proper use and optimal performance of your device.
2. What's in the Box
Upon unpacking, please verify that all the following items are included:
- Voice Recorder (Model A20) x 1
- 128GB TF Memory Card (pre-installed in the recorder) x 1
- USB Cable (Type-C) x 1
- Line-in Cable x 1
- Mic Cable x 1
- User Manual x 1

Figure 2.1: Tonfarb A20 Digital Voice Recorder and its accessories.
3. Product Features
3.1 High-Fidelity Recording with Noise Reduction
The A20 recorder features advanced dual noise reduction microphones and supports 1536 kbps PCM HD audio recording. It includes automatic noise reduction and voice-activated recording (VOR) to minimize background noise, ensuring clear sound capture. It offers 5 levels of noise reduction and 7 levels of gain control for optimal audio quality in diverse environments.
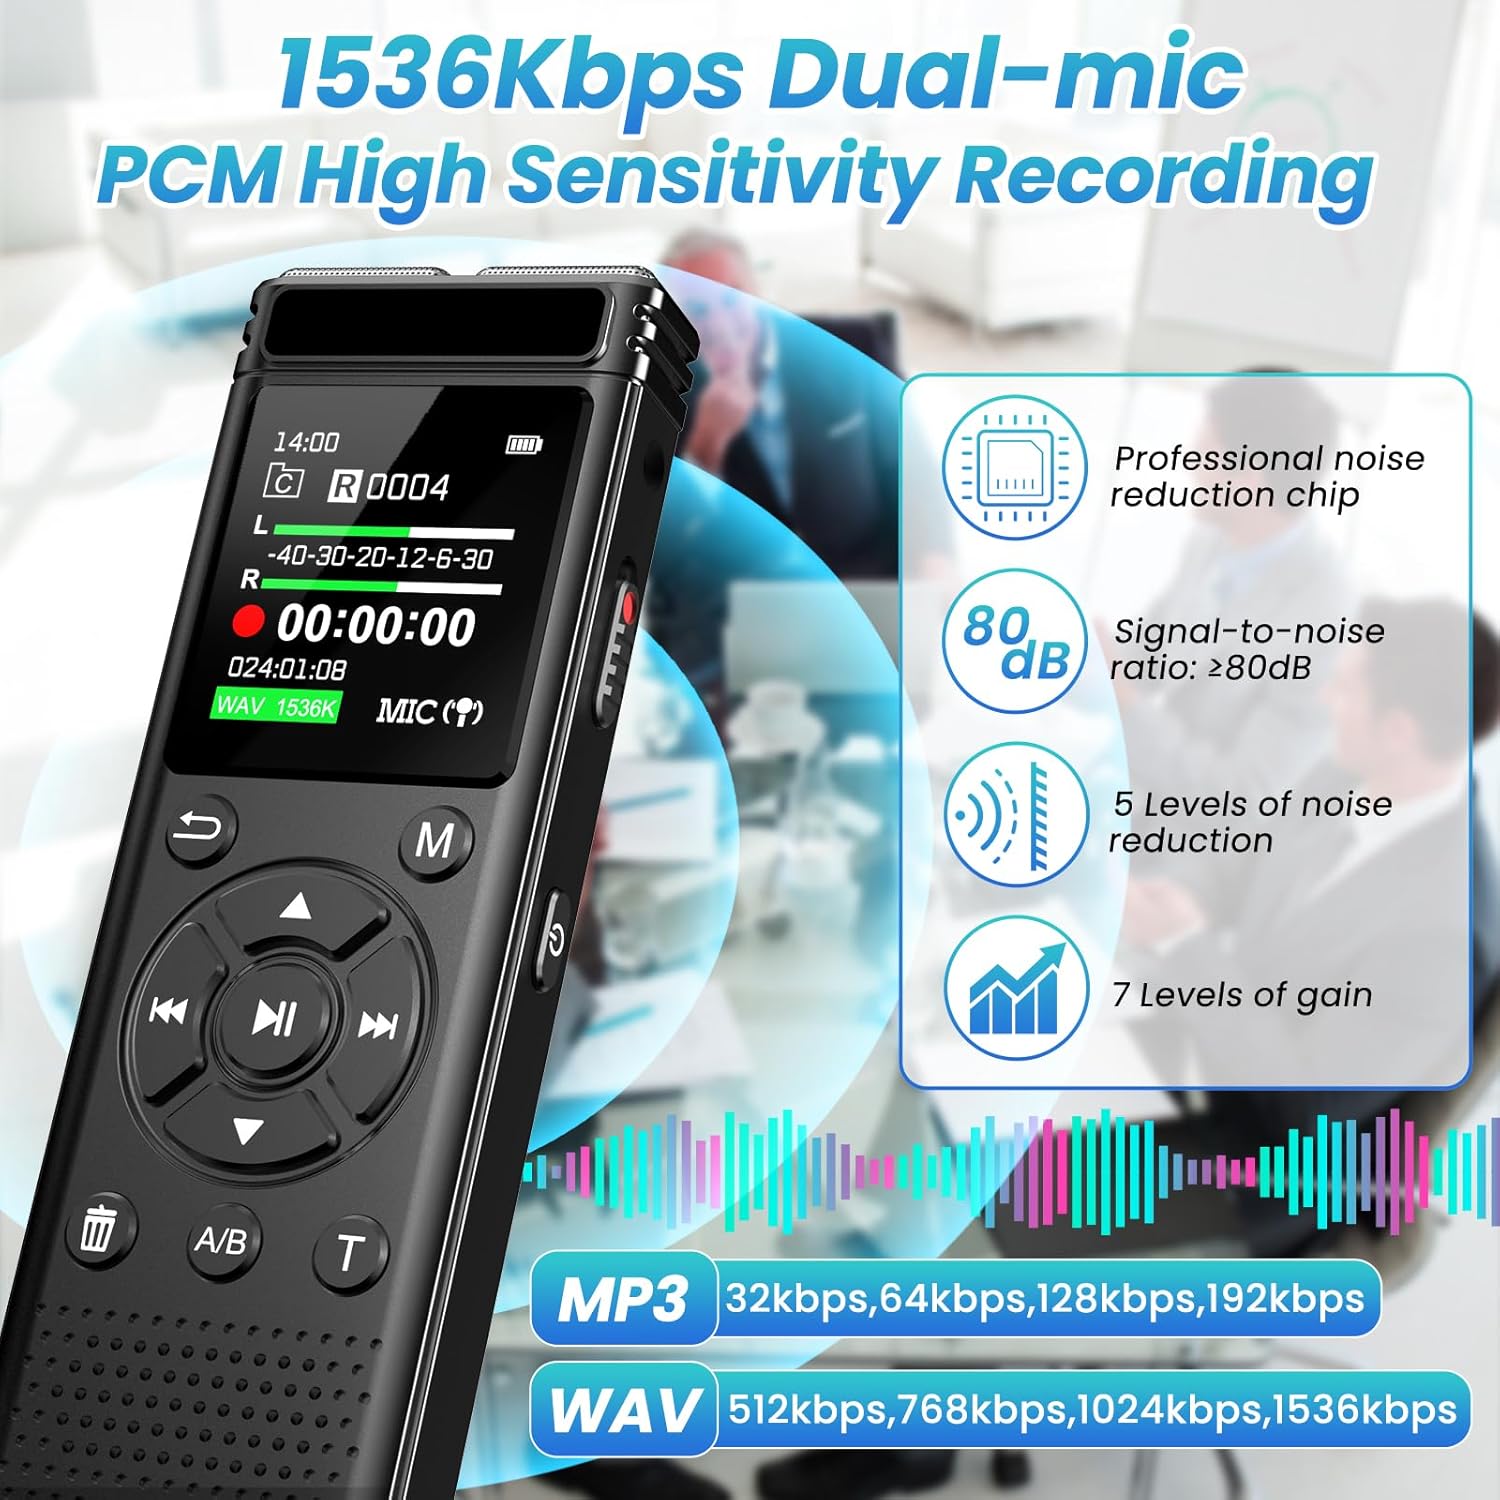
Figure 3.1: High-Fidelity Recording Capabilities.
3.2 Expansive Memory and Extended Battery Life
Equipped with 8GB of built-in storage and a complimentary 128GB TF card, the A20 provides a total of 136GB memory, capable of storing up to 7000 hours of recordings in MP3 or WAV format. Its built-in 1100mAh rechargeable lithium battery allows for up to 68 hours of continuous recording on a single charge, making it suitable for prolonged use.

Figure 3.2: Memory and Battery Specifications.
3.3 User-Friendly Operation
The A20 features a simple, user-friendly interface with a clear LCD screen. It supports one-click recording and saving, allowing you to start recording instantly by sliding a switch and save by sliding it back. The voice-activated recording (VOR) feature enables hands-free operation, and A-B repeat function along with password protection enhance accessibility and security of your recordings.

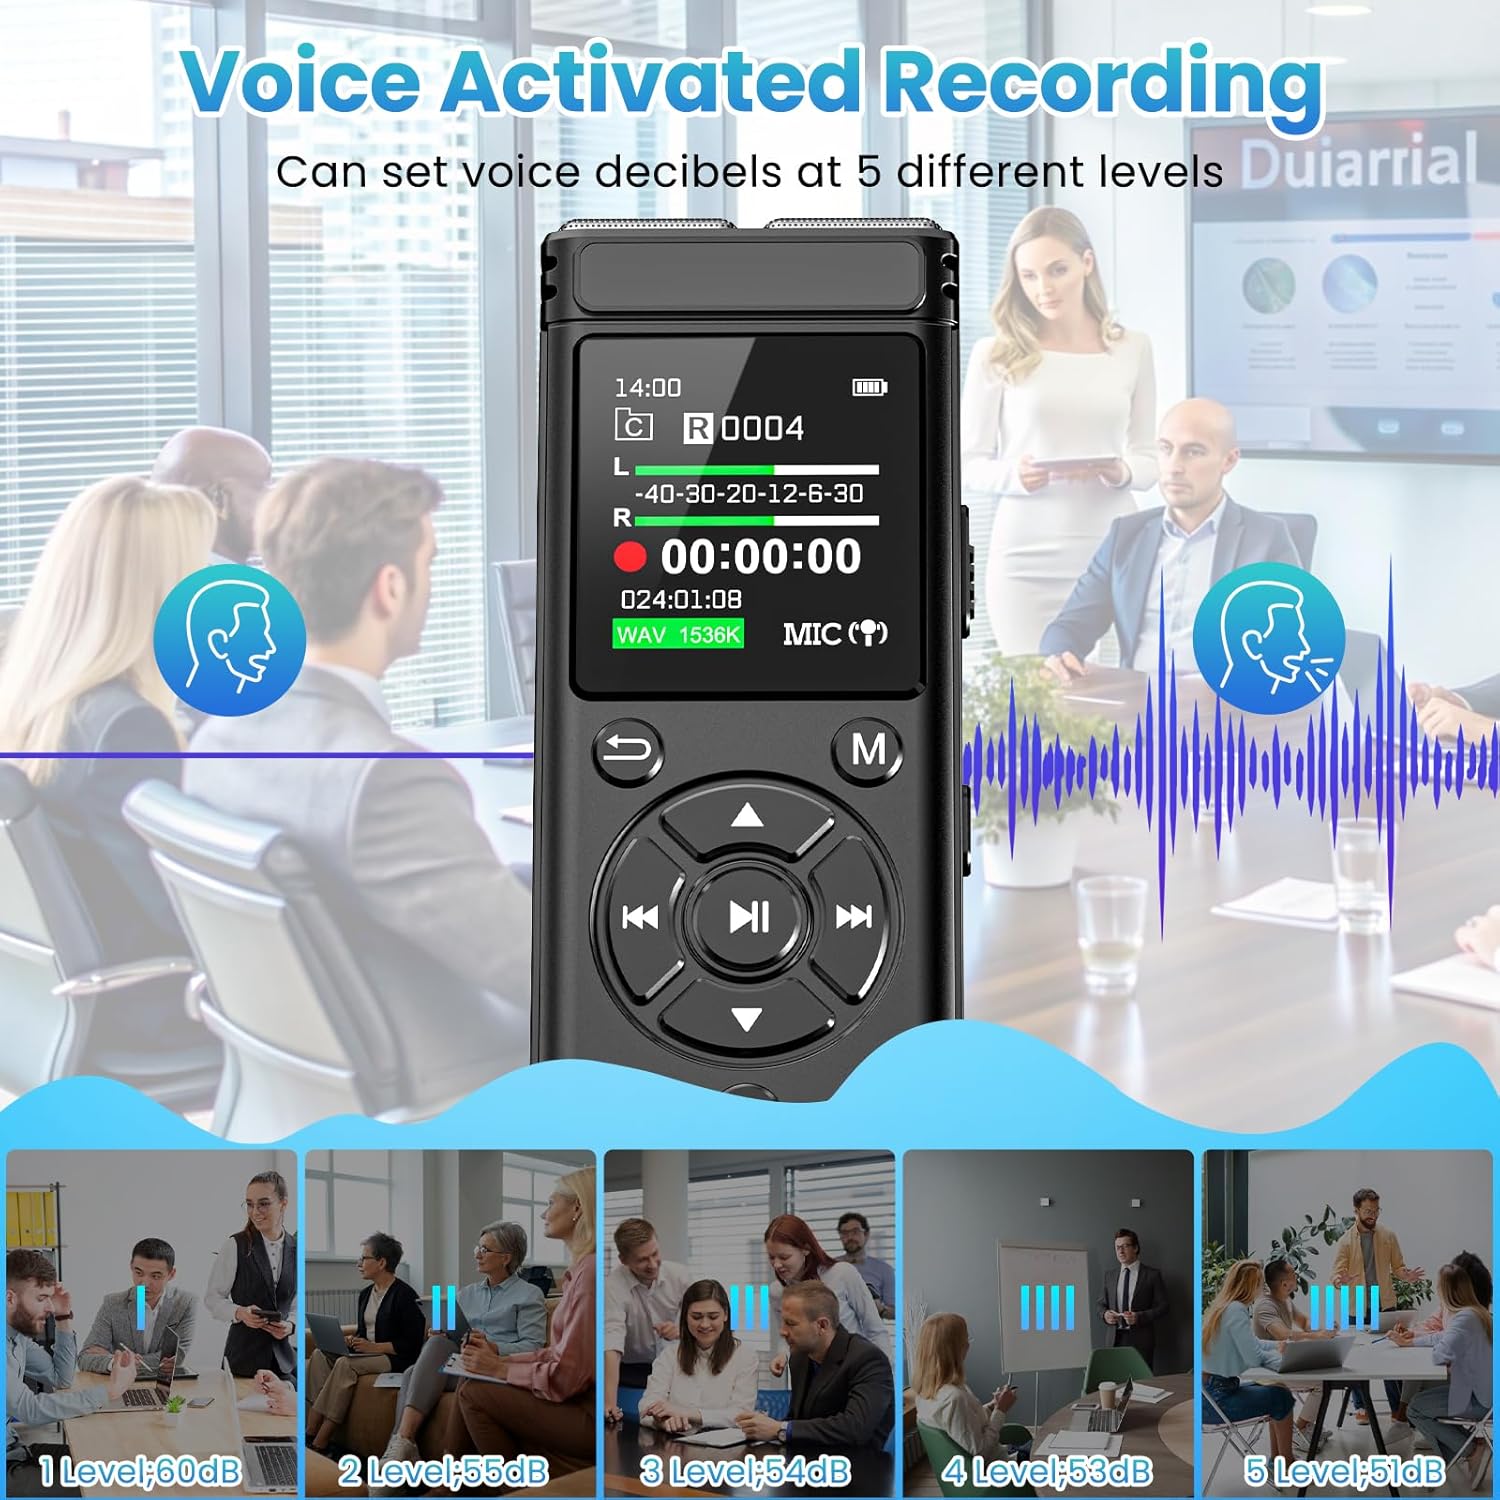
Figure 3.3: One-Click Recording and Voice Activation.
3.4 Portable and Durable Design
Weighing only 97 grams, this lightweight recorder fits comfortably in your pocket or bag. Its sleek and durable metal casing provides protection against daily wear and tear, making it a reliable companion for on-the-go recording needs.

Figure 3.4: Portable Design for Various Scenarios.
4. Setup
- Charging the Device: Before first use, fully charge the recorder using the provided USB-C cable. Connect the USB-C end to the recorder and the USB-A end to a power adapter (not included) or a computer USB port. The battery indicator on the LCD screen will show charging status.
- Memory Card Installation: The 128GB TF memory card comes pre-installed. Ensure it is securely seated in its slot. If you need to remove or re-insert it, gently push the card until it clicks into place.
- Power On/Off: To power on the device, slide the power switch (usually on the side) to the 'ON' position. To power off, slide it to the 'OFF' position.
- Initial Settings: Upon first power-on, you may be prompted to set the date and time. Use the navigation buttons to adjust values and confirm.

Figure 4.1: Charging the Voice Recorder.
5. Operating Instructions
5.1 Basic Recording and Saving
- Start Recording: Locate the REC/SAVE slide switch on the side of the device. Slide the switch upwards (towards REC) to immediately begin recording. The screen will display recording time and status.
- Stop and Save: To stop recording and save the current file, slide the REC/SAVE switch downwards (towards SAVE). The recording will be automatically saved to the device's memory.
5.2 Playback
- Access Recordings: From the main menu, navigate to the "Recordings" or "Files" folder. Use the navigation buttons (up/down) to browse through your saved audio files.
- Play/Pause: Select a file and press the Play/Pause button (usually a central button with a triangle icon) to start playback. Press it again to pause.
- Skip/Fast Forward/Rewind: Use the left/right navigation buttons to skip between tracks. Long-press these buttons to fast forward or rewind within a track.
- A-B Repeat: During playback, press the A-B repeat button to mark the start point (A). Press it again to mark the end point (B). The device will then repeatedly play the segment between A and B. Press a third time to exit A-B repeat mode.

Figure 5.1: A-B Repeat Function.
5.3 Voice Activated Recording (VOR)
The VOR feature allows the recorder to start recording automatically when sound is detected and pause when silence occurs, saving memory and battery life.
- Enable VOR: Access the settings menu, usually by pressing the 'M' (Menu) button. Navigate to "Recording Settings" and then "VOR Mode" or "Voice Activated". Select "On".
- Adjust Sensitivity: Within the VOR settings, you can typically adjust the sensitivity level (e.g., 1 to 5, where 1 is highest sensitivity and 5 is lowest). Choose a level appropriate for your environment to prevent unwanted recordings or missed audio.
- Start VOR Recording: Once VOR is enabled, simply slide the REC/SAVE switch upwards to begin recording. The device will now only record when sound is present.
5.4 Password Protection
Protect your recordings from unauthorized access by setting a password.
- Set Password: Go to the settings menu, find "System Settings" or "Security", and select "Password Protection". Follow the on-screen prompts to set a 4-digit password.
- Unlock Device: After setting, the device will require the password upon power-on or when accessing protected files.

Figure 5.2: Password Protection Feature.
5.5 File Transfer to Computer
Easily transfer your recordings to your computer for backup or editing.
- Connect: Use the provided USB-C cable to connect the recorder to your computer.
- Access Files: The recorder will appear as a removable disk drive (e.g., "TONFARB" or "Removable Disk") on your computer. Open the drive to access your recorded files, typically found in a folder named "RECORD" or "VOICE".
- Transfer: Drag and drop files to your computer's folders.

Figure 5.3: Transferring Files to a Computer.
6. Maintenance
- Cleaning: Use a soft, dry cloth to clean the device. Do not use liquid cleaners or aerosols.
- Storage: Store the device in a cool, dry place away from direct sunlight and extreme temperatures.
- Battery Care: To prolong battery life, avoid fully discharging the battery frequently. Charge the device regularly, even if not in use for extended periods.
- Data Backup: Regularly back up important recordings to your computer or cloud storage to prevent data loss.
7. Troubleshooting
| Problem | Possible Cause | Solution |
|---|---|---|
| Device does not power on. | Low battery; Power switch in OFF position. | Charge the device fully. Ensure power switch is in 'ON' position. |
| Cannot record. | Memory full; REC/SAVE switch not in REC position. | Delete old files to free up space. Ensure REC/SAVE switch is slid upwards to 'REC'. |
| Poor recording quality. | Microphone obstructed; VOR sensitivity too low/high; High background noise. | Ensure microphone is clear. Adjust VOR sensitivity. Record in a quieter environment or adjust noise reduction settings. |
| Device not recognized by computer. | Faulty USB cable; Driver issue; Incorrect connection. | Try a different USB port or cable. Restart both the recorder and computer. Ensure the cable is fully inserted. |
| Password forgotten. | User forgot password. | Refer to the full user manual for factory reset instructions (note: this may erase data). |
8. Specifications
- Model: A20
- Dimensions: 0.47 x 1.45 x 4 inches (1.2 x 3.68 x 10.16 cm)
- Item Weight: 3.53 ounces (100 grams)
- Memory: 8GB Built-in + 128GB TF Card (136GB total)
- Battery: 1100mAh Lithium Polymer (rechargeable)
- Recording Formats: MP3 Audio, WAV
- Recording Quality: Up to 1536 kbps PCM HD
- Microphone: Built-In Dual Microphones
- Interface: USB 3.0 Type C
- Headphones Jack: 3.5 mm
- Continuous Recording Time: Up to 68 hours
- Noise Reduction: Automatic, 5 levels
- Voice Activated Recording (VOR): Yes, with adjustable sensitivity
- Password Protection: Yes
- A-B Repeat: Yes
9. Warranty and Support
For warranty information and technical support, please refer to the warranty card included in your product packaging or visit the official Tonfarb website. You may also contact Tonfarb customer service directly for assistance with product issues or inquiries.
Manufacturer: Tonfarb


