1. Important Safety Information
Please read all instructions carefully before installation and use. Failure to follow these instructions may result in property damage, personal injury, or voiding of the warranty.
- Professional Installation Recommended: Installation of plumbing fixtures can be complex. It is highly recommended to consult or hire a qualified, licensed plumber for installation to ensure proper function and compliance with local codes.
- Water Supply: Always turn off the main water supply before beginning any installation or maintenance.
- Pressure Balance Valve: This system includes a pressure-balanced valve designed to protect against sudden changes in hot or cold water pressure.
- CUPC Certification: The included valve is CUPC-certified, ensuring compliance with North American plumbing standards.
- Tools: Ensure you have all necessary tools and materials before starting.
2. Product Overview
The WELLFOR 12-Inch Wall Mounted Rain Shower Faucet System provides a dual showering experience with a large rain shower head and a versatile handheld spray. Constructed from durable materials, this system is designed for reliable performance and ease of use.

Figure 2.1: Complete WELLFOR 12-Inch Wall Mounted Rain Shower Faucet System.
Key Features:
- Premium Materials: Crafted from durable 304 stainless steel for the shower arm and trim, with a zinc alloy handle and 304 stainless steel hand shower.
- 12-Inch Rain Shower Head: Features a 304 stainless steel shower head with a 360° swivel metal ball for adjustable angle.
- Solid Brass Valve: Includes a solid brass pressure balance diverter valve with a 40 mm CUPC-certified cartridge for reliable performance and balanced water pressure.
- 2-Way Diverter: Allows selection between the overhead rainfall shower and the handheld spray.
- Single Handle Control: Easy control of water temperature and flow.
- Extra Long Shower Hose: Equipped with a 59-inch stainless steel shower hose for extended reach.
3. Package Contents
Verify that all components are present and undamaged before beginning installation. If any parts are missing or damaged, please contact WELLFOR customer support.

Figure 3.1: All components included in the WELLFOR Shower System package.
- 12-Inch Rain Shower Head
- Shower Arm
- Pressure Balance Valve with Trim Plate and Handle
- Handheld Shower Spray
- 59-Inch Stainless Steel Shower Hose
- Adjustable Handheld Holder
- Installation Hardware (screws, anchors, plumber's tape)
- Installation Manual
4. Specifications
Detailed technical specifications for the WELLFOR 12-Inch Wall Mounted Rain Shower Faucet System.

Figure 4.1: Key dimensions of the shower system components.
| Feature | Specification |
|---|---|
| Brand | WELLFOR |
| Model Number | DTG-803S12 |
| Color | Brushed Nickel |
| Material | Stainless Steel (Shower Head, Arm, Hand Shower, Hose), Brass (Valve, Handle) |
| Finish Type | Brushed |
| Number of Handles | 1 |
| Mounting Type | Wall Mount |
| Head Size | 12-inch |
| Flow Rate | 2.5 GPM at 80 psi |
| Shower Hose Length | 59 inches |
| Valve Type | Pressure Balance Diverter Valve, CUPC Certified |
| Connections | 1/2" NPT Standard |
| Product Dimensions | 12 x 12 x 12 inches (approximate overall) |
| Item Weight | 12.82 pounds |
5. Installation Instructions
This section provides general guidance for installation. Due to varying plumbing configurations, professional installation is strongly recommended.
5.1 Pre-Installation Steps
- Turn off Water Supply: Locate and turn off the main water supply to your home or the specific bathroom.
- Clear Work Area: Ensure the installation area is clean and free of obstructions.
- Review Diagrams: Familiarize yourself with the component layout and connection points.

Figure 5.1: Exploded view of shower system components for installation reference.
5.2 Valve Installation
The pressure balance valve is the core of the system and must be installed correctly within the wall.
- Rough-in Valve: Install the solid brass pressure balance valve body into the wall according to standard plumbing practices. Ensure it is level and securely mounted.
- Connect Water Lines: Connect the hot and cold water supply lines to the designated 1/2" NPT inlets on the valve. Connect the shower head and handheld spray output lines to the corresponding 1/2" NPT outlets. Use plumber's tape on all threaded connections.
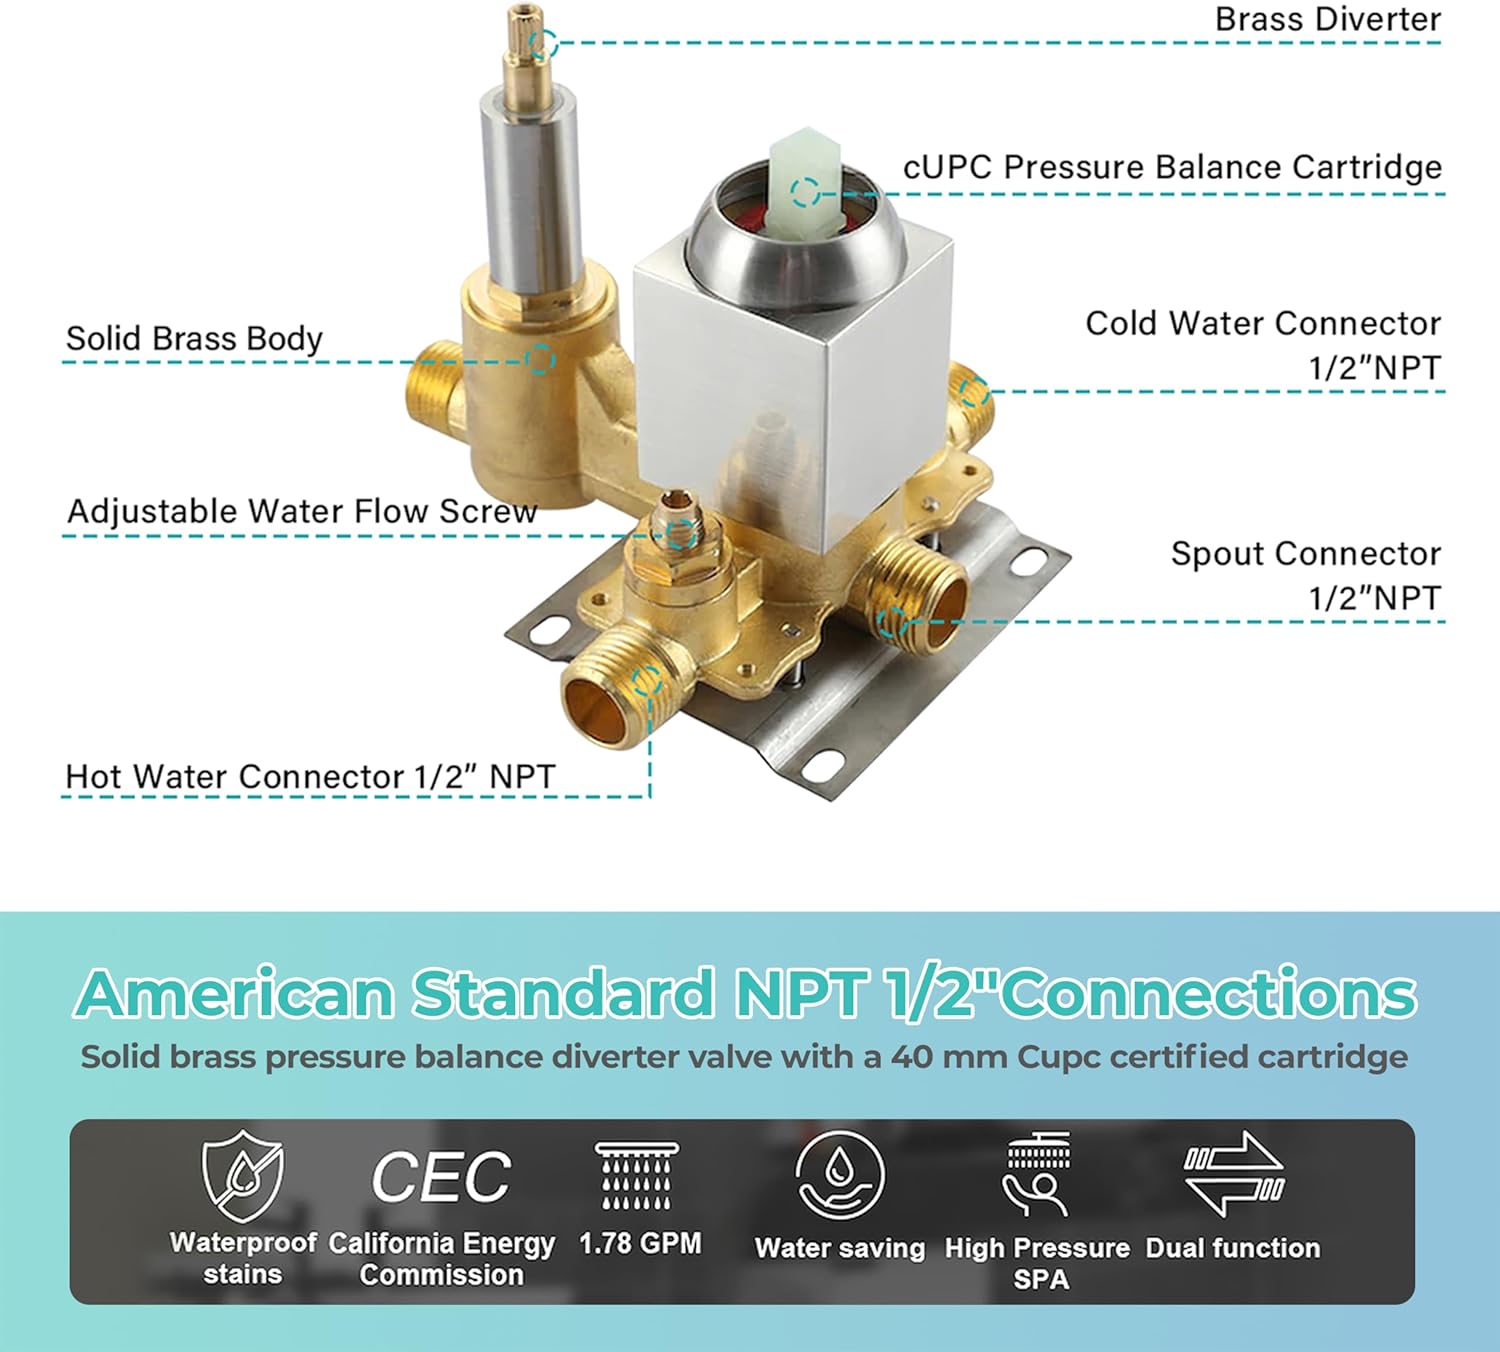
Figure 5.2: Detailed view of the pressure balance valve and 1/2" NPT connections.
5.3 Trim and Component Installation
- Install Trim Plate and Handle: Once the valve is secured and water lines are connected, install the decorative trim plate and the single control handle onto the valve body.
- Mount Shower Arm: Securely mount the shower arm to the wall, ensuring it is properly threaded into the water supply line and sealed.
- Attach Rain Shower Head: Thread the 12-inch rain shower head onto the shower arm. The 360° swivel ball allows for angle adjustment.
- Install Handheld Holder: Mount the adjustable handheld holder to the wall at a convenient height.
- Connect Handheld Spray: Attach the 59-inch stainless steel shower hose to the handheld spray and the corresponding outlet on the valve or wall elbow. Place the handheld spray into its holder.
5.4 Post-Installation Check
- Leak Test: Slowly turn on the main water supply and check all connections for leaks. Tighten any leaking connections as needed.
- Functionality Test: Test the operation of the handle, diverter, rain shower, and handheld spray to ensure proper water flow and temperature control.
6. Operation
Operating your WELLFOR shower system is straightforward.
6.1 Water Flow and Temperature Control
- Single Handle: The single handle controls both water flow and temperature.
- Temperature Adjustment: Rotate the handle to the left for hot water and to the right for cold water.
- Flow Adjustment: Lift the handle to increase water flow and push it down to decrease or turn off the flow.
6.2 2-Way Diverter Function
The diverter knob allows you to switch between the rain shower head and the handheld spray.

Figure 6.1: Illustration of the 2-way diverter knob for selecting shower functions.
- Select Rain Shower: Turn the diverter knob to the position indicated for the overhead rain shower.
- Select Handheld Spray: Turn the diverter knob to the position indicated for the handheld spray.
- Dual Function: Depending on water pressure, it may be possible to operate both functions simultaneously, though this may reduce pressure to each outlet.
7. Maintenance
Regular cleaning and proper care will help maintain the appearance and functionality of your WELLFOR shower system.
7.1 Cleaning the Finish
- Gentle Cleaning: Clean the brushed nickel finish with a soft, damp cloth and mild soap.
- Avoid Abrasives: Do not use abrasive cleaners, harsh chemicals, or scouring pads, as these can damage the finish.
- Dry Thoroughly: After cleaning, wipe the surfaces dry to prevent water spots.
7.2 Cleaning Silicone Nozzles
The rain shower head and handheld spray feature easy-to-clean silicone nozzles.

Figure 7.1: Close-up of the ultra-thin shower head showing silicone nozzles.
- Remove Mineral Buildup: Periodically rub the silicone nozzles with your finger or a soft brush to dislodge any mineral deposits or limescale.
- Vinegar Solution: For stubborn buildup, a solution of white vinegar and water can be used. Apply with a soft cloth, let it sit for a few minutes, then rinse thoroughly.
8. Troubleshooting
This section addresses common issues you might encounter with your shower system.
| Problem | Possible Cause | Solution |
|---|---|---|
| Low Water Pressure | Partially closed shut-off valve, clogged nozzles, debris in lines. | Ensure shut-off valves are fully open. Clean silicone nozzles. Check for debris in the shower head or handheld spray. Consult a plumber if the issue persists. |
| Leaks from Connections | Loose connections, insufficient plumber's tape, damaged O-rings. | Turn off water supply. Tighten connections. Reapply plumber's tape. Inspect and replace O-rings if damaged. |
| Diverter Not Switching Properly | Debris in diverter mechanism, worn cartridge. | Flush the system. If the issue continues, the diverter cartridge may need inspection or replacement by a professional. |
| Water Temperature Fluctuations | Issues with the pressure balance cartridge, external water pressure changes. | Ensure the pressure balance valve is correctly installed. If fluctuations are severe or persistent, the cartridge may need replacement. Consult a plumber. |
If you are unable to resolve an issue using the troubleshooting steps above, please contact a qualified plumber or WELLFOR customer support.
9. Warranty and Support
WELLFOR is committed to providing high-quality products. For specific warranty details, please refer to the warranty card included with your purchase or contact WELLFOR customer service directly.
If you have any questions about your WELLFOR shower faucet set, require technical assistance, or need to report a missing/damaged part, please feel free to contact us. Our customer support team is available to assist you.
Contact Information: Please refer to the contact details provided in your product packaging or on the official WELLFOR website.


