1. Introduction
The Neoteck Digital Turntable Stylus Force Scale Gauge (Model U-NTK002) is an essential tool for vinyl enthusiasts. Accurate stylus tracking force is crucial for optimal sound quality, minimizing record wear, and extending the lifespan of your turntable's stylus and records. This manual provides detailed instructions for the proper setup, operation, and maintenance of your stylus force gauge.
2. Package Contents
Please verify that all items listed below are included in your package:
- 1 x Neoteck Digital Stylus Force Gauge
- 1 x 5g Calibration Weight
- 4 x 1.5V AG12 Lithium Cell Batteries (pre-installed or included separately)
- 1 x Leatherette Protective Case
- 1 x User Manual (this document)

Image: The Neoteck Digital Stylus Force Gauge, its 5g calibration weight, four AG12 batteries, and a leatherette protective case, all neatly arranged with the product packaging.
3. Product Features
The Neoteck Digital Turntable Stylus Force Scale Gauge offers a range of features designed for precision and ease of use:
- High Precision Measurement: Measures stylus force from 0.01g to 5.00g with 0.01g resolution and ±0.02g accuracy.
- Clear LCD Display: Features a black background with white values for enhanced readability, even in low light conditions.
- Retro Tray Design: The measurement tray is designed with a retro vinyl record aesthetic.
- Multifunctional Operation: Includes zero setting (tare function) and automatic shutoff after 2 minutes of inactivity to conserve battery life.
- Unit Conversion: Supports 6 different weight units: grams (g), ounces (Oz), carats (Ct), troy ounces (Ozt), grains (Gn), and taels (Tl).
- Durable Construction: Equipped with a high-performance chipset and sensitive aluminum sensor for reliable and fast measurements.
- Portability: Comes with a semi-transparent smoked black cover and a leatherette case for easy storage and transport.

Image: An exploded view of the Neoteck Digital Stylus Force Gauge, highlighting its internal components: a sensitive aluminum sensor for high accuracy and a premium SD8020 chipset for fast and precise measurements.

Image: The Neoteck Digital Stylus Force Gauge positioned on a turntable platter, showing its clear VA backlight display with a reading of '1.08g'. A detailed inset highlights the retro tray design, resembling a vinyl record.
4. Setup
Follow these steps to prepare your stylus force gauge for use:
- Battery Installation: If the batteries are not pre-installed, open the battery compartment (refer to the 'Multifunctional Stylus Force Gauge' diagram in Section 5) and insert the four 1.5V AG12 lithium cell batteries, ensuring correct polarity.
- Placement: Place the stylus force gauge on a stable, level surface, ideally on the turntable platter itself, ensuring it is free from vibrations.
- Remove Protective Cover: Gently slide off the semi-transparent protective cover from the measurement tray.

Image: The Neoteck Digital Stylus Force Scale Gauge in its red casing, displayed alongside its retail packaging, a small silver 5g calibration weight, and its clear protective cover.
5. Operating Instructions
Operating the Neoteck Stylus Force Gauge is straightforward:
- Power On/Off: Press the ON/OFF button (labeled '2' in the diagram below) to turn the device on. Press and hold the same button to turn it off.
- Zero Setting (Tare): After powering on, the display should show '0.00g'. If not, or if you wish to re-zero the scale, press the T (Tare) button (labeled '3' in the diagram below). This will reset the display to zero.
- Units Conversion: To change the measurement unit, press the M (Mode) button (labeled '1' in the diagram below). The available units are g, Oz, Ct, Ozt, Gn, Tl. Select 'g' for stylus force measurement.
- Measuring Stylus Force:
- Ensure the gauge is powered on and zeroed ('0.00g').
- Carefully lower your turntable's tonearm so that the stylus rests gently on the center of the gauge's measurement tray (the retro vinyl record design).
- Read the displayed value. This is your current stylus tracking force in grams.
- Adjust your turntable's counterweight or tracking force mechanism according to your cartridge manufacturer's recommendations until the desired force is displayed.
- Automatic Shutoff: The device will automatically power off after 2 minutes of inactivity to conserve battery life.

Image: A detailed diagram of the Neoteck Digital Stylus Force Gauge, labeling its key components and buttons: (1) Mode button for unit conversion, (2) ON/OFF button, (3) Tare button for zero setting, (4) LCD Display, (5) Aluminum+ABS Measurement Tray, (6) Protection Cover, and (7) Battery Cover.

Image: A close-up view of a turntable's tonearm with its stylus carefully placed on the measurement tray of the Neoteck Digital Stylus Force Gauge, which shows a reading of '1.08g'.
Video: This video demonstrates the basic operation of the Neoteck Digital Turntable Stylus Force Scale, including powering on, zeroing, placing the stylus for measurement, and storing the device in its protective case.
6. Calibration
Your Neoteck Stylus Force Gauge comes pre-calibrated, but regular calibration checks are recommended to ensure continued accuracy. Use the included 5g calibration weight:
- Power on the gauge and ensure it is zeroed ('0.00g').
- Carefully place the 5g calibration weight onto the center of the measurement tray.
- The display should read '5.00g'. If it does not, or if you notice significant deviation, the device may require recalibration. Refer to the manufacturer's website or contact support for advanced calibration procedures if necessary.
- Remove the 5g weight once the check is complete.
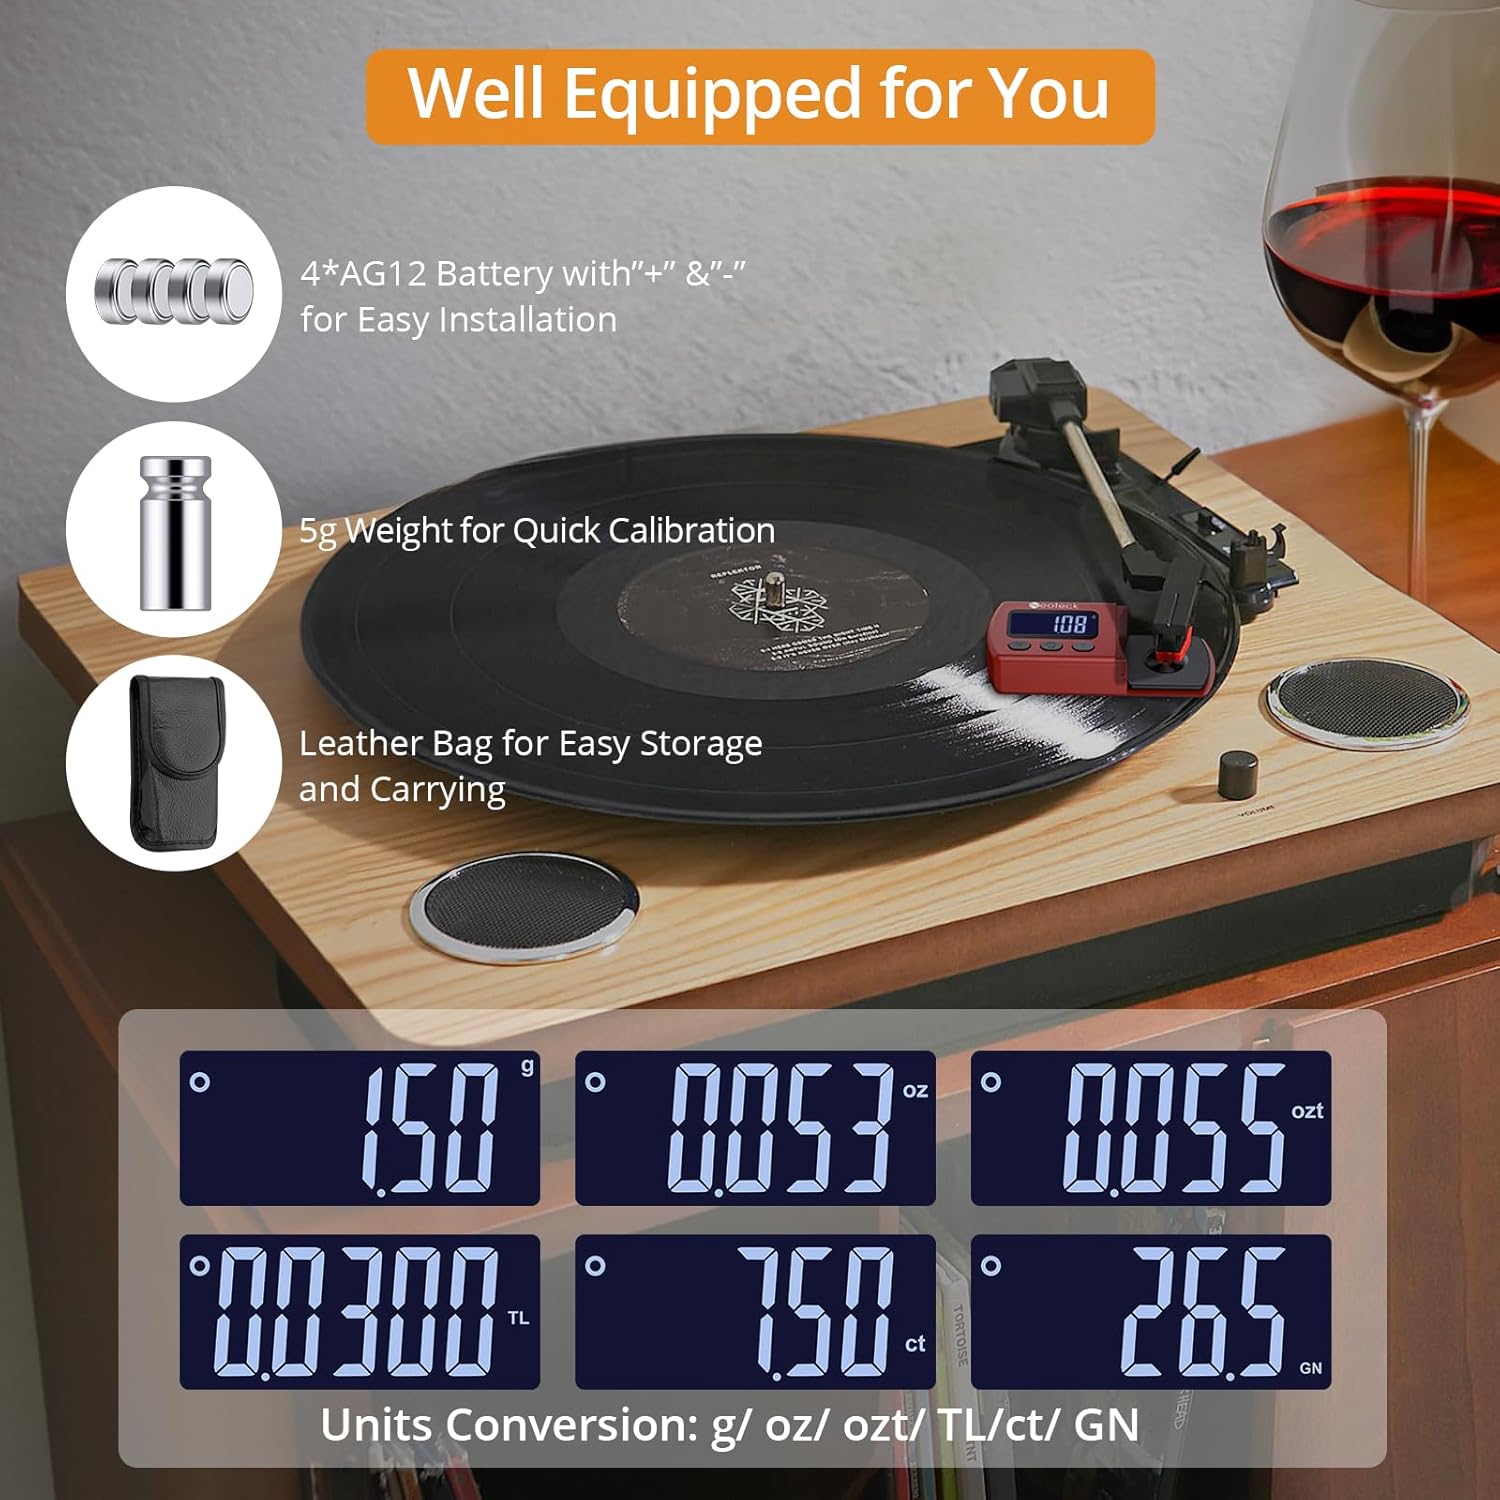
Image: A composite image showing the Neoteck Digital Stylus Force Gauge's display with different unit conversions (g, oz, ozt, tl, ct, gn). Also pictured are the included accessories: four AG12 batteries, a 5g calibration weight, and a leatherette protective bag.
7. Maintenance
To ensure the longevity and accuracy of your stylus force gauge:
- Cleaning: Use a soft, dry cloth to clean the device. Avoid abrasive cleaners or solvents. Do not immerse the device in water.
- Storage: When not in use, store the gauge in its leatherette protective case to prevent dust and damage. Keep it in a cool, dry place away from direct sunlight and extreme temperatures.
- Battery Replacement: If the display becomes dim or erratic, replace the AG12 batteries. Ensure correct polarity during installation.
- Handle with Care: The measurement sensor is delicate. Avoid dropping the device or applying excessive force to the measurement tray.
8. Troubleshooting
If you encounter issues with your stylus force gauge, refer to the following common solutions:
| Problem | Possible Cause | Solution |
|---|---|---|
| Display is blank or dim. | Low or dead batteries. | Replace all four AG12 batteries, ensuring correct polarity. |
| Inaccurate readings. | Not zeroed correctly; unstable surface; device malfunction. | Press the Tare button to re-zero. Ensure the gauge is on a stable, level surface. Perform a calibration check with the 5g weight. If issues persist, contact support. |
| Gauge turns off unexpectedly. | Automatic shutoff activated; low batteries. | The device has a 2-minute auto-off feature. If it turns off sooner, replace batteries. |
| Buttons are unresponsive. | Low batteries; internal issue. | Replace batteries. If the problem continues, contact customer support. |
9. Specifications
- Model: U-NTK002
- Measurement Range: 0.01g - 5.00g
- Resolution: 0.01g
- Accuracy: ±0.02g
- Units: g, Oz, Ct, Ozt, Gn, Tl
- Display: LCD with backlight
- Power: 4 x 1.5V AG12 Lithium Cell Batteries (included)
- Auto-Off: 2 minutes of inactivity
- Product Dimensions: 3.78 x 1.69 x 0.79 inches (9.6 x 4.3 x 2.0 cm)
- Item Weight: 1.76 ounces (50 grams)
- Material: Acrylonitrile Butadiene Styrene (ABS)
10. Warranty and Support
Neoteck products are designed for reliability and performance. For specific warranty information, please refer to the warranty card included with your product or visit the official Neoteck website. If you require technical assistance, troubleshooting, or have questions about your Neoteck Digital Turntable Stylus Force Scale Gauge, please contact Neoteck customer support through their official channels.


