
1. Introduction
This manual provides detailed instructions for the safe and effective use of your Aramox Air Vacuum Blow Gun Pneumatic Cleaner 2-in-1 Suction Kit. This versatile tool is designed for various cleaning tasks, offering both blowing and suction capabilities. Please read this manual thoroughly before operation and retain it for future reference.
2. Product Overview
The Aramox 2-in-1 Air Vacuum Blow Gun is a pneumatic device that efficiently removes dust, wood chips, metal shavings, and other debris. Its dual functionality allows for precise cleaning in hard-to-reach areas, making it suitable for car detailing, workshop cleanup, and general maintenance.
Key Features:
- Versatile 2-in-1 Design: Functions as both an air spray gun and a suction tool.
- Corner Cleaning: Enables detailed cleaning of confined spaces.
- Efficient Dust Removal: Provides powerful 6 kPa suction for various materials.
- Easy Function Switching: Convenient main valve control for seamless transition between modes.
- Durable Construction: Made from plastic for stable performance and long service life.
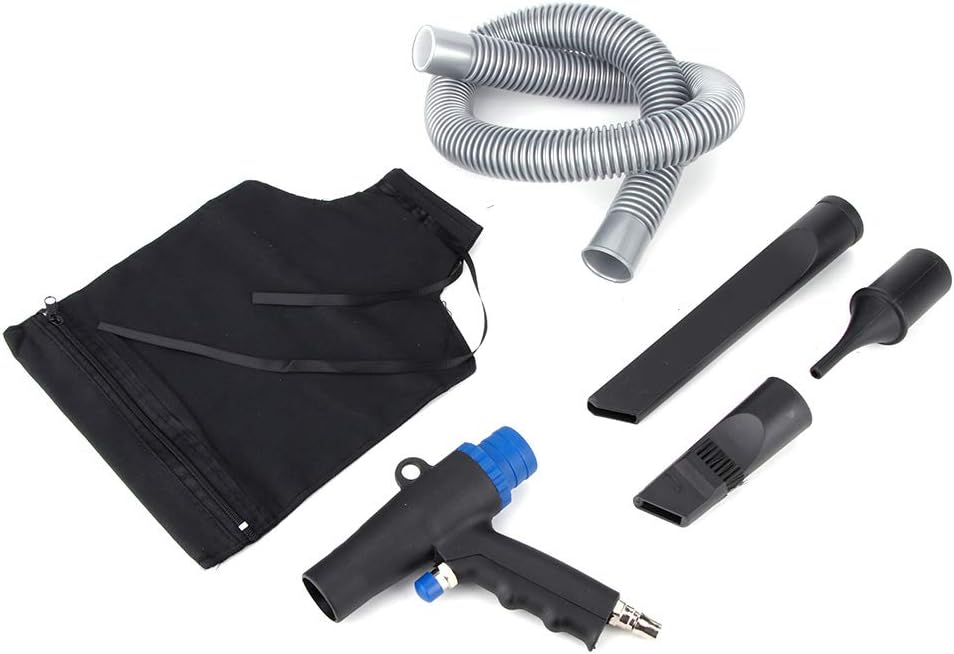
Figure 2.1: Overview of the Aramox Air Vacuum Blow Gun and its accessories, including the main gun, flexible hose, collection bag, and various nozzles.
3. Safety Information
WARNING: Failure to follow these safety instructions may result in injury or property damage.
- Always wear appropriate personal protective equipment (PPE), such as safety glasses, when operating the tool.
- Keep the product clean and free from debris to ensure proper function.
- Keep the tool out of reach of children.
- Ensure the air compressor is properly regulated and within the tool's specified pressure range.
- Never point the gun at yourself or others.
- Disconnect the air supply before changing accessories or performing maintenance.
4. Package Contents
Verify that all items listed below are present in your package:
- 1 x Vacuum Cleaner Gun
- 3 x Vacuum Cleaner Ports (Nozzles)
- 1 x Plastic Long Tube (Flexible Hose)
- 1 x Storage Bag
- 1 x Instruction Manual (this document)

Figure 4.1: The three included vacuum cleaner nozzles for various cleaning applications.
5. Setup
- Connect Air Supply: Attach a standard pneumatic quick-connect fitting from your air compressor to the inlet port at the base of the gun handle. Ensure a secure connection to prevent air leaks.
- Select Mode (Blow/Suction):
- For Blowing: Ensure no hose or bag is attached to the front nozzle. The gun will direct compressed air out of the front opening.
- For Suction:
- Attach the flexible long tube (hose) to the front nozzle of the gun.
- Connect the storage bag to the other end of the flexible tube.
- Select the appropriate vacuum cleaner port (nozzle) for your cleaning task and attach it to the end of the flexible tube.

Figure 5.1: The vacuum gun assembled with the flexible hose and collection bag for suction operations.
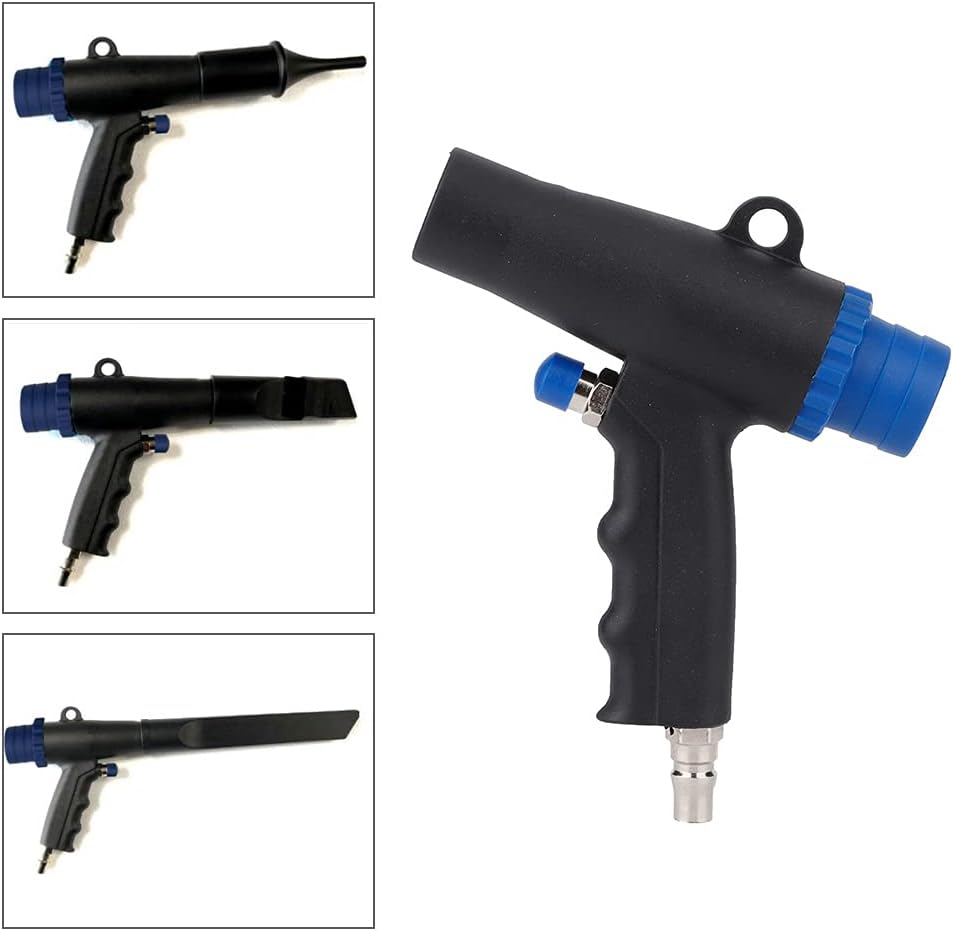
Figure 5.2: The main gun body shown with various nozzle attachments, demonstrating its adaptability for different cleaning tasks.
6. Operating Instructions
Once the tool is set up and connected to an air supply, you can begin operation.
- Activate Airflow: Press the trigger on the gun handle to activate the airflow. The intensity of the airflow can often be controlled by the pressure applied to the trigger or by adjusting the air compressor's regulator.
- Blowing Function:
- Direct the nozzle towards the area to be cleaned.
- Use short bursts of air to dislodge dust and debris.
- Maintain a safe distance from the surface to avoid damage.
- Suction Function:
- Ensure the hose, collection bag, and desired nozzle are securely attached.
- Position the nozzle over the debris to be collected.
- Activate the airflow. The vacuum action will draw debris into the collection bag.
- The main valve control on the gun allows for switching between blowing and suction modes. Refer to the product diagram for its location.
- After Use: Release the trigger to stop airflow. Disconnect the air supply.

Figure 6.1: Examples of the vacuum gun's application in car detailing, including interior and engine bay cleaning.

Figure 6.2: Visual representation of the tool's effectiveness in removing various types of debris such as dust, wood chips, and metal shavings.
7. Maintenance
Regular maintenance ensures the longevity and optimal performance of your tool.
- Cleaning: After each use, wipe down the gun and accessories with a clean, dry cloth. For stubborn dirt, a slightly damp cloth can be used, ensuring the tool is completely dry before storage.
- Collection Bag: Empty the collection bag regularly to maintain suction efficiency. Clean the bag as needed.
- Air Inlet: Periodically check the air inlet for any blockages or debris.
- Storage: Store the tool and its accessories in the provided storage bag in a clean, dry place, away from direct sunlight and extreme temperatures.

Figure 7.1: The flexible corrugated hose, a key component for the suction function, should be kept clean and free of obstructions.

Figure 7.2: A close-up view of the main gun body, highlighting the trigger and air inlet for maintenance checks.
8. Troubleshooting
| Problem | Possible Cause | Solution |
|---|---|---|
| No airflow/suction | Air compressor not connected or turned on; insufficient air pressure; blocked air inlet; trigger not fully pressed. | Ensure air compressor is operating and connected. Check air pressure settings. Clear any blockages in the air inlet. Press the trigger completely. |
| Weak suction | Collection bag full; hose or nozzle blocked; loose connections; insufficient air pressure. | Empty the collection bag. Check and clear any blockages in the hose or nozzle. Ensure all connections are secure. Verify air pressure. |
| Air leaks | Loose connections; damaged hose or seals. | Tighten all connections. Inspect hose and seals for damage and replace if necessary. |
9. Specifications
| Attribute | Value |
|---|---|
| Brand | Aramox |
| Model Number | Aramoxb0orhi6dkv |
| Item Type | Vacuum Gun |
| Material | Plastic |
| Vacuum Suction | 6 kPa |
| Air Consumption | 10 cfm |
| Item Weight | 1.08 pounds |
| Package Dimensions | 9.84 x 7.09 x 3.15 inches |
10. Warranty and Support
This product is designed for durability and performance. For specific warranty information, please refer to the documentation provided at the time of purchase or contact Aramox customer support. Keep your purchase receipt as proof of purchase.
For technical support or inquiries, please visit the official Aramox website or contact their customer service department.