1. Introduction
This manual provides detailed instructions for the proper use and maintenance of your Bewinner 58mm Bluetooth Thermal Receipt Printer. Please read this manual thoroughly before operating the device to ensure optimal performance and longevity.
The Bewinner thermal printer is a portable, wireless solution designed for printing invoices, cash register tickets, product labels, warehouse labels, and barcodes. It is suitable for various retail POS systems and small business applications.
2. Product Overview
2.1 Components and Features
The Bewinner 58mm Bluetooth Thermal Receipt Printer features a compact design and robust construction. Key components and features are outlined below:
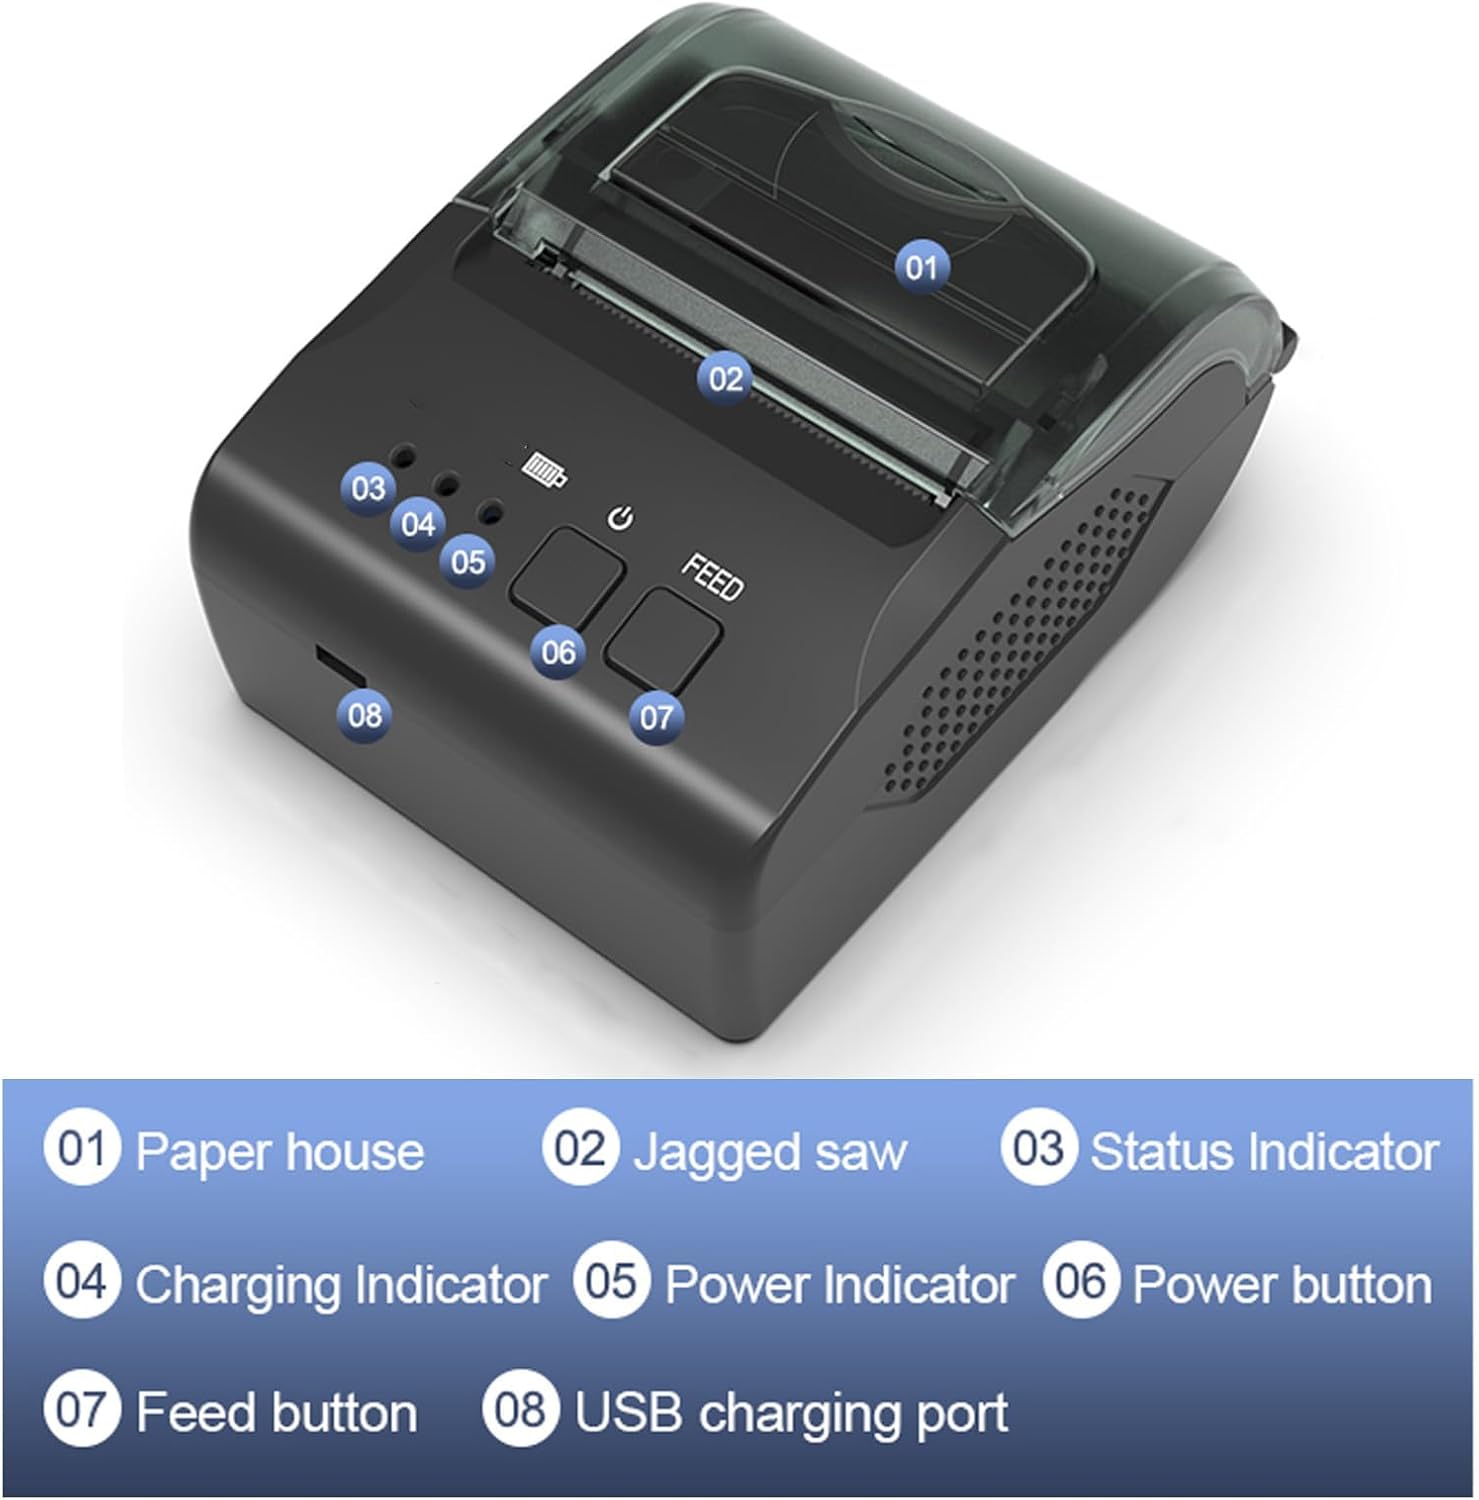
Figure 1: Printer Components. This image displays the various parts of the Bewinner 58mm Bluetooth Thermal Receipt Printer, including the paper house, jagged saw, status indicator, charging indicator, power indicator, power button, feed button, and USB charging port, each clearly numbered for identification.
- 01 Paper House: Compartment for loading thermal paper rolls.
- 02 Jagged Saw: For easy tearing of printed receipts or labels.
- 03 Status Indicator: Displays the current operational status of the printer.
- 04 Charging Indicator: Shows the charging status of the battery.
- 05 Power Indicator: Indicates if the printer is powered on or off.
- 06 Power Button: Used to turn the printer on or off.
- 07 Feed Button: Advances the paper.
- 08 USB Charging Port: For connecting the charging cable.

Figure 2: Durable ABS Body. The printer features an ABS solid body, providing shock and drop resistance for enhanced durability.
The printer's body shell is constructed from ABS material, ensuring strength and resistance to shocks and drops, contributing to its reliability in various environments.

Figure 3: Portable and Lightweight Design. This image illustrates the compact and lightweight nature of the printer, making it convenient for one-hand operation and easy portability.
Its lightweight design allows for convenient one-hand operation and easy portability, fitting into a pocket for on-the-go use.
3. Setup
3.1 Loading Thermal Paper
- Open the paper house cover (01 in Figure 1).
- Insert a 58mm thermal paper roll, ensuring the printing side faces the thermal print head.
- Pull a small amount of paper out past the jagged saw (02 in Figure 1).
- Close the paper house cover securely.
The printer supports both roll and fan-fold thermal labels, offering versatile paper management without requiring an external label holder.
3.2 Charging the Printer
The printer is equipped with a built-in 1500mAh removable lithium battery for long-term standby and continuous printing.

Figure 4: Dual Charging Modes. This image demonstrates the printer's capability to be charged using either a standard power adapter or a mobile power bank via the USB charging port, offering flexibility for indoor and outdoor use.
Two charging methods are supported: using a standard power adapter or a mobile power bank. Connect the charging cable to the USB charging port (08 in Figure 1) and the power source. The charging indicator (04 in Figure 1) will show the charging status.
3.3 Connecting to Devices
The printer supports both Bluetooth and wired connections, offering wide compatibility with various operating systems.
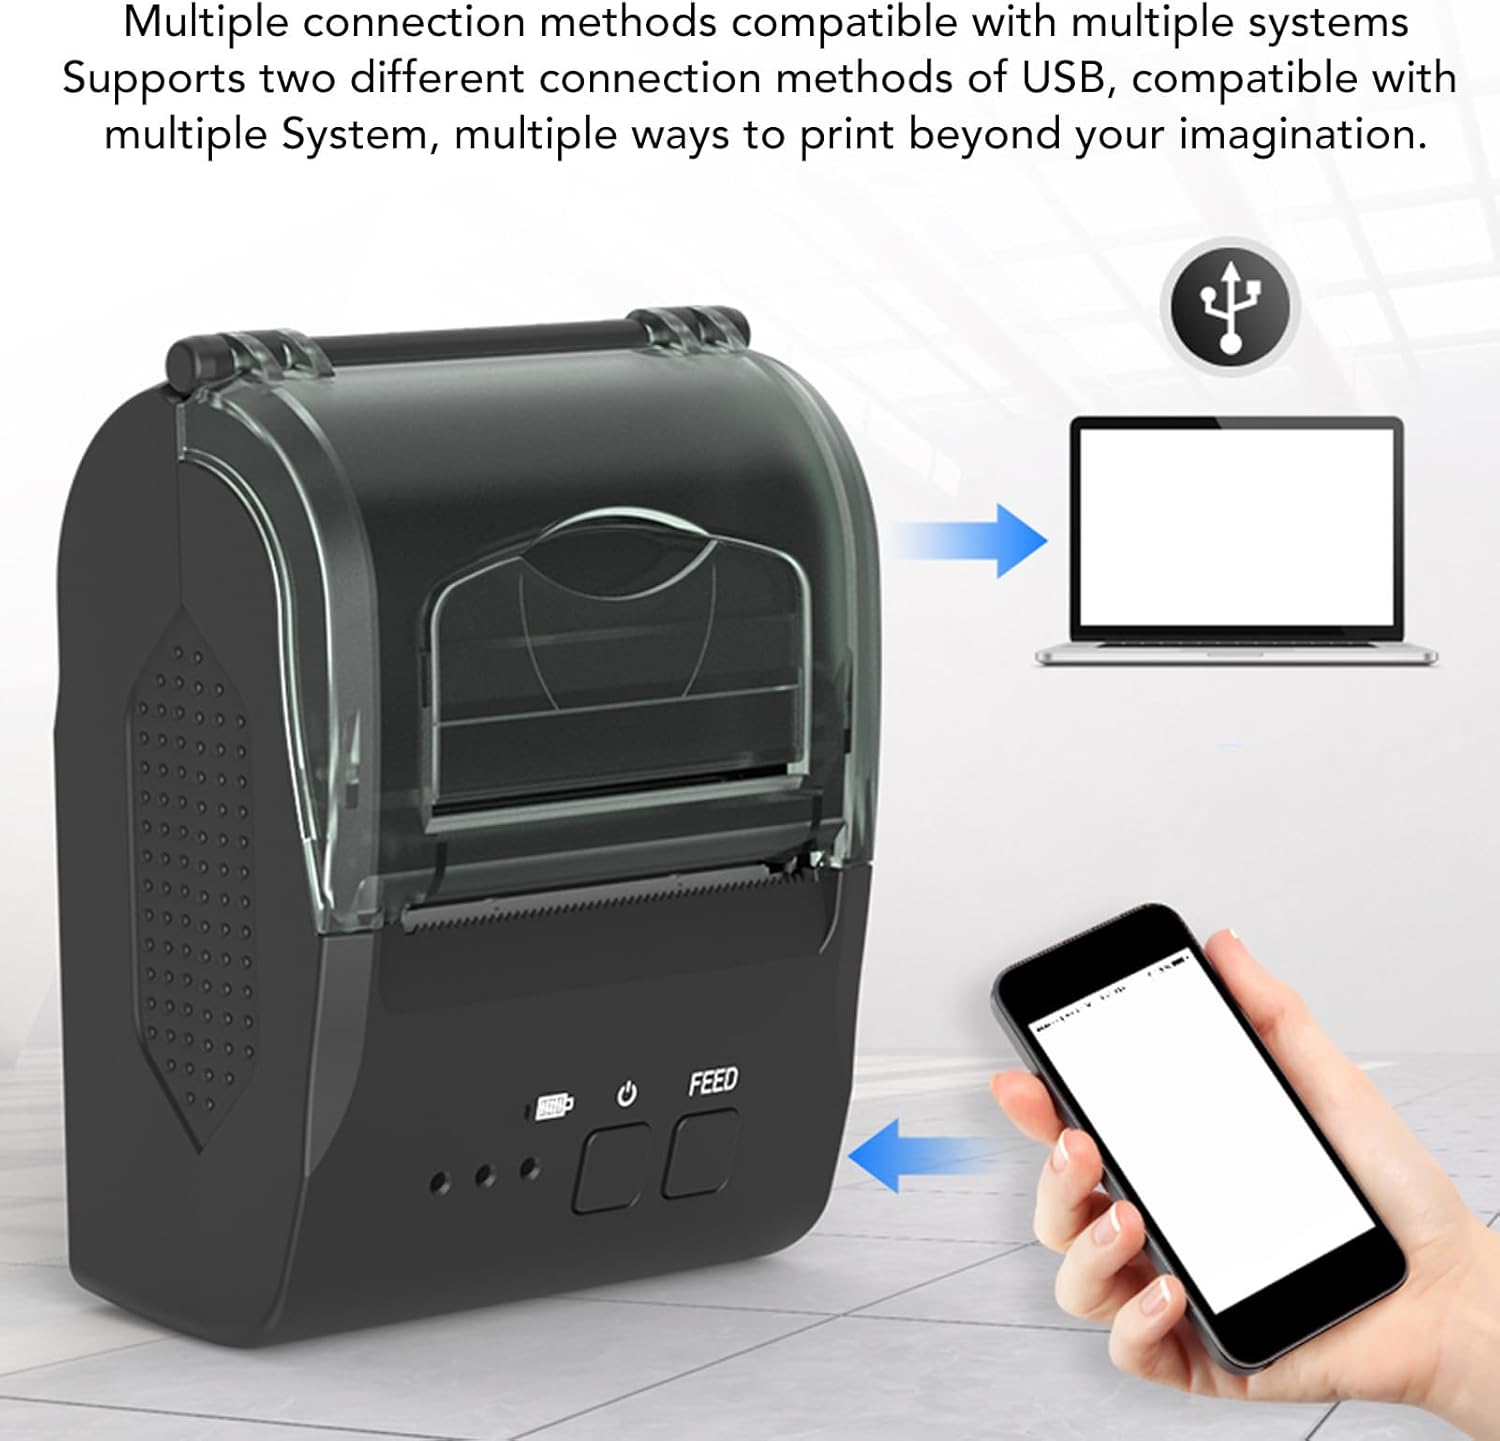
Figure 5: Multiple Connection Methods. This image illustrates the printer's ability to connect to a laptop via USB and a smartphone via Bluetooth, highlighting its compatibility with various systems.
- Bluetooth Connection:
- Turn on the printer using the Power Button (06).
- Enable Bluetooth on your smartphone or tablet.
- Search for available devices and select the printer (usually named "Printer" or similar).
- Pair the devices. A password (often "0000" or "1234") may be required.
- Wired (USB) Connection:
- Connect the printer to your computer using a USB cable.
- Install the necessary drivers for your operating system (Windows, Linux, OS X). Drivers are typically provided on a CD or available for download from the manufacturer's website.
The printer is compatible with Win2003, Win200, Win7, WinXP, Win10, Win8, Linux, OS X laptops, and Android devices.
4. Operating Instructions
4.1 Powering On/Off
- To power on: Press and hold the Power Button (06) until the Power Indicator (05) illuminates.
- To power off: Press and hold the Power Button (06) until the Power Indicator (05) turns off.
4.2 Printing
Once connected to your device and with paper loaded, you can initiate printing from your application.

Figure 6: Clear Thermal Printing. This image highlights the professional thermal print head's capability to produce clear and precise printouts, as demonstrated by a magnified section of a printed receipt.
The printer utilizes a professional thermal print head for stable and clear printing. It achieves high-speed printing at up to 90mm/s, ensuring efficient output.

Figure 7: High-Speed Printing. This image visually represents the printer's high-speed printing capability, indicating a maximum print speed of 70mm/s for clear and stable output.
After printing, use the jagged saw (02) to easily tear off the receipt or label.
4.3 Paper Feed
Press the Feed Button (07) to manually advance the paper. This is useful for adjusting paper position or checking paper alignment.
5. Maintenance
5.1 Cleaning the Print Head
Regular cleaning of the thermal print head ensures optimal print quality and extends the printer's lifespan. Clean the print head with an alcohol swab or a specialized print head cleaning pen when the print quality degrades or after every few paper roll changes.
- Turn off the printer and disconnect the power cable.
- Open the paper house cover.
- Gently wipe the thermal print head surface with the cleaning tool.
- Allow the print head to dry completely before closing the cover and powering on the printer.
5.2 Battery Care
To maximize battery life:
- Avoid fully discharging the battery frequently.
- Charge the printer regularly, even if not in constant use.
- Store the printer in a cool, dry place when not in use for extended periods.

Figure 8: High Capacity Battery. This image shows the internal 1500mAh removable lithium battery, designed for long-term standby and continuous operation.
The 1500mAh battery provides long-term standby and continuous printing capabilities.
5.3 General Cleaning
Wipe the exterior of the printer with a soft, damp cloth. Do not use harsh chemicals or abrasive cleaners.
6. Troubleshooting
| Problem | Possible Cause | Solution |
|---|---|---|
| Printer does not power on. | Low battery or power cable not connected. | Charge the printer. Ensure the power cable is securely connected. |
| No print output. | No paper, paper loaded incorrectly, or printer not connected. | Load paper correctly. Check Bluetooth or USB connection. Ensure drivers are installed for wired connection. |
| Poor print quality. | Dirty print head or low battery. | Clean the print head (refer to Section 5.1). Charge the printer. Ensure you are using thermal paper. |
| Bluetooth connection fails. | Printer not in pairing mode, incorrect password, or device compatibility issue. | Ensure printer is on and discoverable. Re-enter pairing password. Check device compatibility (refer to Section 3.3). |
| Paper jam. | Paper loaded incorrectly or foreign object in paper path. | Turn off printer. Open paper house and carefully remove jammed paper. Ensure paper is loaded straight. |
7. Specifications
| Feature | Detail |
|---|---|
| Brand | Bewinner |
| Model Number | Bewinnerutw9cz6e2b-11 |
| Printing Method | Direct Thermal Printing |
| Print Speed | Up to 90 mm/s |
| Paper Width | 58 mm |
| Connectivity | Bluetooth, Wired (USB) |
| Battery Capacity | 1500 mAh Lithium Battery |
| Device Compatibility | Win2003, Win200, Win7, WinXP, Win10, Win8, Linux, OS X laptops, Android devices |
| Material | ABS |
| Color | Default (Black) |
| Miscellaneous | Portable, Easy-tear design |
8. Warranty and Support
For warranty information and technical support, please refer to the documentation included with your purchase or visit the official Bewinner website. Keep your purchase receipt as proof of purchase for warranty claims.
For further assistance, you may contact Bewinner customer service through their official channels. Details are typically available on the product packaging or the brand's website.


