1. Important Safety Instructions
Always observe basic safety precautions when using power tools to reduce the risk of fire, electric shock, and personal injury. Read all instructions before operating this product.
- Work Area Safety: Keep the work area clean and well-lit. Cluttered or dark areas invite accidents. Do not operate power tools in explosive atmospheres, such as in the presence of flammable liquids, gases, or dust.
- Electrical Safety: Avoid body contact with earthed or grounded surfaces. Do not expose power tools to rain or wet conditions. Water entering a power tool will increase the risk of electric shock.
- Personal Safety: Always wear eye protection. Use hearing protection when operating noisy tools. Wear a dust mask if operations create dust. Dress properly; avoid loose clothing or jewelry. Keep hair, clothing, and gloves away from moving parts.
- Power Tool Use and Care: Do not force the power tool. Use the correct power tool for your application. Disconnect the battery pack from the power tool before making any adjustments, changing accessories, or storing power tools. Store idle power tools out of the reach of children.
- Battery Tool Use and Care: Recharge only with the charger specified by the manufacturer. Use power tools only with specifically designated battery packs. When the battery pack is not in use, keep it away from other metal objects.
- Service: Have your power tool serviced by a qualified repair person using only identical replacement parts.
2. Product Overview and Components
The INGCO CKLI20273 kit includes a 20V Cordless Brushless Compact Impact Drill and a Brushless Angle Grinder, along with essential accessories for various tasks.
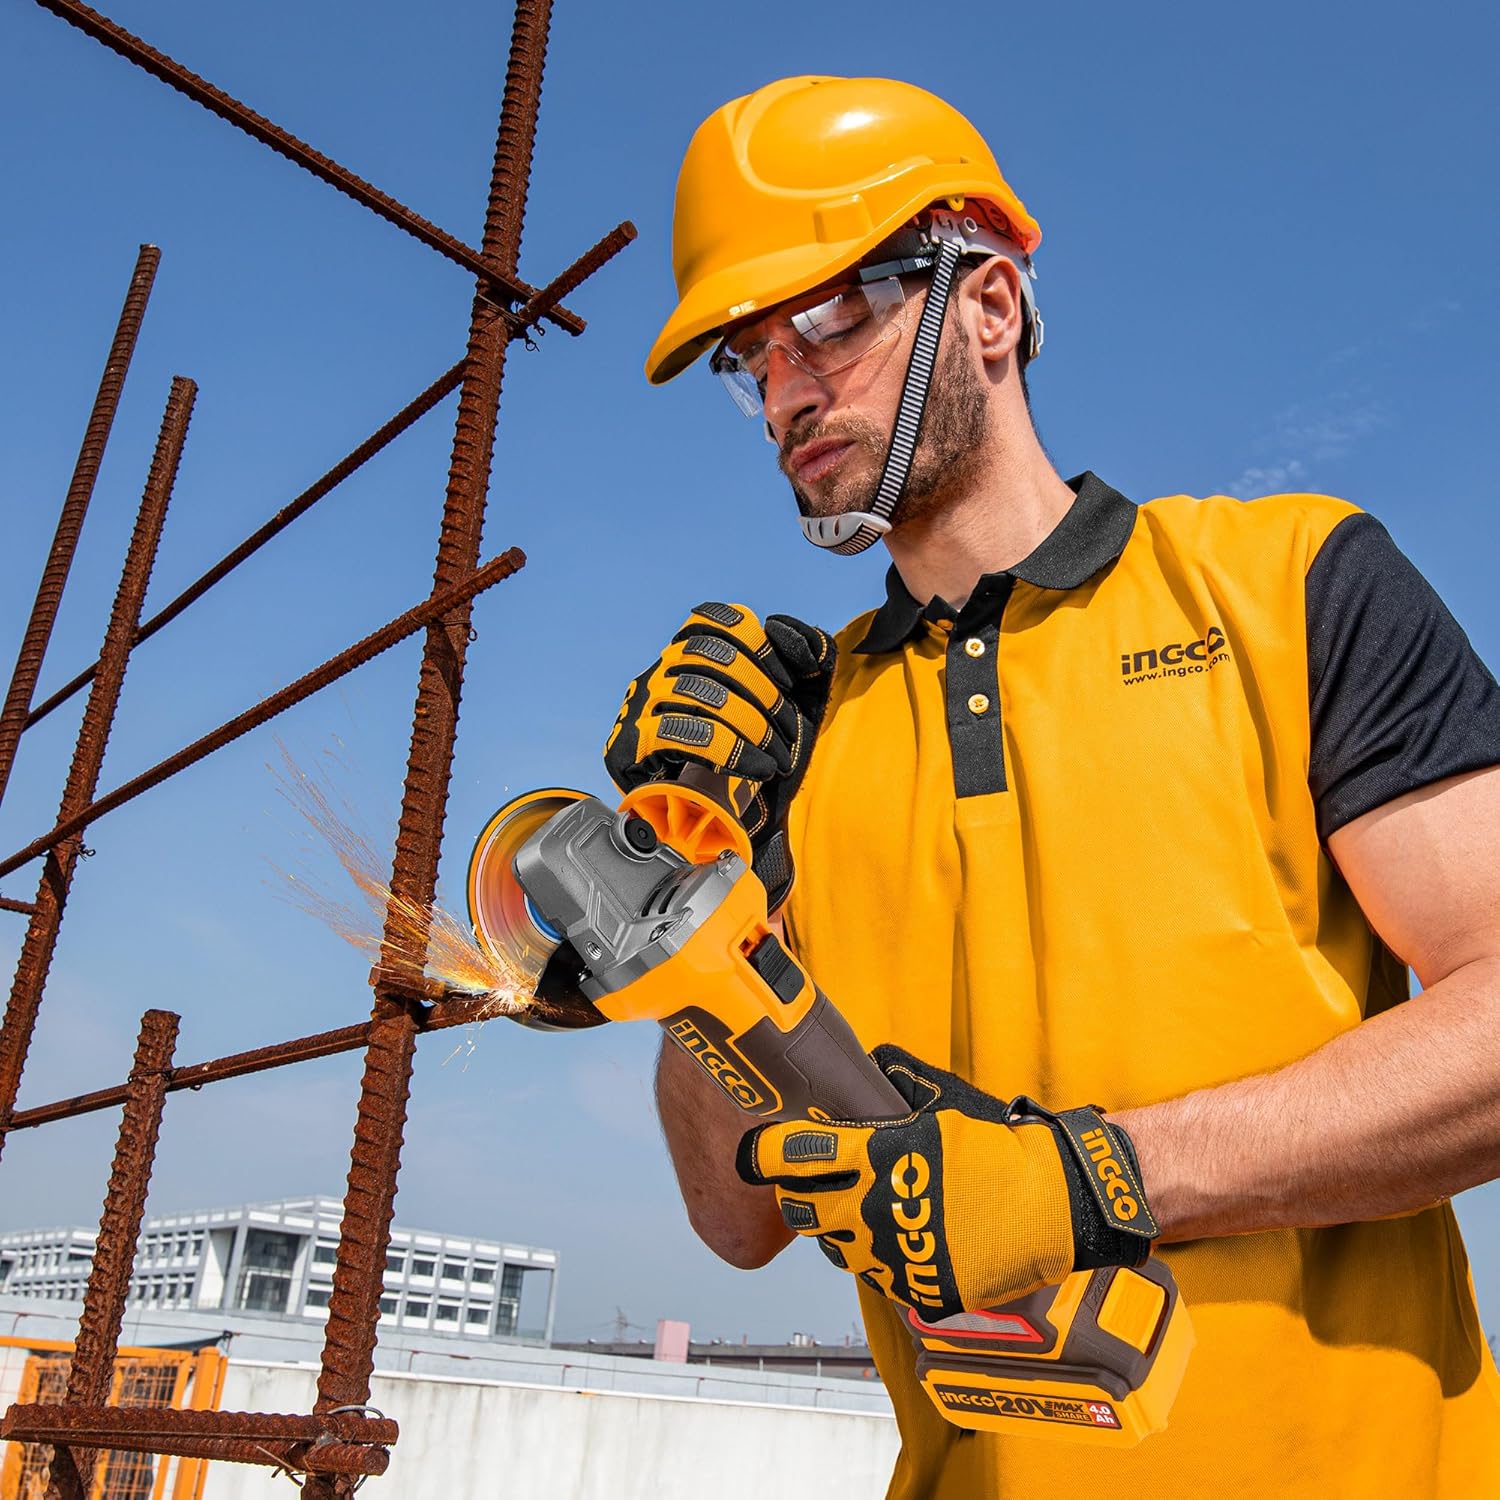
Figure 2.1: Kit Contents. This image displays the complete INGCO CKLI20273 kit, including the impact drill, angle grinder, two batteries (2.0Ah and 4.0Ah), charger, various accessories, and the carrying case.

Figure 2.2: Parameter Information. This image provides a visual summary of the technical specifications for both the cordless angle grinder (CAGLI21154) and the compact brushless cordless impact drill (CIDLI206681), along with a list of included items.
2.1 Impact Drill Components (CIDLI206681)

Figure 2.3: Impact Drill Features. This diagram highlights key components of the impact drill, including the adjustable clutch setting, 2-speed setting, brushless motor, forward & reverse button, variable speed trigger, LED work light, and belt clip.
- Brushless Motor: Provides increased efficiency and longer tool life.
- 13mm Metal Chuck: For secure bit retention.
- Adjustable Clutch Setting: 22+1+1 torque settings for precise control.
- 2-Speed Gearbox: Low (0-500 RPM) and High (0-2000 RPM) for various applications.
- Forward & Reverse Button: For changing rotation direction.
- Variable Speed Trigger: For speed control based on pressure.
- LED Work Light: Illuminates the work area.
- Belt Clip: For convenient carrying.
2.2 Angle Grinder Components (CAGLI21154)
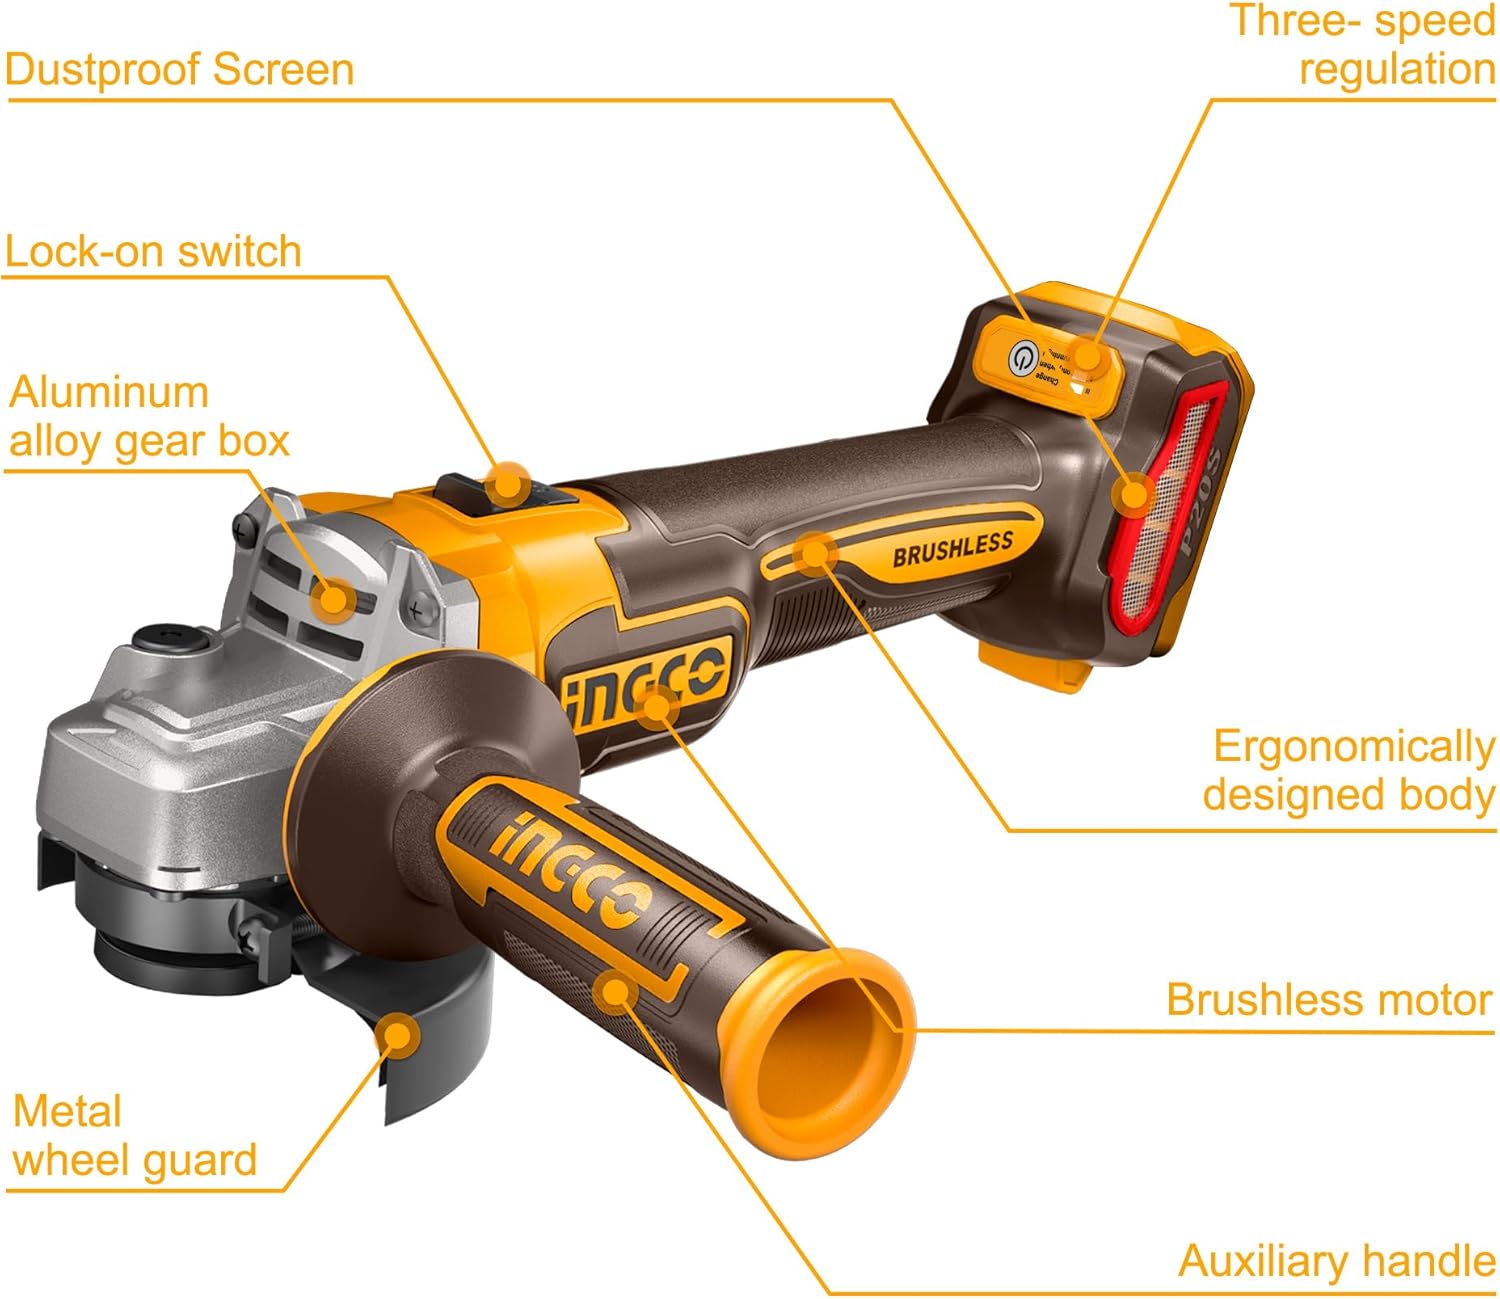
Figure 2.4: Angle Grinder Features. This diagram illustrates the main parts of the angle grinder, such as the dustproof screen, lock-on switch, aluminum alloy gear box, metal wheel guard, auxiliary handle, brushless motor, ergonomically designed body, and three-speed regulation.
- Brushless Motor: For high efficiency and durability.
- 115mm Disc Diameter: Standard size for grinding and cutting discs.
- 3-Speed Mode: 3000/6000/9000 RPM for different materials.
- Auxiliary Handle: For improved control and safety.
- Metal Wheel Guard: Protects against sparks and debris.
- Lock-on Switch: For continuous operation.
- Dustproof Structure: Enhances tool longevity.
3. Setup
3.1 Battery Charging
- Ensure the charger is connected to a suitable power outlet.
- Slide the battery pack into the charger until it clicks into place.
- Monitor the charger's indicator lights for charging status. A full charge is indicated when the light changes (refer to charger manual for specific indications).
- Once fully charged, remove the battery from the charger.
3.2 Installing/Removing Battery Pack
- To install: Align the battery pack with the tool's battery port and slide it in until it locks securely.
- To remove: Press the battery release button (if present) and slide the battery pack out.
3.3 Impact Drill Bit Installation
- Ensure the drill is switched off and the battery is removed.
- Rotate the chuck counter-clockwise to open the jaws.
- Insert the desired drill bit or screwdriver bit into the chuck.
- Rotate the chuck clockwise to tighten the jaws securely around the bit. Ensure the bit is centered and firmly held.
3.4 Angle Grinder Disc Installation
- Ensure the angle grinder is switched off and the battery is removed.
- Press the spindle lock button to prevent the spindle from rotating.
- Using the provided combination wrench, loosen and remove the outer flange nut.
- Place the desired 115mm grinding or cutting disc onto the inner flange, ensuring it sits correctly.
- Replace the outer flange nut and tighten it firmly with the combination wrench while holding the spindle lock button.
- Adjust the metal wheel guard for optimal protection during operation.
- Attach the auxiliary handle to either side of the gear housing for comfortable and secure grip.
4. Operating Instructions
4.1 Operating the Impact Drill

Figure 4.1: Impact Drill in Use. This image shows a user operating the INGCO impact drill to bore into a wooden surface, demonstrating its application.
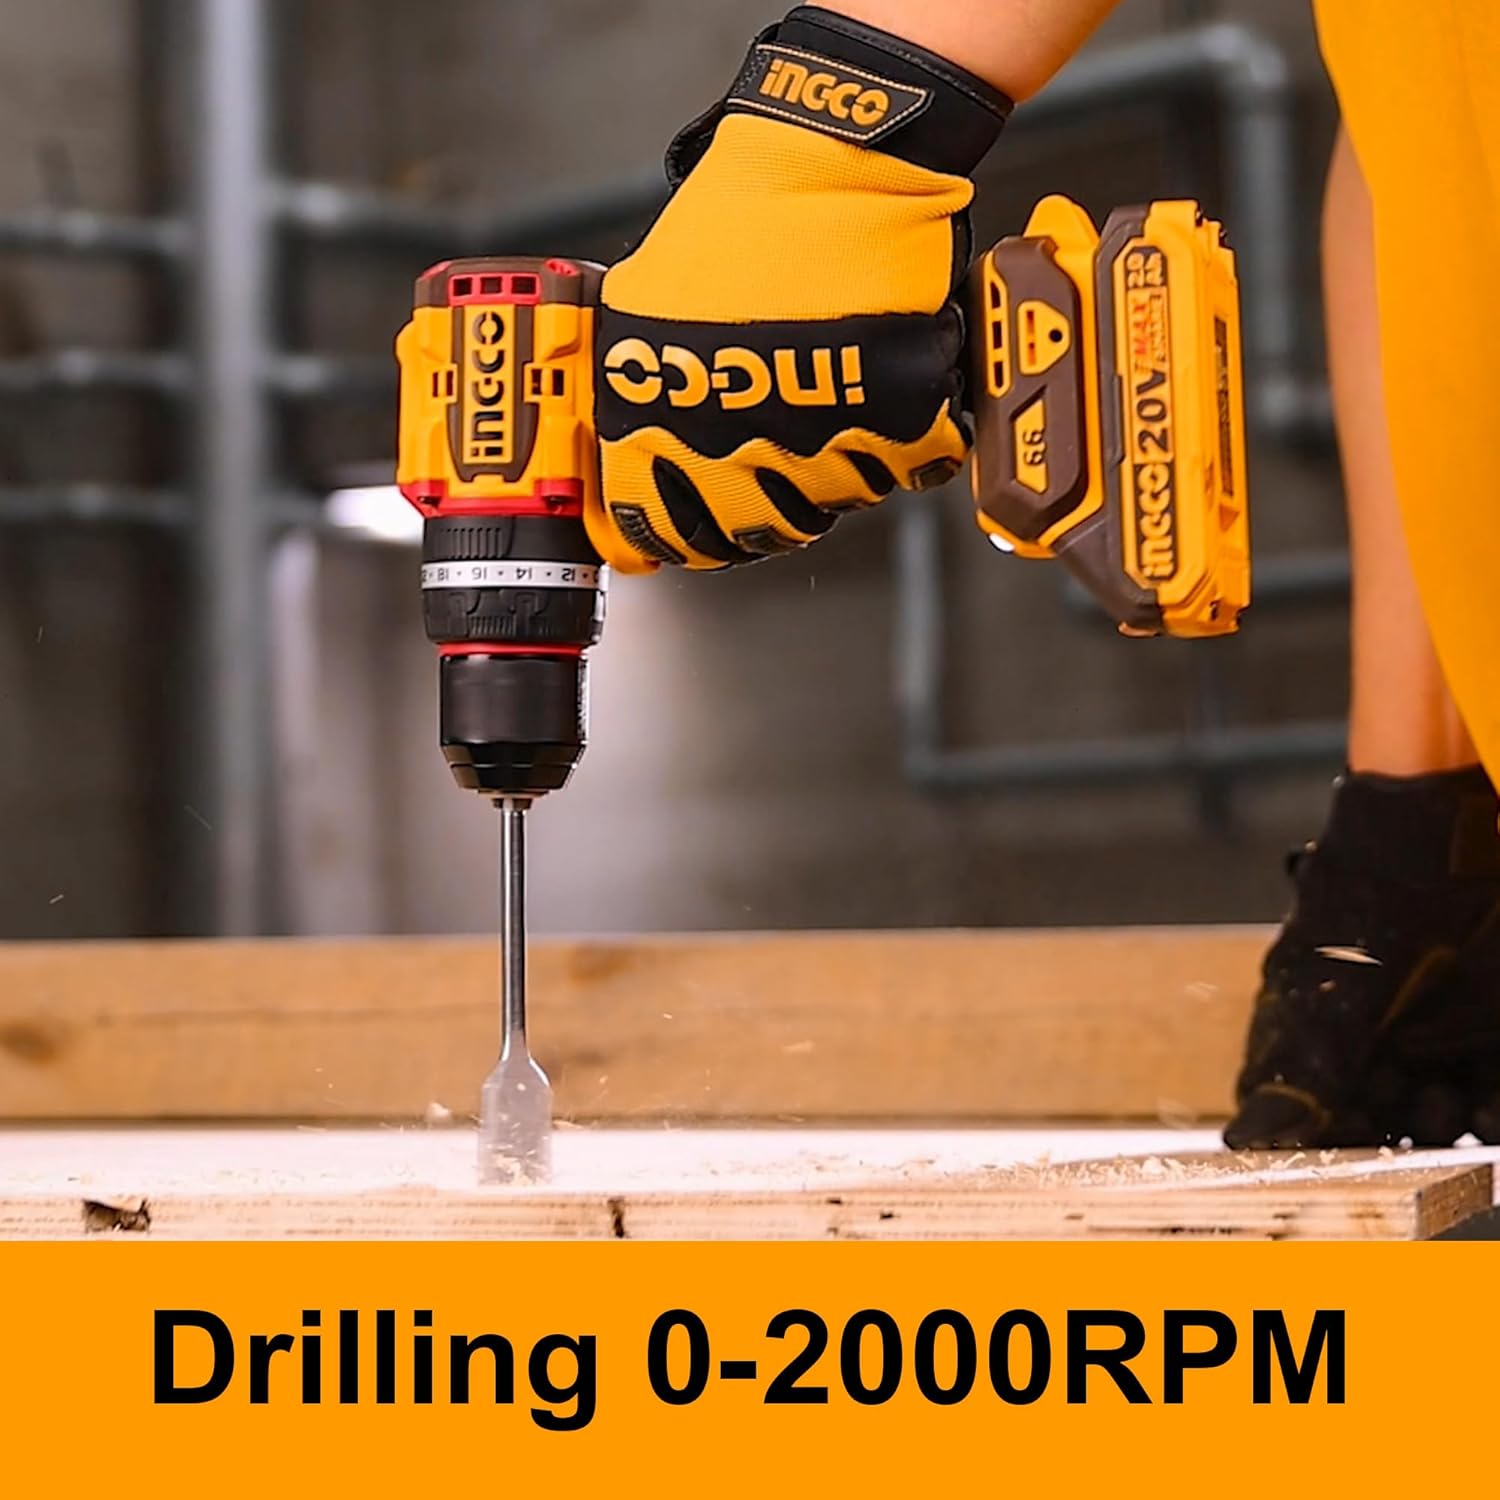
Figure 4.2: Drilling Operation. A close-up view of the impact drill performing a drilling task, indicating its capability for drilling at speeds up to 2000 RPM.

Figure 4.3: Screw Driving Operation. This image shows the impact drill being used for screw driving, highlighting its lower speed range (0-500 RPM) suitable for controlled fastening.
- Select Speed: Use the 2-speed selector switch on top of the drill to choose between low speed (0-500 RPM) for high torque applications like screw driving, or high speed (0-2000 RPM) for drilling.
- Set Torque: Rotate the adjustable clutch ring to select one of the 22 torque settings for screw driving, or the drill/impact mode for drilling. The 'drill' setting provides maximum torque, and the 'impact' setting activates the hammer function for masonry.
- Direction of Rotation: Push the forward/reverse button to select clockwise (forward) for drilling and fastening, or counter-clockwise (reverse) for removing screws or freeing jammed bits.
- Start/Stop: Squeeze the variable speed trigger to start the drill. The speed will increase with trigger pressure. Release the trigger to stop. The LED work light will illuminate when the trigger is pressed.
- Operation: Apply steady pressure and allow the tool to do the work. For impact drilling, apply firm, consistent pressure.
4.2 Operating the Angle Grinder
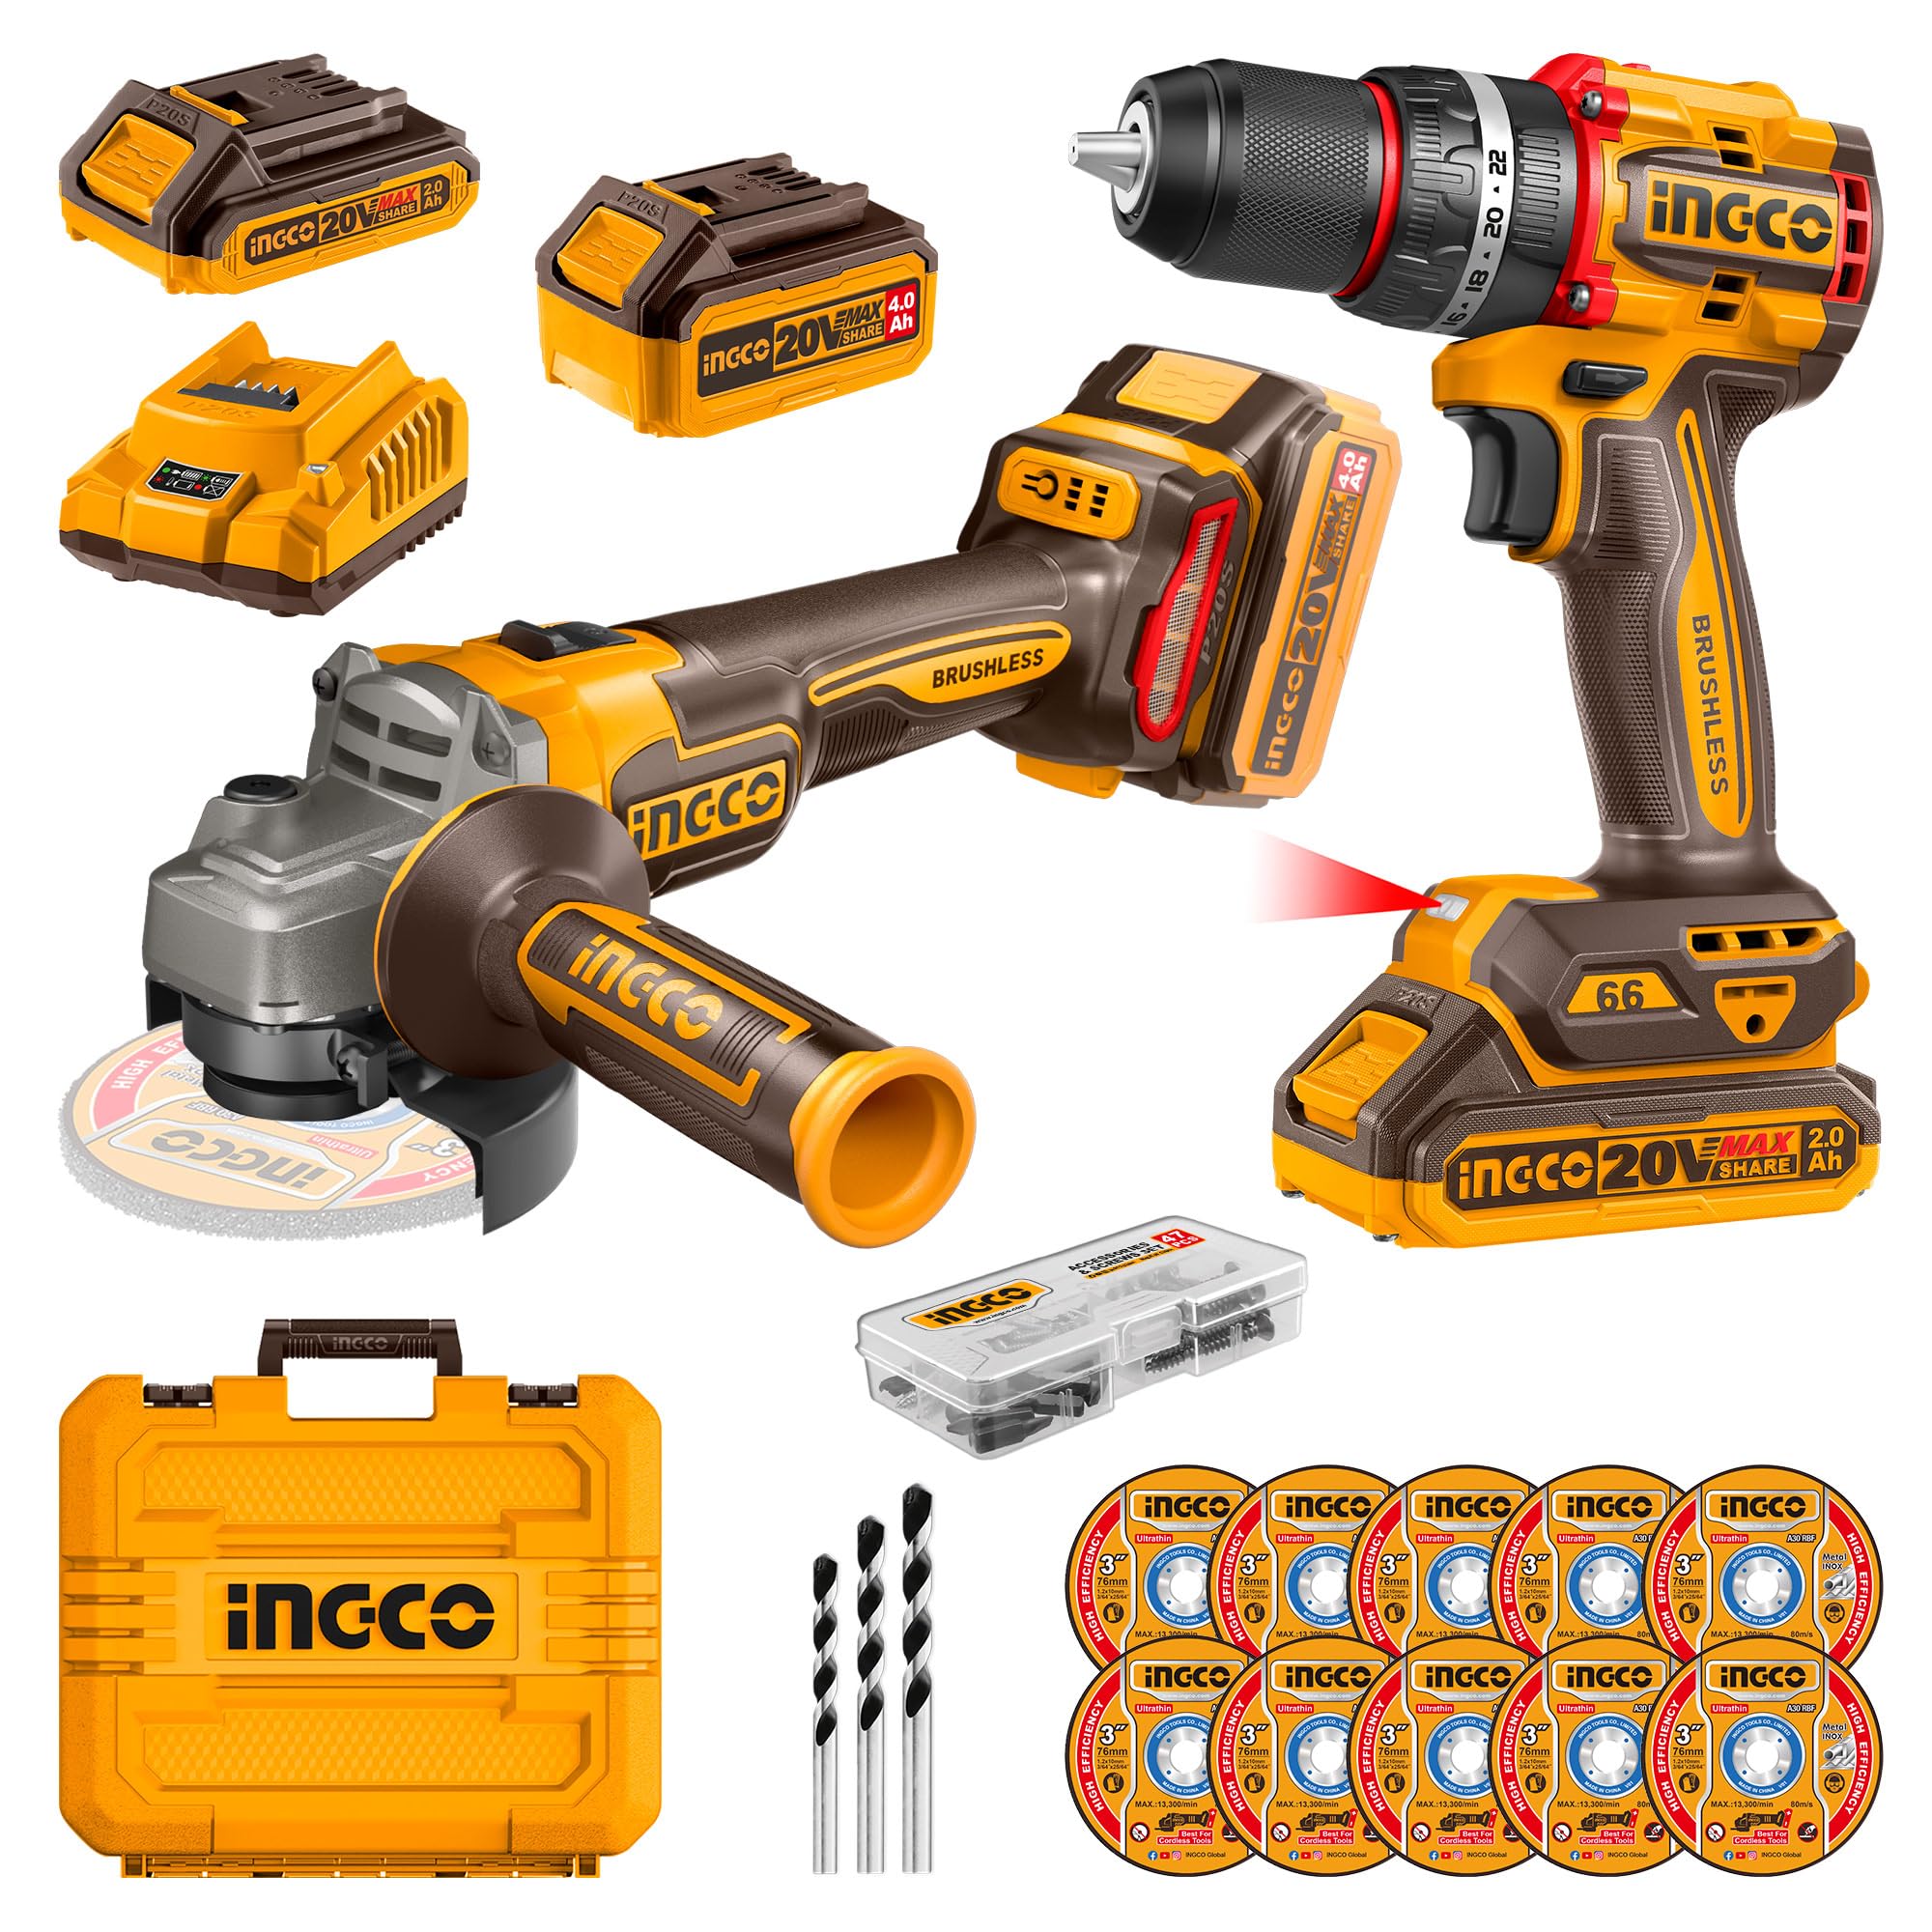
Figure 4.4: Angle Grinder in Use. This image depicts a worker using the INGCO angle grinder to cut metal rebar, showcasing the tool's application in construction or fabrication.
- Select Speed: Use the 3-speed regulation switch to select the desired RPM (3000/6000/9000 RPM) based on the material and disc type. Lower speeds are generally for polishing or softer materials, while higher speeds are for cutting and grinding hard materials.
- Start/Stop: Slide the lock-on switch forward to turn on the grinder. To stop, push the switch backward.
- Grip: Always hold the grinder firmly with both hands, one on the main handle and one on the auxiliary handle.
- Operation: Allow the disc to reach full speed before contacting the workpiece. Apply light, even pressure. Do not force the tool. For cutting, use the edge of the disc. For grinding, use the face of the disc at a slight angle to the workpiece.
- Safety Guard: Ensure the metal wheel guard is always in place and adjusted to direct sparks and debris away from you.
5. Maintenance
Regular maintenance ensures optimal performance and extends the lifespan of your tools.
- Cleaning: After each use, clean the tools with a soft, damp cloth. Remove any dust, debris, or metal shavings from air vents and moving parts. Do not use harsh chemicals or abrasive cleaners.
- Battery Care: Store batteries in a cool, dry place away from direct sunlight and extreme temperatures. Do not store fully discharged batteries for extended periods. Charge them periodically if not in use.
- Accessory Inspection: Regularly inspect drill bits, grinding discs, and other accessories for wear or damage. Replace worn or damaged accessories immediately.
- Storage: Store the tools and accessories in the provided carrying case in a dry, secure location, out of reach of children.
- Lubrication: These tools feature brushless motors and sealed gearboxes, requiring no user lubrication.
6. Troubleshooting
If you encounter issues, refer to the following common troubleshooting steps:
- Tool Not Starting:
- Ensure the battery pack is fully charged and securely inserted.
- Check if the power switch/trigger is fully engaged.
- For angle grinder, ensure the lock-on switch is correctly operated.
- Reduced Power/Performance:
- The battery may be low; recharge it.
- The accessory (drill bit, disc) may be dull or damaged; replace it.
- Ensure the correct speed and torque settings are selected for the task.
- Overheating:
- Allow the tool to cool down.
- Ensure air vents are clear of obstructions.
- Avoid continuous heavy-duty operation without breaks.
- Excessive Vibration/Noise:
- Check if the accessory is properly installed and tightened.
- Inspect the accessory for damage or imbalance.
- If the issue persists, discontinue use and contact customer support.
For issues not covered here, please contact INGCO customer support or an authorized service center.
7. Specifications
| Feature | Specification |
|---|---|
| Brand | Ingco |
| Model Number | CKLI20273 |
| Voltage | 20 Volts |
| Power Source | Battery Powered (Lithium Ion) |
| Item Weight | 6.5 Kilograms (Total Package) |
| Special Features | Brushless Motor, Built-In LED Working Light, Cordless |
| Batteries Included | Yes (1x 2.0Ah, 1x 4.0Ah) |
| Included Components | 1x Angle Grinder, 1x Drill, 1x 2.0Ah Battery, 1x 4.0Ah Battery, 1x Charger, 10x Discs, 47x Accessories, 1x Auxiliary Handle, 1x Combination Wrench, 1x Carrying Case |
| Compact Brushless Cordless Impact Drill (CIDLI206681) | |
| No-load Speed | 0-500 / 0-2000 RPM |
| Max Impact Rate | 30000 BPM |
| Max Torque | 66 Newton Meters |
| Chuck Capacity | 13mm Metal Chuck |
| Torque Settings | 22+1+1 |
| Cordless Angle Grinder (CAGLI21154) | |
| No-load Speed | 3000 / 6000 / 9000 RPM (3-speed mode) |
| Disc Diameter | 115mm |
| Spindle Thread | M14 |
8. Warranty and Support
INGCO products are manufactured to high-quality standards and are warranted against defects in materials and workmanship.
- Warranty Information: Specific warranty terms and duration may vary by region and retailer. Please retain your proof of purchase for warranty claims. For detailed warranty information, refer to the documentation provided with your purchase or contact your retailer.
- Customer Support: For technical assistance, spare parts, or service inquiries, please contact the seller or an authorized INGCO service center. Contact information can typically be found on the product packaging or the retailer's website.


