1. Introduction
Thank you for choosing the HUPEJOS V50-4CH Dash Cam. This device is designed to provide comprehensive vehicle surveillance with its 4-channel recording capabilities, ensuring 360-degree protection. This manual will guide you through the installation, operation, and maintenance of your dash camera to ensure optimal performance and longevity.
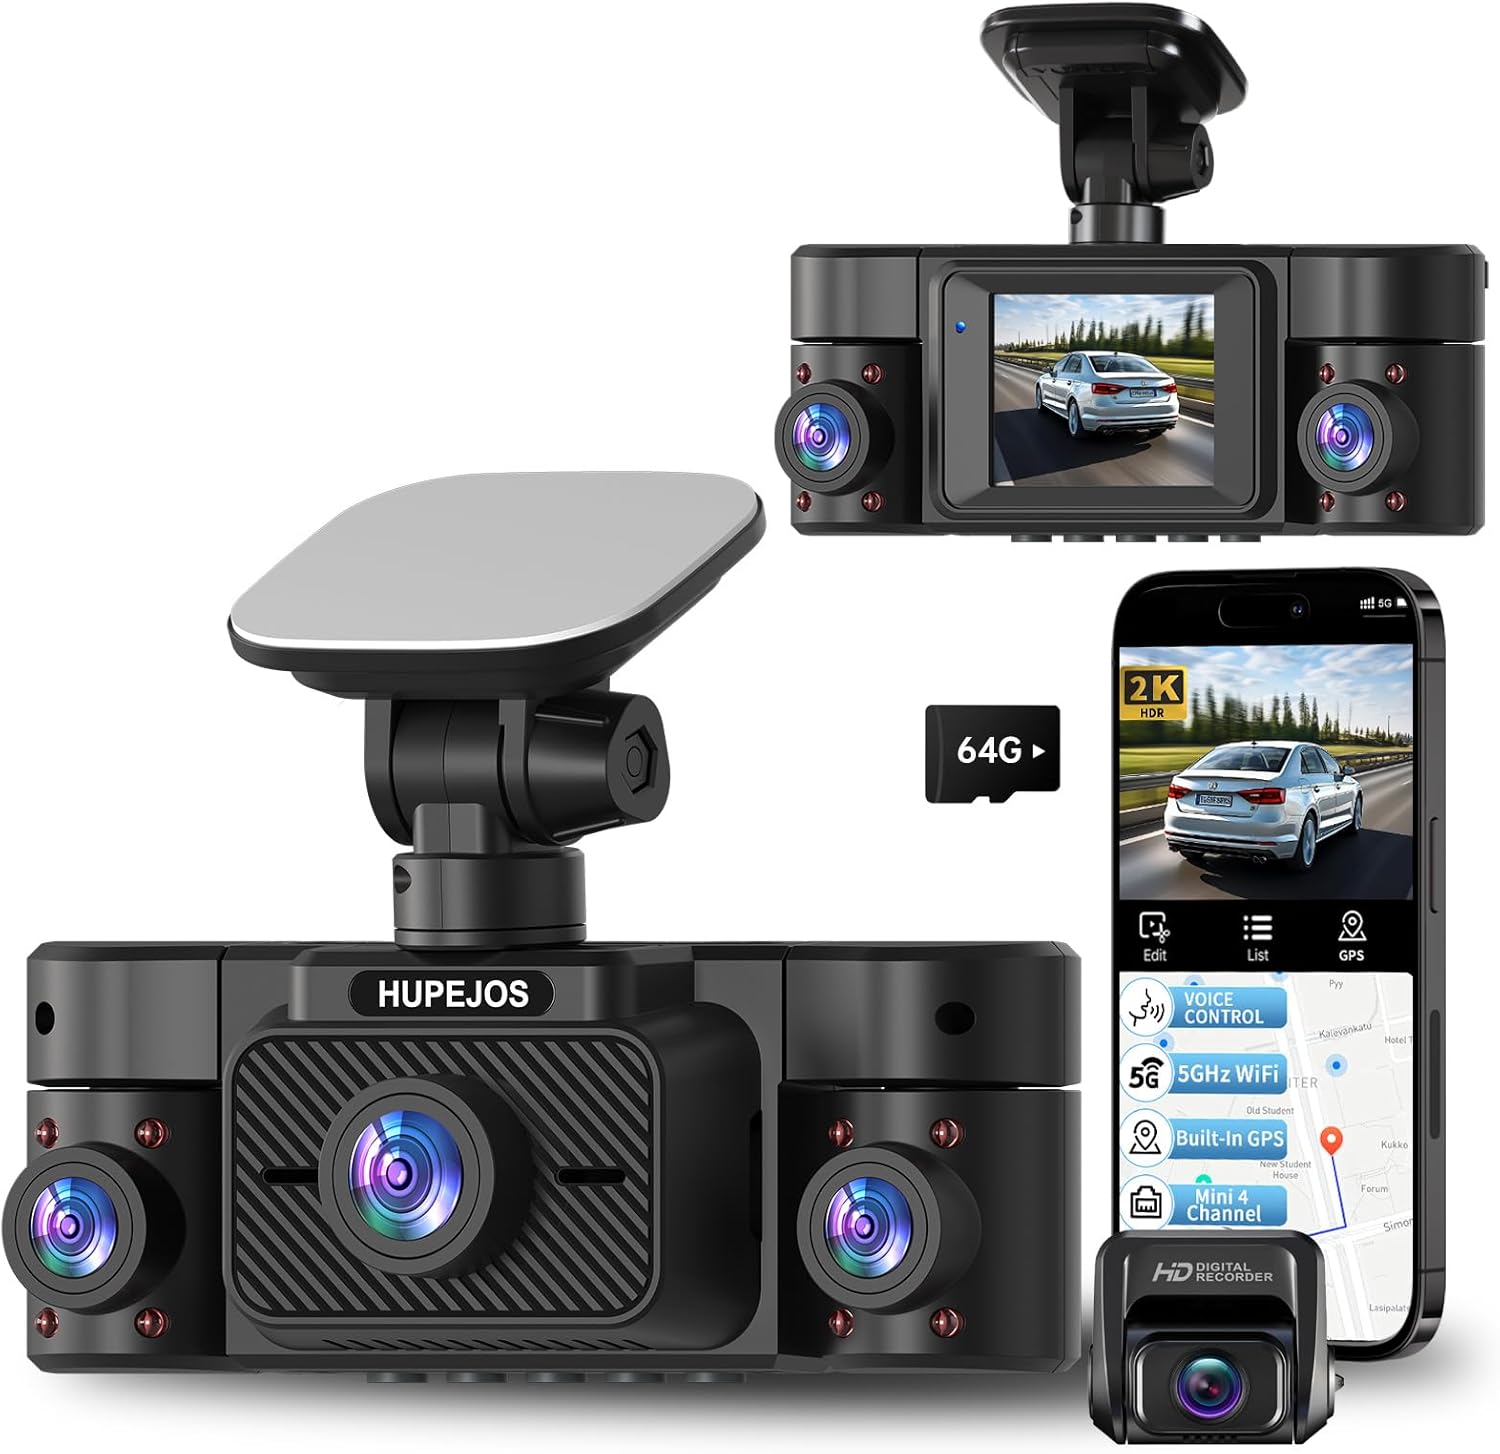
Image 1.1: The HUPEJOS V50-4CH Dash Cam, showcasing its main unit, rear camera, and smartphone app connectivity.
2. Package Contents
Please verify that all items listed below are included in your package:
- 1 x V50-4CH Dash Cam (Main Unit)
- 1 x 1080P Rear Camera
- 1 x Type-C Power Cable
- 1 x 19.6ft Rear Camera Cable
- 2 x Electrostatic Stickers
- 1 x 64GB SD Card
- 1 x 3M Adhesive Mount
- 1 x Car Wire Trim Tool
- 1 x Packing Box
- 1 x User Manual (this document)

Image 2.1: The HUPEJOS V50-4CH Dash Cam in a car interior, illustrating voice control functionality.
3. Product Overview
The HUPEJOS V50-4CH is a compact 4-channel dash camera system designed for comprehensive vehicle monitoring. It features a main unit with front, left, and right cameras, and a separate rear camera. Key features include 4K/2K recording, built-in WiFi and GPS, voice control, and advanced night vision.
3.1 Key Features
- 4-Channel Recording: Front, Left, Right, and Rear cameras for 360-degree coverage.
- High Resolution: Supports 4K front + 1080P rear, or 2K front + 2560x720P left/right + 1080P rear.
- Built-in 5GHz WiFi: Faster data transfer for app control and video download.
- Built-in GPS: Records driving tracks and speed.
- Voice Control: Hands-free operation for common commands.
- Super Night Vision: F/1.8 aperture, 6 optical lenses, HDR/WDR technology for clear low-light recording.
- Loop Recording & G-Sensor: Automatic file protection and continuous recording.
- 24-Hour Parking Mode: Continuous surveillance when parked (requires hardwire kit).

Image 3.1: Overview of the HUPEJOS V50-4CH Dash Cam's primary features.

Image 3.2: The compact design of the V50-4CH Dash Cam, illustrating its small footprint.
4. Installation
Proper installation is crucial for optimal performance. Please follow these steps carefully.
4.1 Main Dash Cam Installation
- Step 1: Select Mounting Location. Choose a location on your front windshield that does not obstruct your view. Clean the area thoroughly with a clean cloth.
- Step 2: Apply Electrostatic Sticker. Peel off the electrostatic sticker and transfer it to the chosen location. Ensure no air bubbles are present. It is recommended to let the sticker settle for at least 30 minutes to enhance adhesion.
- Step 3: Mount Dash Cam. Attach the 3M adhesive mount to the electrostatic sticker. Press the dash cam firmly onto the mount for at least 5 seconds to secure it. For best results, allow 12 hours for the adhesive to fully cure before driving.
- Step 4: Route Power Cable. Use the included car wire trim tool to run the Type-C power cable along the front windshield and roof, then hide it along the A-pillar. This prevents the cable from blocking your view or causing hazards. Connect the power cable to your car's cigarette lighter socket.
4.2 Rear Camera Installation
- Step 1: Select Mounting Location. Choose a location on your rear windshield, typically at the top center, that provides a clear view. Clean the area.
- Step 2: Apply Electrostatic Sticker. Apply an electrostatic sticker to the chosen rear windshield location.
- Step 3: Mount Rear Camera. Attach the rear camera to the electrostatic sticker.
- Step 4: Route Rear Camera Cable. Connect the 19.6ft rear camera cable to the rear camera and route it along the ceiling, through the vehicle's body, and along the passenger seat side to the main dash cam unit. Connect the cable to the AV-IN port on the main unit.

Image 4.1: Visual guide for installing the main dash cam and routing cables.
5. Initial Setup
5.1 Inserting the SD Card
Locate the SD card slot on the dash cam. Insert the provided 64GB SD card with the gold contacts facing the front of the camera until it clicks into place. The dash cam supports up to a 256GB SD card.
5.2 Powering On/Off
Once connected to your car's power supply, the dash cam will automatically power on and begin recording when you start your vehicle. It will power off automatically when you turn off your vehicle's engine.
6. Operating Instructions
6.1 Recording Modes
The V50-4CH offers flexible recording configurations:
- 4-Channel Mode: Records Front (2K), Left (2560x720P), Right (2560x720P), and Rear (1080P) simultaneously. The left and right lens footage is stitched into a single frame.
- 2-Channel Mode: Records Front (4K) and Rear (1080P) simultaneously.
You can switch between these modes in the dash cam's menu settings.

Image 6.1: Illustration of the 4-channel recording and available resolution modes.
6.2 Loop Recording
The dash cam records video in 3-minute segments. When the SD card is full, the oldest unlocked video files will be automatically overwritten by new recordings. This ensures continuous recording without manual intervention.
6.3 G-Sensor (Emergency Recording)
The built-in G-sensor detects sudden impacts or collisions. When triggered, it automatically locks the current video segment, preventing it from being overwritten by loop recording. These emergency videos are stored in a separate folder on the SD card.
6.4 24-Hour Parking Mode
The V50-4CH offers 24-hour parking surveillance to protect your vehicle when parked. This feature requires a separately purchased hardwire kit (ASIN: B0DBR2SLFH) for continuous power supply.
- Motion & Collision Detection: The camera will automatically record when motion is detected within a 3-4 meter range or when a collision occurs.
- Collision Detection Only: Records only when a collision is detected.
Refer to the hardwire kit's instructions for proper installation and configuration of parking modes.

Image 6.2: Visual explanation of Loop Recording, G-Sensor, and Parking Mode.

Image 6.3: Details on the two available 24/7 parking monitor modes.
6.5 Super Night Vision with HDR/WDR
The V50-4CH is equipped with an F/1.8 large aperture lens and 6 layers of optical glass, combined with HDR (High Dynamic Range) and WDR (Wide Dynamic Range) technology. This allows the camera to automatically balance light and dark areas, capturing clear details like license plates in low-light conditions or bright environments.
To manually control the IR LED for night vision, navigate to the dash camera Menu-IR LED option. You can set it to ON, OFF, or Automatic.

Image 6.4: Explanation of Super Night Vision, HDR, and WDR technologies.
6.6 Built-in 5GHz WiFi & App Control
The dash cam features built-in 5GHz WiFi, offering faster connection speeds compared to 2.4GHz WiFi. This allows you to connect your smartphone to the dash cam via a dedicated app. Through the app, you can:
- View live footage.
- Manage and download recorded videos directly to your smartphone.
- Adjust camera settings.
- Share videos on social media.
The WiFi range is typically 6-7 meters from the dash cam. You cannot view videos remotely beyond this range without downloading them to your phone.
6.7 Built-in GPS
The integrated GPS module accurately records your driving tracks and speed. This data can be viewed alongside your video footage, providing crucial evidence in case of an incident. GPS data can be accessed via the smartphone app or a dedicated GXPlayer on your PC (Windows and Mac).

Image 6.5: Illustration of Built-in 5GHz WiFi and GPS functionality with app and PC integration.
6.8 Voice Control
The V50-4CH supports voice commands in English, allowing for hands-free operation. This enhances driving safety by letting you keep your hands on the steering wheel. Supported commands include:
- "Video Start"
- "Video Stop"
- "Take Photo"
- "Turn On WiFi"
- "Turn Off WiFi"
- "Turn On Screen"
- "Turn Off Screen"
- "Turn On Audio"
- "Turn Off Audio"
- "Show Front Camera"
Note: Only the voice options available in the dash cam's menu are supported.
7. Specifications
| Feature | Detail |
|---|---|
| Model Name | V50-4CH |
| Product Dimensions (Main Unit) | 1.57 x 4.72 x 1.57 inches |
| Item Weight | 1.54 pounds |
| Video Capture Resolution | 4K Front + 1080P Rear OR 2K Front + 2560x720P Left/Right + 1080P Rear |
| Field of View | 150 Degrees (per camera) |
| Connectivity Technology | USB, 5GHz Wi-Fi |
| Special Features | 2" IPS Screen, 360 Degree Protection, G-Sensor Lock, Loop Recording, App Control, Audio Recording, 64GB SD Card Included, Built-In GPS, Built-In WiFi, Super Night Vision, WDR, HDR, 24/7 Radar Parking Mode, Voice Control |
| Mounting Type | Windshield Mount |
| Power Source | Type-C Car Charger (Hardwire kit for 24/7 parking mode sold separately) |
| Operating Temperature | Reliable performance in extreme temperatures (-22°F to 140°F / -30°C to 60°C) due to Super Capacitor. |
8. Troubleshooting
If you encounter issues with your HUPEJOS V50-4CH Dash Cam, please refer to the following common problems and solutions:
- Dash Cam does not power on:
- Ensure the power cable is securely connected to both the dash cam and the car's power outlet.
- Check if the car's power outlet is functioning.
- Dash Cam stops recording:
- Check if the SD card is full. If loop recording is enabled, older files should be overwritten.
- Format the SD card regularly (monthly recommended) to prevent data corruption.
- Ensure the SD card is a high-speed Class 10 or U3 card.
- Poor video quality:
- Clean the camera lenses.
- Ensure the protective film has been removed from the lenses.
- Check video resolution settings in the menu.
- WiFi connection issues:
- Ensure you are within 6-7 meters of the dash cam.
- Restart both the dash cam and your smartphone.
- Reinstall the companion app.
- Parking Mode not working:
- Verify that the hardwire kit (ASIN: B0DBR2SLFH) is correctly installed and connected.
- Check parking mode settings in the dash cam menu.
9. Maintenance
9.1 Cleaning
Regularly clean the camera lenses with a soft, lint-free cloth to ensure clear video recordings. Avoid using abrasive cleaners or solvents.
9.2 SD Card Care
To maintain optimal performance and prevent data corruption, it is recommended to format the SD card within the dash cam's menu settings at least once a month. This helps clear fragmented files and ensures smooth operation.
10. Warranty and Support
For any questions, technical assistance, or support regarding your HUPEJOS V50-4CH Dash Cam, please contact our customer service team. You can reach us via email at any time.
Please refer to your purchase documentation for specific warranty terms and contact details.


