1. Introduction
Thank you for choosing the Omethey Biometric Fingerprint Gun Safe. This manual provides essential information for the safe and efficient operation of your new gun safe. Please read these instructions carefully before assembly and use, and retain them for future reference. This safe is designed to provide secure storage for firearms and valuables, featuring multiple access options including biometric fingerprint, electronic code, and emergency key.

Image 1.1: The Omethey Biometric Fingerprint Gun Safe, showing its exterior and interior storage capacity with firearms and accessories.
2. Safety Information
- Always store firearms unloaded and locked within the safe.
- Keep all keys, passcodes, and registered fingerprints confidential and out of reach of unauthorized individuals, especially children.
- Do not store the emergency keys inside the safe.
- Ensure the safe is securely mounted to a wall or floor to prevent unauthorized removal.
- Regularly check battery levels to ensure continuous functionality of the electronic lock.
- This safe is designed as a deterrent to theft and unauthorized access. It is not fireproof or waterproof.
3. Package Contents
Verify that all components listed below are present in your package:
- Gun Safe Body (unassembled panels) x 1
- Emergency Key x 2
- Expansion Screws x 4
- Magnetic Gun Slots x 3
- Screwdriver x 1
- Magnetic Induction Light x 1
- User Manual x 1
- Gloves x 1 pair
- Screw Bag (containing various screws for assembly)
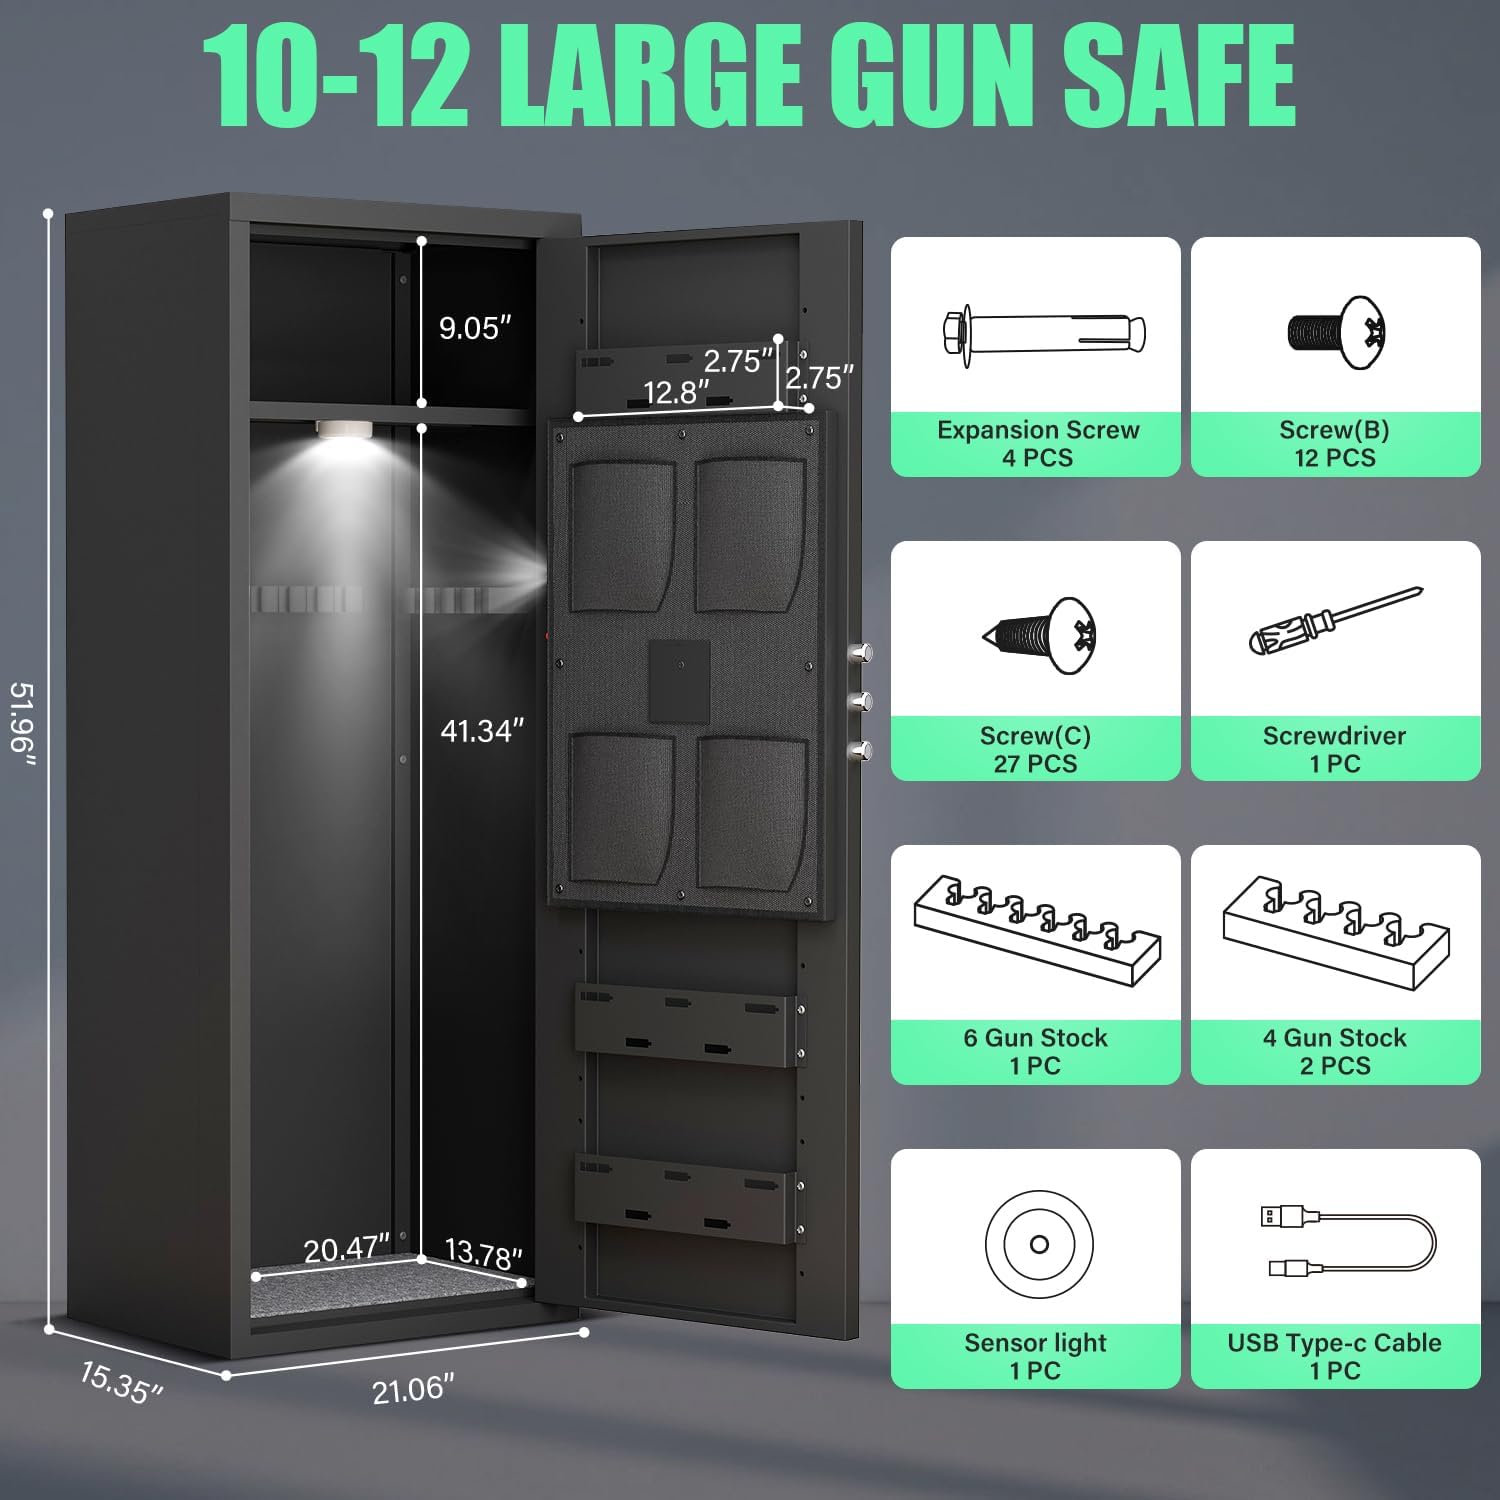
Image 3.1: Visual representation of the gun safe's dimensions and a list of included accessories and hardware.
4. Assembly Instructions
Assembly requires careful attention to detail. It is recommended to have assistance during certain steps. Ensure you have a clear, flat workspace.
- Left Plate Installation: Position the left side panel and secure it using the designated screws.
- Right Plate Installation: Attach the right side panel, ensuring alignment with the left panel and base.
- Door Installation: Carefully attach the door assembly to the main frame.
- Top Plate Installation: Secure the top panel to complete the main structure.
- Bottom Plate and Ammo Box Installation: Install the bottom plate and any internal ammo box or compartment.
- Fix the Bottom Plate: Ensure the bottom plate is firmly secured to the side panels.
- Mount the Cabinet: Secure the assembled safe to a wall or floor using the provided expansion screws for stability and security.
- Shelf and Gun Stock Installation: Install the removable shelf and gun stock holders as desired. The shelf can be adjusted or removed to accommodate firearms up to 51 inches in height.

Image 4.1: Illustrated guide detailing the eight steps for assembling the Omethey gun safe.
5. Setup
5.1 Initial Setup
Upon first use, or if the battery is depleted, use the emergency key to open the safe. Install 4 AA batteries (not included) into the battery compartment located on the inside of the door panel. Close the door and proceed with setting up your preferred access methods.
5.2 Fingerprint Registration
The safe can store up to 100 unique fingerprints.
- Open the safe using the emergency key or current access method.
- Locate the 'SET' button on the inside of the door panel. Press it once.
- Place your finger on the fingerprint scanner. The indicator light will flash.
- Lift and place your finger again, repeating this process 4-5 times until the indicator light turns solid green, confirming successful registration.
- To register additional fingerprints, repeat the process.
5.3 Setting a Passcode
The safe supports a 4-8 digit passcode.
- Open the safe.
- Press the 'SET' button twice.
- Enter your desired 4-8 digit passcode on the keypad.
- Press the '#' key to confirm. The indicator light will turn solid green, confirming successful passcode setup.

Image 5.1: Close-up of the safe's electronic lock, highlighting the fingerprint scanner, keypad, and handle, along with various unlocking methods.
6. Operating Instructions
6.1 Unlocking Methods
- Fingerprint Access: Place a registered finger on the scanner, then turn the knob clockwise to open.
- Passcode Access: Enter your 4-8 digit passcode, press '#', then turn the knob clockwise to open.
- Emergency Key Access: Insert the emergency key into the keyhole, turn it, then turn the knob clockwise to open. This method is used for initial access, forgotten passwords, or dead batteries.
- USB Type-C Cable + Passcode Access (for dead battery): Connect a USB Type-C cable to the external power port. Enter your passcode, press '#', then turn the knob clockwise to open.
6.2 Dual Alarm System
The safe is equipped with a dual alarm system for enhanced security:
- Vibration Alarm: Triggered if the safe experiences violent shaking or movement.
- Input Error Alarm: Activates after 3 consecutive incorrect passcode attempts.
When an alarm is activated, the buzzer will sound for 20 seconds.
6.3 Silent Mode
To enable or disable silent mode, press the '*' key on the keypad. In silent mode, all button presses and alarm sounds are muted, providing discreet operation.
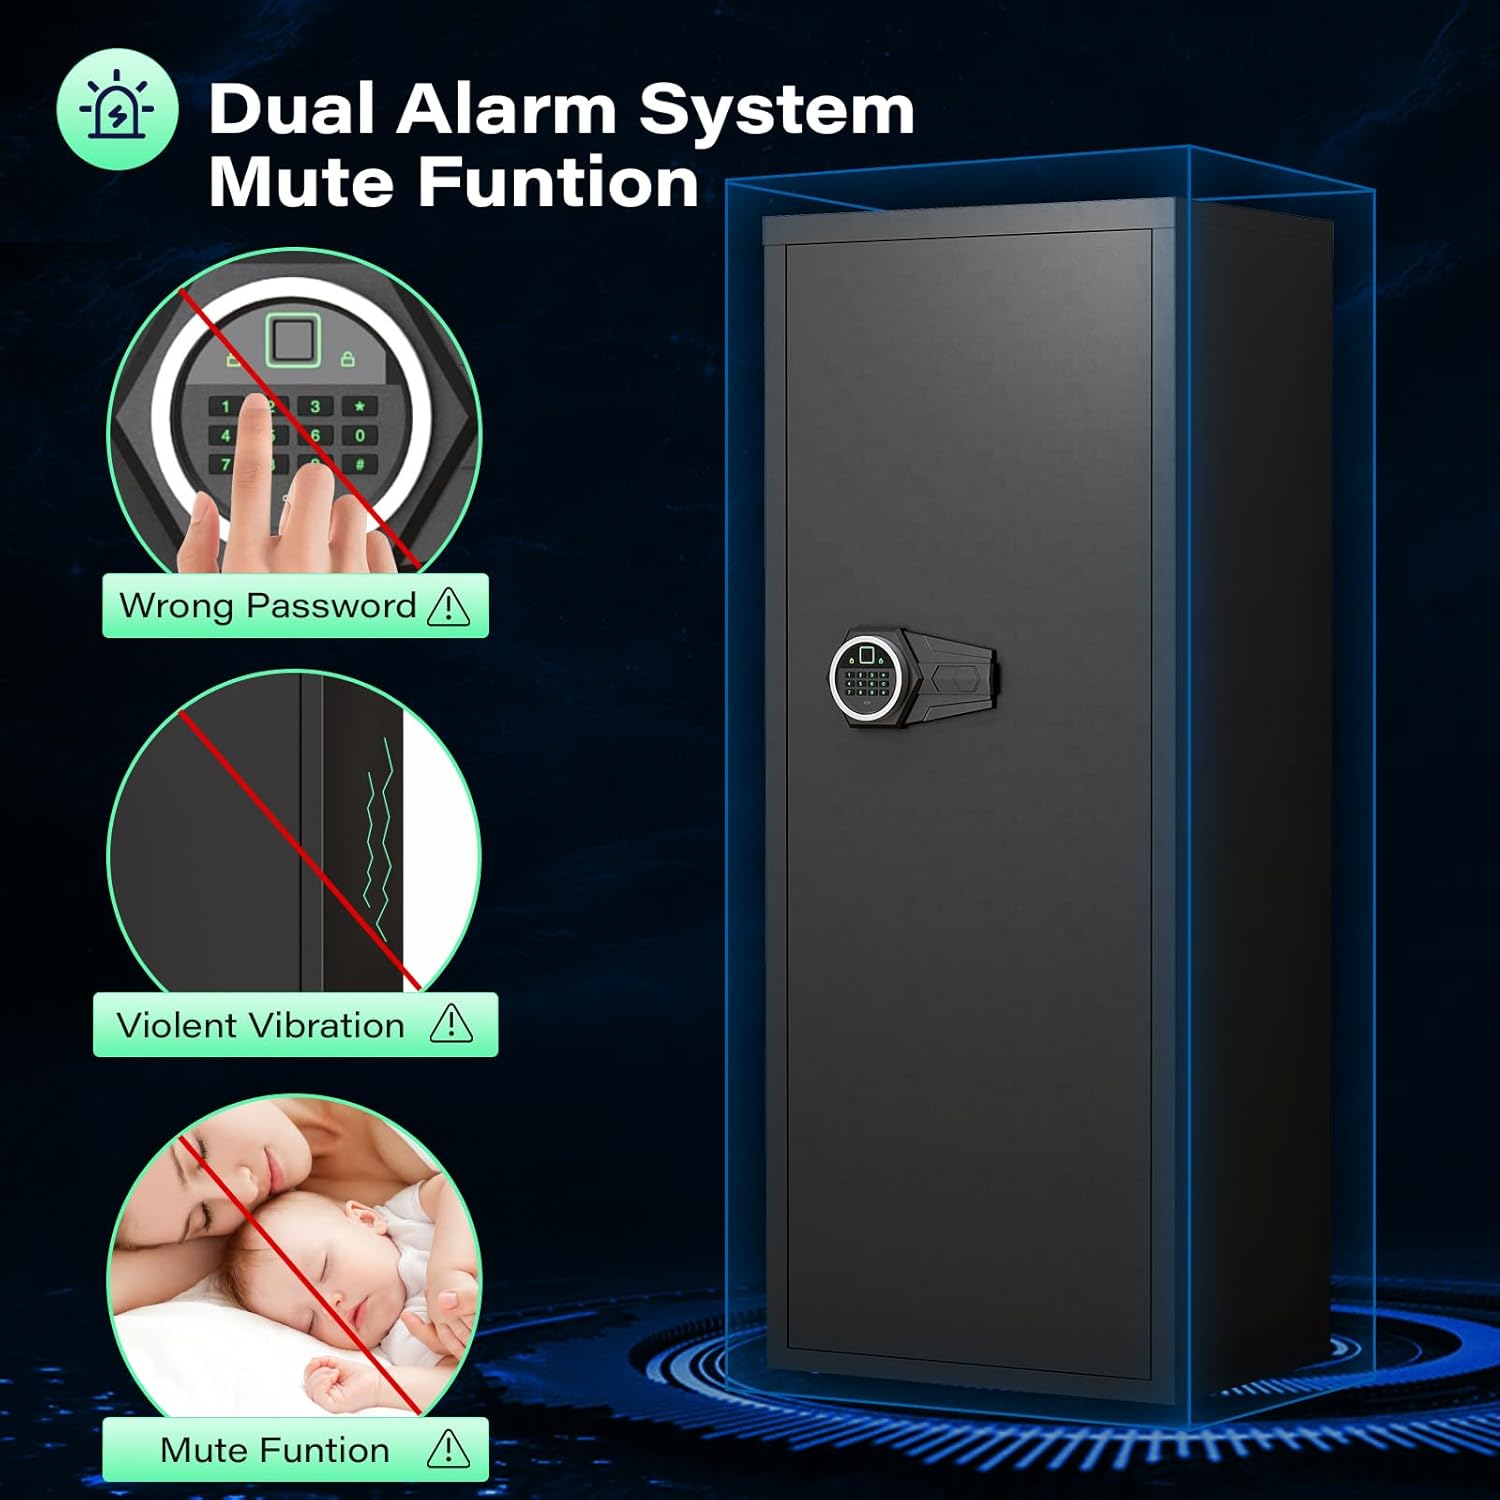
Image 6.1: Visual explanation of the safe's dual alarm system (triggered by wrong password or violent vibration) and the silent mode function.
7. Maintenance
- Cleaning: Wipe the safe's exterior with a soft, damp cloth. Avoid abrasive cleaners or solvents.
- Battery Replacement: Replace batteries promptly when the low battery indicator appears or if the safe fails to respond. Use 4 new AA alkaline batteries.
- Fingerprint Sensor: Keep the fingerprint sensor clean and dry for optimal performance.
- Internal Environment: Consider using a desiccant or dehumidifier inside the safe to protect contents from moisture, especially in humid environments.
8. Troubleshooting
| Problem | Possible Cause | Solution |
|---|---|---|
| Safe does not open with fingerprint. | Finger not registered; dirty sensor; incorrect finger placement. | Ensure finger is registered. Clean sensor. Reposition finger correctly. Try another registered finger. |
| Safe does not open with passcode. | Incorrect passcode entered; batteries low. | Re-enter passcode carefully. Replace batteries. Use emergency key or USB power. |
| No power/Safe unresponsive. | Dead batteries. | Replace batteries. Use emergency key. Use USB Type-C cable for temporary power. |
| Alarm sounds unexpectedly. | Vibration detected; multiple incorrect entries. | Ensure safe is stable. Avoid accidental bumps. Enter correct passcode. |
| Difficulty assembling the safe. | Misalignment of panels; missing screws. | Refer to assembly diagrams carefully. Ensure all screws are used in correct locations. Contact support if parts are missing or damaged. |
9. Specifications
| Feature | Detail |
|---|---|
| Brand | Omethey |
| Model Number | WY-AKL-132W |
| Product Dimensions (D x W x H) | 15.35" x 21.06" x 51.96" |
| Lock Type | Biometric, Electronic Combination Lock, Key |
| Material | Low Carbon Steel |
| Color | Black |
| Special Features | 3 Magnetic Gun Slots, Alarm System, Biometric Fingerprint, Magnetic Induction Light, Silent Mode |
| Mounting Type | Wall Mount (hardware included) |
| Item Weight | 58.1 Pounds |
| Storage Capacity | Accommodates 10-12 firearms (rifles and pistols) |
| Max Firearm Length | Up to 51 inches (with shelf removed) |
10. Warranty and Support
For specific warranty details, please refer to the documentation included with your purchase or contact Omethey customer support directly. If you have any questions regarding the safe, assembly, or operation, please reach out to the manufacturer for assistance. Contact information can typically be found on the product packaging or the official Omethey website.


