
1. Introduction
Welcome to the instruction manual for your MR. Carve M1 Pro Engraver. This document provides essential information for the safe and effective operation of your new engraving machine. Please read all instructions thoroughly before initial use and retain this manual for future reference.
2. Safety Information
Operating a laser engraver requires adherence to specific safety precautions to prevent injury and damage. Always prioritize safety.
- Eye Protection: Always wear the provided protective eyewear when the engraver is in operation. The laser beam can cause severe eye damage.
- Ventilation: Ensure the work area is well-ventilated to dissipate fumes and particles generated during engraving.
- Clearance: Keep hands, hair, clothing, and other objects clear of the laser path and moving parts during operation.
- Inspection: Do not operate the machine if any components appear damaged or if the protective casing is compromised.
- Children and Pets: Keep the engraver out of reach of children and pets. Never leave the machine unattended while operating.
- Power Supply: Use only the power adapter supplied with the device.
- Flammable Materials: Avoid engraving highly flammable materials or operating near combustible substances.
3. Package Contents
Please verify that all items listed below are included in your package. If any items are missing or damaged, contact customer support immediately.
- MR. Carve M1 Pro Marking Machine (Main Unit)
- Power Adapter (US Plug)
- USB Cable
- Protective Goggles
- Sample Materials (e.g., metal tags, ruler)
- Hex Wrenches
- Mounting Brackets
- User Manual
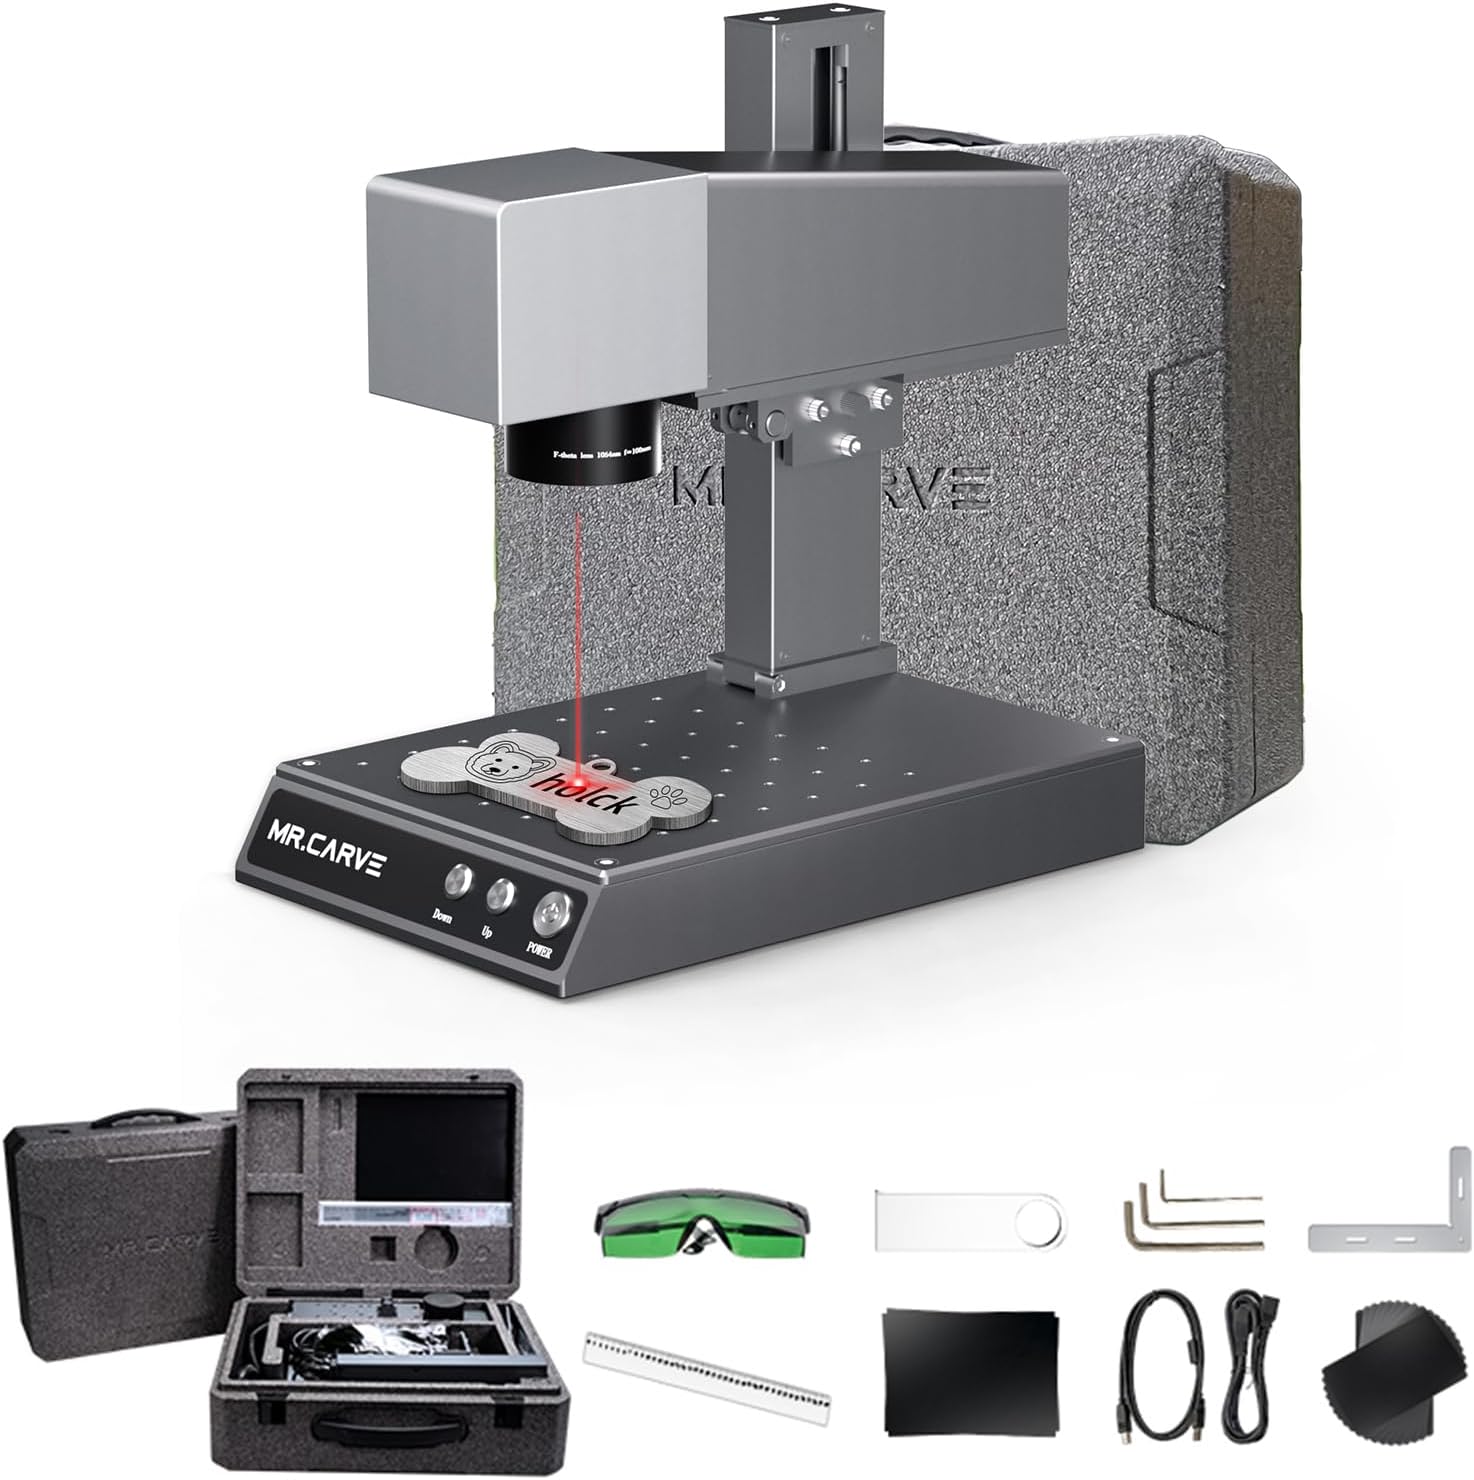
This image displays the complete set of items included in the MR. Carve M1 Pro Engraver package. It shows the main engraving unit, a carrying case containing the power adapter and cables, green protective goggles, a metal ruler, various small tools like hex wrenches and mounting brackets, and sample metal tags.
4. Product Overview
Familiarize yourself with the main components of the MR. Carve M1 Pro Engraver to understand its functionality.

This diagram illustrates the disassembled components of the MR. Carve M1 Pro Engraver. Key parts identified include the metal shell, laser module, galvanometer, field mirror, infrared focusing lens, lifting strut, workbench, up/down power switch, and metal base. Understanding these components is crucial for maintenance and troubleshooting.
- Metal Shell: The protective outer casing that houses the internal components.
- Laser Module: The core component responsible for generating the infrared laser beam for engraving.
- Galvanometer: A high-speed mirror system that precisely directs the laser beam across the engraving area.
- Field Mirror: Focuses the laser beam onto the material surface.
- Infrared Focusing: Mechanism for fine-tuning the laser's focal point for optimal engraving quality.
- Lifting Strut: Allows for vertical adjustment of the laser head to accommodate different material thicknesses.
- Workbench: The stable platform where materials are placed for engraving.
- Up / Down Power Switch: Controls the vertical movement of the laser head and the main power supply.
- Metal Base: Provides stability and support for the entire engraving unit.
5. Setup
Follow these steps to set up your MR. Carve M1 Pro Engraver for the first time.
- Unpacking: Carefully remove all components from the packaging. Retain the packaging for potential future transport or storage.
- Placement: Place the engraver on a stable, level, and non-combustible surface. Ensure there is adequate space around the machine for ventilation and safe operation.
- Power Connection: Connect the power adapter to the engraver's power input port, then plug the adapter into a suitable electrical outlet.
- Initial Inspection: Before powering on, visually inspect all cables and components for any signs of damage or loose connections.
6. Software and App Installation
The MR. Carve M1 Pro Engraver can be controlled via dedicated computer software or a mobile application. Choose the method that best suits your workflow.
6.1 Mobile App Installation
Scan the appropriate QR code below with your mobile device to download the "Add Mark" application. This app allows for wireless control and design editing.

This image displays a QR code specifically for Android users to download the M1 Pro/M4 Pro application. Scan this code with your Android smartphone or tablet to initiate the app download.
For Android devices, download the app from: Android App Download Link

This image displays a QR code specifically for iOS users to download the M1 Pro/M4 Pro application. Scan this code with your iPhone or iPad to initiate the app download from the Apple App Store.
For iOS devices, download the app from: iOS App Store Link
6.2 Computer Software Installation
For computer-based control, refer to the official MR. Carve website or any included USB drive for the latest software download and installation instructions. The software supports Windows 7/8/10/11/XP operating systems.
7. Operation
This section outlines the general steps for operating your MR. Carve M1 Pro Engraver.
7.1 Basic Engraving Process
- Prepare Material: Place the material to be engraved securely on the workbench. Ensure it is flat and will not shift during operation.
- Connect Device: Connect the engraver to your computer via USB or pair it with your mobile device using the installed app.
- Launch Software/App: Open the control software on your computer or the "Add Mark" app on your mobile device.
- Import/Design Pattern: Load an existing design file or create a new one within the software/app interface.
- Adjust Parameters: Set engraving parameters such as laser power, engraving speed, and number of passes. These settings will vary depending on the material type and desired effect. Consult the software's material guidelines for recommendations.
- Focus Adjustment: Use the infrared focusing mechanism and the up/down power switch to achieve optimal laser focus on the material surface. Proper focus is critical for engraving quality.
- Preview (Optional): Utilize the preview function in the software/app, if available, to project a low-power outline of your design onto the material. This helps confirm placement before engraving.
- Start Engraving: Initiate the engraving process. Always monitor the machine during operation.
- Completion: Once engraving is complete, safely remove the material. Allow hot materials to cool before handling.
7.2 Material Compatibility
The MR. Carve M1 Pro supports engraving on a wide range of materials due to its infrared laser technology. Compatible materials include:
- Metals: Stainless steel, aluminum alloy, electroplated metals, gold, silver, brass, copper, and various jewelry materials.
- Non-Metals: Leather, PVC pipe, acrylic plate, certain types of wood, and some plastics.
For optimal results and to prevent damage, always perform a test engraving on a scrap piece of the same material before proceeding with your final project.

This collage showcases various items successfully engraved using the MR. Carve M1 Pro. Examples include personalized metal dog tags, intricate designs on a leather wallet, engraved metal pendants, and custom markings on a ceramic mug. This demonstrates the versatility of the engraver across different materials and applications.

This image highlights the precision of the MR. Carve M1 Pro in engraving fine details on jewelry. It shows a laser beam actively marking a metal pendant, illustrating the machine's capability for delicate and intricate work on small objects.
8. Maintenance
Regular maintenance ensures optimal performance, extends the lifespan of your engraver, and helps maintain engraving quality.
- Cleaning the Lens: Periodically clean the field mirror and focusing lens with a soft, lint-free cloth and a specialized lens cleaning solution. Ensure the machine is powered off and unplugged before cleaning.
- Workbench Cleaning: Keep the workbench clean from debris and residue. A clean surface helps ensure materials lie flat.
- Dust Removal: Use compressed air to gently remove dust and debris from cooling vents and other accessible internal components. Avoid directing air directly into sensitive optical parts.
- Firmware Updates: Check the official MR. Carve website or app for any available firmware updates for the engraver. Installing updates can improve performance and add new features.
- Software/App Updates: Keep your control software and mobile app updated to the latest versions for compatibility and new functionalities.
9. Troubleshooting
This section addresses common issues you might encounter and provides potential solutions.
| Problem | Possible Cause | Solution |
|---|---|---|
| Laser not firing | Power supply issue, software error, safety interlock engaged. | Check power connections, restart the software/app, ensure all safety features (e.g., protective cover) are correctly engaged. |
| Poor engraving quality (blurry, weak, inconsistent) | Incorrect focus, wrong power/speed parameters, dirty lens, material not flat. | Adjust the laser focus, optimize power and speed settings for the specific material, clean the field mirror and lens, ensure material is flat and secure. |
| Machine not connecting to computer/app | USB cable issue, driver problem, Bluetooth/Wi-Fi connectivity issue, app/software not running correctly. | Check USB cable connection, reinstall necessary drivers, verify Bluetooth/Wi-Fi is enabled and paired, restart the app/software and the engraver. |
| Engraving is offset or distorted | Material moved during engraving, machine vibrated, incorrect design origin. | Secure the material firmly to the workbench, ensure the work surface is stable, verify design origin settings in the software/app. |
If you encounter issues not listed here or require further assistance, please contact customer support.
10. Specifications
Detailed technical specifications for the MR. Carve M1 Pro Engraver.
| Feature | Specification |
|---|---|
| Model | M1 Pro |
| Brand | MR CARVE (Irfora) |
| Product Dimensions (L x W x H) | 300mm x 200mm x 320mm (approx. 11.8 x 7.9 x 12.6 inches) |
| Carving Speed | Up to 10000mm/s |
| Laser Wavelength | 1064nm (Infrared) |
| Operating Temperature | -10°C to 65°C |
| Cooling Method | Built-in fan |
| Accuracy | ≤0.001mm |
| Standard Engraving Area | 70x70mm |
| Support System | Win7/Win8/Win10/WIN11/XP |
| Application Software | Computer operating engraving software, Mobile Phone APP software |
| Power Consumption | Below 300W |
| Line Width | 0.001-0.05mm |
| Item Weight | 6.26kg (approx. 13.8 lbs) |

This image visually compares the compact size and lighter weight of the M1 Pro (300x200x320mm, 6.26kg) against a typical industrial engraving machine (1400x680x740mm, 110kg). It highlights the M1 Pro's portability and suitability for desktop use.

This diagram explains the high precision of the M1 Pro's laser, showing a focus accuracy of 0.001mm. It details the infrared pulse laser (1064nm) with approximately 15KW peak power and an average laser power greater than 2W, contributing to its fine engraving capabilities.

This image illustrates the superior engraving detail of the MR. Carve M1 Pro, showing a 0.001mm*0.001mm compression spot size compared to 0.01mm*0.01mm for other machines. A photo engraving example of a dog's fur highlights the vivid and fine details achievable with the M1 Pro.
11. Warranty and Support
The MR. Carve M1 Pro Engraver comes with a standard manufacturer's warranty. Please refer to your purchase documentation or the official Irfora website for specific warranty terms, conditions, and duration.
For technical support, troubleshooting assistance, or warranty claims, please contact Irfora customer service through their official website or the retailer where the product was purchased. Provide your model number (M1 Pro) and purchase date for faster service.