1. Product Overview
The Irfora 12A 5500RPM Corded Circular Saw is a powerful and efficient tool designed for various cutting tasks. It features a robust motor and adjustable settings for precision and versatility.

Image 1.1: The Irfora Circular Saw, showcasing the main unit along with the included 24-TCT and 48-TCT blades, guide, and hex key.
Key Features:
- Efficient and Powerful Motor: Equipped with a 12 Amps 1500W pure copper motor, delivering 5,500 rpm for cutting tile, wood, metal panels, and flooring.
- Adjustable Cutting Depth and Angle: Features a quick adjustment lever for the base plate. Maximum cutting depth is 62mm (2.45 inches) at 90 degrees and 46mm (1.81 inches) at 45 degrees. Includes a 0-45° tilt function.
- Integrated Guide and Rip Fence: An adjustable fence with graduated ruler markings assists in thinner cuts. The integrated guide ensures straight lines for precise cutting.
- Lightweight Design: Weighing only 7.1 lbs, designed to reduce user fatigue. Includes a dust extraction facility to maintain a clean work area and clear cut line visibility.
- Laser Guided System: The integrated laser guide assists in achieving accurate and precise cuts, beneficial for both novice and experienced users.
2. Specifications
| Specification | Value |
|---|---|
| Model | 76321L (Internal), LAKUSE22944UK-3 (Part Number) |
| Amperage | 12 Amps |
| Max Watts Out | 1500 watts |
| No Load Speed | 5500 rpm |
| Blade Diameter | 7.25 Inches (7-1/4'') |
| Max Cutting Depth (90°) | 62mm (2.45 inches) |
| Max Cutting Depth (45°) | 46mm (1.81 inches) |
| Tilt Function | 0-45° |
| Voltage | US: 120V/60Hz; EU&UK: 220-240V/50Hz |
| Material | PA+CU+FE |
| Product Weight | Approx. 3.22 kg (7.1 lbs) |
| Gross Weight | 4.25 kg (9.35 lbs) |
| Product Dimensions | Approx. 31.3 x 25 x 20 cm (12.3 x 9.8 x 7.8 inches) |
Packing List:
- 1 x Circular Saw Unit
- 2 x 24-Tooth TCT Blade
- 1 x 48-Tooth TCT Blade
- 1 x Guide Rule
- 1 x Hex Key
3. Safety Instructions
Always observe basic safety precautions when operating power tools to reduce the risk of fire, electric shock, and personal injury. Read all instructions carefully before use.
General Safety Rules:
- Work Area Safety: Keep your work area clean and well-lit. Cluttered or dark areas invite accidents. Do not operate power tools in explosive atmospheres, such as in the presence of flammable liquids, gases, or dust.
- Electrical Safety: Power tool plugs must match the outlet. Never modify the plug in any way. Avoid body contact with earthed or grounded surfaces, such as pipes, radiators, ranges, and refrigerators.
- Personal Safety: Always wear eye protection (safety glasses or goggles) and hearing protection. Use dust masks when working in dusty conditions. Dress properly; avoid loose clothing or jewelry.
- Tool Use and Care: Do not force the power tool. Use the correct power tool for your application. Disconnect the plug from the power source before making any adjustments, changing accessories, or storing power tools.
4. Setup and Assembly
Before operating the circular saw, ensure proper assembly and setup for safe and efficient use.
4.1 Blade Installation:
- Ensure the saw is unplugged from the power source.
- Press the spindle lock button and use the hex key to loosen the blade arbor nut.
- Lift the lower blade guard and remove the old blade (if applicable).
- Place the new blade onto the arbor, ensuring the teeth are pointing in the direction of rotation indicated on the saw.
- Secure the blade with the arbor nut, tightening it firmly with the hex key while holding the spindle lock.

Image 4.1: Proper installation of the circular saw blade, showing the blade, arbor, and securing nut.
4.2 Adjusting Cutting Depth:
The cutting depth can be adjusted to match the thickness of your workpiece.
- Loosen the depth adjustment lever located on the side of the saw.
- Raise or lower the saw base until the desired cutting depth is achieved. Refer to the depth scale for precise measurement.
- Tighten the depth adjustment lever firmly to secure the setting.
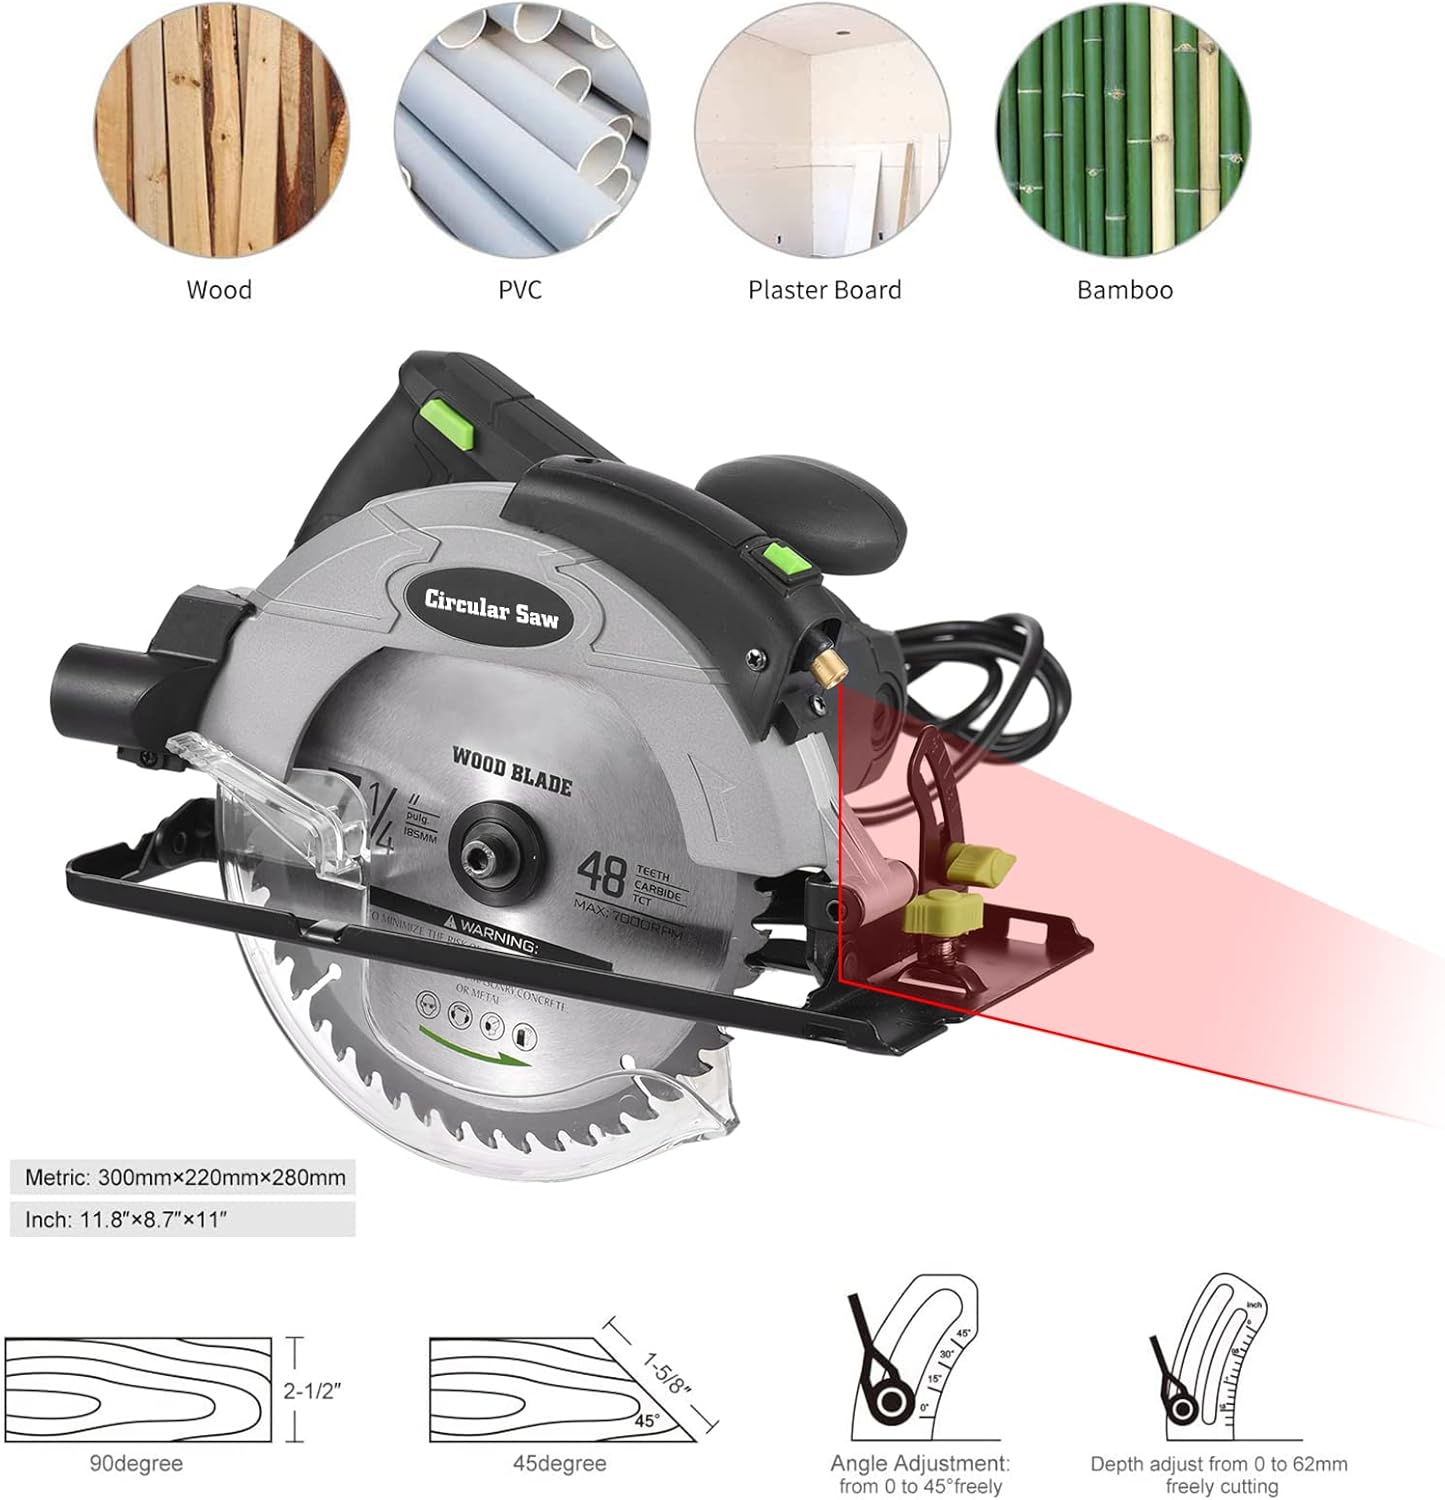
Image 4.2: Illustration of the cutting depth adjustment mechanism, showing the lever and scale.
4.3 Adjusting Bevel Angle:
For angled cuts, adjust the bevel angle of the saw base.
- Loosen the bevel adjustment knob/lever.
- Tilt the saw base to the desired angle (0-45°). Use the angle scale for accuracy.
- Tighten the bevel adjustment knob/lever securely.

Image 4.3: Overview of the circular saw's dimensions and the angle adjustment feature.
4.4 Using the Laser Guide:
The integrated laser guide provides a visual line for accurate cuts.
- Ensure the laser guide is clean and unobstructed.
- Align the laser line with your desired cut line on the workpiece before starting the cut.

Image 4.4: The circular saw demonstrating its laser guide feature, projecting a red line onto a workpiece for precise cutting.
5. Operating Instructions
Follow these steps for safe and effective operation of your circular saw.
5.1 Starting and Stopping the Saw:
- Ensure the workpiece is securely clamped.
- To start, depress the safety lock-off button (if present) and then squeeze the trigger switch.
- Allow the blade to reach full speed before beginning the cut.
- To stop, release the trigger switch.
5.2 Making a Cut:
- Position the front of the saw base flat on the workpiece, ensuring the blade is clear of the material.
- Start the saw and slowly guide the blade into the material along your marked cut line.
- Maintain a steady, even pressure and feed rate. Do not force the saw.
- Ensure the lower blade guard operates freely and covers the blade when not cutting.

Image 5.1: A user demonstrating the proper grip and operation of the circular saw during a cut.
5.3 Using the Rip Fence/Guide Rule:
The rip fence helps make accurate, parallel cuts along the edge of a workpiece.
- Insert the rip fence into the slot on the front of the saw base.
- Adjust the fence to the desired width of cut and tighten its locking screw.
- Keep the fence firmly against the edge of the workpiece throughout the cut.

Image 5.2: The circular saw highlighting its laser guide and the adjustable rip fence for precise cuts.
6. Maintenance
Regular maintenance ensures the longevity and optimal performance of your circular saw.
6.1 Cleaning:
- Always unplug the saw before cleaning.
- Use a dry cloth or soft brush to remove dust and debris from the motor housing, vents, and blade guard.
- Do not use water or chemical cleaners.
6.2 Blade Care:
- Inspect blades regularly for sharpness and damage. Replace dull or damaged blades immediately.
- Clean resin and pitch buildup from blades using a suitable blade cleaner.
6.3 Storage:
- Store the saw in a clean, dry place, out of reach of children.
- Protect the power cord from damage.
7. Troubleshooting
This section addresses common issues you might encounter with your circular saw.
| Problem | Possible Cause | Solution |
|---|---|---|
| Saw does not start | No power supply; Faulty switch; Overload protection tripped | Check power connection and circuit breaker; Contact service center; Allow motor to cool down |
| Blade binds or smokes | Dull or dirty blade; Incorrect blade for material; Improper feed rate; Workpiece not supported | Replace or clean blade; Use correct blade type; Reduce feed rate; Ensure workpiece is stable |
| Inaccurate cuts | Blade not square to base; Guide not properly set; Loose blade | Check and adjust blade squareness; Re-align guide; Tighten blade arbor nut |
| Excessive vibration | Damaged or unbalanced blade; Loose components | Replace blade; Check all fasteners and tighten as necessary |
8. Warranty and Support
Irfora products are manufactured to high-quality standards. For specific warranty information, including terms and conditions, please refer to the warranty card included with your purchase or visit the official Irfora website.
For technical support, spare parts, or service inquiries, please contact Irfora customer service through their official channels. Always provide your product model number (LAKUSE22944UK-3) and purchase details when seeking support.
Note: Unauthorized repairs or modifications may void the product warranty.


