1. Introduction
The Atomos Shinobi II is a versatile 5-inch HDMI 4K monitor designed for filmmakers and content creators. It features an HDR touchscreen, extended battery life, and a lightweight design, focusing on common settings that require on-the-fly adjustments. This manual provides detailed instructions for setting up, operating, and maintaining your Shinobi II monitor.

Image: Atomos Shinobi II highlighting its slimmer, brighter design and camera control capabilities.
2. Product Overview
The Shinobi II monitor is engineered for optimal performance and ease of use. Its compact and robust construction ensures reliability in various shooting environments.
2.1 Key Features
- 5-inch HDR Display: High-brightness 1500 nits screen for clear outdoor viewing.
- 4K HDMI Monitoring: Supports HDMI signals up to 4Kp30.
- Touchscreen Interface: Intuitive control for settings and monitoring tools.
- USB-C Connectivity: Versatile power and camera control options.
- Long Battery Life: Designed for all-day operation on a single battery.
- Lightweight Design: Enhanced portability for on-the-go productions.
2.2 Physical Components
Familiarize yourself with the physical layout and connections of your Shinobi II monitor:

Image: Rear view of the Shinobi II monitor, detailing the power button, NP-style battery slot, locking cable adapter, HDMI IN, USB-C control & power, LANC control, battery release, and SD card slot.
- Power Button: Located on the side for turning the device on/off.
- NP-Style Battery Slot: Accommodates standard NP-F type batteries for portable power.
- HDMI IN: Connects to your camera for video input.
- USB-C Control & Power: Provides power delivery and camera control capabilities.
- LANC Control: For remote camera control (future firmware releases may support more vendors).
- SD Card Slot: For loading LUTs and firmware updates.
- Headphone Jack: For audio monitoring.
- Remote Port: For additional remote control options.
3. Setup
3.1 Powering the Monitor
The Shinobi II can be powered using NP-F style batteries or via USB-C Power Delivery.
- Battery Installation: Slide a compatible NP-F battery into the battery slot on the rear of the monitor until it clicks securely into place.
- USB-C Power: Connect a USB-C PD compatible power source to the USB-C port. This port can also power/charge your camera.
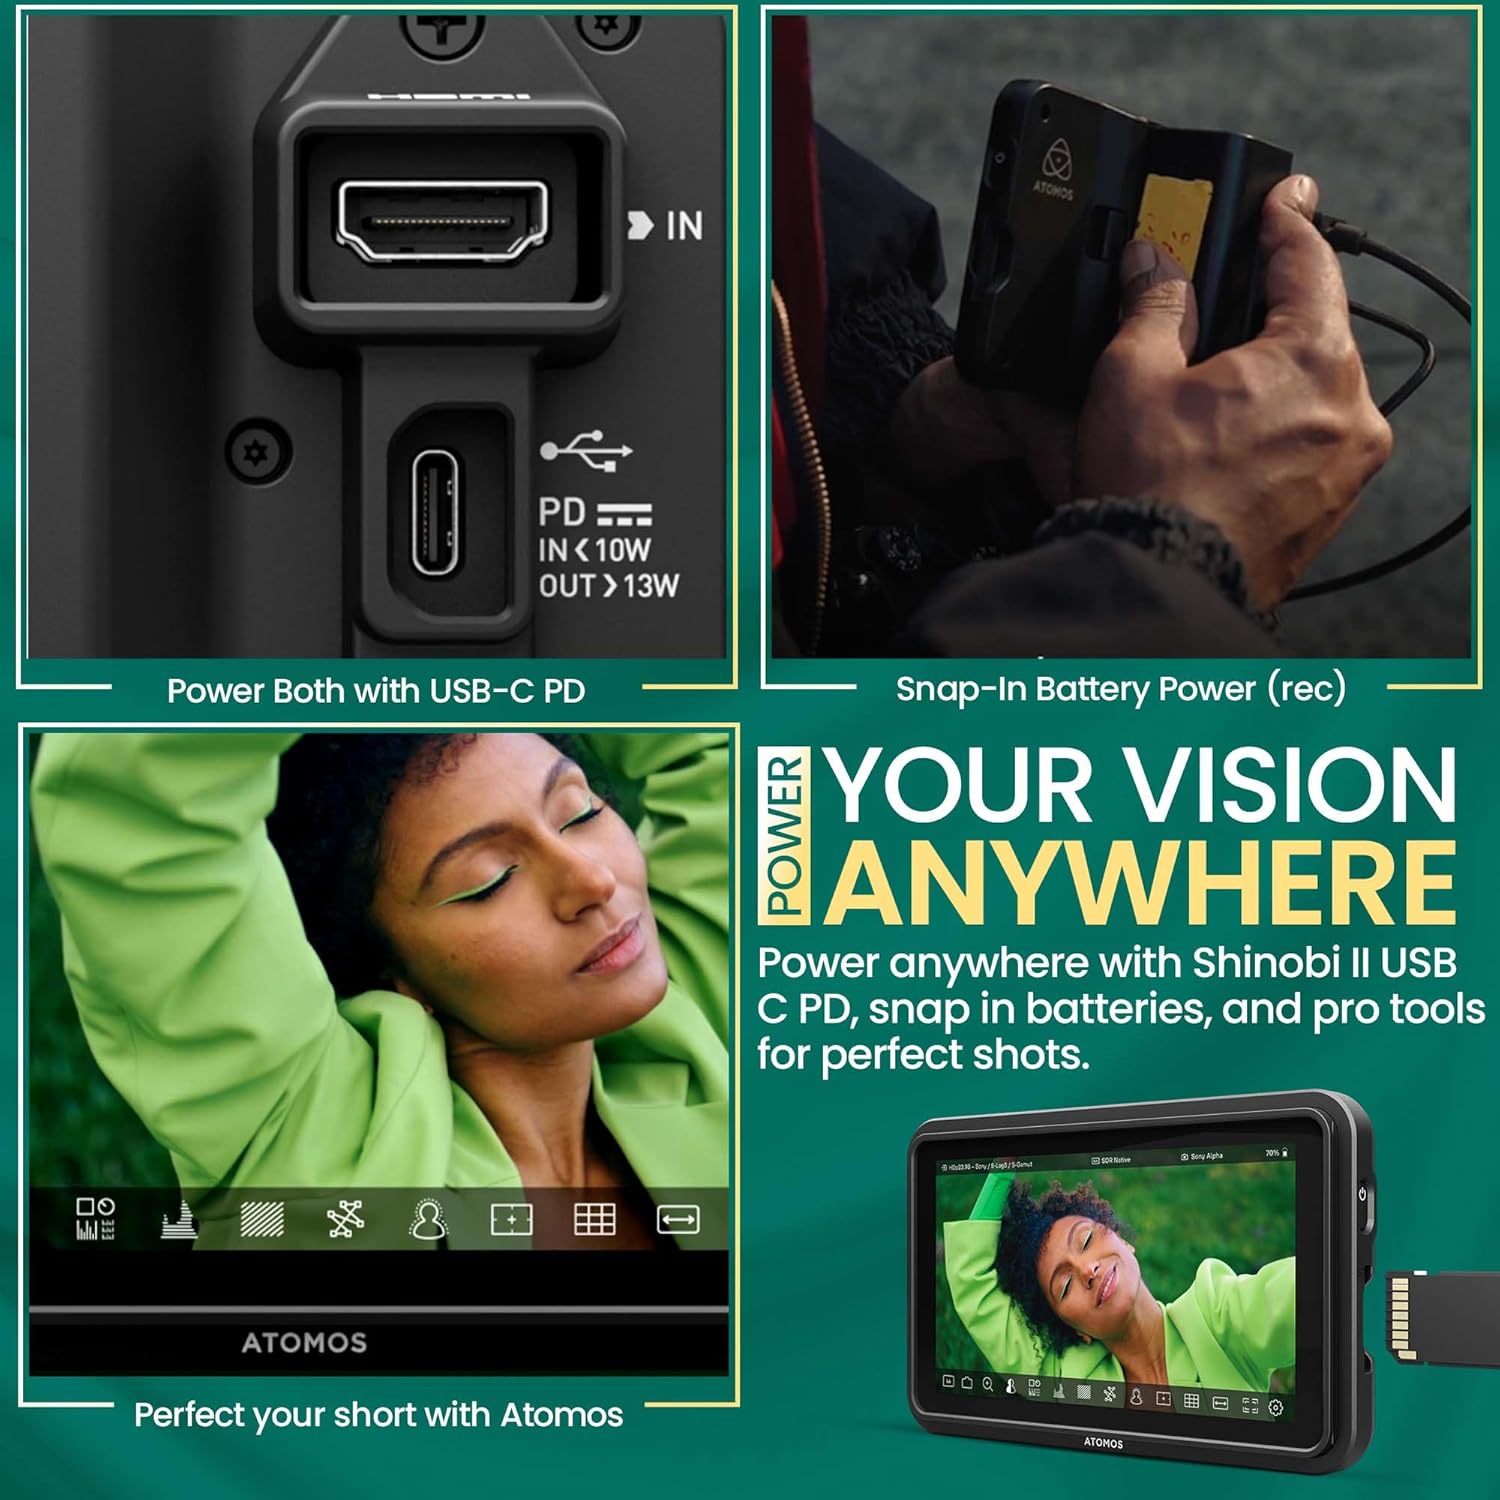
Image: A hand connecting a USB-C cable to the Shinobi II, demonstrating power options and battery use.
3.2 Connecting to Your Camera
Use an HDMI cable to connect your camera to the Shinobi II monitor.
- Connect one end of an HDMI cable to your camera's HDMI output port.
- Connect the other end of the HDMI cable to the HDMI IN port on the Shinobi II monitor.
- Ensure both devices are powered on. The monitor should automatically detect the input signal.
4. Operating the Monitor
The Shinobi II features an intuitive touchscreen interface for easy navigation and control.
4.1 Basic Controls
- Power On/Off: Press and hold the power button on the side of the monitor.
- Touchscreen Navigation: Tap, swipe, and pinch to navigate menus and adjust settings.
4.2 Monitoring Tools
The Shinobi II offers a suite of professional monitoring tools to ensure accurate exposure and focus.
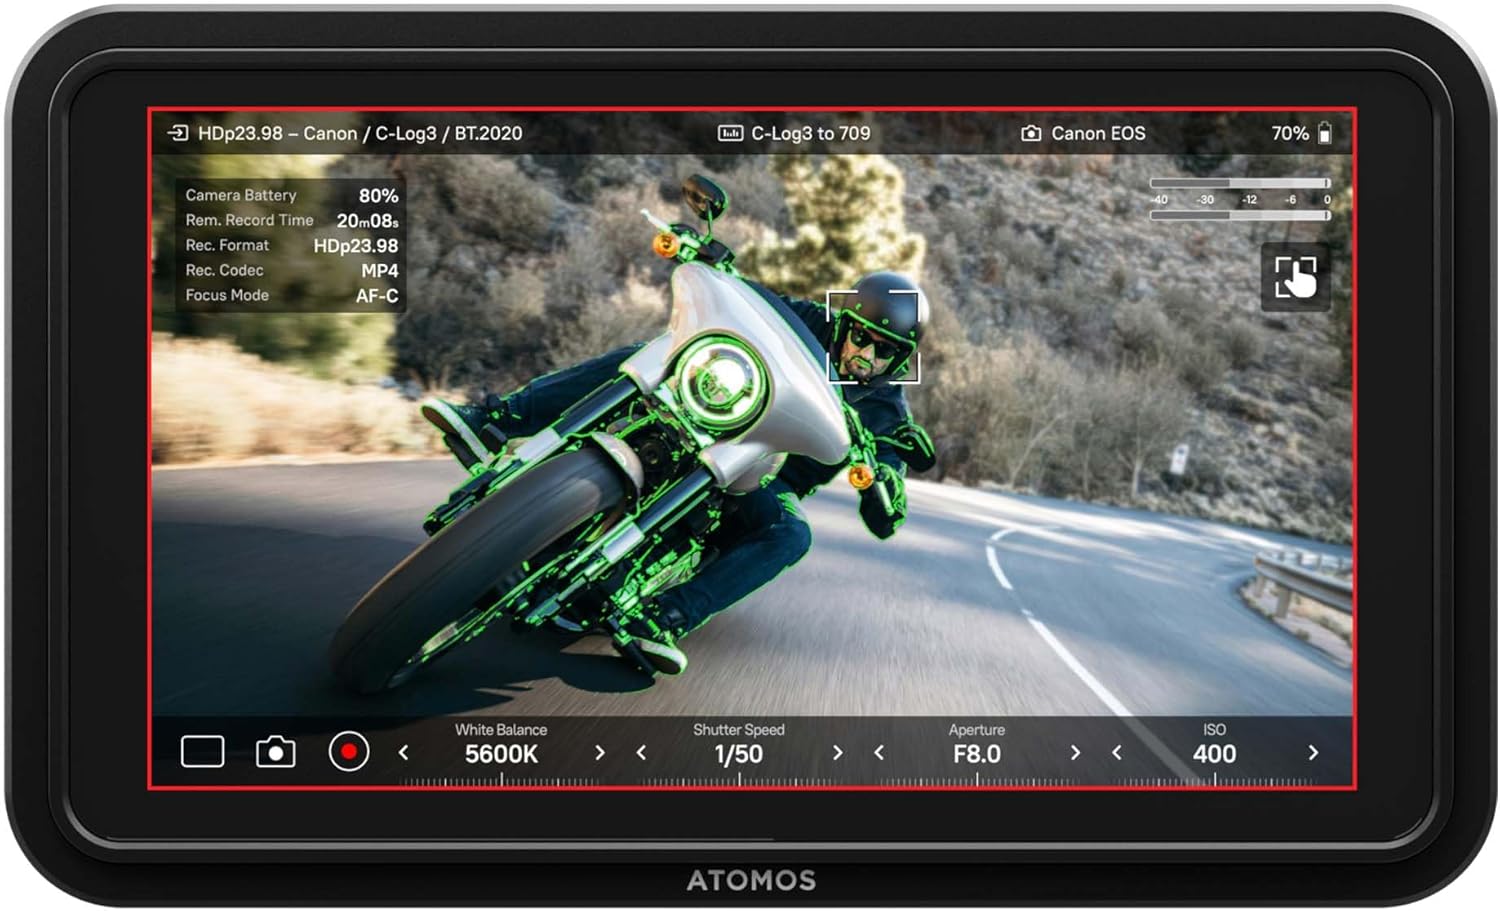
Image: The Shinobi II display showing various camera parameters like White Balance, Shutter Speed, Aperture, and ISO, along with monitoring overlays.
- Analysis Mode: Access waveform, histogram, and vectorscope tools for detailed image analysis.
- Built-in LUTs: Preview your look with up to 8 customizable LUTs. Load additional LUTs via the SD card slot.
- Frame Guides: Utilize various frame guides for precise composition for social media or cinematic productions.
- On-Screen Sliders: Adjust white balance, lens aperture, shutter speed, and ISO directly from the touchscreen.
4.3 Camera Control
The Shinobi II supports camera control for various mirrorless and DSLR cameras via USB-C and LANC, allowing for immediate and responsive access to camera settings.

Image: The Shinobi II monitor mounted on a camera, illustrating quick white balance adjustments, precise aperture, shutter, and ISO control for real-time shooting.
Video: An official product guide for the Atomos Shinobi II, demonstrating its features and functionality.
Video: A demonstration of the Atomos Shinobi II's touch focus capability.
5. Maintenance
Proper care and maintenance will extend the life of your Shinobi II monitor.
- Cleaning: Use a soft, lint-free cloth to clean the screen and body. For stubborn smudges, a screen-safe cleaning solution can be applied to the cloth (not directly to the screen).
- Storage: Store the monitor in a dry, cool place away from direct sunlight and extreme temperatures. Use a protective case during transport.
- Firmware Updates: Regularly check the Atomos website for the latest firmware updates to ensure optimal performance and access new features. Updates can typically be loaded via the SD card slot.
6. Troubleshooting
If you encounter issues with your Shinobi II, refer to the following common solutions:
- No Signal: Ensure the HDMI cable is securely connected to both the camera and the monitor. Verify that the camera's HDMI output is active and configured correctly.
- Monitor Not Powering On: Check battery charge or USB-C power connection. Ensure the power button is pressed and held for a few seconds.
- Touchscreen Unresponsive: Restart the monitor. If the issue persists, check for available firmware updates.
- Overheating: Ensure proper ventilation around the monitor. Avoid prolonged use in direct sunlight or hot environments.
- Image Ghosting/Artifacts: Verify HDMI cable quality and connection. Check camera output settings and monitor input settings for compatibility.
For persistent issues, contact Atomos customer support.
7. Specifications
| Feature | Specification |
|---|---|
| Model Number | SHINOBI2 |
| Screen Size | 5 Inches |
| Resolution | 1920 x 1080 (FHD 1080p) |
| Image Brightness | 1500 nits |
| Image Contrast Ratio | 1000:1 |
| Aspect Ratio | 16:9 |
| Input Ports | HDMI, USB-C (Power/Control), LANC |
| Output Ports | Headphone Jack |
| Power Source | NP-F Batteries, USB-C PD (12V batteries required) |
| Product Dimensions | 5.12 x 7.87 x 3.15 inches |
| Item Weight | 7.4 ounces |
8. Warranty and Support
Atomos products are designed for reliability and performance. For warranty information, product registration, and technical support, please visit the official Atomos website or contact their customer service department. Keeping your product registered ensures you receive the latest news and information about Atomos updates.
For further assistance, please visit: www.atomos.com/support


