
1. Introduction
This manual provides detailed instructions for the installation, operation, and maintenance of your LIAMOS 1000W Grid Tie Inverter with Limiter. This inverter is designed to convert direct current (DC) from solar panels or batteries into alternating current (AC) for feeding into the utility grid, featuring Maximum Power Point Tracking (MPPT) and a pure sine wave output. It includes a limiter function to prevent over-exporting power to the grid and supports WiFi for mobile app monitoring.
2. Safety Guidelines
- Read all instructions before installation and operation.
- Installation must be performed by qualified personnel in accordance with local electrical codes.
- Ensure all connections are secure and correct before applying power.
- Do not attempt to repair the inverter yourself. Contact qualified service personnel.
- Keep the inverter away from flammable materials and ensure adequate ventilation.
- The inverter operates at high voltages; exercise extreme caution.
3. Product Features
- Compatible with both battery and solar panel input.
- Integrated power acquisition meter for monitoring (one meter can connect up to 5 inverters).
- Includes a limiter sensor clamp for grid export control.
- Wide PV input voltage range for various solar panel configurations.
- WiFi connectivity for mobile application monitoring and control.
- Pure Sine Wave output for compatibility with sensitive electronics.
- Maximum Power Point Tracking (MPPT) for optimized solar energy harvesting.
4. Package Contents
Verify that all items listed below are included in your package:
- LIAMOS 1000W Grid Tie Inverter
- Power Acquisition Meter
- Limiter Sensor Clamp
- WiFi Module
- AC Power Cable
- User Manual (this document)

Image 4.1: LIAMOS 1000W Grid Tie Inverter shown with its accompanying power acquisition meter, limiter clamp, and WiFi module, illustrating the complete package contents.
5. Product Overview
5.1 Inverter Front and Side Views
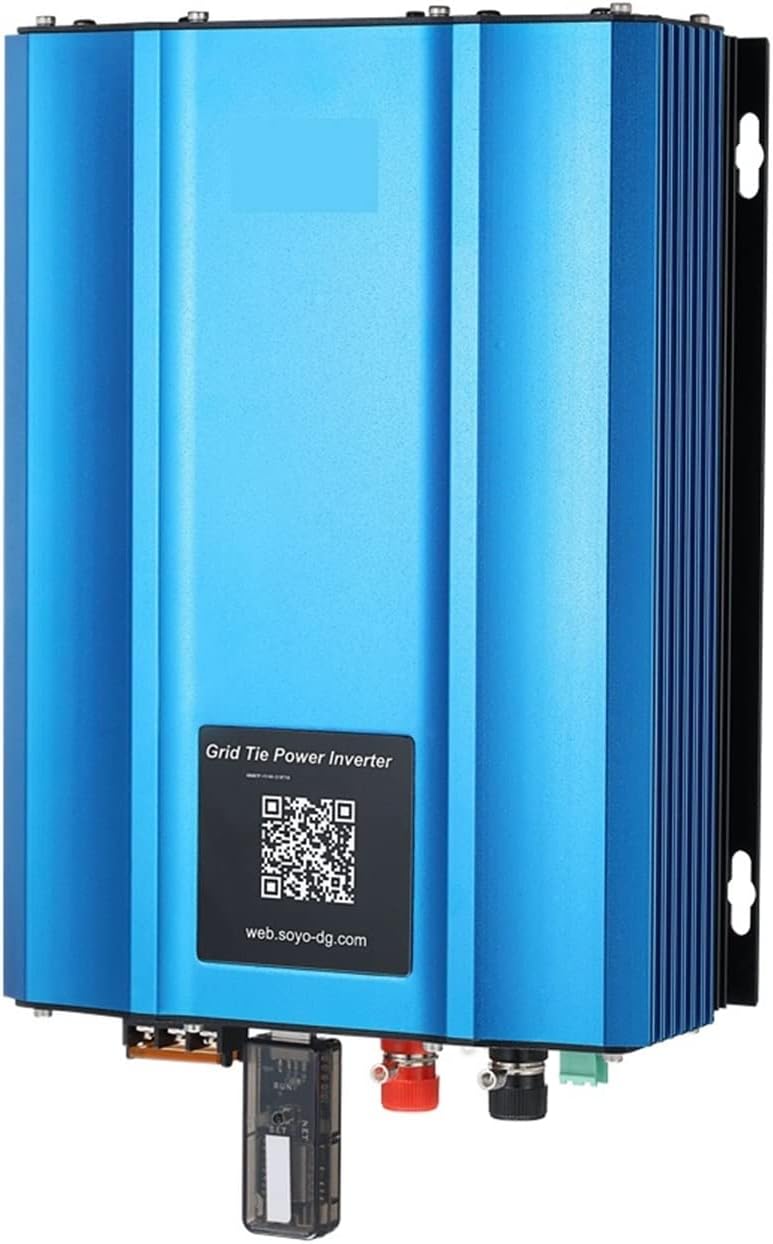
Image 5.1: Front view of the LIAMOS 1000W Grid Tie Inverter. This image displays the main blue casing, a QR code for web access, and various connection ports located at the bottom of the unit.

Image 5.2: Side view of the LIAMOS 1000W Grid Tie Inverter. This perspective emphasizes the black heatsink fins, crucial for thermal management, and the integrated mounting brackets for installation.
5.2 AC Power Meter

Image 5.3: Close-up view of the AC Power Meter. The image details its digital display for active power, various input/output terminals, and the accompanying current transformer (CT) clamp used for measuring grid current.
5.3 WiFi Module

Image 5.4: Close-up view of the USB WiFi module. This image provides a detailed look at the module's internal circuitry and its standard USB connector, used for wireless communication with the inverter.
6. Setup and Installation
6.1 Mounting the Inverter
Select a cool, dry, and well-ventilated location for mounting the inverter. Ensure the mounting surface is sturdy enough to support the inverter's weight. Use appropriate screws and anchors to secure the inverter to the wall via its mounting brackets.
6.2 Wiring Connections
Before making any connections, ensure all power sources (solar panels, batteries, and AC grid) are disconnected.
6.2.1 DC Input (Solar Panel or Battery)
- Connect the positive (+) terminal of your solar panel array or battery bank to the positive DC input terminal on the inverter.
- Connect the negative (-) terminal of your solar panel array or battery bank to the negative DC input terminal on the inverter.
- Ensure the DC input voltage falls within the specified range for your inverter model (e.g., PV 120-180V or Bat 96V for this model).
6.2.2 AC Output (Grid Connection)
- Connect the AC output cable from the inverter to your home's electrical panel or a dedicated grid connection point.
- Ensure proper grounding is established.
- Consult with a licensed electrician for grid-tie connections to ensure compliance with local regulations.
6.2.3 Limiter Sensor Clamp Connection
- Install the limiter sensor clamp around the main AC input wire from your utility meter to your electrical panel. This allows the inverter to monitor your household's power consumption.
- Connect the sensor clamp cable to the designated input port on the power acquisition meter.
6.2.4 WiFi Module Installation
- Insert the USB WiFi module into the designated USB port on the inverter.
- Follow the instructions provided with the WiFi module or refer to the mobile app guide for network configuration.
6.3 Initial Configuration
After all physical connections are made, power on the inverter. Use the mobile app or the inverter's display (if available) to configure settings such as grid voltage, frequency, and limiter thresholds according to your specific requirements and local grid standards.
7. Operating Instructions
7.1 Powering On/Off
- To Power On: Ensure all DC and AC connections are secure. Turn on the DC input switch (if present) and then the AC breaker. The inverter will perform a self-test and begin operation.
- To Power Off: First, disconnect the AC power by turning off the AC breaker. Then, disconnect the DC input by turning off the DC switch or disconnecting the solar panels/battery.
7.2 Monitoring with WiFi App
Once the WiFi module is connected and configured, download the LIAMOS monitoring app from your device's app store. Follow the in-app instructions to connect to your inverter. The app allows you to:
- View real-time power generation and consumption data.
- Monitor inverter status and performance.
- Adjust certain operational parameters (if supported by the app).
- Access historical data and reports.
7.3 Understanding Display Indicators
Refer to the inverter's built-in display (if applicable) or the mobile app for status indicators. Common indicators include:
- Power Output: Current AC power being fed to the grid.
- DC Input Voltage/Current: Readings from solar panels or battery.
- Grid Voltage/Frequency: Current utility grid parameters.
- Error Codes: Indicate specific operational issues. Consult the troubleshooting section for details.
8. Maintenance and Care
- Regular Inspection: Periodically check all wiring connections for tightness and signs of wear or damage.
- Cleaning: Keep the inverter's exterior clean and free of dust. Use a soft, dry cloth. Do not use liquid cleaners or solvents. Ensure ventilation openings are not obstructed.
- Environmental Conditions: Ensure the inverter operates within its specified temperature and humidity ranges.
- Firmware Updates: Check for available firmware updates via the mobile app or manufacturer's website to ensure optimal performance and security.
9. Troubleshooting Guide
This section addresses common issues you might encounter. For problems not listed here, contact customer support.
| Problem | Possible Cause | Solution |
|---|---|---|
| Inverter not producing power | No DC input (solar panels/battery), AC grid disconnected, inverter error. | Check DC input voltage, ensure AC grid connection is active, check inverter display for error codes. |
| Low power output | Insufficient sunlight, dirty solar panels, incorrect MPPT settings, limiter active. | Clean solar panels, verify MPPT tracking, check limiter settings via app. |
| WiFi connection issues | Incorrect network settings, weak signal, module not properly inserted. | Ensure WiFi module is securely inserted, reconfigure network settings in the app, move router closer or use a repeater. |
| Inverter displays an error code | Internal fault, over/under voltage, over temperature. | Note the error code and consult the specific error code section in the full manual (if available) or contact customer support. |
10. Technical Specifications
The following table outlines the technical specifications for the LIAMOS 1000W Grid Tie Inverter (Model GTN-1000-W).
| Parameter | Value |
|---|---|
| Model | GTN-1000-W |
| Rated AC Output Power | 1000W |
| PV Voc Voltage Range | 120V-180V |
| MPPT Tracking Range | 90V-135V |
| Battery Voltage Suitable for Connection | 96V |
| Battery Start Voltage Settable Range | 94V-120V |
| Battery Low Voltage Shutdown Range | 88V-118V |
| Maximum Input Protection Current | 15A |
| Recommended PV Module Power Range | 200W-1100W |
| AC Voltage | 120V/230V |
| AC Voltage Range | 90V-140V / 180V-260VAC |
| AC Frequency | 50HZ/60HZ |
| AC Frequency Range | 48HZ-62HZ |
| Maximum Inverter Efficiency | 91% |
| MPPT Tracking Efficiency | >99% |
| Output Power Factor | >0.98 |
| Night Standby Power Consumption | <3W |
| Output Current Total Harmonic Distortion Rate | <5% |
| Island Effect Protection | VAC;FAC |
| Package Dimensions | 1.18 x 0.79 x 0.39 inches |
| Item Weight | 9.92 pounds |
| Manufacturer Model Number | 1005003658843683 |
11. Warranty and Customer Support
11.1 Warranty Information
LIAMOS products are covered by a limited warranty against defects in materials and workmanship. Please refer to the warranty card included with your product or visit the official LIAMOS website for detailed warranty terms and conditions.
11.2 Customer Support
For technical assistance, troubleshooting, or warranty claims, please contact LIAMOS customer support. Contact information can typically be found on the product packaging, the official LIAMOS website, or through your point of purchase.