1. Important Safety Instructions
Please read all safety instructions carefully before using this projector. Keep this manual for future reference.
- Power Source: Use only the specified power adapter. Ensure the voltage matches the projector's requirements.
- Ventilation: Do not block ventilation openings. Ensure adequate airflow around the projector to prevent overheating.
- Water and Moisture: Do not expose the projector to rain, moisture, or any liquids.
- Cleaning: Unplug the projector before cleaning. Use a soft, dry cloth. Do not use liquid or aerosol cleaners.
- Heat: Keep the projector away from heat sources such as radiators, heat registers, stoves, or other apparatus that produce heat.
- Servicing: Do not attempt to service this product yourself. Refer all servicing to qualified service personnel.
- Eye Protection: Do not look directly into the projector lens when the lamp is on.
2. Package Contents
Verify that all items are present in your package:
- Optex Compact WiFi Projector
- Remote Control
- Power Adapter
- User Manual (this document)
3. Product Overview
3.1 Front and Top View
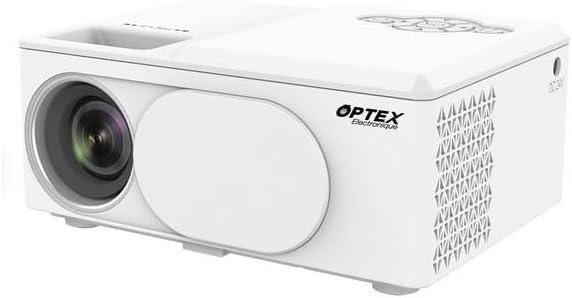
This image displays the Optex Compact WiFi Projector from a three-quarter front and top perspective. Visible components include the projection lens on the front left, a protective lens cover, and the main body of the projector. The top surface shows a recessed area for focus adjustment and a control panel with navigation buttons.
3.2 Control Panel and Ports

This image highlights two key areas of the projector. On the left, a close-up of the top control panel shows a circular array of navigation buttons (up, down, left, right, OK), power button, and return button, allowing for direct interaction with the projector's menu. On the right, a close-up of the side panel reveals the various input/output ports: DC 21V power input, IR receiver, two USB ports, an HDMI port, and a Type-C port, enabling diverse connectivity options.
4. Setup Guide
4.1 Placement
- Place the projector on a stable, flat surface.
- Ensure the projector is positioned at an appropriate distance from the projection surface (wall or screen) to achieve the desired image size.
- For optimal image quality, project in a dark environment.
4.2 Power Connection
- Connect the power adapter to the 'DC 21V' port on the side of the projector.
- Plug the other end of the power adapter into a wall outlet.
- The power indicator light on the projector will illuminate.
5. Operating Instructions
5.1 Power On/Off
- Power On: Press the power button on the projector or the remote control.
- Power Off: Press the power button again. Confirm shutdown if prompted.
5.2 Focus Adjustment
- Rotate the focus ring located near the lens until the projected image appears clear and sharp.
5.3 Input Source Selection
- Press the 'Source' button on the remote control or navigate through the projector's menu to select the desired input source (e.g., HDMI, USB, WiFi).
- HDMI: Connect an HDMI cable from your device (laptop, game console) to the projector's HDMI port.
- USB: Insert a USB drive into a USB port to play media files.
5.4 WiFi Connection and Screen Mirroring
- Navigate to the 'Settings' or 'WiFi' menu on the projector.
- Select your WiFi network and enter the password.
- Once connected, select the 'Screen Mirroring' or 'Wireless Display' option.
- On your smartphone or tablet, enable screen mirroring (e.g., Miracast, AirPlay, Smart View) and select the projector from the list of available devices.
6. Maintenance
6.1 Cleaning the Lens
- Use a soft, lint-free cloth specifically designed for optical lenses.
- Gently wipe the lens to remove dust or smudges. Do not use abrasive cleaners.
6.2 Cleaning the Projector Body
- Wipe the exterior of the projector with a soft, dry cloth.
- Do not use harsh chemicals or solvents.
6.3 Storage
- When not in use, store the projector in a cool, dry place.
- Cover the lens with its protective cap to prevent dust accumulation.
7. Troubleshooting
If you encounter issues, refer to the following common problems and solutions:
- No Power: Ensure the power adapter is securely connected to both the projector and the power outlet. Try a different outlet.
- No Image: Check the input source selection. Ensure the connected device is powered on and sending a signal. Verify all cables are securely connected.
- Blurry Image: Adjust the focus ring on the projector lens. Ensure the projection surface is flat and the projector is at an optimal distance.
- No Sound: Check the volume settings on both the projector and the connected source device. Ensure external speakers are properly connected if used.
- Remote Control Not Working: Check the batteries in the remote control. Ensure there are no obstructions between the remote and the projector's IR receiver.
8. Technical Specifications
| Feature | Specification |
|---|---|
| Brand | Optex |
| Display Technology | LED |
| Native Resolution | 800 x 400 |
| Maximum Display Resolution | 1920 x 1080 (Full HD) |
| Brightness | 2100 Lumens |
| Connectivity Technology | HDMI, USB, WiFi |
| Hardware Interface | HDMI, USB, Type-C |
| Controller Type | Remote Control |
| Power Consumption | 43 Watts |
| Form Factor | Portable |
| Mounting Type | Table Mount |
9. Warranty and Customer Support
This product comes with a standard manufacturer's warranty. For specific warranty terms and conditions, please refer to the documentation provided with your purchase or contact your retailer.
For technical support or customer service inquiries, please contact the Optex customer support team through their official website or the contact information provided in your purchase documentation.


