Introduction
Thank you for choosing the iTOMA 515 Alarm Clock. This device combines an alarm clock with an FM radio, a dimmable LED display, and dual alarm functionality, designed for convenience and reliability. This manual provides detailed instructions for setup, operation, and maintenance to ensure optimal performance.
Package Contents
- 1 x iTOMA 515 Alarm Clock
- 1 x User Manual
Note: A power adapter is not included and must be purchased separately.
Product Overview
Familiarize yourself with the main components and controls of your iTOMA 515 Alarm Clock.
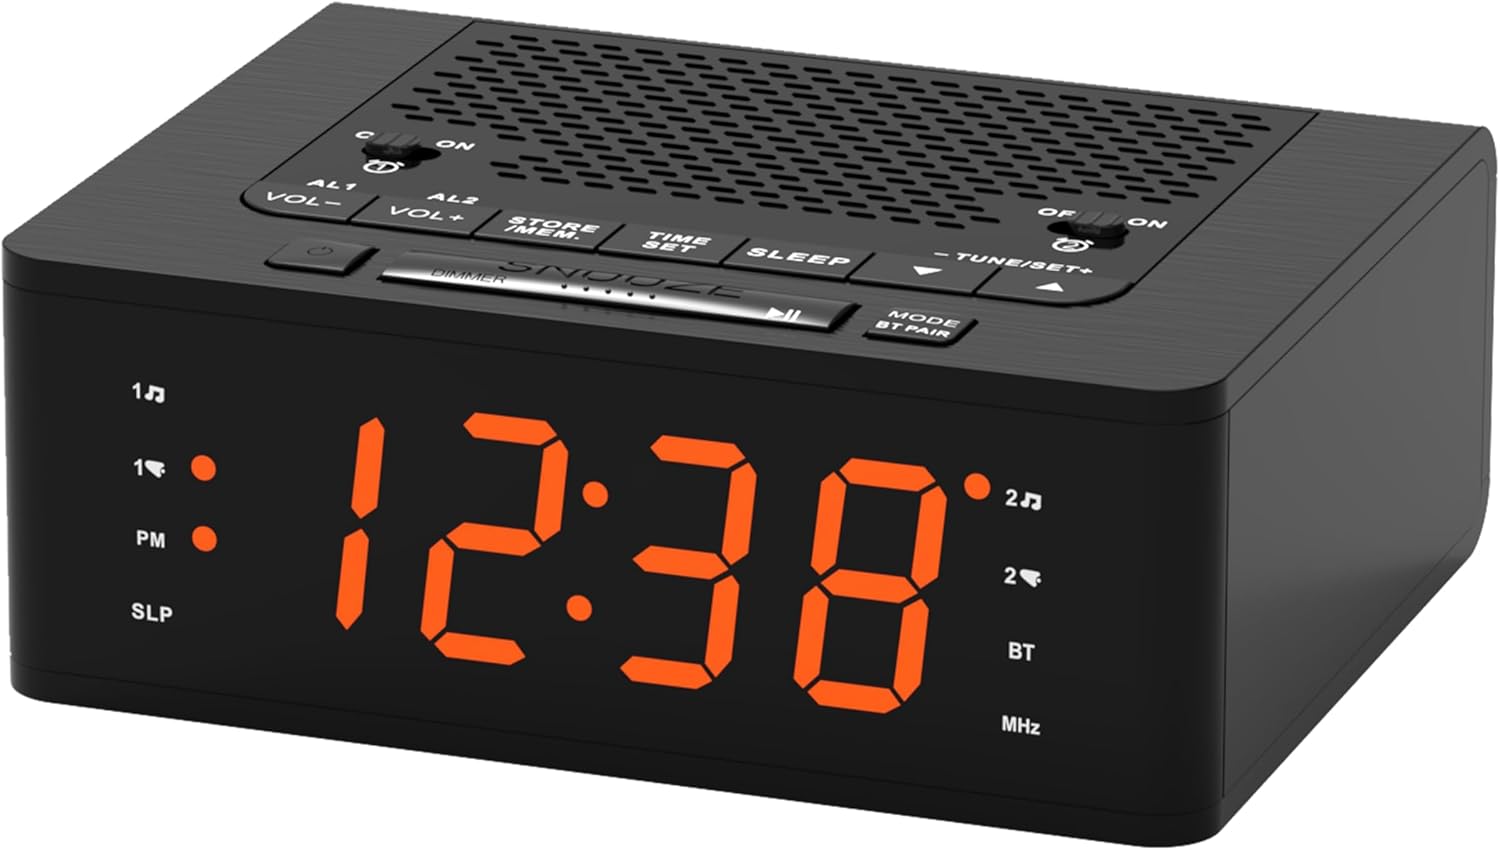
Image: Front view of the iTOMA 515 Alarm Clock, showcasing the orange LED display and top-mounted control buttons.

Image: Top view of the alarm clock, highlighting the various control buttons for volume, alarm settings, time, sleep, and tuning.
Control Buttons:
- AL1 / AL2: Alarm 1 / Alarm 2 setting buttons.
- VOL+ / VOL-: Adjusts volume.
- STORE / MEM: Saves and recalls FM radio presets.
- TIME SET: Enters time setting mode.
- SLEEP: Activates sleep timer for FM radio.
- TUNE+ / TUNE-: Adjusts FM radio frequency.
- SNOOZE / DIMMER: Snoozes alarm; adjusts display brightness.
- MODE / BT PAIR: Switches between modes (FM, Bluetooth); initiates Bluetooth pairing.
- ON / OFF (for AL1/AL2): Toggles alarms on or off.
Setup
1. Power Connection
- Connect a compatible DC 5V power adapter (not included) to the DC IN port on the back of the alarm clock.
- Plug the adapter into a standard wall outlet. The display will light up.

Image: Side view of the iTOMA 515 Alarm Clock with dimensions indicated, and a clear note stating "ADAPTER NOT INCLUDED".
2. Initial Time Setting
- Press and hold the TIME SET button until the hour digits begin to flash.
- Use the TUNE+ or TUNE- buttons to adjust the hour. Pay attention to the PM indicator if using 12-hour format.
- Press TIME SET again to confirm the hour and move to minute adjustment.
- Use the TUNE+ or TUNE- buttons to adjust the minutes.
- Press TIME SET once more to confirm the minutes and exit time setting mode.
3. 12/24 Hour Format Selection
While the time is flashing during setup, press the MODE button to toggle between 12-hour and 24-hour display formats.
Operating Instructions
1. Display Brightness Control (Dimmer)
The iTOMA 515 features a 4-level dimmable LED display.
- Press the SNOOZE / DIMMER button repeatedly to cycle through the brightness levels: Level 3 (brightest), Level 2, Level 1, and OFF.
- Select the brightness level that suits your preference for optimal visibility without disturbance.

Image: The alarm clock display transitioning through four brightness levels (L3, L2, L1, OFF) to illustrate the dimmer function.
2. Setting Alarms (AL1 & AL2)
The clock supports two independent alarms. You can set the alarm time, sound source (buzzer or FM radio), and alarm week mode.
- Press and hold either the AL1 or AL2 button until the alarm hour digits flash.
- Use the TUNE+ or TUNE- buttons to adjust the alarm hour.
- Press the corresponding AL1 or AL2 button again to confirm the hour and move to minute adjustment.
- Use the TUNE+ or TUNE- buttons to adjust the alarm minutes.
- Press the AL1 or AL2 button again to select the alarm sound source: Buzzer or FM Radio.
- Press the AL1 or AL2 button again to select the alarm week mode: d1-7 (every day), d1-5 (weekdays only), or d6-7 (weekends only).
- Press the AL1 or AL2 button one last time to save the settings and exit.

Image: The alarm clock display with indicators for two separate alarms, showing AM 7:00 (Wake Up Time) and PM 7:00 (Coffee Time) as examples.
3. Turning Alarms ON/OFF
To activate or deactivate an alarm, use the dedicated ON/OFF buttons located on the top panel for AL1 and AL2.
4. Snooze Function
When an alarm sounds, press the large SNOOZE button on the top of the clock to temporarily silence the alarm for an additional 9 minutes of sleep. The alarm will sound again after this period.

Image: A hand reaching to press the large SNOOZE button on the top of the alarm clock, indicating its function for an extra 9 minutes of sleep.
5. FM Radio Operation
The iTOMA 515 features an FM radio with 20 preset stations and adjustable volume.
- Press the MODE button to switch to FM radio mode. The frequency will appear on the display.
- Automatic Scan: Press and hold the TUNE+ or TUNE- button to automatically scan for the next available station.
- Manual Tune: Briefly press the TUNE+ or TUNE- button to manually adjust the frequency in small increments.
- Adjust Volume: Use the VOL+ or VOL- buttons to adjust the radio volume (16 levels).
- Save Presets: To save a station, tune to your desired frequency, then press and hold the STORE / MEM button until a preset number flashes. Use TUNE+ or TUNE- to select the preset number (P01-P20), then press STORE / MEM again to save.
- Recall Presets: In FM mode, briefly press the STORE / MEM button to cycle through your saved preset stations.

Image: The alarm clock displaying an FM radio frequency (87.5 MHz), with icons indicating sleep timer, presets, and volume levels.
6. FM Radio Sleep Timer
The sleep timer allows you to fall asleep to the radio, which will automatically turn off after a set duration.
- While the FM radio is playing, press the SLEEP button repeatedly to cycle through the sleep timer options (e.g., 90, 80, 70... 10 minutes, OFF).
- The radio will play for the selected duration and then automatically turn off.
7. Bluetooth Pairing
The iTOMA 515 supports Bluetooth connectivity for audio streaming.
- Press the MODE / BT PAIR button to switch to Bluetooth mode. The display will show "BT" and flash, indicating it's in pairing mode.
- On your mobile device, enable Bluetooth and search for available devices.
- Select "iTOMA 515" from the list of devices to pair.
- Once paired, the "BT" indicator on the clock will stop flashing and remain solid. You can now stream audio from your device to the alarm clock.

Image: The iTOMA 515 Alarm Clock positioned next to a smartphone, illustrating its capability to play music via Bluetooth connection.
Maintenance
To ensure the longevity and proper functioning of your iTOMA 515 Alarm Clock, follow these simple maintenance guidelines:
- Cleaning: Use a soft, dry cloth to wipe the exterior of the clock. Avoid using abrasive cleaners, waxes, or solvents as they may damage the finish.
- Placement: Place the clock on a stable, flat surface away from direct sunlight, heat sources, and excessive moisture.
- Ventilation: Ensure the ventilation openings on the top and sides of the unit are not blocked to prevent overheating.
- Power Disconnection: If the clock will not be used for an extended period, unplug it from the power outlet.
Troubleshooting
If you encounter issues with your iTOMA 515 Alarm Clock, refer to the following common problems and solutions:
| Problem | Possible Cause | Solution |
|---|---|---|
| Clock display is off or not working. | No power connection or faulty adapter. | Ensure the power adapter is securely plugged into the clock and a working wall outlet. Verify the adapter is functional. |
| Cannot set time or alarm. | Incorrect button sequence or not in setting mode. | Press and hold the TIME SET or respective ALARM button until digits flash. Follow the instructions carefully. |
| FM radio reception is poor. | Weak signal or interference. | Adjust the position of the clock. Extend the FM antenna fully if available (not explicitly mentioned but common for radios). Try scanning for stations again. |
| Alarm does not sound. | Alarm is off or volume is too low. | Ensure the alarm's ON/OFF button is set to ON. Check the alarm volume setting. |
| Cannot switch off military time (24-hour format). | Incorrect setting during time adjustment. | During time setting (when hour digits flash), press the MODE button to toggle between 12-hour and 24-hour formats. |
| Bluetooth device cannot pair. | Clock not in pairing mode or device too far. | Ensure the clock is in Bluetooth pairing mode (BT flashing). Move your device closer to the clock. Try restarting both devices. |
Specifications
- Brand: iTOMA
- Model: 515
- Display Type: LED (Orange)
- Display Brightness: 4 levels (L3, L2, L1, OFF)
- Power Source: Mains powered (DC 5V adapter, not included)
- Product Dimensions: 15 cm (L) x 11.5 cm (W) x 5.8 cm (H) / 5.91 in (L) x 4.53 in (W) x 2.39 in (H)
- Item Weight: 420 g
- FM Radio Frequency: 87.5 - 108 MHz
- FM Presets: Up to 20 stations
- Radio Volume: 16 adjustable levels
- Sleep Timer: 10-90 minutes
- Alarm Types: Buzzer, FM Radio
- Alarm Week Modes: Every day (d1-7), Weekdays (d1-5), Weekends (d6-7)
- Connectivity: Bluetooth
Warranty Information
iTOMA products are manufactured to high-quality standards. For specific warranty details, please refer to the warranty card included with your purchase or contact iTOMA customer support. Keep your purchase receipt as proof of purchase for any warranty claims.
Support
For further assistance, technical support, or inquiries regarding your iTOMA 515 Alarm Clock, please visit the official iTOMA website or contact their customer service department. Contact information can typically be found on the product packaging or the brand's official online presence.


