1. Introduction
This manual provides detailed instructions for the installation, setup, operation, and maintenance of your SALCAR T5W Smart Wi-Fi Heating Thermostat. This device is designed to offer precise temperature control, energy efficiency, and smart home integration for your heating system. Please read this manual thoroughly before installation and use to ensure proper functionality and safety.

Image 1.1: SALCAR T5W Smart Wi-Fi Thermostat with its accompanying smartphone application interface.
2. Package Contents
Verify that all items listed below are included in your package:
- 1 x SALCAR T5W Smart Wi-Fi Thermostat
- 1 x User Manual
- 2 x Mounting Screws
- 2 x AA 1.5V Alkaline Batteries

Image 2.1: Contents of the SALCAR T5W Thermostat package.
3. Product Features
The SALCAR T5W Thermostat offers a range of features designed for comfort and energy efficiency:
- Wi-Fi Connectivity: Remote control and monitoring via the Tuya Smart Life app.
- Voice Control: Compatible with Amazon Alexa and Google Assistant for hands-free operation.
- Programmable Schedules: Customize heating schedules with 5+2, 6+1, or 7-day options, allowing up to 6 heating events per day.
- Child Lock: Prevents unauthorized changes to settings.
- Anti-frost Protection: Automatically activates heating to prevent pipes from freezing.
- Power-off Memory: Retains settings in case of power interruption.
- Built-in Humidity Sensor: Displays current room humidity.
- LCD Display: Clear digital display for temperature, time, and mode.
- Open Window Detection: (Feature may vary by firmware) Automatically adjusts heating when an open window is detected.

Image 3.1: Overview of the SALCAR T5W Smart Thermostat's key features.
4. Installation
4.1. Wiring
Important: Electrical installation should be performed by a qualified professional to ensure safety and compliance with local regulations. Always turn off the main power supply before beginning any wiring work.
The SALCAR T5W thermostat supports two main wiring configurations:
- For Valve Actuator (NC Electrothermal Actuator): Connect the Neutral (N) and Live (L) wires from your power supply to the corresponding terminals on the thermostat. Connect the actuator to the N and NO (Normally Open) terminals.
- For Water/Gas Boiler (Dry Contact Control): Connect the N and L wires from your power supply to the thermostat. Connect the boiler's control wires to the N and COM (Common) terminals.

Image 4.1: Wiring diagrams for connecting the thermostat to a valve actuator or a boiler.
4.2. Battery Installation
The thermostat is powered by two AA 1.5V alkaline batteries.
- Gently pull the front cover of the thermostat upwards and outwards to detach it from the backplate.
- Insert the two AA 1.5V alkaline batteries into the battery compartment, ensuring correct polarity (+/-).
- Align the front cover with the backplate and push it back into place until it clicks securely.

Image 4.2: Step-by-step guide for battery installation.
5. Initial Setup and Wi-Fi Connection
To utilize the smart features of your SALCAR T5W thermostat, connect it to your home Wi-Fi network via the Tuya Smart Life app.
- Download the App: Search for "Tuya Smart" or "Smart Life" in your smartphone's app store (iOS or Android) and install it.
- Register/Log In: Open the app and create a new account or log in with an existing one.
- Activate Wi-Fi Pairing Mode: Ensure the thermostat is powered OFF. Press and hold the 'OFF' button on the thermostat for approximately 3 seconds until the Wi-Fi icon on the display starts blinking rapidly. This indicates it is in pairing mode.
- Add Device in App: In the Tuya Smart Life app, tap the '+' icon (usually in the top right corner) to add a new device. Select 'Add Device' and then choose 'Small Home Appliances' > 'Thermostat (Wi-Fi)'.
- Connect to 2.4GHz Wi-Fi: Confirm your smartphone is connected to a 2.4GHz Wi-Fi network. Enter your Wi-Fi password in the app and proceed. The app will search for and connect to the thermostat.
- Completion: Once connected, the Wi-Fi icon on the thermostat display will become solid. You can then rename your device in the app and begin controlling it remotely.

Image 5.1: Visual guide for Wi-Fi connection using the Tuya Smart Life app.
6. Operating the Thermostat
6.1. Thermostat Display and Buttons
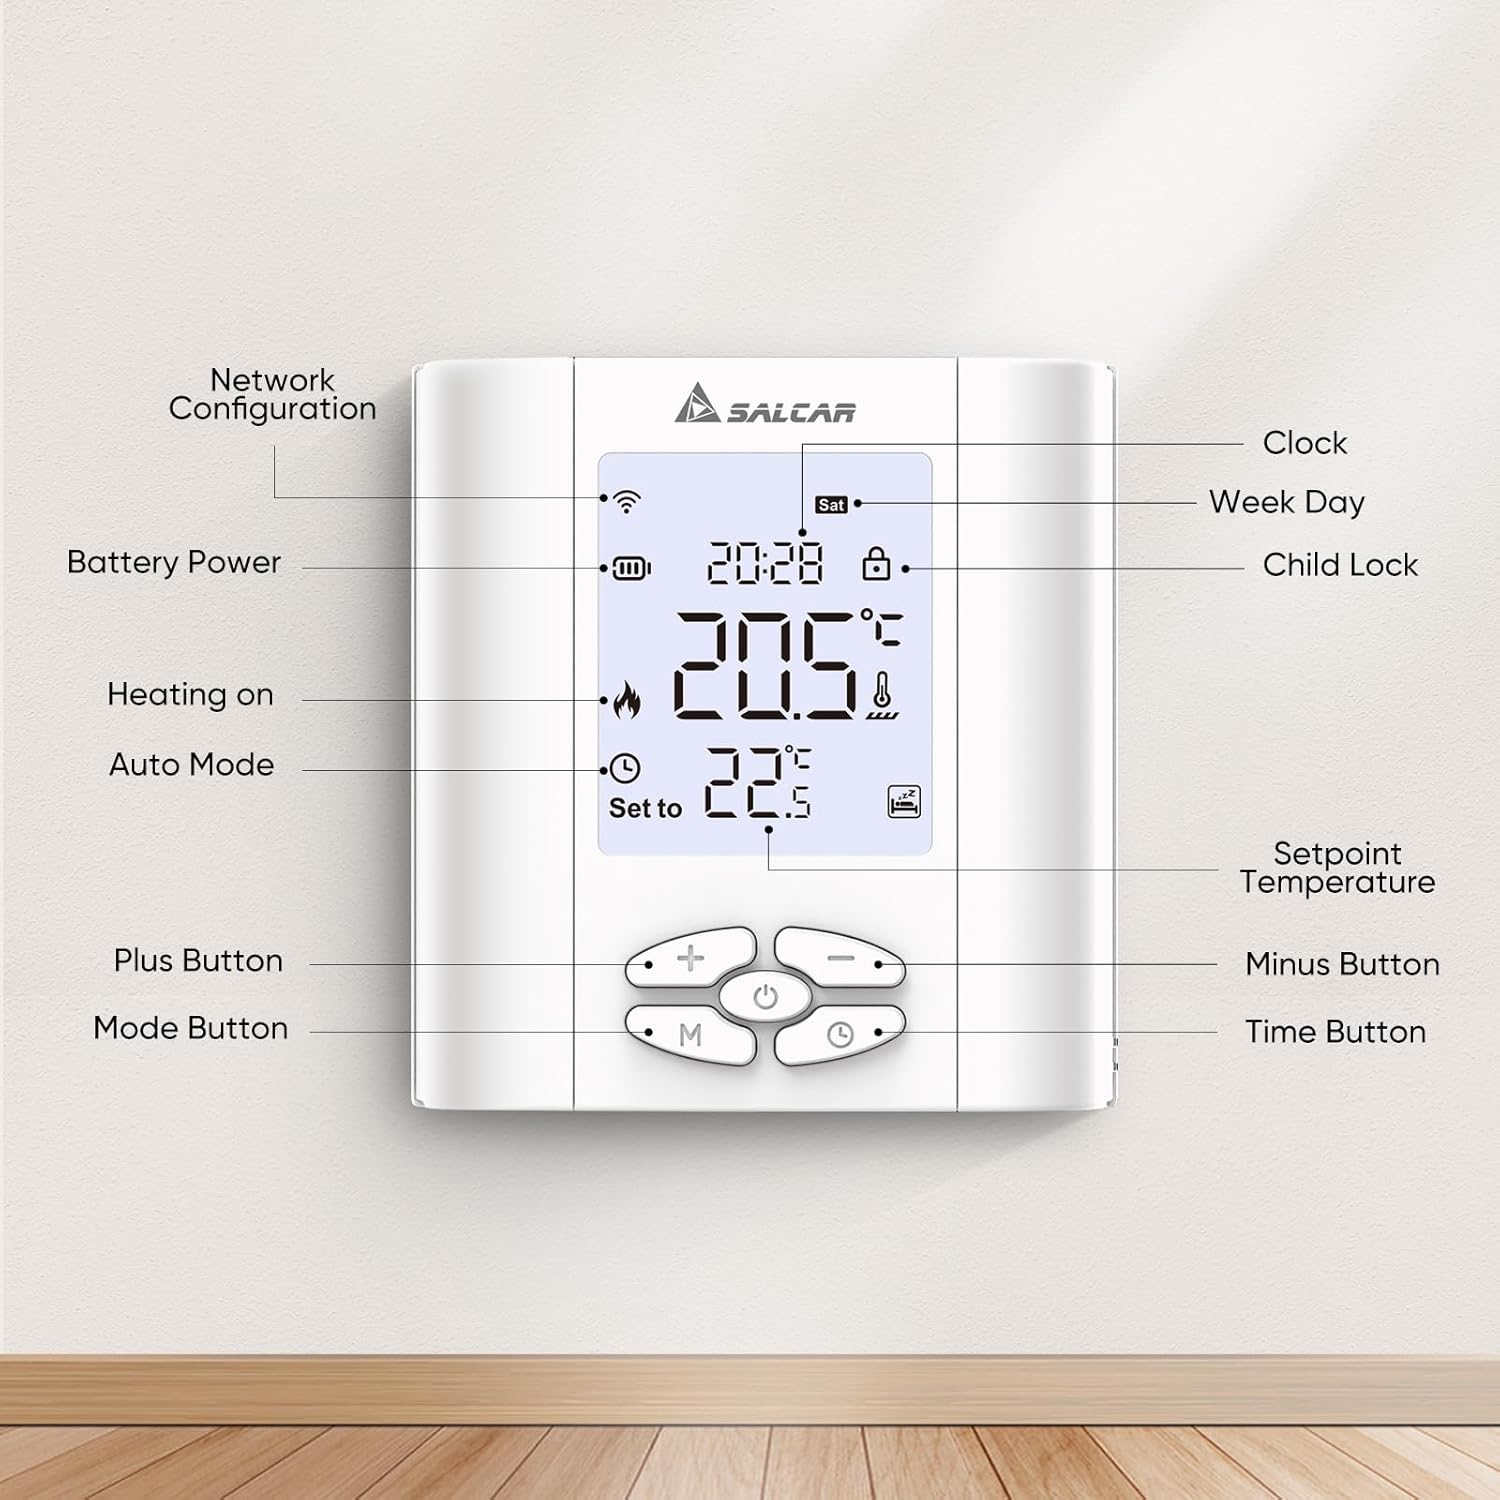
Image 6.1: Labeled components of the SALCAR T5W Thermostat display and control buttons.
| Element | Description |
|---|---|
| Network Configuration Icon | Indicates Wi-Fi connection status. |
| Battery Power Icon | Shows current battery level. |
| Heating On Icon | Indicates when the heating system is active. |
| Auto Mode Icon | Indicates the thermostat is operating in automatic programmed mode. |
| Plus Button (+) | Increases temperature setpoint or adjusts settings. |
| Mode Button (M) | Switches between manual and automatic modes, or enters programming. |
| Clock Display | Shows current time. |
| Week Day Display | Shows current day of the week. |
| Child Lock Icon | Indicates if child lock is active. |
| Setpoint Temperature | The desired temperature setting. |
| Minus Button (-) | Decreases temperature setpoint or adjusts settings. |
| Time Button | Used for setting time and programming schedules. |
6.2. Modes of Operation
- Manual Mode: The thermostat maintains a constant temperature set by the user until manually changed.
- Automatic (Programmed) Mode: The thermostat follows a pre-set heating schedule based on time and day.
6.3. Programming Heating Schedules
The thermostat supports 5+2 (weekday/weekend), 6+1 (Mon-Sat/Sun), and 7-day (individual day) programming. You can set up to 6 heating events per day.
- Press the 'M' (Mode) button to enter programming mode.
- Use the '+' and '-' buttons to select the desired programming type (5+2, 6+1, or 7 days).
- Press the 'Time' button to confirm and move to setting the first event's time and temperature.
- Use '+' and '-' to adjust the time, then 'Time' to confirm.
- Use '+' and '-' to adjust the temperature for that event, then 'Time' to confirm.
- Repeat for all 6 events for the selected day(s).
- Exit programming mode by pressing 'M' or waiting for the thermostat to automatically exit.

Image 6.2: Example of setting programmable heating schedules via the app.
6.4. Child Lock
To activate or deactivate the child lock, press and hold the '+' and '-' buttons simultaneously for a few seconds until the child lock icon appears or disappears on the display.
6.5. Anti-frost Protection
The anti-frost function helps prevent your heating system from freezing by automatically activating heating if the room temperature drops below a set threshold (e.g., 5°C). This feature is active by default and can usually be configured in advanced settings via the app.

Image 6.3: Illustration of the anti-frost protection feature.
7. Voice Control Integration
The SALCAR T5W thermostat is compatible with Amazon Alexa and Google Assistant, allowing you to control your heating with voice commands.
- Link Accounts: In the Alexa or Google Home app, enable the "Tuya Smart" or "Smart Life" skill/service. Follow the on-screen instructions to link your Tuya Smart Life account.
- Discover Devices: Once linked, ask your voice assistant to "Discover devices" or manually initiate device discovery in the app.
- Voice Commands: You can now use commands such as:
- "Alexa, set [Thermostat Name] to 22 degrees."
- "Hey Google, what is the temperature in [Room Name]?"
- "Alexa, turn on [Thermostat Name]."

Image 7.1: Demonstrating voice control with Amazon Alexa and Google Assistant.
8. Maintenance
8.1. Battery Replacement
When the battery icon on the display indicates low power, replace the two AA 1.5V alkaline batteries. Follow the steps outlined in Section 4.2 for battery installation. It is recommended to replace both batteries at the same time.
9. Troubleshooting
If you encounter issues with your SALCAR T5W thermostat, refer to the following common problems and solutions:
| Problem | Possible Cause | Solution |
|---|---|---|
| Thermostat not powering on | Dead or incorrectly installed batteries. | Replace batteries, ensuring correct polarity. |
| Wi-Fi icon not blinking during pairing | Not in pairing mode. | Ensure thermostat is OFF, then press and hold the 'OFF' button for 3 seconds. |
| Cannot connect to Wi-Fi | Incorrect Wi-Fi password, 5GHz network, or too far from router. | Verify password, ensure 2.4GHz network, move thermostat closer to router. |
| Heating not turning on/off | Incorrect wiring, thermostat in wrong mode, or setpoint not met. | Check wiring (consult professional), switch to manual mode, adjust setpoint, or check program. |
| Inaccurate temperature reading | Thermostat placed near heat source/draft, or needs calibration. | Relocate thermostat, check app for calibration options. |
10. Specifications
| Attribute | Detail |
|---|---|
| Brand | SALCAR |
| Model | T5W |
| Dimensions | 8.6 x 2.08 x 9 cm |
| Weight | 200 grams |
| Material | Plastic |
| Voltage | 15 Volt (for internal operation, external power supply for heating control) |
| Special Features | Humidity sensor |
| Controller Type | Tuya Smart Life App |
| Specific Product Uses | Boiler control |
11. Warranty and Support
For warranty information, technical support, or service inquiries, please contact SALCAR customer support. Refer to the product packaging or the official SALCAR website for the most current contact details.
Manufacturer Contact Information:
- Company: Salcar GmbH
- Address: An der Hebemärchte 6, 04316 Leipzig, Germany
- Email: info@salcar.de
- Phone: 0341 25257850

Image 11.1: Manufacturer contact details as found on the product packaging.


