1. Introduction
This manual provides detailed instructions for the safe and proper installation, operation, and maintenance of your IWORKBOARD Low Profile Tilting TV Wall Mount. Please read all instructions carefully before beginning installation to ensure a secure and optimal viewing experience. Keep this manual for future reference.
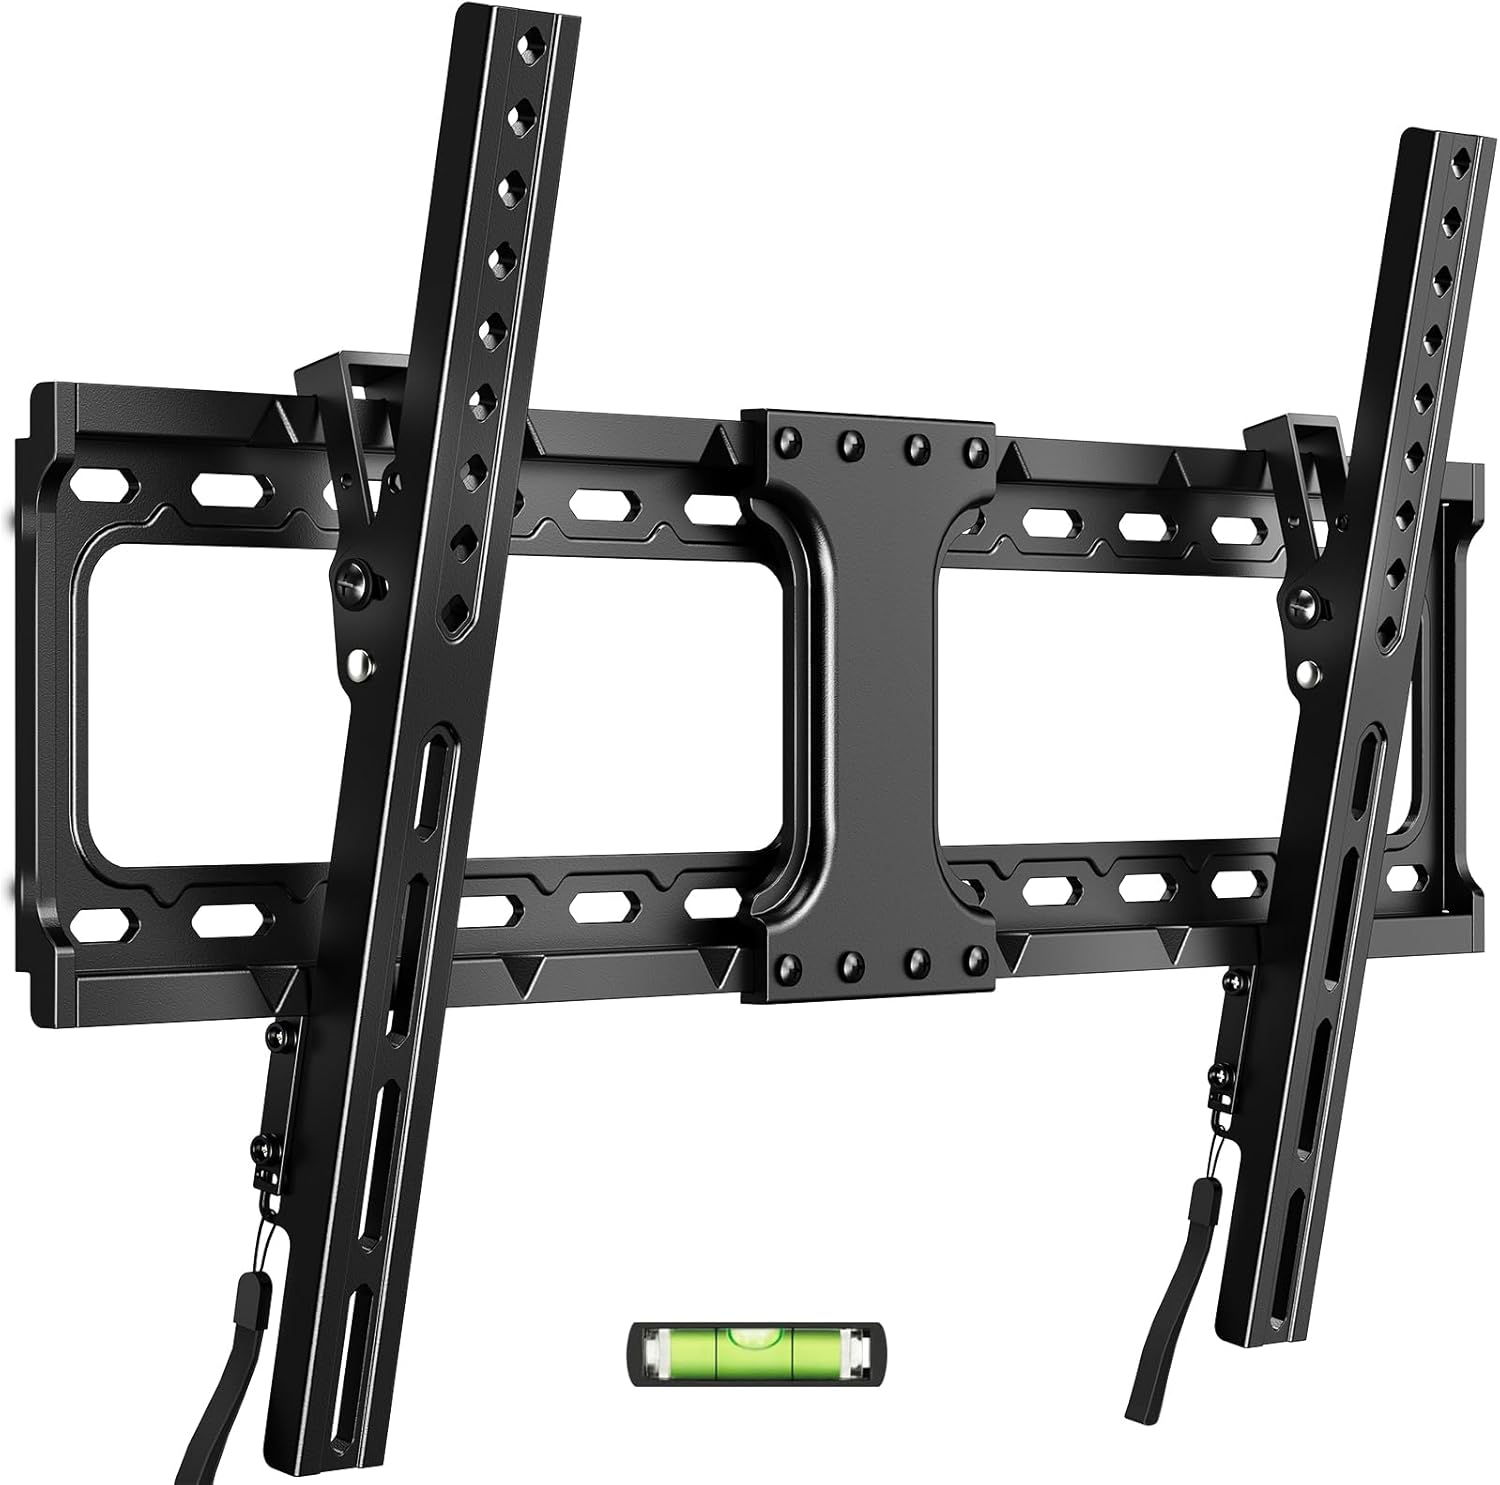
Image 1.1: The IWORKBOARD Tilting TV Wall Mount, including the wall plate, TV brackets, and a small bubble level for installation.
2. Safety Information
WARNING: Failure to read and follow these instructions can result in serious personal injury, property damage, or voiding of your warranty.
- This TV wall mount is UL-certified, ensuring it meets specific safety and performance standards.
- The mount is designed to support televisions weighing up to 132 lbs (60 kg). Do not exceed this weight limit.
- Ensure your TV's VESA mounting pattern is compatible with this mount (Max VESA 600x400mm, Min VESA 150x100mm).
- This mount is intended for installation on wood studs (8-24 inch spacing), solid concrete, or brick walls. DO NOT install into drywall alone. If installing into concrete, contact us for appropriate concrete anchors.
- Always use a stud finder to locate the center of wood studs accurately.
- Ensure the mounting surface can safely support the combined weight of the mount and your television.
- Two people are recommended for safe installation, especially when lifting and mounting the TV.

Image 2.1: Illustration of the TV wall mount's robust construction, highlighting its maximum load capacity of 132 lbs and UL certification for safety.
3. Package Contents
Verify that all components are present and undamaged before beginning installation. If any parts are missing or damaged, please contact customer support.
- Wall Plate Assembly
- TV Brackets (2)
- Hardware Kit (various screws, washers, spacers, anchors)
- Bubble Level
- Instruction Manual
4. Specifications
| Feature | Specification |
|---|---|
| Brand | IWORKBOARD |
| Model | Low Profile 32-90 Inch & 24'' Studs |
| TV Size Compatibility | 32 - 90 inches |
| Weight Capacity | 132 lbs (60 kg) |
| VESA Compatibility | Max: 600x400mm, Min: 150x100mm |
| Wall Type Compatibility | Wood Studs (8-24 inch spacing), Solid Concrete, Brick Walls |
| Tilt Angle | Up to 10 degrees downward |
| Low Profile Distance | Approximately 1.3 inches from wall |
| Material | Metal |
| Color | Black |

Image 4.1: Visual representation of the mount's tilt capability and VESA mounting pattern specifications.
5. Installation Guide
5.1. Pre-Installation Checks
- Verify TV Compatibility: Check your TV's size (32-90 inches), weight (under 132 lbs), and VESA mounting pattern (150x100mm to 600x400mm).
- Identify Wall Type: Determine if your wall is wood stud, solid concrete, or brick. Use a reliable stud finder for wood studs.
- Gather Tools: You will need a stud finder, pencil, drill, drill bits, level (included), screwdriver, and a socket wrench.
5.2. Mounting the Wall Plate
- Mark Drill Holes: Position the wall plate template (if available, otherwise use the wall plate itself) on the wall at your desired TV height. Use the included bubble level to ensure it is perfectly horizontal. Mark the drill hole locations with a pencil.
- Drill Pilot Holes: For wood studs, drill pilot holes according to the recommended drill bit size in the hardware kit. For concrete or brick, use a masonry drill bit and insert concrete anchors (contact us if needed).
- Attach Wall Plate: Secure the wall plate to the wall using the provided lag bolts and washers. Tighten firmly, but do not overtighten.

Image 5.1: Step-by-step illustration of marking the wall for drilling and securing the wall plate to the wall.
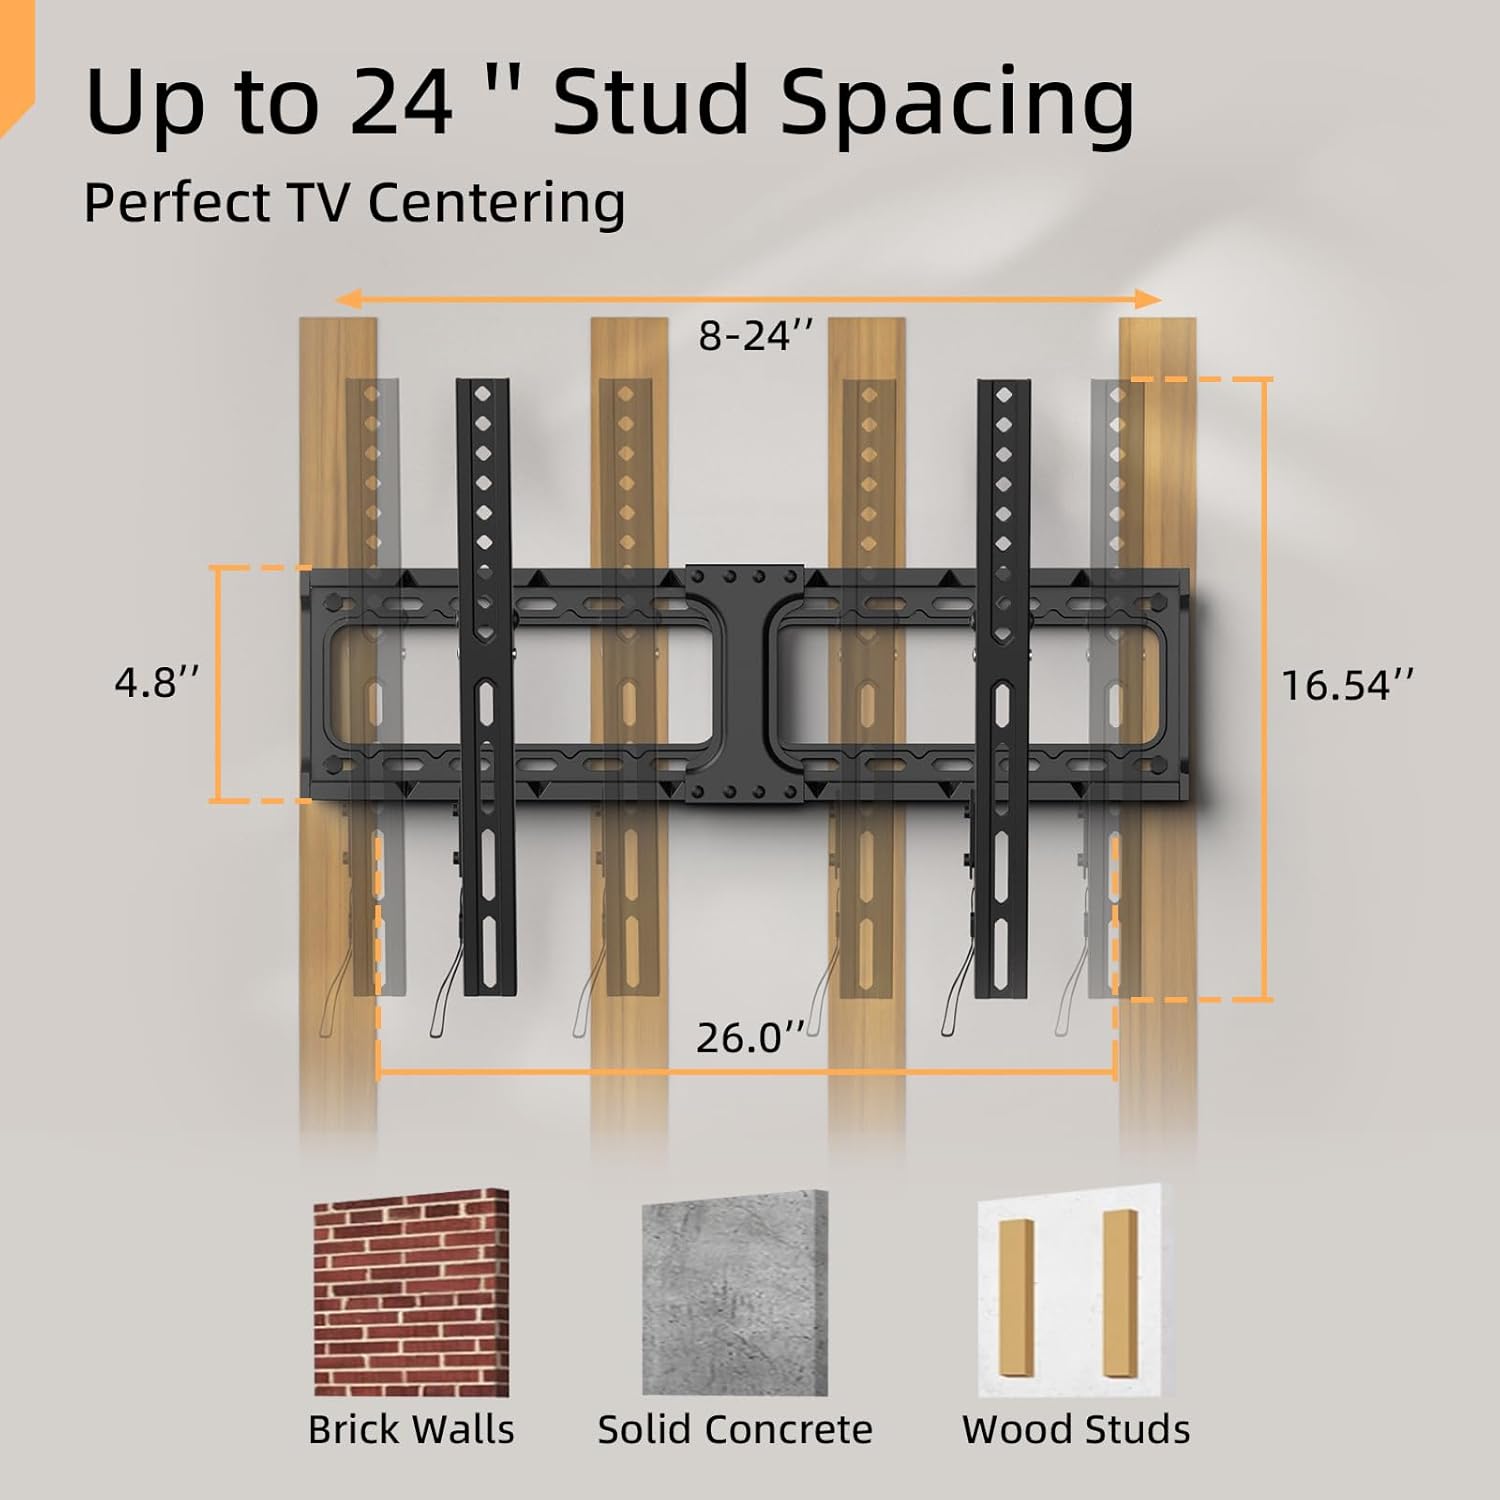
Image 5.2: Visual guide to stud spacing and compatible wall types for installation.
5.3. Attaching TV Brackets
- Select Screws: Choose the correct diameter and length of screws from the hardware kit that fit your TV's VESA holes. Use spacers if your TV back is uneven or if cables need extra clearance.
- Attach Brackets: Align the TV brackets with the VESA holes on the back of your TV. Secure them using the selected screws and washers. Ensure the brackets are oriented correctly (hooks facing downwards).
5.4. Hanging the TV
- With assistance, carefully lift the TV and hook the TV brackets onto the top edge of the wall plate.
- Gently lower the TV until the brackets are fully seated on the wall plate.
5.5. Securing the TV
- Locate the safety screws or quick-release straps at the bottom of the TV brackets.
- Tighten the safety screws or engage the quick-release mechanism to lock the TV securely to the wall plate. This prevents accidental dislodging.
6. Operation
6.1. Tilting the TV
This mount allows you to tilt your TV downwards by up to 10 degrees. To adjust the tilt:
- Loosen the tilt adjustment knobs or bolts on the side of the TV brackets (if applicable to your specific model).
- Carefully tilt the TV to your desired angle.
- Tighten the tilt adjustment knobs or bolts to secure the TV in place. This feature helps reduce glare and optimize viewing angles.
6.2. Adjusting TV Position (Centering)
After installation, you can slide the TV horizontally along the wall plate to achieve perfect centering.

Image 6.1: The TV can be slid horizontally on the wall plate for precise centering after initial installation.
6.3. Quick Release Mechanism
The mount features a quick-release mechanism for easy removal of the TV when needed. Consult the specific instructions for your model, typically involving pulling release straps or disengaging safety screws to unhook the TV from the wall plate.
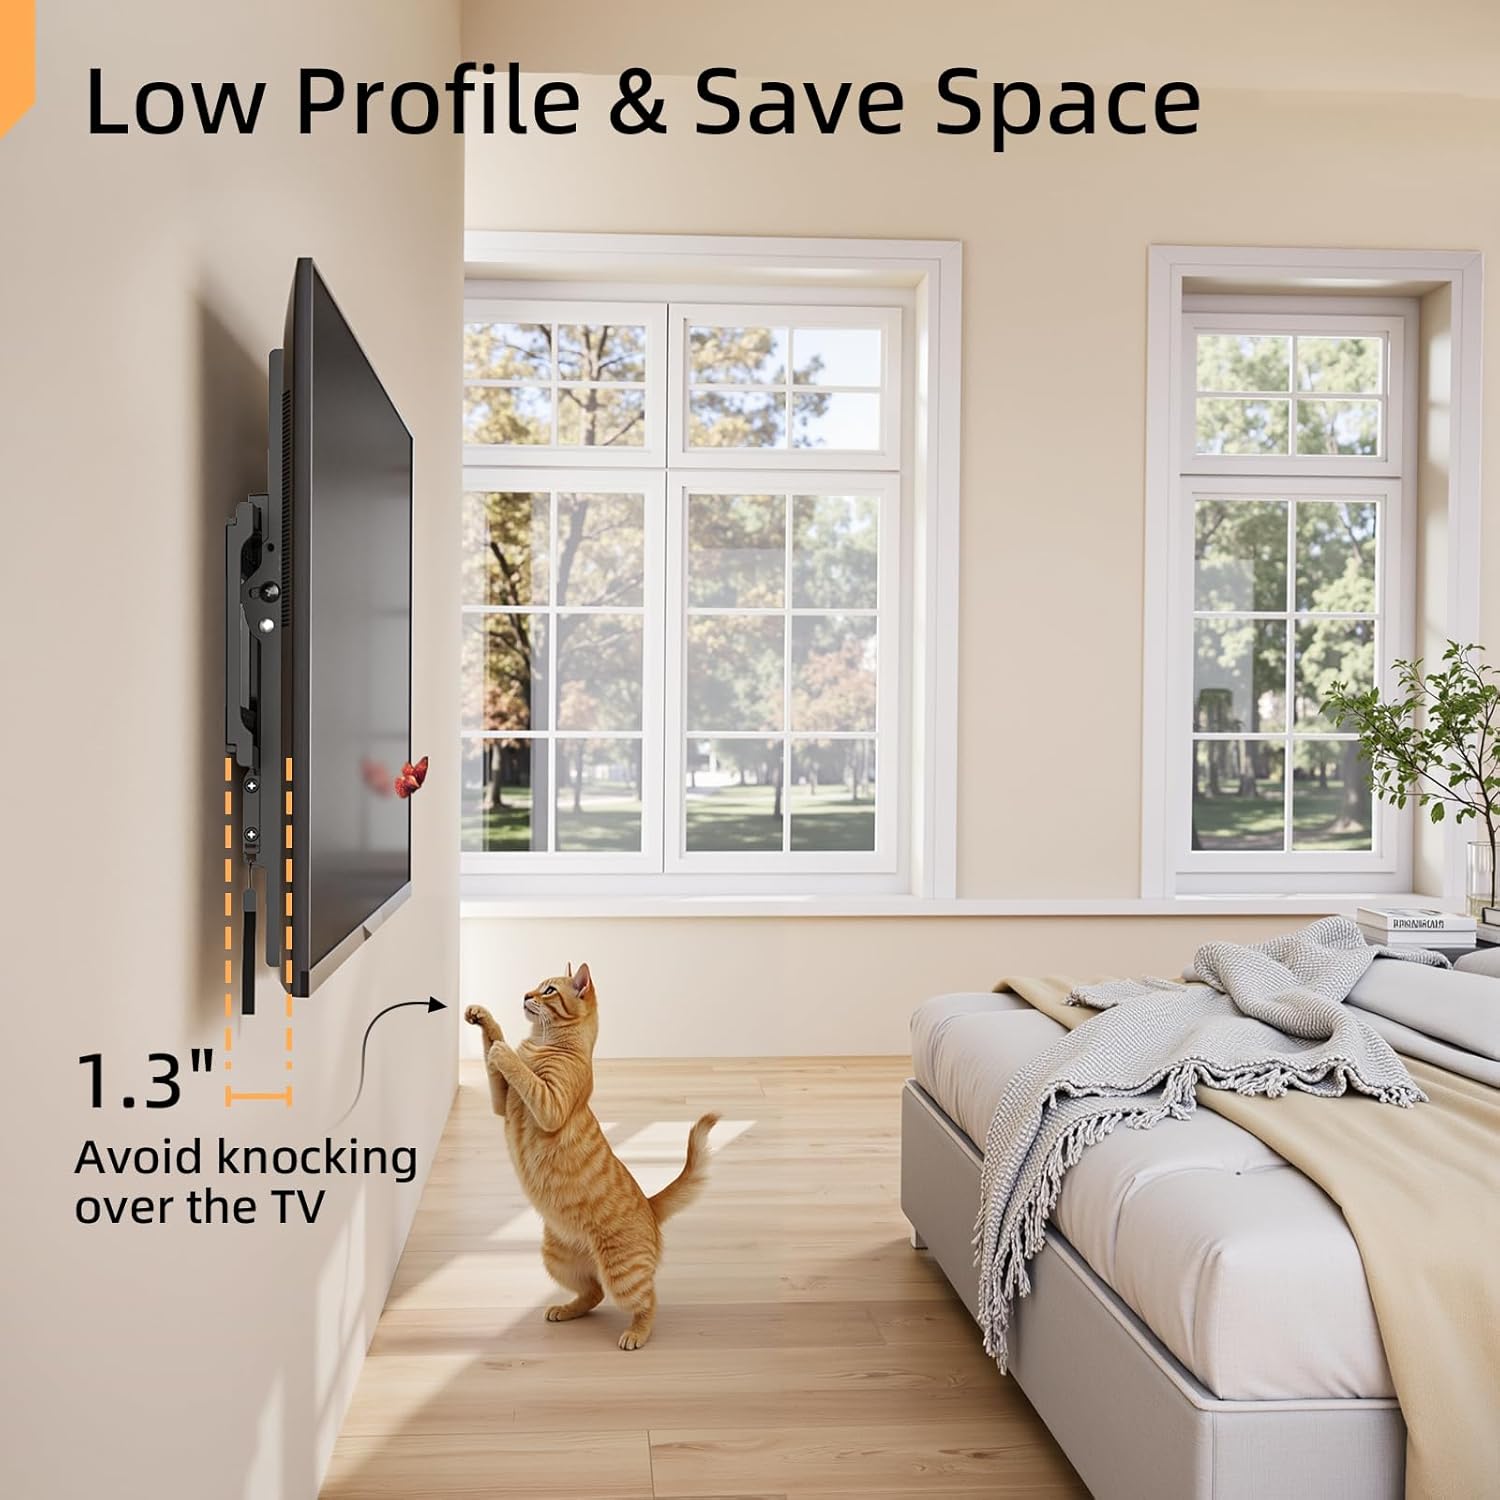
Image 6.2: The low-profile design positions the TV approximately 1.3 inches from the wall, saving space and providing a sleek appearance.
7. Maintenance
- Periodically check all screws and bolts to ensure they remain tight and secure.
- Clean the mount with a soft, dry cloth. Avoid abrasive cleaners or solvents.
- Ensure no cables are pinched or stressed by the mount or TV.
8. Troubleshooting
- TV is not level: Ensure the wall plate was installed perfectly level. If not, carefully loosen the lag bolts, adjust the wall plate using the bubble level, and re-tighten. Some mounts also offer post-installation leveling adjustments on the TV brackets.
- Difficulty tilting the TV: Check if the tilt adjustment knobs/bolts are sufficiently loosened. Ensure no cables are obstructing the movement.
- TV feels unstable: Immediately remove the TV from the mount. Re-check all installation steps, especially the wall type, stud location, and tightness of all fasteners. Ensure the TV's weight does not exceed the mount's capacity.
- Missing hardware: Refer to the package contents list. If any parts are missing, contact IWORKBOARD customer support for assistance.
9. Warranty and Support
This IWORKBOARD TV wall mount comes with a 10-year support period. For any questions, technical assistance, or warranty claims, please contact IWORKBOARD customer service. Refer to your purchase documentation for specific contact details.
10. Official Product Videos
No official product videos from the seller are available for embedding at this time.


