
NICREW 08608
NICREW HyperReef Gen 2 Controller
User Manual
Model: 08608
1. Introduction
Thank you for choosing the NICREW HyperReef Gen 2 Controller. This device is designed to provide precise and flexible control over your aquarium lighting, specifically for NICREW HyperReef Gen 2 lights. It features a 2.4-inch LCD screen, touch button controls, and the ability to manage up to 5 independent light channels with stepless dimming. This manual will guide you through the setup, operation, and maintenance of your controller to ensure optimal performance and longevity.

Image 1.1: Front view of the NICREW HyperReef Gen 2 Controller, showcasing its LCD screen and touch buttons.
2. Safety Instructions
Please read and follow all safety instructions carefully to prevent injury or damage to the product or your aquarium setup.
- Always disconnect power to the controller and connected lights before performing any maintenance or setup.
- This device is designed for indoor use only. Do not expose it to water splashes or excessive humidity.
- Ensure your hands are dry when handling the controller and power connections.
- Do not attempt to disassemble or modify the controller. Refer all servicing to qualified personnel.
- Keep the controller out of reach of children and pets.
- Use only the power adapter and cables supplied or recommended by NICREW.
3. Package Contents
Verify that all items are present and in good condition upon opening the package. If any items are missing or damaged, please contact NICREW customer support.
- NICREW HyperReef Gen 2 Controller Unit
- USB-C to USB-C Cable (for daisy chain connection)
- Magnetic Wall Mount Plate with Screws
- User Manual (this document)
4. Product Overview and Features
The NICREW HyperReef Gen 2 Controller offers advanced functionality for managing your aquarium lighting system.
- 5 Independent Light Channels: Control Violet, Blue, White, Green, and Red channels with stepless dimming from 0% to 100%. (For HyperReef Gen 2 Only)
- Easy Set Program: Provides a quick and straightforward setup for establishing ideal photoperiods with ramp-up and dim-down effects.
- Pro Set Program: Allows for detailed customization of light intensity and color across 8 different time points, creating unique lighting effects.
- Daisy Chain Functionality: Connect multiple HyperReef Gen 2 lights to a single controller for synchronized control.
- Compatibility: Fully compatible with HyperReef Gen 2 lights. Also compatible with HyperReef Gen 1 lights, supporting 2 light channels (requires a 3.5mm TRRS cable, not included).
- Intuitive Interface: Features a 2.4-inch LCD screen and responsive touch buttons for easy navigation and programming.
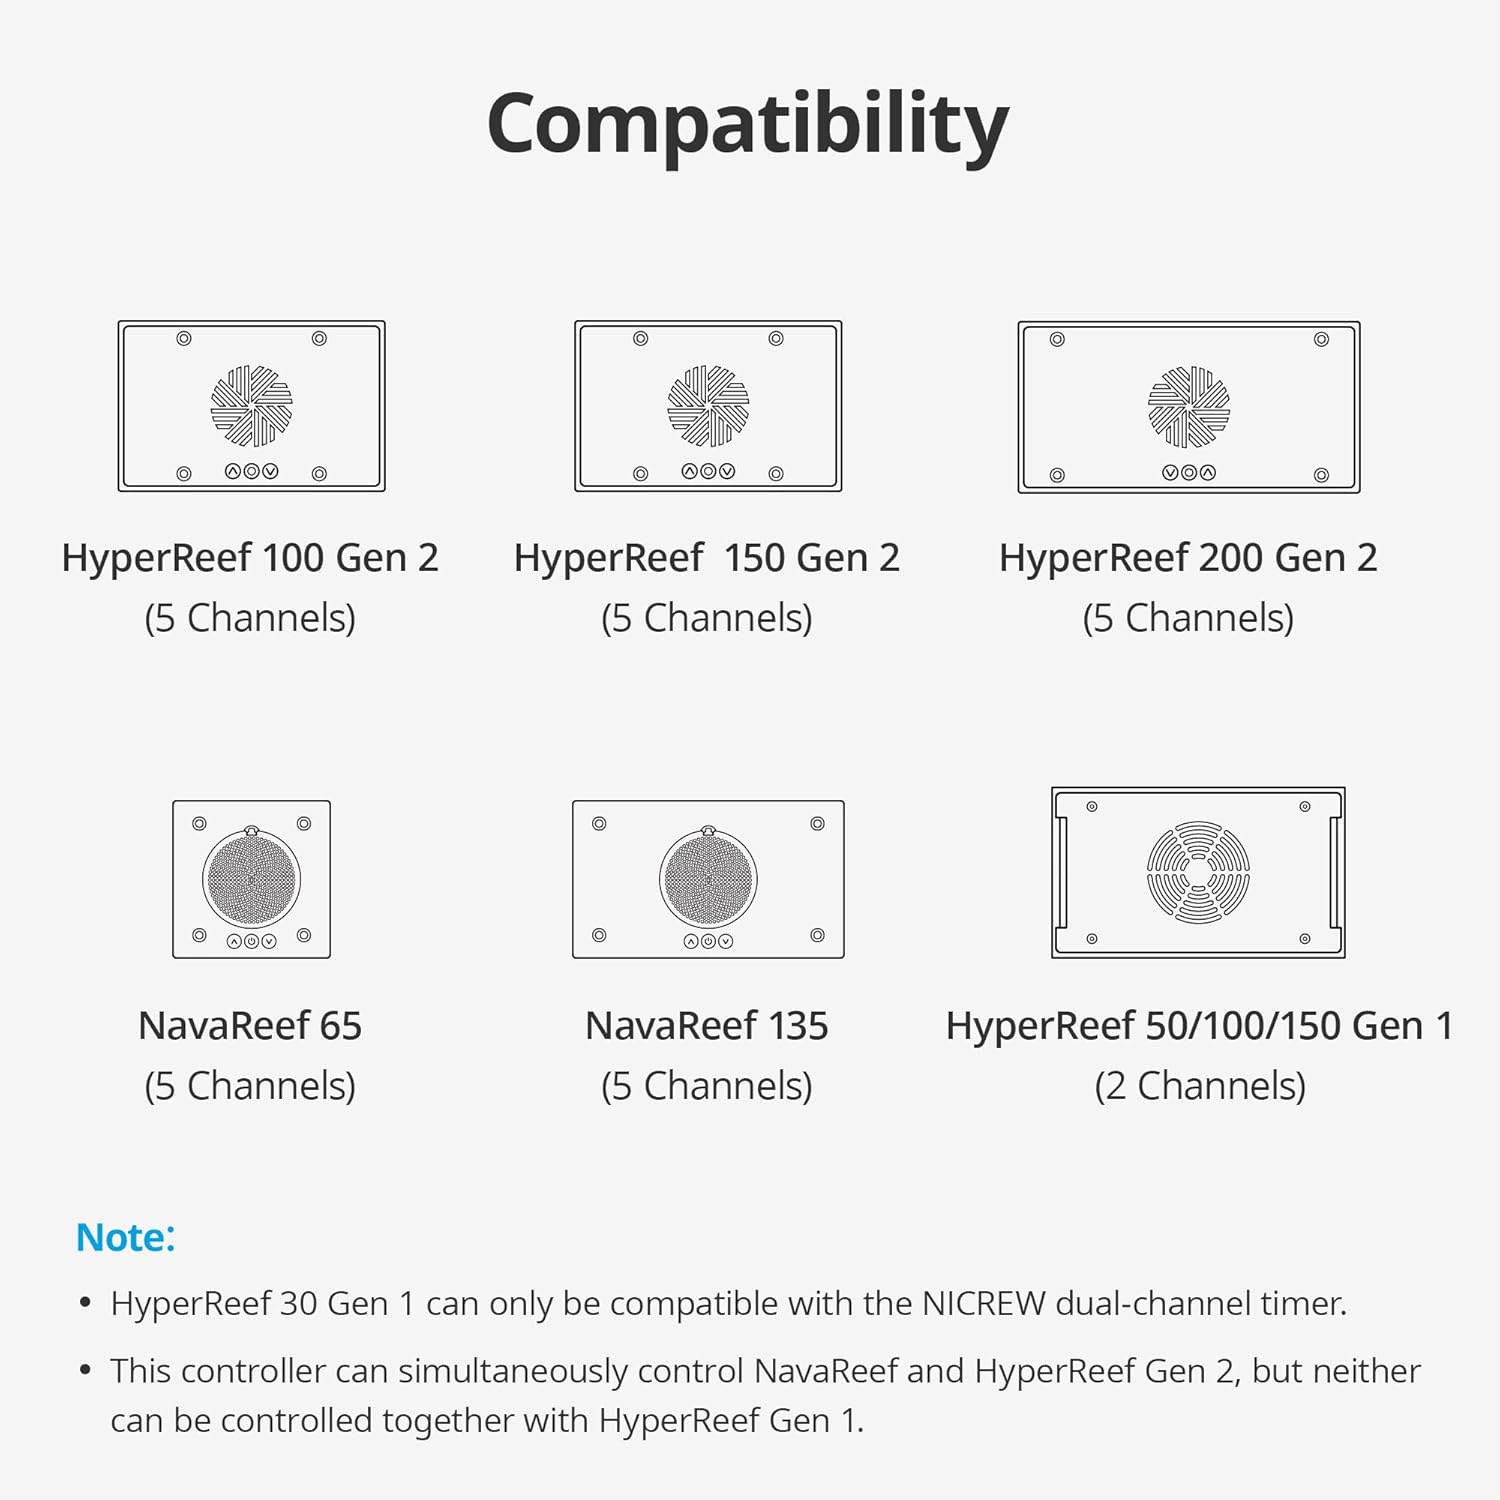
Image 4.1: Compatibility overview for various NICREW HyperReef and NavaReef light models with the controller.
5. Setup
5.1 Connecting the Controller to Lights
- Ensure your HyperReef Gen 2 light(s) are powered off.
- Connect one end of the provided USB-C to USB-C cable to the controller's USB-C port.
- Connect the other end of the USB-C cable to the designated input port on your HyperReef Gen 2 light.
- If connecting to a HyperReef Gen 1 light, use a 3.5mm TRRS cable (not included) to connect the controller to the light's control port.
5.2 Daisy Chain Connection
The controller supports daisy-chaining multiple HyperReef Gen 2 lights. This allows a single controller to manage the settings for all connected lights simultaneously.
- Connect the first light to the controller as described in Section 5.1.
- Use additional USB-C to USB-C cables (not included) to connect the output port of the first light to the input port of the second light, and so on.
- Ensure all connections are secure before powering on the lights.
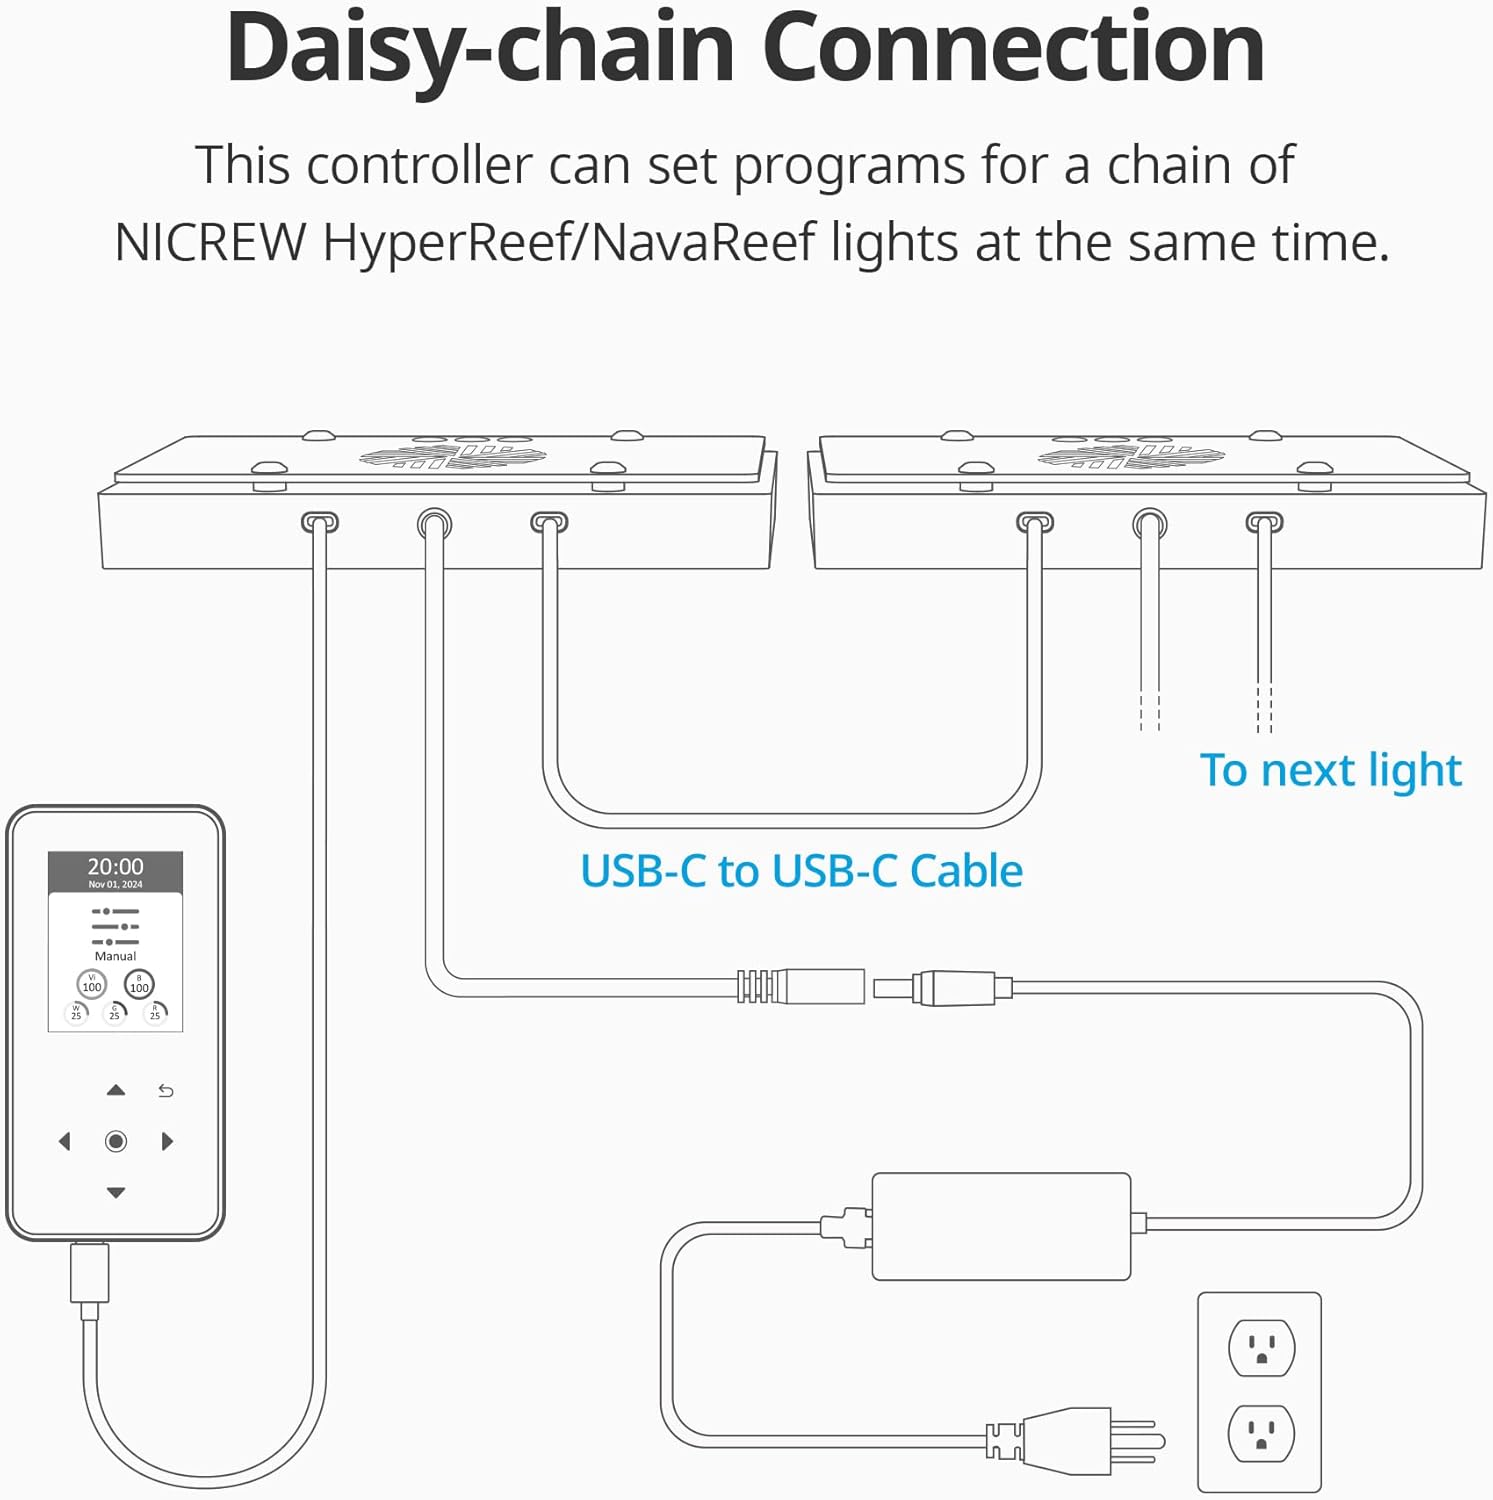
Image 5.1: Illustration of how to connect multiple HyperReef lights in a daisy chain configuration using the controller.
5.3 Mounting the Controller
The controller comes with a magnetic wall mount plate for convenient placement.
- Choose a suitable location near your aquarium, ensuring it is dry and easily accessible.
- Secure the magnetic plate to the wall or cabinet using the provided screws.
- The controller will magnetically attach to the plate, allowing for easy removal and reattachment.

Image 5.2: The controller being attached to its magnetic wall mount for convenient placement.
6. Operating Instructions
The HyperReef Gen 2 Controller offers various modes for light control. Use the touch buttons to navigate the menu and adjust settings.
6.1 Understanding Light Channels
The controller allows you to adjust the intensity of five independent color channels:
- Vi (Violet): Controls UV and Violet LEDs.
- B (Blue): Controls Royal Blue and Blue LEDs.
- W (White): Controls Cool White and Warm White LEDs.
- G (Green): Controls Green LEDs.
- R (Red): Controls Red LEDs.

Image 6.1: The controller display showing the five independent light channels and their adjustable intensity levels.
6.2 Control Modes
The controller features three primary control modes: Manual, Easy Set, and Pro Set.

Image 6.2: Overview of the Manual, Easy Set, and Pro Set programming interfaces on the controller.
6.2.1 Manual Mode
Manual mode allows for immediate, real-time adjustment of each light channel's intensity. This is useful for quick changes or testing.
- Navigate to the Manual screen using the touch buttons.
- Select the desired channel (Vi, B, W, G, R) and use the up/down arrows to adjust its intensity from 0% to 100%.
- Options like MAX (100% intensity for all channels), AB+ (preset blue-dominant spectrum), and OFF are available for quick toggling.

Image 6.3: Manual mode interface, showing individual channel controls and a visual representation of the light spectrum.
6.2.2 Easy Set Program
The Easy Set program simplifies scheduling by allowing you to define a sunrise and sunset time, with a gradual ramp-up and dim-down period.
- Access the Easy Set menu.
- Set the desired Sunrise and Sunset times.
- Adjust the intensity for each channel at the peak of the photoperiod.
- Define the Ramp Time, which determines the duration of the gradual intensity change at the beginning and end of the cycle.

Image 6.4: Visual representation of the Easy Set program's light cycle, including ramp-up, steady light, and dim-down periods.
6.2.3 Pro Set Program
For advanced users, the Pro Set program offers granular control over light intensity and color at up to 8 distinct time points throughout the day. This allows for highly customized lighting simulations.
- Enter the Pro Set menu.
- For each of the 8 time points, set the specific time and the desired intensity for all 5 light channels.
- The controller will smoothly transition between these set points, creating a dynamic lighting effect.
7. Maintenance
Regular maintenance ensures the longevity and optimal performance of your NICREW HyperReef Gen 2 Controller.
- Cleaning: Wipe the controller's screen and body with a soft, dry, lint-free cloth. Do not use abrasive cleaners, solvents, or spray directly onto the device.
- Storage: If storing the controller for an extended period, disconnect it from power and lights. Store it in a cool, dry place away from direct sunlight and extreme temperatures.
- Connections: Periodically check all cable connections to ensure they are secure and free from corrosion or damage.
8. Troubleshooting
If you encounter issues with your controller, refer to the following common problems and solutions.
| Problem | Possible Cause | Solution |
|---|---|---|
| Controller does not power on. | No power from connected light; faulty cable. | Ensure the connected light is powered on. Check the USB-C cable for damage and ensure it is securely connected. |
| Lights do not respond to controller. | Incorrect connection; incompatible light; controller not in active mode. | Verify the cable connection between the controller and light. Confirm your light is a compatible HyperReef Gen 2 (or Gen 1 with correct cable). Ensure the controller is not in a standby or locked mode. |
| Daisy-chained lights are not synchronized. | Loose connection in the chain; incompatible lights in chain. | Check all USB-C connections between lights in the daisy chain. Ensure all lights in the chain are HyperReef Gen 2 models for full synchronization. |
| Screen is unresponsive or frozen. | Temporary software glitch. | Disconnect the controller from power for 10 seconds, then reconnect to perform a soft reset. |
If the problem persists after attempting these solutions, please contact NICREW customer support for further assistance.
9. Specifications
| Brand | NICREW |
| Model Name | HyperReef Gen 2 Controller |
| Model Number | 08608 |
| Compatible Devices | HyperReef Gen 1, HyperReef Gen 2 |
| Max Number of Supported Channels | 5 (for HyperReef Gen 2) |
| Special Features | Touch button control, Daisy chain functionality |
| Material Type | Plastic |
| Product Dimensions | 11.7 x 5.6 x 1.3 cm |
| Item Weight | 260 g |
10. Warranty and Support
For warranty information and customer support, please refer to the warranty card included with your product or visit the official NICREW website. You can also contact NICREW customer service directly for assistance with product setup, troubleshooting, or any other inquiries.
NICREW Customer Service: Please refer to the contact information provided on the product packaging or the official NICREW website.
Related documents08608

Ask a question about this manual
Ask about setup, troubleshooting, compatibility, parts, safety, or missing instructions. Manuals+ will review the question and use this page’s manual context to help answer it.