Introduction
This manual provides detailed instructions for the installation and use of the Varghesyla Mounting Bracket for Dell Micro PCs. This bracket is designed to securely mount compatible Dell OptiPlex Micro Form Factor (MFF) and Dell Pro Micro Business PCs, offering various mounting options to optimize your workspace.
Compatible Models
This mounting bracket is compatible with the following Dell Micro PC models:
- Dell OptiPlex MFF Series: 3000, 3020, 3040, 3046, 3050, 3060, 3070, 3080, 3090, 5000, 5050, 5060, 5070, 5090, 7000, 7010, 7020, 7040, 7050, 7060, 7070, 7080, 7080 XE, 7090, 9020.
- Dell Pro Micro Business PC Series: QBM1250, QCM1250, QCM1255.
The bracket is designed for Dell OptiPlex micro computers with a size of approximately 1.4" x 7" x 7.2" (36.00 mm x 178.00 mm x 182.00 mm). Note: This bracket is not compatible with OptiPlex tower or small form factor models, nor with Wyse models.

Package Contents
Verify that all components are present before beginning installation:
- Mounting Bracket (1)
- Pen Holder (1)
- Mounting Screws (various types for different surfaces)
- Wall Anchors (for drywall installation)
- Velcro Straps (for cable management)
- Rubber Pads (4)
- Thumb Screw (1)

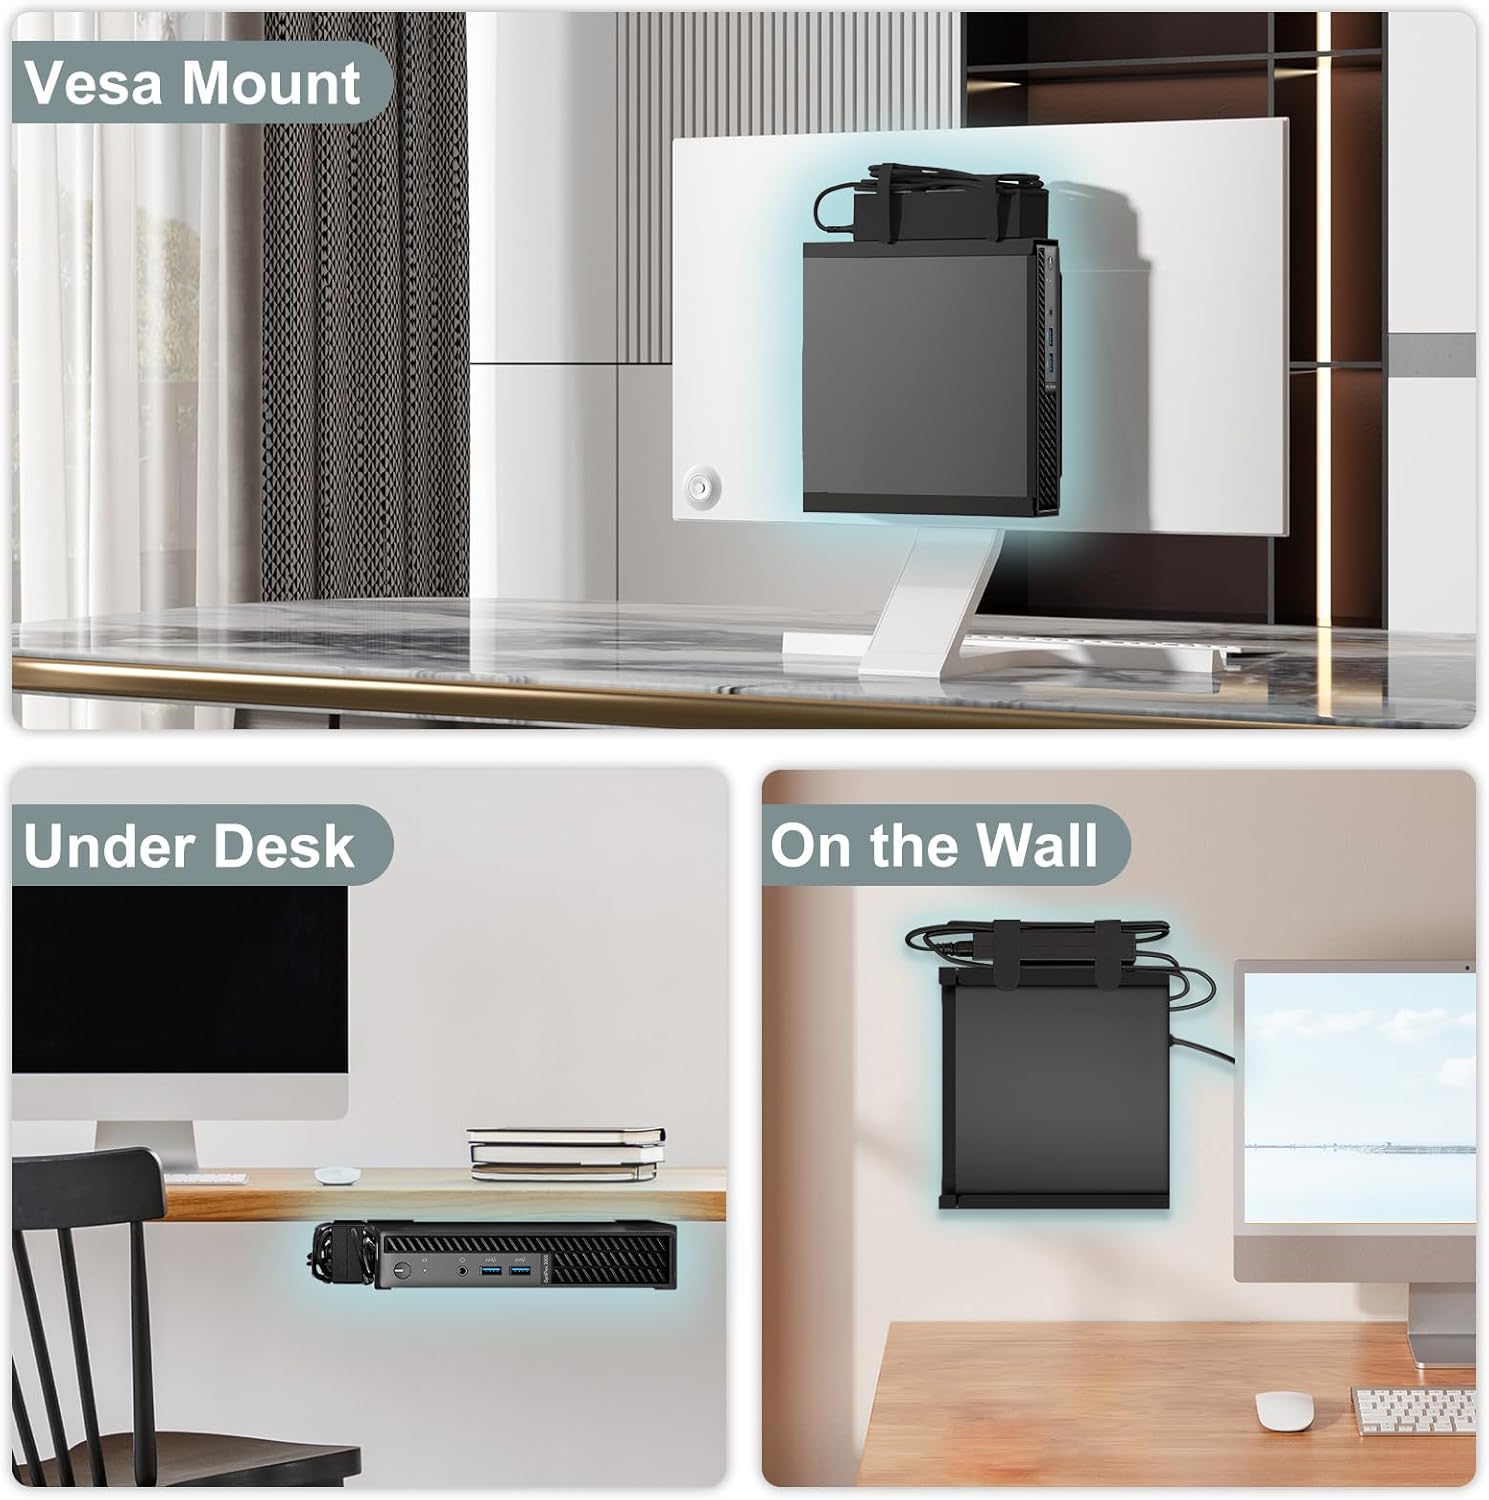
Setup and Installation
The Varghesyla mounting bracket offers multiple installation options: VESA mount (behind monitor), under desk mount, and wall mount. Choose the method that best suits your workspace.
1. VESA Mount Installation (Behind Monitor)
- Verify VESA Pattern: Ensure your monitor has a 75 x 75 mm or 100 x 100 mm VESA mounting pattern.
- Attach Bracket to Monitor: Align the mounting holes on the bracket with the VESA holes on the back of your monitor. Secure the bracket using the appropriate screws provided.
- Secure Power Adapter: If applicable, use the supplied Velcro strap to secure the PC's power adapter to the bracket or monitor arm, ensuring it is stable and cables are managed.
- Insert Micro PC: Carefully slide your Dell Micro PC into the bracket.
- Secure PC: Use the provided thumb screw to secure the Micro PC within the bracket, preventing accidental dislodgement.

2. Under Desk Mount Installation
- Position Bracket: Determine the desired location under your desk. Ensure there is sufficient clearance for the PC and cables.
- Mark Screw Holes: Hold the bracket in place and mark the screw hole positions on the underside of the desk.
- Drill Pilot Holes: Drill pilot holes if necessary, appropriate for the type of screws being used and the desk material.
- Secure Bracket: Attach the bracket to the underside of the desk using the provided screws.
- Insert Micro PC: Carefully slide your Dell Micro PC into the bracket.
- Secure PC: Use the provided thumb screw to secure the Micro PC within the bracket.
- Cable Management: Use the Velcro straps to organize and secure cables, maintaining a tidy workspace.

3. Wall Mount Installation
- Select Location: Choose a suitable wall location, considering cable routing and accessibility.
- Mark Screw Holes: Hold the bracket against the wall and mark the screw hole positions.
- Drill Holes and Insert Anchors: Drill holes and insert the appropriate wall anchors (if mounting into drywall) as per the marked positions.
- Secure Bracket: Attach the bracket to the wall using the provided screws.
- Insert Micro PC: Carefully slide your Dell Micro PC into the bracket.
- Secure PC: Use the provided thumb screw to secure the Micro PC within the bracket.
- Cable Management: Use the Velcro straps to organize and secure cables along the wall or desk.


Operation and Usage
Once installed, the Varghesyla mounting bracket securely holds your Dell Micro PC, transforming your workspace into a more organized and efficient area. The bracket does not interfere with the normal operation of your PC.
Pen Holder Usage
The included pen holder can be attached to a convenient surface (e.g., wall, side of desk) using adhesive or screws. It is designed to store small office items such as pens, pencils, remote controls, or other small accessories, helping to keep your desktop clutter-free.

Maintenance
The Varghesyla mounting bracket requires minimal maintenance. Periodically check all screws and connections to ensure they remain tight and secure. Clean the bracket with a soft, dry cloth as needed.
Troubleshooting
| Problem | Possible Cause | Solution |
|---|---|---|
| PC does not fit into the bracket. | Incompatible PC model or incorrect dimensions. | Verify your PC model against the "Compatible Models" section. Ensure your PC's dimensions match the specified 1.4" x 7" x 7.2" (36.00 mm x 178.00 mm x 182.00 mm). |
| Bracket feels loose after installation. | Screws are not tightened sufficiently or incorrect anchors used for wall mounting. | Retighten all mounting screws. For wall mounts, ensure appropriate wall anchors were used and installed correctly. |
| PC is not secure within the bracket. | Thumb screw not fully tightened. | Ensure the thumb screw is fully tightened to secure the PC. |
| Cables are messy. | Cable management not fully utilized. | Use the provided Velcro straps to bundle and route cables neatly. |
Specifications
- Brand: Varghesyla
- Material: Metal
- Finish Type: Powder Coated
- Color: Black
- Mounting Type: Wall Mount, Monitor Mount (VESA), Under Desk Mount
- Compatible PC Dimensions: Approximately 1.4" x 7" x 7.2" (36.00 mm x 178.00 mm x 182.00 mm)
- VESA Compatibility: 75 x 75 mm, 100 x 100 mm
- Item Weight: 1.06 pounds (0.48 Kilograms)
- Package Dimensions: 7.83 x 7.09 x 2.4 inches

Warranty and Support
For warranty information or technical support, please refer to the contact details provided with your purchase documentation or visit the official Varghesyla website. Please retain your proof of purchase for any warranty claims.


