1. Product Overview
The HGLRC Talon frame set introduces a new one-piece modular design for 2-inch drones. The fuselage shell is crafted from multi-color open mold injection molding parts, delivering a vibrant and innovative visual appeal. Its lightweight and smooth body design significantly enhances the overall flight experience.

This image displays the complete HGLRC Talon 2-inch Cinewhoop FPV Drone Frame in black, showcasing its integrated design and protective ducts.
2. Technical Specifications
| Parameter | Value |
|---|---|
| Frame Type | Talon frame |
| Flight Control Installation Hole | 25.5mm x 25.5mm |
| Motor Installation Hole | 9mm x 9mm |
| Image Transmission Installation Hole | 20mm x 20mm, 25.5mm x 25.5mm |
| Wheelbase | 106mm |
| External Dimensions | 150mm x 170mm |
| Applicable Propeller Blade Diameter | 2 inches |
| Frame Weight | 46g |
| Material | Carbon Fiber |
| Color | Black |
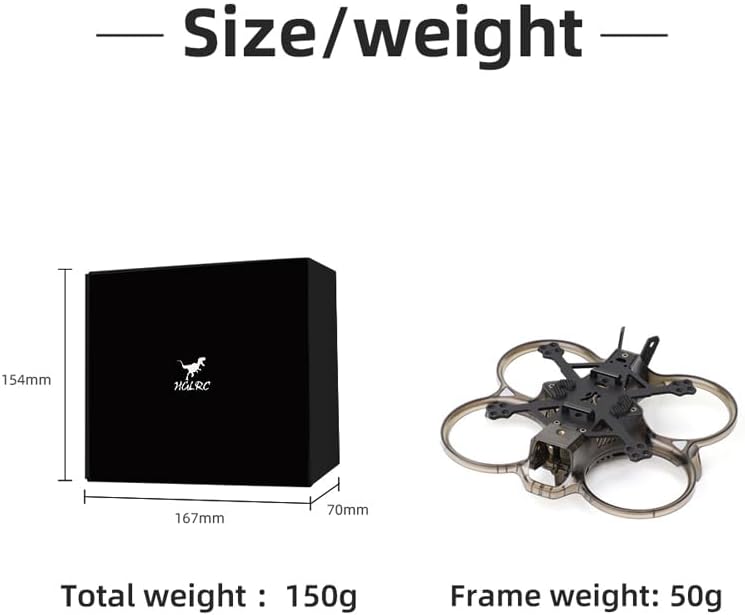
This diagram illustrates the external dimensions of the product packaging (154mm x 167mm x 70mm) and confirms the frame weight of 46g, with a total package weight of 150g.
3. Package Contents
The HGLRC Talon frame set includes the following components:
- Protective guard x 1
- Bottom shell x 1
- Frame carbon plate x 1
- Silicone image transmission cover x 1
- CNC battery tie buckle x 2
- Antenna mount x 1
- Camera mount x 1
- LED (pre-installed on the guard) x 2
- Battery anti-skid pad x 2
- 0.5mm camera silicone sheet x 2
- 1.0mm camera silicone sheet x 1
- Thermal grease (for HD) x 1
- Thermal grease sheet (for Zeus 800mw image transmission) x 1
- Net-shaped aluminum column M2X20 x 2
- Counter-sunk hexagon socket M2X4 x 20
- Counter-sunk hexagon socket M2X6 x 4
- Counter-sunk hexagon socket M2X8 x 8
- Counter-sunk hexagon socket M2X10 x 4
- Counter-sunk hexagon socket M2X12 x 4
- Semi-circular hexagon socket M1.6X10 x 4
- Semi-circular hexagon socket M2X6 x 6
- Semi-circular hexagon socket M2X16 x 1
- Anti-loosening self-locking M2 nut x 1
- Hexagon M2 black nylon nut x 8
- Battery tie 10X150mm x 2
- Air docking cable 6P6 line x 1
- Air docking cable 6P4 line x 1
- Air docking cable flight control end x 1
- Frequency matching and card removal pin ejector x 1
- 32AWG red 120mm x 1
- 32AWG yellow 120mm x 1
- 32AWG black 120mm x 1
- 32AWG red 80mm x 1
- 32AWG yellow 80mm x 1
- 32AWG black 80mm x 1

This image provides a visual representation of all components included in the HGLRC Talon frame package, including the frame parts, screws, cables, and accessories.
4. Assembly Guide
Follow these steps to assemble your HGLRC Talon 2-inch Cinewhoop FPV Drone Frame.

This image provides an overview of the frame assembly process, showing the main components before and during installation.
4.1. Installation Steps
- Step 1: Attach Battery Tie Buckle and Anti-skid Pad
Fix the CNC battery tie buckle using countersunk hexagon screw M2X4mm. Afterward, attach the battery anti-skid pad to the designated area.
Figure 5: Step 1 - Battery Tie Buckle and Anti-skid Pad Installation This image shows the attachment of the CNC battery tie buckle with M2X4mm screws and the placement of the battery anti-skid pads on the frame's bottom plate.
- Step 2: Stack Carbon Plate on Protective Ring
Carefully stack the carbon plate onto the protective ring. Ensure correct orientation (front and back). Secure the carbon plate using countersunk hexagon screws M2X8mm and M2X10mm.
Figure 6: Step 2 - Carbon Plate and Protective Ring Assembly This image illustrates how to position the carbon plate onto the protective ring and secure it with M2X8mm and M2X10mm countersunk hexagon screws.
- Step 3: Buckle TPU Antenna Base and Fix Aluminum Column
Buckle the TPU antenna base into its designated slot. Then, fix the countersunk hexagon screw M2X10mm with the mesh aluminum column M2X20mm.
Figure 7: Step 3 - TPU Antenna Base and Aluminum Column Installation This image shows the TPU antenna base being buckled into place and the M2X10mm countersunk hexagon screw being secured with the M2X20mm mesh aluminum column.
- Step 4: Install Silicone Image Transmission Cover and Bottom Shell
Install the silicone image transmission cover onto the bottom shell. Buckle the bottom shell into place and fix it with countersunk hexagon screw M2X8mm and countersunk hexagon screw M2X10mm.Figure 8: Step 4 - Silicone Image Transmission Cover and Bottom Shell Installation This image demonstrates the installation of the silicone image transmission cover onto the bottom shell, followed by securing the bottom shell with M2X8mm and M2X10mm countersunk hexagon screws.
- Step 5: GoPro Mounting Capability
The frame is designed to easily accommodate a naked GoPro camera, allowing for high-quality aerial videography.
Figure 9: GoPro Mounting This image illustrates how a naked GoPro camera can be easily mounted onto the HGLRC Talon frame, highlighting its compatibility for aerial videography.
5. Key Features
- Fully open mold injection molding parts ensure a completely wrapped and integrated fuselage.
- New modular design allows the image transmission system, power system, and frame shell to be completely independent, simplifying assembly.
- Lightweight and smooth fuselage body provides a light and smooth flight experience.
- Capable of carrying a naked GoPro for enhanced video capture.
- Features 25.5*25.5mm and 20*20mm fixed positions for the image transmission system, ensuring compatibility with various high-definition and analog image transmission systems.
- Includes a CNC metal heat sink to prevent high temperatures in the image transmission system.
- Comes with a special silicone shock-absorbing pad for 19mm and 20mm cameras, contributing to more stable filming.
6. Maintenance and Care
To ensure the longevity and optimal performance of your HGLRC Talon frame, consider the following maintenance tips:
- Regular Inspection: Periodically check all screws and connections for tightness. Vibrations during flight can loosen components over time.
- Cleaning: Keep the frame clean from dust, dirt, and debris. Use a soft, dry cloth or a small brush. Avoid using harsh chemicals that could damage the plastic or carbon fiber.
- Component Check: Inspect the protective guard and carbon plate for any cracks or damage after crashes or hard landings. Replace damaged parts promptly to maintain structural integrity.
- Heat Management: Ensure proper airflow around electronic components, especially the image transmission system, to prevent overheating. The included CNC metal heat sink aids in this.
- Storage: Store the frame in a cool, dry place away from direct sunlight and extreme temperatures.
7. Troubleshooting
This section provides general guidance for common issues you might encounter with your drone frame. For specific electronic component issues, refer to their respective manuals.
- Loose Components: If you notice any rattling or instability, check all screws and ensure they are securely fastened. Refer to the assembly guide for screw locations.
- Vibrations: Excessive vibrations can affect flight performance and video quality. Check for bent propellers (if installed), loose motors, or damaged frame parts. Ensure all components are mounted securely with appropriate dampening (e.g., silicone pads for cameras).
- Damaged Frame Parts: In case of a crash, inspect the protective guard, bottom shell, and carbon plate for cracks or breaks. Replacement parts may be available from the manufacturer or authorized dealers.
- Camera Jello/Vibrations in Video: Ensure the camera is securely mounted and the silicone shock-absorbing pads are correctly installed. If the issue persists, check for overall frame rigidity and propeller balance.
8. Warranty and Customer Support
For detailed warranty information and customer support, please refer to the official HGLRC resources.
- Official User Manual (PDF): For a comprehensive guide and additional details, you can download the official user manual in PDF format: Download User Manual
- HGLRC Store: Visit the official HGLRC store for product information, support, and other offerings: Visit HGLRC Store
If you require further assistance, please contact HGLRC customer support through their official channels.


