1. Introduction
Thank you for choosing the AERLANG EM13 Massage Gun with Heat. This device is designed to provide deep tissue percussion massage, aiding in muscle relaxation, pain relief, and post-workout recovery. Featuring an innovative heated massage head, multiple speed settings, and various attachments, it offers a customizable massage experience. Please read this manual thoroughly before use to ensure safe and effective operation.
2. Safety Information
To prevent injury or damage to the device, always adhere to the following safety guidelines:
- Do not use the massager for more than 15 minutes at a time to prevent overheating. Allow the device to cool down before resuming use.
- Always turn off and unplug the massager when not in use or before cleaning.
- Keep the massager away from water or other liquids to prevent electrical shock. Do not use in wet environments.
- Do not use the massager on broken skin, open wounds, or areas with inflammation, swelling, or rashes.
- Consult a healthcare professional before use if you have any medical conditions, are pregnant, have a pacemaker, or are undergoing medical treatment.
- Do not insert any objects into the ventilation openings.
- Keep out of reach of children and pets.
- Use only the provided charging cable and adapter.
3. Product Overview
The AERLANG EM13 Massage Gun is equipped with a powerful motor, an intuitive LCD display, and a variety of interchangeable massage heads, including a specialized heated head.
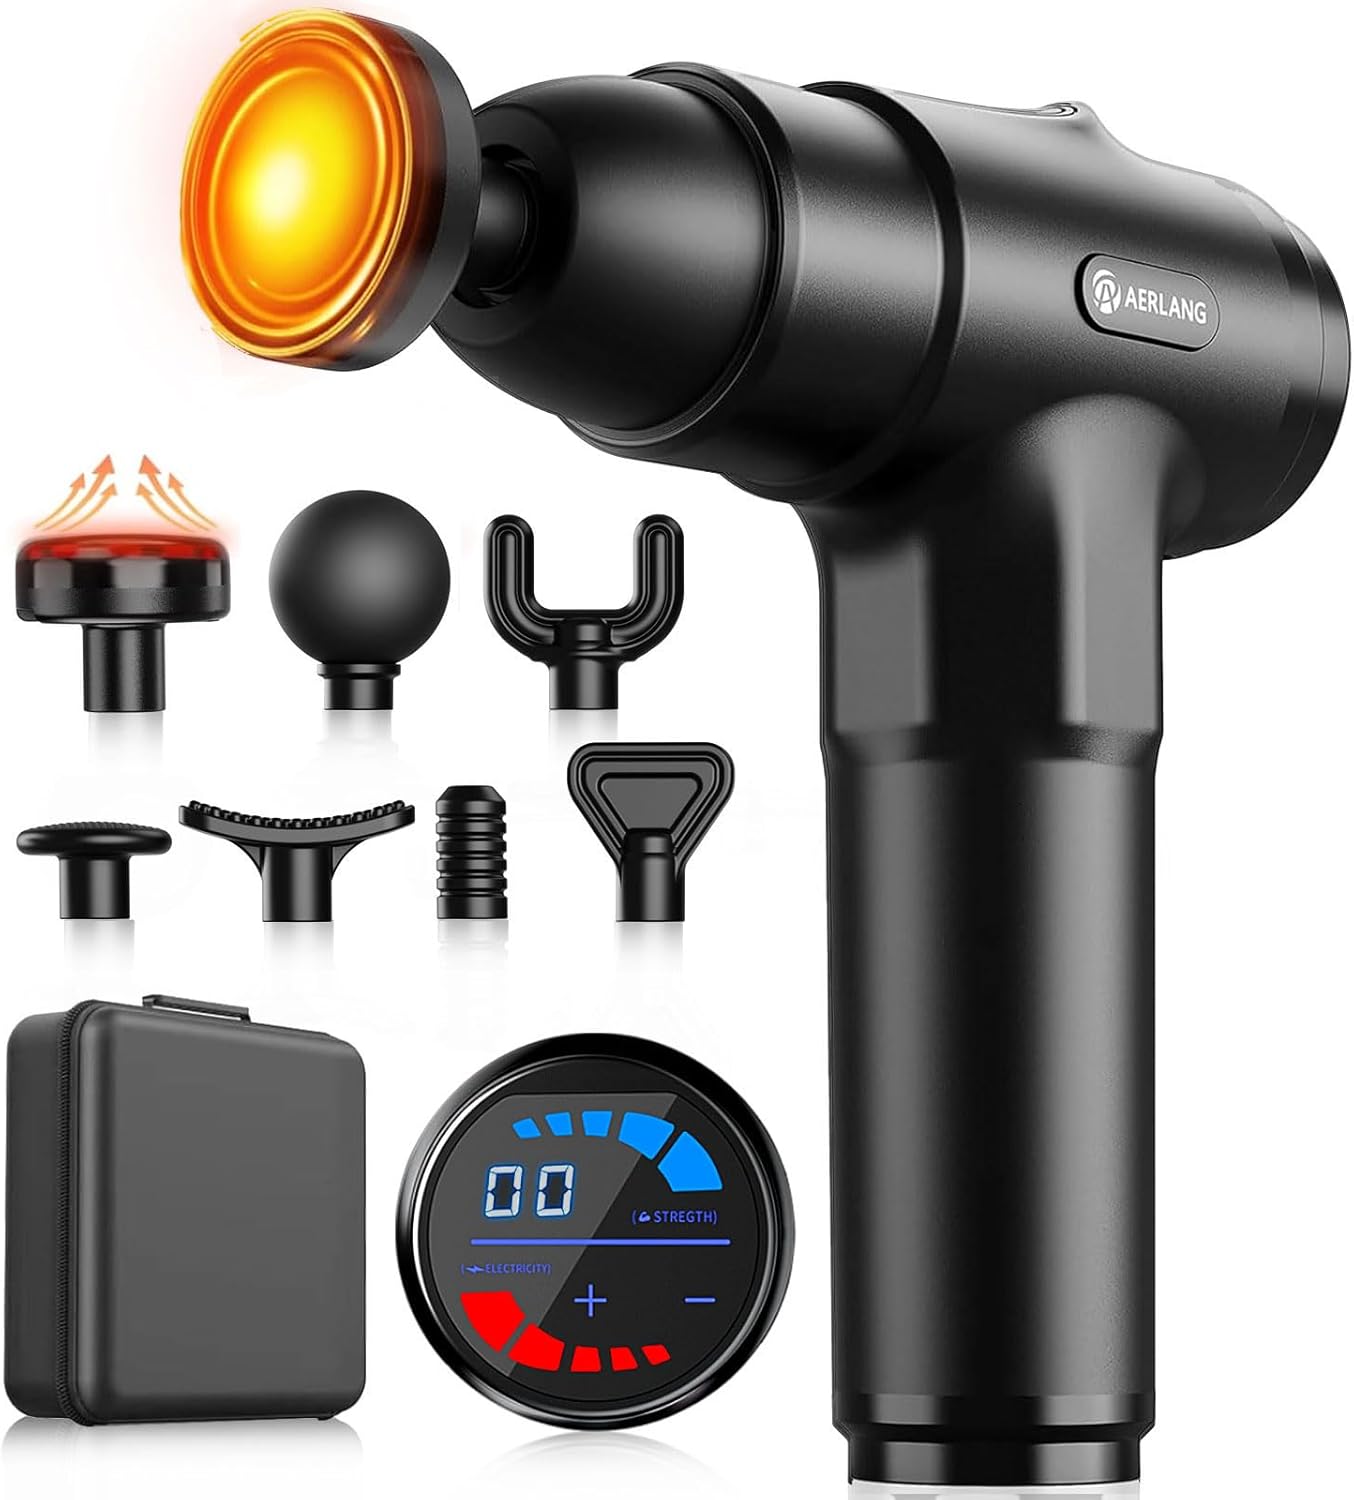
Figure 3.1: AERLANG EM13 Massage Gun with its seven interchangeable heads, charging cable, and carrying case.
Components:
- Massage Gun Body: Main unit housing the motor, battery, and control panel.
- LCD Display: Shows speed level, battery status, and pressure indication.
- Heated Massage Head: A specialized attachment that provides therapeutic heat.
- Interchangeable Massage Heads (6 additional): Various shapes for targeting different muscle groups.
- Charging Cable: For recharging the device.
- Carrying Case: For convenient storage and portability.

Figure 3.2: The new generation LCD display provides real-time feedback on pressure, speed, and battery level.
4. Setup
Initial Charging:
Upon receiving your AERLANG EM13 Massage Gun, it is essential to fully charge both the main unit and the heated massage head separately before first use.
- Massage Gun Body: Charge for approximately 6 hours.
- Heated Massage Head: Charge separately for approximately 2 hours.
Refer to the "Charging" section for detailed instructions on how to charge each component.
5. Operating Instructions
5.1 Attaching Massage Heads:
To attach a massage head, align the base of the desired head with the opening on the front of the massage gun and twist clockwise until securely fastened. To remove, twist counter-clockwise and pull.

Figure 5.1: Quick rotating installation method for massage heads.
5.2 Powering On/Off and Speed Adjustment:
- Power On: Press and hold the power button located on the handle for a few seconds until the LCD screen illuminates.
- Adjust Speed: Use the '+' and '-' buttons on the LCD display to adjust the percussion speed. The device offers 20 adjustable speed levels (1400-3200 rpm). Start at the lowest setting and gradually increase to a comfortable intensity.
- Power Off: Press and hold the power button again for a few seconds until the display turns off. The device also features an automatic shut-off after 10 minutes of continuous use to prevent overheating.

Figure 5.2: The 20-speed levels are categorized for different stages of muscle relief, from warm-up to deep massage.
5.3 Using the Heated Massage Head:
The heated massage head has its own separate power and temperature controls.
- Activate Heat: Once attached to the massage gun, locate the separate on/off switch on the heated head itself. Press to turn on.
- Adjust Temperature: The heated head offers three adjustable temperature settings, reaching up to 131°F (55°C). Cycle through the settings by pressing the temperature switch button.
- Application: The heat helps accelerate muscle relaxation. Use it on sensitive areas or for deeper penetration.

Figure 5.3: The heated massage head combines impact with therapeutic warmth for enhanced muscle relaxation.
5.4 Intelligent Pressure Sensing System:
The massage gun features a built-in intelligent pressure sensing system. This system automatically adjusts the percussion strength based on the pressure you apply, providing a customized deep muscle massage. If you press harder, the device will increase its impact to compensate.

Figure 5.4: The internal intelligent pressure sensing system ensures optimal impact depth for effective massage.
5.5 General Usage Guidelines:
- Identify the areas of muscle tension or soreness.
- Turn on the massage gun at the lowest speed setting.
- Place the head of the device gently on the target muscle area.
- Slowly glide the massager over the muscle, applying light to moderate pressure. Avoid pressing too hard, especially on bony areas.
- Move the device continuously; do not hold it stationary on one spot for extended periods.
- Consider stretching before or after using the massage gun to enhance muscle relief.
6. Massage Head Guide
The AERLANG EM13 Massage Gun comes with 7 professional massage heads, each designed for specific muscle groups and massage needs.

Figure 6.1: Overview of the 7 professional massage heads.
| Massage Head | Recommended Use |
|---|---|
| Heating Head | Suitable for muscles all over the body, especially for accelerating relaxation and targeting sensitive areas with warmth. |
| Ball Head | Ideal for large muscle groups such as arms, back, hips, and thighs. |
| Crescent Head | Designed for medium muscle groups. |
| Fork Head | Best for the neck, spine, and Achilles tendon. Use with caution around bones. |
| Flat Head | Versatile for all parts of the body, providing a general, even massage. |
| Bullet Head | Excellent for deep tissue massage, trigger points, and small muscle areas like feet and palms. |
| Shovel Head | Suitable for shoulder, lower back, and stomach muscles. |
7. Charging
7.1 Charging the Massage Gun Body:
- Connect the charging cable to the charging port on the base of the massage gun.
- Plug the other end of the cable into a compatible USB power adapter (not included) or a USB port.
- The battery indicator on the LCD screen will show charging progress.
- A full charge typically takes approximately 6 hours for the first use, and less for subsequent charges.

Figure 7.1: The massage gun features a high-capacity battery for long-term use.
7.2 Charging the Heated Massage Head:
The heated massage head charges independently from the main unit.
- Locate the Type-C charging port on the heated massage head.
- Connect a Type-C charging cable (often included with the main unit) to the port.
- Plug the other end into a compatible USB power adapter.
- The battery indicator light on the heated head will show its charging status (e.g., Red Light: Need to charge; Green Light: Fully charged).
- A full charge typically takes approximately 2 hours for the first use.

Figure 7.2: The heated head features a Type-C charging port and indicator lights for battery and temperature.
8. Maintenance
Cleaning:
- Before cleaning, ensure the massage gun is turned off and unplugged from its charger.
- Wipe the surface of the massage gun and massage heads with a slightly damp, soft cloth.
- Do not use abrasive cleaners, solvents, or harsh chemicals.
- Ensure all parts are completely dry before storing or next use.
Storage:
- Store the massage gun and its accessories in the provided carrying case.
- Keep in a cool, dry place, away from direct sunlight and extreme temperatures.
- Ensure the device is fully charged before long-term storage to preserve battery life.
9. Troubleshooting
| Problem | Possible Cause | Solution |
|---|---|---|
| Device does not turn on. | Low battery or device is not charged. | Charge the massage gun for the recommended duration (refer to Section 7.1). |
| Heated head does not heat up. | Heated head not charged or not turned on. | Ensure the heated head is separately charged (Section 7.2) and its individual power switch is activated. |
| Device suddenly stops during use. | Automatic shut-off activated (after 10 minutes) or low battery. | Restart the device if it was used for more than 10 minutes. If not, charge the battery. |
| Reduced power/strength after charging. | Incomplete charge or issue with charging cable/adapter. | Ensure the device is fully charged. Try a different compatible charging cable or adapter. If the issue persists, contact customer support. |
| Massage heads are loose or fall off. | Improper installation or wear and tear. | Ensure massage heads are twisted securely into place. If they continue to loosen, contact customer support for replacement parts. |
10. Specifications
| Feature | Detail |
|---|---|
| Brand | AERLANG |
| Model Number | EM13 |
| Product Dimensions | 5 x 8 x 10 inches |
| Item Weight | 2.2 Pounds (1 Kilogram) |
| Power Source | Battery Powered (1 Lithium Ion battery included) |
| Material | Plastic |
| Speed Levels | 20 adjustable speeds (1400-3200 rpm) |
| Heated Head Temperature | Up to 131°F (55°C) with 3 settings |
| Massage Heads | 7 (including 1 heated head) |
| Auto Shut-off | 10 minutes |
11. Warranty and Support
AERLANG is committed to providing high-quality products and customer satisfaction.
- Customer Support: If you encounter any quality issues, missing parts, or require assistance with your AERLANG EM13 Massage Gun, please contact our customer support team. We are dedicated to assisting you promptly and providing a solution.
- Contact Information: Please refer to the contact details provided with your product packaging or visit the official AERLANG website for support.


