1. Introduction
This manual provides detailed instructions for the installation, operation, and maintenance of your Junsun 11.5-inch Touch Screen Car Radio Stereo. This unit is designed to enhance your in-car entertainment and navigation experience with features such as wireless CarPlay, Android Auto, GPS, and Bluetooth connectivity. Please read this manual thoroughly before installation and use to ensure proper function and safety.
Applicable Car Models:
- Jeep Wrangler: 2007-2018
- Jeep Compass: 2009-2016
- Jeep Patriot: 2009-2016
- Jeep Grand Cherokee: 2005-2011
- Jeep Liberty: 2008-2011
- Jeep Commander: 2008-2011
- Chrysler Sebring: 2007-2010
- Chrysler Town&Country: 2007-2010
- Dodge Grand Caravan: 2011-2014
- Dodge Charger: 2008-2010
- Dodge Ram Pickup 1500/2500/3500: 2009-2012

Image 1.1: The Junsun 11.5-inch Touch Screen Car Radio Stereo installed in a vehicle dashboard.
2. Safety Information
- Always operate the device responsibly. Distracted driving can lead to accidents.
- Ensure all wiring is correctly connected to prevent electrical shorts or damage.
- Do not attempt to disassemble or modify the unit. This may void the warranty and cause damage.
- Keep the screen clean and free from obstructions to maintain clear visibility.
- Consult a professional for installation if you are unsure about any steps.
3. Package Contents
Verify that all components are present in the package before beginning installation:
- 11.5-inch Car Radio Stereo Unit
- Microphone
- GPS Module
- USB Cable (x2)
- 4G Antenna (for 4G-Model, if applicable)
- Can Bus Box
- Power Cable (Plug and Play harness)
- RCA Cable Set
- Reversing Line (for optional backup camera)
- Screwdriver
- Crowbar (for trim removal)
- Antenna Adapter Cable
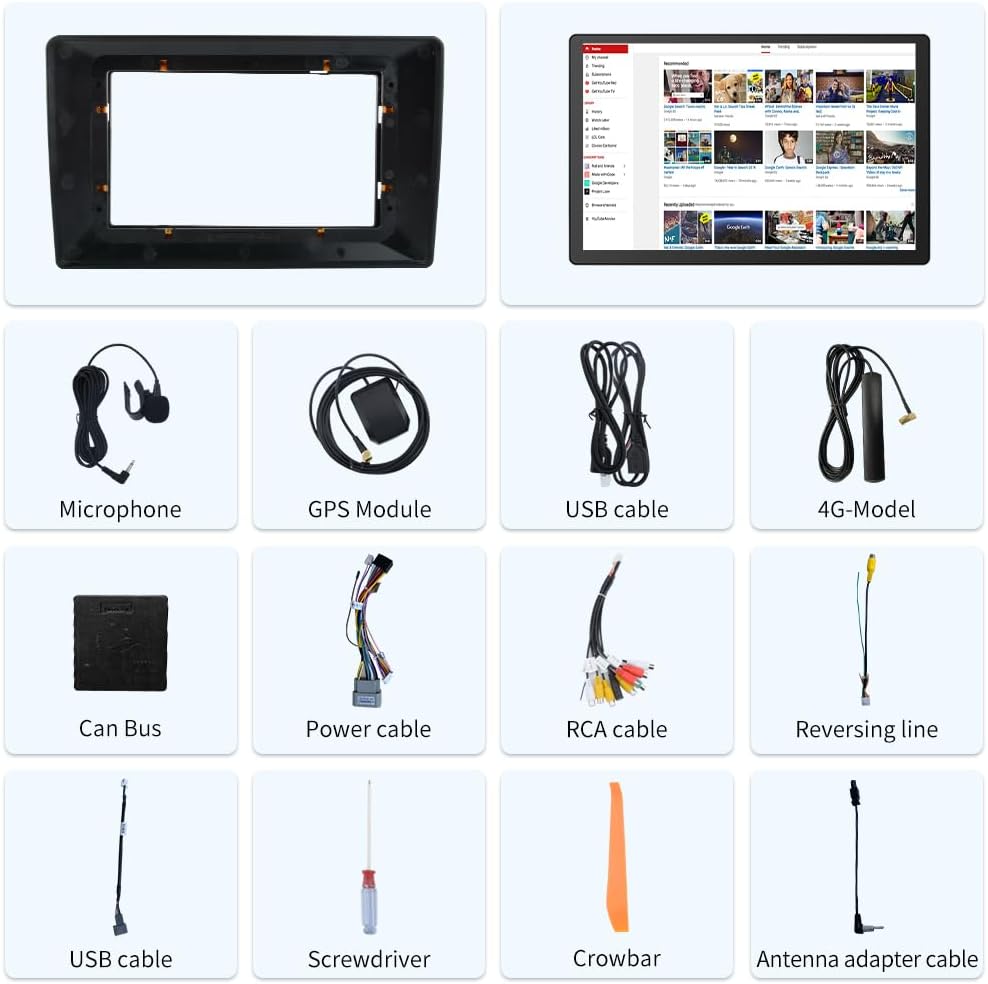
Image 3.1: Included components of the Junsun 11.5-inch Car Radio Stereo package.
4. Setup and Installation
The Junsun car radio stereo is designed for dashboard mounting and features a plug-and-play power harness for simplified installation. It supports existing steering wheel controls and factory backup cameras in compatible vehicles.
4.1 Wiring Connections
Refer to the wiring diagram below for proper connection of all cables. Ensure all connections are secure before powering on the unit.
- Power Harness: Connect the plug-and-play power harness to your vehicle's wiring.
- GPS Module: Connect the GPS module and position it in a location with a clear view of the sky for optimal signal reception.
- USB Cables: Connect the provided USB cables for external device connectivity.
- RCA Cables: Use the RCA cable set for audio/video input/output connections, including front camera input, video output, auxiliary input, and subwoofer output.
- Microphone: Connect the external microphone for improved call quality and voice commands.
- Antenna Adapter: Connect your vehicle's radio antenna using the provided adapter.
- Can Bus Box: Connect the Can Bus box to enable integration with vehicle features like steering wheel controls.

Image 4.1: Wiring diagram for the Junsun 11.5-inch Car Radio Stereo.
4.2 Initial Power On and Configuration
After installation, turn on your vehicle's ignition. The unit should power on automatically. Follow the on-screen prompts for initial setup, including language selection and time zone settings.
5. Operating Instructions
5.1 Display and Interface
The unit features an 11.5-inch touch screen with a resolution of 2000*1200 pixels, providing a clear and responsive interface.

Image 5.1: Display resolution comparison for the 11.5-inch screen.
5.2 Wireless CarPlay and Android Auto
Connect your smartphone wirelessly via Bluetooth to access CarPlay or Android Auto. This allows for voice control and integration of phone functions such as music, navigation, calls, and messages directly on the car stereo display.
- Pairing: Enable Bluetooth on your smartphone and the car stereo. Select your phone from the stereo's Bluetooth menu to pair.
- Activation: Once paired, CarPlay or Android Auto should automatically launch or be selectable from the main menu.

Image 5.2: CarPlay and Android Auto interfaces.
5.3 GPS Navigation
The unit includes a built-in GPS module that supports both online and offline navigation applications from the Google Play app market. Ensure the GPS antenna is properly installed for accurate positioning.
- Online Navigation: Requires a Wi-Fi connection or mobile hotspot for real-time traffic data and map updates.
- Offline Navigation: Download maps for offline use to navigate without an internet connection.

Image 5.3: GPS Navigation interface.
5.4 Bluetooth Connectivity
Utilize Bluetooth for hands-free calling and audio streaming. The built-in microphone allows for clear communication during calls.
- Hands-Free Calling: Pair your phone to make and receive calls directly from the stereo.
- Bluetooth Music: Stream audio from your paired device to the car stereo.

Image 5.4: Bluetooth phone and music interface.
5.5 Steering Wheel Control
The unit supports integration with your vehicle's existing steering wheel controls, allowing you to manage audio and calls without taking your hands off the wheel. Configuration may be required in the settings menu.

Image 5.5: Steering wheel control functionality.
5.6 FM Radio
Access local radio stations with the built-in FM tuner. Scan for stations and save your favorites for quick access.

Image 5.6: FM Radio interface.
5.7 Split Screen Functionality
The split-screen feature allows you to run two applications simultaneously on the display, such as navigation and music playback.

Image 5.7: Split Screen mode.
5.8 Audio Equalizer (DSP)
Adjust audio settings using the built-in Digital Sound Processor (DSP) and equalizer to customize your sound experience.

Image 5.8: Built-in DSP and Equalizer interface.
6. Maintenance
- Screen Cleaning: Use a soft, lint-free cloth to clean the touch screen. For stubborn smudges, lightly dampen the cloth with water or a screen-safe cleaner. Avoid abrasive materials or harsh chemicals.
- General Cleaning: Keep the unit and surrounding dashboard area free from dust and debris.
- Software Updates: Periodically check for available software updates to ensure optimal performance and access to new features. Updates can typically be found through the unit's settings menu or the manufacturer's website.
7. Troubleshooting
If you encounter issues with your Junsun car radio stereo, refer to the following common troubleshooting steps:
| Problem | Possible Cause | Solution |
|---|---|---|
| Unit does not power on. | Incorrect wiring, blown fuse, vehicle ignition off. | Check power cable connections. Verify vehicle ignition is on. Inspect vehicle fuses. |
| No sound. | Volume too low, mute activated, incorrect speaker wiring. | Increase volume. Check if mute is active. Verify speaker connections. |
| GPS signal lost or inaccurate. | GPS antenna improperly placed or disconnected. | Ensure GPS antenna has a clear view of the sky and is securely connected. |
| Bluetooth connection unstable. | Interference, phone too far, software glitch. | Ensure phone is close to the unit. Re-pair the Bluetooth device. Restart both devices. |
| Steering wheel controls not working. | Can Bus box not connected, incorrect configuration. | Verify Can Bus box connection. Check steering wheel control settings in the unit's menu. Some vehicles may require specific configuration. |
| CarPlay/Android Auto not connecting. | Bluetooth issue, phone compatibility, software glitch. | Ensure Bluetooth is active and paired. Restart phone and stereo. Check phone compatibility with CarPlay/Android Auto. |
8. Specifications
| Feature | Detail |
|---|---|
| Display Size | 11.5 Inches |
| Screen Resolution | 2000*1200 |
| Operating System | Android |
| Connectivity Technology | Bluetooth |
| Special Feature | Touchscreen |
| Mounting Type | Dashboard Mount |
| Audio Output Mode | Stereo |
| Voice Command | Microphone, Touchscreen |
| Map Type | North America |
| Item Weight | 4.69 pounds |
| Package Dimensions | 13.58 x 11.42 x 6.57 inches |
9. Warranty and Support
9.1 Warranty Information
This Junsun car radio stereo comes with a 1-year warranty from the date of purchase. Please retain your proof of purchase for warranty claims. The warranty covers manufacturing defects but does not cover damage caused by improper installation, misuse, accidents, or unauthorized modifications.
9.2 Technical Support
For technical assistance, installation questions, or troubleshooting beyond what is covered in this manual, please contact Junsun Car Electronics directly. You can typically find contact information on the seller's page where you purchased the product or through the official Junsun website.

Image 9.1: How to contact Junsun Car Electronics for support.