1. Introduction
This manual provides detailed instructions for the safe and efficient operation, maintenance, and troubleshooting of your Mubeay 5L Cool Mist Humidifier, model LP-2308. Please read this manual thoroughly before first use and retain it for future reference.
Key Features:
- 5.0L Water Tank Capacity: Provides up to 50 hours of continuous cool mist on the lowest setting.
- Ultra-Quiet Operation: Operates at 28dB, suitable for bedrooms and nurseries.
- Adjustable Mist Output: Three mist levels (High, Medium, Low) to suit various humidity needs.
- Constant Humidity Mode: Allows setting a desired humidity level, with automatic monitoring and adjustment.
- Sleep Mode: Turns off the LED display for undisturbed sleep while maintaining humidity.
- Convenient Top-Fill Design: Easy water refilling without removing the tank.
- Automatic Shut-off: Device powers off when the water tank is empty for safety.
- BPA-Free Materials: Ensures safety for home, baby nursery, and plant environments.
2. Important Safety Instructions
To reduce the risk of fire, electric shock, or injury, please observe the following safety precautions:
- Always place the humidifier on a firm, flat, waterproof surface at least 12 inches (30 cm) away from walls and appliances.
- Do not operate the humidifier if the cord or plug is damaged.
- Keep the humidifier out of reach of children and pets.
- Unplug the humidifier before filling, cleaning, or moving it.
- Leakage Prevention:
- Before first use, ensure the foam wrapped around the float rod is completely removed.
- When moving the humidifier, always lift it by the base to prevent water leakage.
- Do not fill water past the maximum water line indicated on the tank.
- Do not add essential oils directly into the water tank. Use the designated essential oil tray if available. Adding oils directly to the tank may corrode the plastic and cause leakage or damage.
- Do not immerse the humidifier base in water or other liquids.
- Do not block the mist outlet or air intake vents.
3. Product Overview
Familiarize yourself with the components of your Mubeay humidifier.

Image 3.1: Front view of the Mubeay 5L Cool Mist Humidifier, showing the water level indicator and control panel.
Components:
- Mist Outlet: Where the cool mist is released.
- Water Tank: Holds up to 5 liters of water. Features a transparent water level indicator.
- Control Panel: Touch-sensitive display for operating settings.
- Base Unit: Contains the ultrasonic transducer and electronic components.
- Power Cord: For connecting to an electrical outlet.
- Essential Oil Tray: A small, removable tray designed for adding essential oils, located near the mist outlet.
4. Setup
4.1 Unpacking and Placement
- Carefully remove all packaging materials from the humidifier.
- Place the humidifier on a flat, stable, and waterproof surface. Ensure it is at least 12 inches (30 cm) away from walls, furniture, and electronic devices.
- Remove any protective foam or tape, especially around the float rod inside the water tank, before first use.
4.2 Filling the Water Tank
The Mubeay humidifier features a convenient top-fill design.
- Ensure the humidifier is unplugged from the power outlet.
- Remove the top lid of the humidifier.
- Pour clean, cool tap water directly into the water tank. Distilled or demineralized water is recommended to prevent mineral buildup.
- Do not fill water above the "MAX-5L" line indicated on the tank.
- Important: Do not pour water directly into the mist outlet or the central mist channel, as this may cause water leakage or damage to internal components.
- Replace the top lid securely.

Image 4.1: Demonstrates the easy top-fill method by pouring water directly into the tank opening.
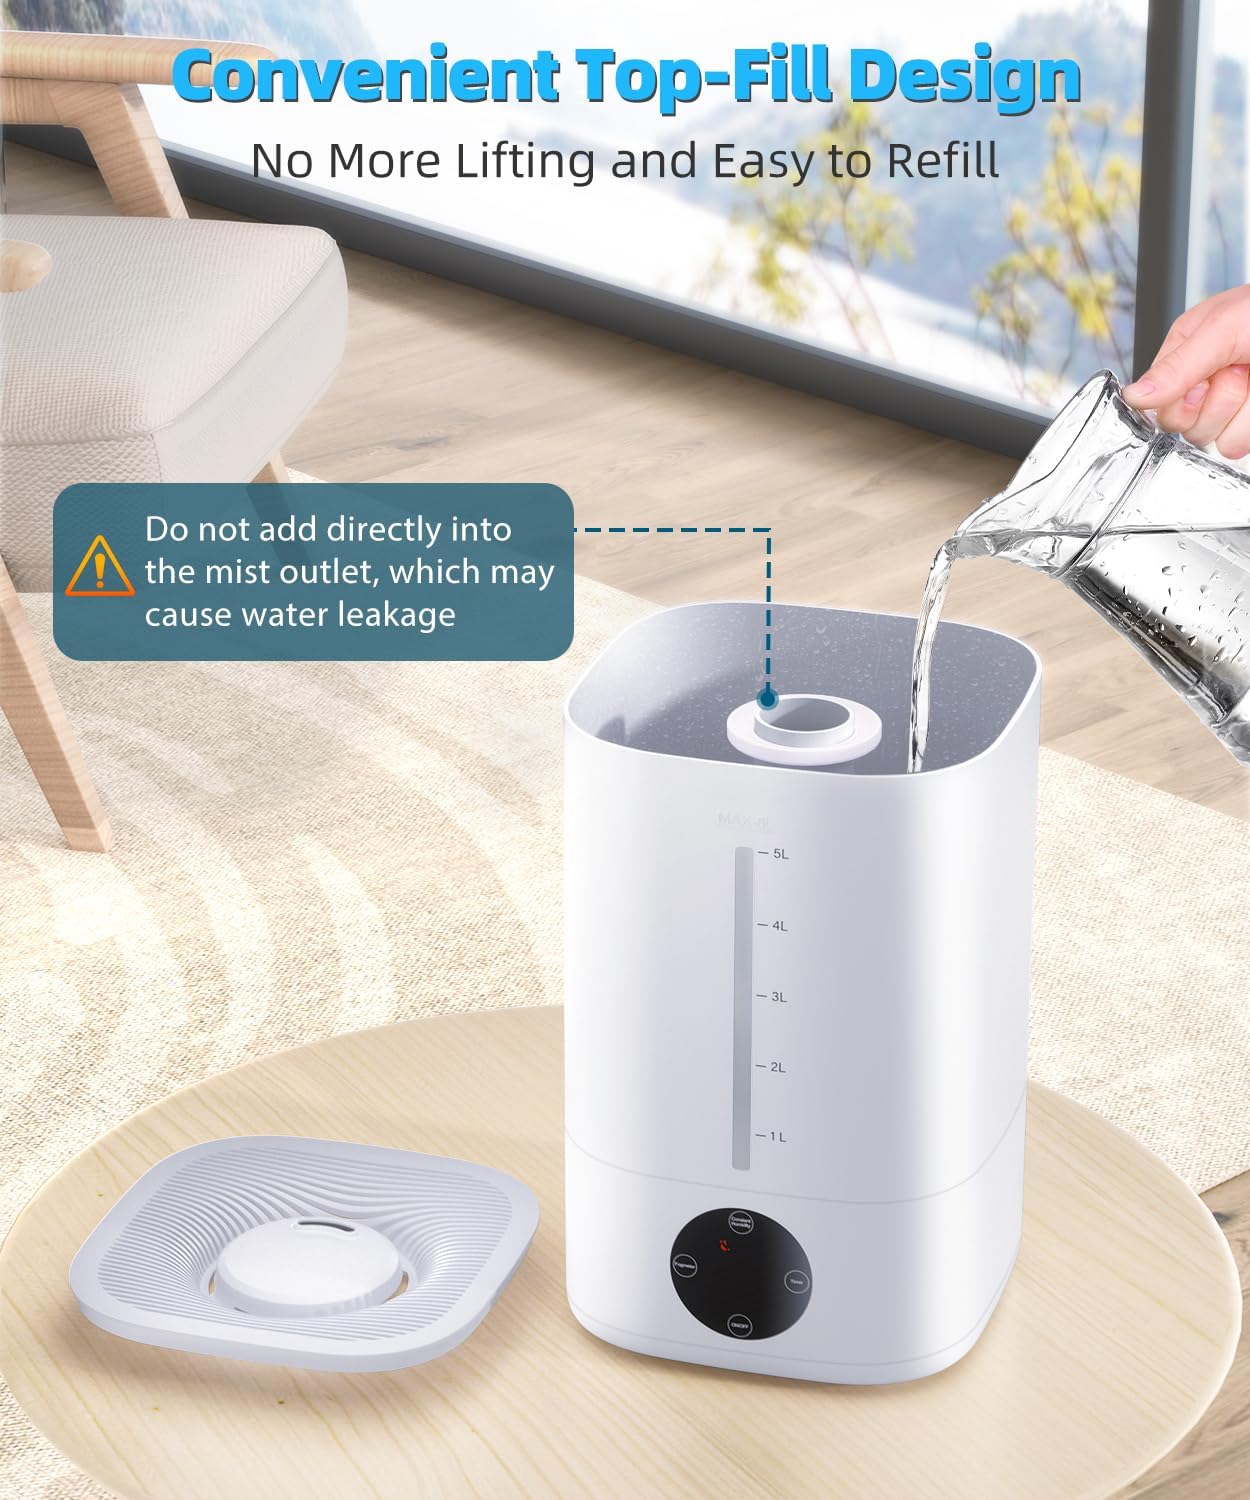
Image 4.2: Illustrates the warning against pouring water into the central mist outlet to prevent leakage.
5. Operation
5.1 Power On/Off
- Plug the power cord into a standard electrical outlet. The display will illuminate briefly.
- Touch the ON/OFF button on the control panel to turn the humidifier on. It will start operating at a default mist level.
- Touch the ON/OFF button again to turn the humidifier off.

Image 5.1: Detailed view of the touch control panel with buttons for power, mist level, constant humidity, and timer.
5.2 Adjusting Mist Level
The humidifier offers three mist output levels: Low, Medium, and High.
- While the humidifier is on, touch the Mist Level button (often indicated by a mist icon or "Speed") to cycle through the settings.
- The current mist level will be displayed on the screen.
- For rapid humidification, activate high-mist mode to increase humidity by 10% within 5 minutes.
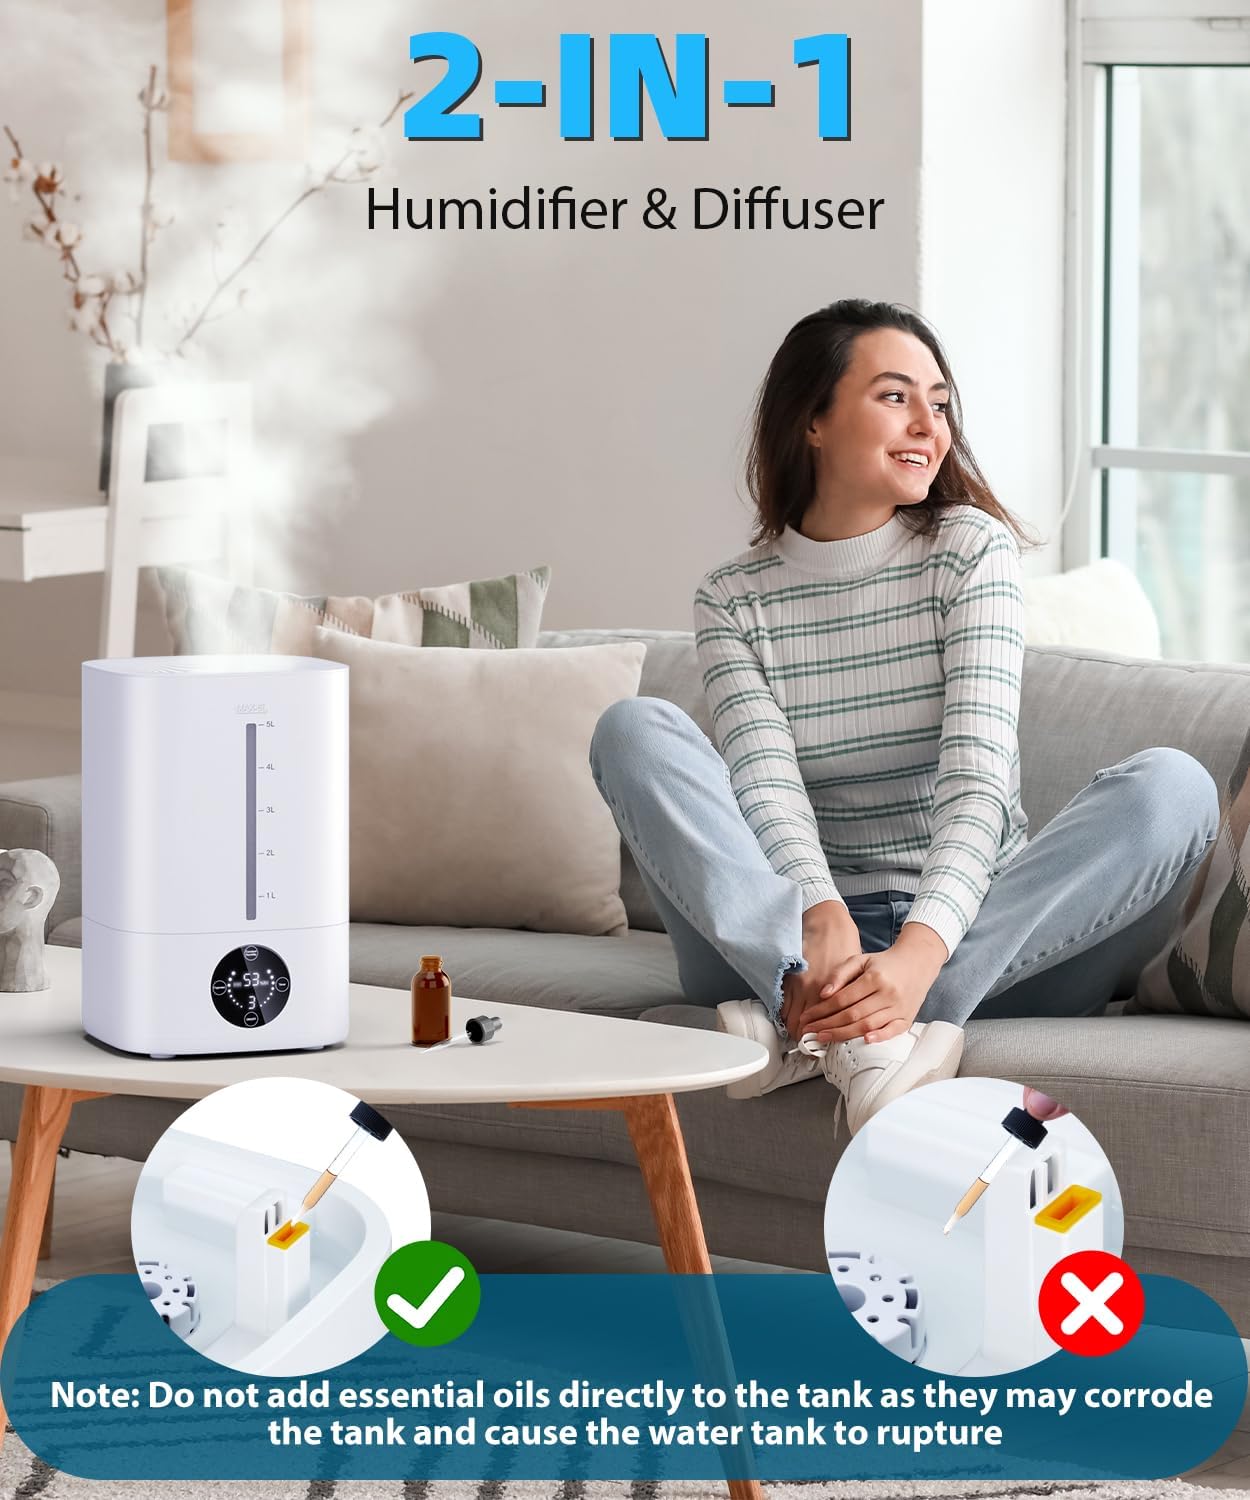
Image 5.2: The humidifier actively releasing cool mist into a room, demonstrating its humidification function.
5.3 Constant Humidity Mode
Set your desired humidity level for automatic maintenance.
- Touch the Constant Humidity button (often labeled "Constant Humidity" or "HUMID").
- The humidity percentage will flash on the display. Use the +/- buttons (if available, or cycle through with the same button) to select your target humidity (e.g., 40% to 90%).
- The humidifier will automatically turn off once the target humidity is reached and restart if the humidity falls below the set level.
5.4 Sleep Mode
For undisturbed rest, activate Sleep Mode.
- Touch the Sleep Mode button (if available, or refer to specific icon on control panel).
- In Sleep Mode, the LED display will turn off, and the humidifier will operate quietly at a low mist setting.
- Touch the button again to exit Sleep Mode.

Image 5.3: The humidifier operating quietly in a bedroom, demonstrating its suitability for sleep environments with the display off.
5.5 Timer Function
Set the humidifier to operate for a specific duration.
- Touch the Timer button to select the desired operating time (e.g., 1, 2, 4, 8 hours).
- The humidifier will automatically shut off once the set time has elapsed.
6. Maintenance
Regular cleaning is essential for optimal performance and longevity of your humidifier.
6.1 Daily Maintenance
- Unplug the humidifier before any cleaning.
- Empty any remaining water from the tank and base.
- Rinse the water tank and base with clean water.
- Wipe the exterior with a soft, damp cloth.
6.2 Weekly Cleaning and Descaling
- Unplug the humidifier and empty all water.
- Pour 1 cup (240ml) of white vinegar into the water tank and base.
- Let it soak for 30 minutes.
- Use a soft brush or cloth to clean the inside of the tank, the base, and the ultrasonic transducer (the small disc in the base).
- Rinse thoroughly with clean water until the vinegar smell is gone.
- Air dry all parts before reassembling or storing.
6.3 Essential Oil Usage
This humidifier is designed with a separate tray for essential oils.
- Locate the small essential oil tray, typically found near the mist outlet or on the side of the base.
- Add a few drops of your preferred essential oil onto the aroma pad in this tray.
- Warning: Do not add essential oils directly into the water tank. Essential oils can corrode the plastic material of the tank, leading to damage and potential leakage.

Image 6.1: Illustrates the correct method of adding essential oils to the designated tray and warns against adding them directly to the water tank.
6.4 Storage
If the humidifier will not be used for an extended period:
- Perform a thorough cleaning and descaling.
- Ensure all parts are completely dry.
- Store the humidifier in its original packaging in a cool, dry place.
7. Troubleshooting
Refer to this section for common issues and their solutions.
| Problem | Possible Cause | Solution |
|---|---|---|
| No mist or low mist output. |
|
|
| Water leakage. |
|
|
| Unusual noise. |
|
|
| Display not working. |
|
|
8. Specifications
| Feature | Detail |
|---|---|
| Brand | Mubeay |
| Model Name | LP-2308 |
| Special Feature | Adjustable Humidity Control |
| Color | White |
| Floor Area Coverage | Up to 500 Square Feet |
| Operation Mode | Automatic |
| Product Dimensions | 12.4"D x 7.67"W x 8.85"H |
| Room Type | Bedroom, Nursery |
| Control Method | Touch |
| Item Weight | 3.43 pounds |
| UPC | 797505404920 |
9. Warranty and Support
Mubeay is committed to providing quality products and customer satisfaction.
- 12-Month Replacement: Your product is eligible for replacement within 12 months of purchase for manufacturing defects.
- Lifetime After-Sales Service & Technical Support: Mubeay offers lifetime technical support for your humidifier.
- 30-Day Return Policy: You may return the product within 30 days of purchase for any reason.
- Customer Service: Expect a quick reply to inquiries within 24 hours.
For warranty claims, technical assistance, or any questions, please contact Mubeay customer support through the retailer's platform or the official Mubeay website.


