
1. Introduction
This manual provides comprehensive instructions for the installation, operation, and maintenance of your CFS Replacement Filter Kit. This kit is designed for use with HL22121, RO150, and RO300 Reverse Osmosis (RO) systems, ensuring high-quality water filtration.
The kit includes a Sediment Cartridge, a Carbon Block Cartridge, a Color-Indicating DI Cartridge filled with MBD-30 Nuclear Grade Resin, and a 150 GPD (Gallons Per Day) Membrane. These components work together to remove sediment, chlorine, bad tastes, odors, and other impurities from your water.
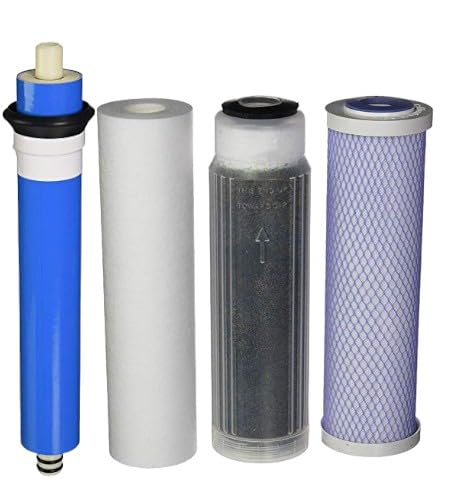
Image: The CFS Replacement Filter Kit, showing the sediment, carbon, DI cartridges, and the 150 GPD membrane.
2. Product Components
The CFS Replacement Filter Kit consists of the following essential components:
- Sediment Cartridge: This filter is designed to remove larger particles such as sand, silt, rust, and scale from the water, protecting subsequent filters from premature clogging. It provides depth filtering for high dirt holding capacity.
- Carbon Block Cartridge: Utilizes activated carbon to effectively remove chlorine, chloramines, volatile organic compounds (VOCs), and other chemicals that cause bad tastes and odors in water.
- Color-Indicating DI Cartridge: Filled with Resintech MBD-30 Nuclear Grade Resin, this deionization (DI) cartridge removes remaining dissolved solids from the water, producing ultra-pure water. The color-indicating feature provides a visual cue for when the resin is exhausted and needs replacement.
- 150 GPD Membrane: The core of the Reverse Osmosis system, this semi-permeable membrane filters out dissolved salts, heavy metals, bacteria, viruses, and other microscopic impurities, providing up to 150 gallons per day of purified water.
3. Installation Instructions
Before beginning installation, ensure your RO system is turned off and the water supply is disconnected. Refer to your specific RO system's manual (HL22121, RO150, or RO300) for detailed housing opening and closing procedures.
- Prepare the System: Turn off the water supply to the RO system and depressurize the system by opening the filtered water faucet.
- Remove Old Filters: Carefully unscrew the filter housings using a filter wrench. Remove the old sediment, carbon, and DI cartridges. Dispose of them properly.
- Clean Housings: Clean the inside of the filter housings with warm, soapy water and rinse thoroughly. Inspect O-rings for damage and replace if necessary. Lubricate O-rings with food-grade silicone grease.
- Install New Cartridges:
- Insert the new Sediment Cartridge into its housing.
- Insert the new Carbon Block Cartridge into its housing.
- Insert the new Color-Indicating DI Cartridge into its housing.
- Install New RO Membrane (if applicable): If replacing the RO membrane, open the membrane housing. Remove the old membrane and insert the new 150 GPD membrane, ensuring the end with the two O-rings goes in first. Secure the cap.
- Secure Housings: Hand-tighten all filter housings and the membrane housing. Do not overtighten.
- Restore Water Supply: Slowly turn on the water supply to the RO system. Check for leaks.
- Flush the System: Allow the system to fill and then flush the new filters by letting water run through the filtered water faucet for at least 10-15 minutes, or until the water runs clear and free of air bubbles. This is crucial for carbon filters to remove any loose carbon fines.
Note: The color-indicating DI resin will change color as it becomes exhausted, typically from blue/green to amber/brown.
4. Operating Instructions
Once installed and flushed, your CFS Replacement Filter Kit will begin purifying water. The system operates automatically, producing purified water as needed and storing it in the RO tank.
- Initial Use: After flushing, the first tank of water produced by the RO system should be drained to ensure optimal performance and taste.
- Water Quality Monitoring: For systems with a TDS (Total Dissolved Solids) meter, regularly check the TDS levels of the purified water. A significant increase in TDS indicates that the RO membrane or DI resin may need replacement.
- Flow Rate: Monitor the flow rate of purified water. A decrease in flow rate can indicate clogged filters or a fouled RO membrane.
5. Maintenance
Regular maintenance is crucial for the longevity and efficiency of your RO system and the quality of your water. The following replacement schedule is recommended, but may vary based on water quality and usage:
- Sediment & Carbon Filters: Replace every 6 months. These filters are the first line of defense and their timely replacement protects the RO membrane.
- DI Cartridge: Replace when the color-indicating resin changes color, or when TDS levels of the purified water begin to rise. This typically occurs every 6-12 months depending on the incoming water quality and usage.
- RO Membrane (150 GPD): Replace every 2-3 years. The lifespan of the membrane is highly dependent on the effectiveness of the pre-filters and the quality of the incoming water.
Always ensure the water supply is off and the system is depressurized before performing any maintenance.
6. Troubleshooting
If you encounter issues with your RO system after installing the replacement filter kit, consider the following common problems and solutions:
| Problem | Possible Cause | Solution |
|---|---|---|
| Low Water Production | Clogged pre-filters (sediment/carbon), low water pressure, fouled RO membrane. | Replace pre-filters. Check household water pressure. Consider replacing RO membrane if pre-filters are new. |
| Bad Taste or Odor | Exhausted carbon filter, contaminated post-filter, or storage tank issues. | Replace carbon filter. Sanitize the storage tank and system if necessary. |
| High TDS in Purified Water | Exhausted DI resin, damaged RO membrane, or improper installation. | Replace DI cartridge. Inspect and replace RO membrane. Recheck all connections and filter seating. |
| Water Leaks | Loose fittings, damaged O-rings, or cracked housing. | Tighten fittings. Replace damaged O-rings. Inspect housings for cracks. |
If problems persist, contact CFS customer support for further assistance.
7. Specifications
| Feature | Detail |
|---|---|
| Brand | CFS (Complete Filtration Services) |
| Compatibility | HL22121, RO150/300 RO Systems |
| Kit Contents | 1x Sediment Cartridge, 1x Carbon Block Cartridge, 1x Color-Indicating DI Cartridge, 1x 150 GPD Membrane |
| DI Resin Type | Resintech MBD-30 Nuclear Grade Resin |
| Product Dimensions | 3"D x 8"W x 10"H (Overall kit dimensions, individual filters vary) |
| Item Weight | 2.44 Pounds |
| Material | Carbon, Resin |
| UPC | 810172420038 |
| Manufacturer | CFS |
8. Official Product Video
Watch this video from Complete Filtration Services Inc. to learn more about their range of filtration products and commitment to quality.
Video: "CFS - One place for all your filter needs" by Complete Filtration Services Inc. This video highlights the brand's various filtration solutions.
9. Warranty and Support
CFS (Complete Filtration Services) is committed to providing quality products. For specific warranty information regarding this replacement filter kit, please refer to the documentation provided with your original RO system or contact CFS directly.
For technical support, troubleshooting assistance, or to inquire about replacement parts, please contact Complete Filtration Services Inc. through their official channels or visit their store on Amazon:
CFS Store on Amazon: Visit the CFS Store
When contacting support, please have your product model (HL22121, RO150/300) and the UPC (810172420038) available for quicker service.


