1. Introduction
This user manual provides comprehensive instructions for the safe and efficient operation of your dé 22kW 32A Mobile Wallbox Electric Vehicle Charging Station. Please read this manual thoroughly before using the product and retain it for future reference.
The dé Mobile Wallbox is designed for convenient and rapid charging of electric vehicles (EVs) and plug-in hybrid electric vehicles (PHEVs) equipped with a Type 2 charging port. Its portable design and adjustable charging current make it suitable for both home and travel use.
2. Safety Information
Important Safety Instructions: Always follow basic safety precautions when using electrical products to reduce the risk of fire, electric shock, and injury to persons.
- Ensure the CEE socket used is properly grounded and rated for 32A (three-phase) or appropriate for the selected charging current.
- Do not use the charging station if the cable, plug, or the unit itself is damaged.
- Keep the charging station away from water, moisture, and extreme temperatures.
- Do not attempt to open, disassemble, or modify the charging station. Refer all servicing to qualified personnel.
- This charging station incorporates Type A 30mA AC + DC 6mA residual current protection and a double fuse for enhanced safety. However, always ensure your electrical installation meets local safety standards.
- Disconnect the charging station from the power source before cleaning or performing any maintenance.
- Ensure the vehicle's charging port is clean and dry before connecting the Type 2 plug.

Figure 2.1: Overview of the dé Mobile Wallbox and its components.
3. Package Contents
Verify that all items are present in the package:
- dé 22 kW Mobile Wallbox (with integrated CEE plug and Type 2 charging cable)
- 3 x RFID Cards
- Wall Mount Bracket
- Mounting Screws
- Carrying Bag
- Cleaning Cloth
4. Product Features
The dé Mobile Wallbox offers a range of features for efficient and secure EV charging:
- High Power Output: Up to 22 kW (three-phase) for rapid charging.
- Adjustable Current: Selectable charging currents (6A/10A/13A/16A/20A/24A/32A) to match your electrical supply and vehicle requirements.
- Delayed Charging: Program charging start times from 0.5 to 8 hours.
- Plug-and-Play Operation: Simple connection to a CEE socket, no complex installation required.
- RFID Access Control: Use included RFID cards to activate and deactivate charging, providing personalized access and protection.
- Advanced Safety: Integrated Type A 30mA AC + DC 6mA RCD and double fuse protection.
- Durable Design: IP65 rating for the Wallbox unit and IP44 for the CEE plug, ensuring resistance to dust and water splashes.
- Portability: Compact design and included carrying bag for easy transport and use in various locations.
- Wide Compatibility: Type 2 connector compatible with most EVs and PHEVs in the EU market.
5. Setup
5.1 Choosing a Location
Select a location that is dry, well-ventilated, and has access to a compatible CEE 32A (three-phase) or CEE 16A (three-phase) industrial socket. Ensure the location allows the charging cable to reach your vehicle's charging port without strain.

Figure 5.1: Example of Wallbox setup for home charging.

Figure 5.2: Usage scenarios: fixed installation at home and portable use for travel.
5.2 Wall Mounting (Optional)
For a more permanent setup, you can use the included wall mount bracket and screws:
- Choose a suitable wall location near your CEE socket and vehicle.
- Mark the drilling points for the wall mount bracket.
- Drill holes and insert appropriate wall plugs (if necessary, depending on wall material).
- Secure the wall mount bracket using the provided screws.
- Attach the dé Mobile Wallbox to the mounted bracket.

Figure 5.3: Wall mounting option and portable setup.
5.3 CEE Plug Compatibility
The Wallbox comes with a CEE 32A 5-pin plug. Ensure your industrial socket is compatible. The Wallbox can also operate with a CEE 16A 5-pin socket, but the maximum charging power will be limited accordingly.

Figure 5.4: CEE 16A vs. 32A plug comparison and verification.
6. Operating Instructions
6.1 Basic Charging Process (Plug-and-Play)
- Plug the CEE connector of the Wallbox into a compatible industrial socket. The Wallbox display will light up.
- Connect the Type 2 charging cable to your electric vehicle's charging port.
- The charging process will typically begin automatically. The display will show charging status, current, voltage, and power.
- To stop charging, disconnect the Type 2 plug from your vehicle first, then unplug the CEE connector from the socket.
6.2 Adjusting Charging Current
You can adjust the charging current (amperage) directly on the Wallbox unit:
- Before connecting to the vehicle or during charging, press the button on the Wallbox unit.
- Each press will cycle through the available current settings: 6A, 10A, 13A, 16A, 20A, 24A, 32A.
- Select the desired current based on your vehicle's capacity and the available power supply.
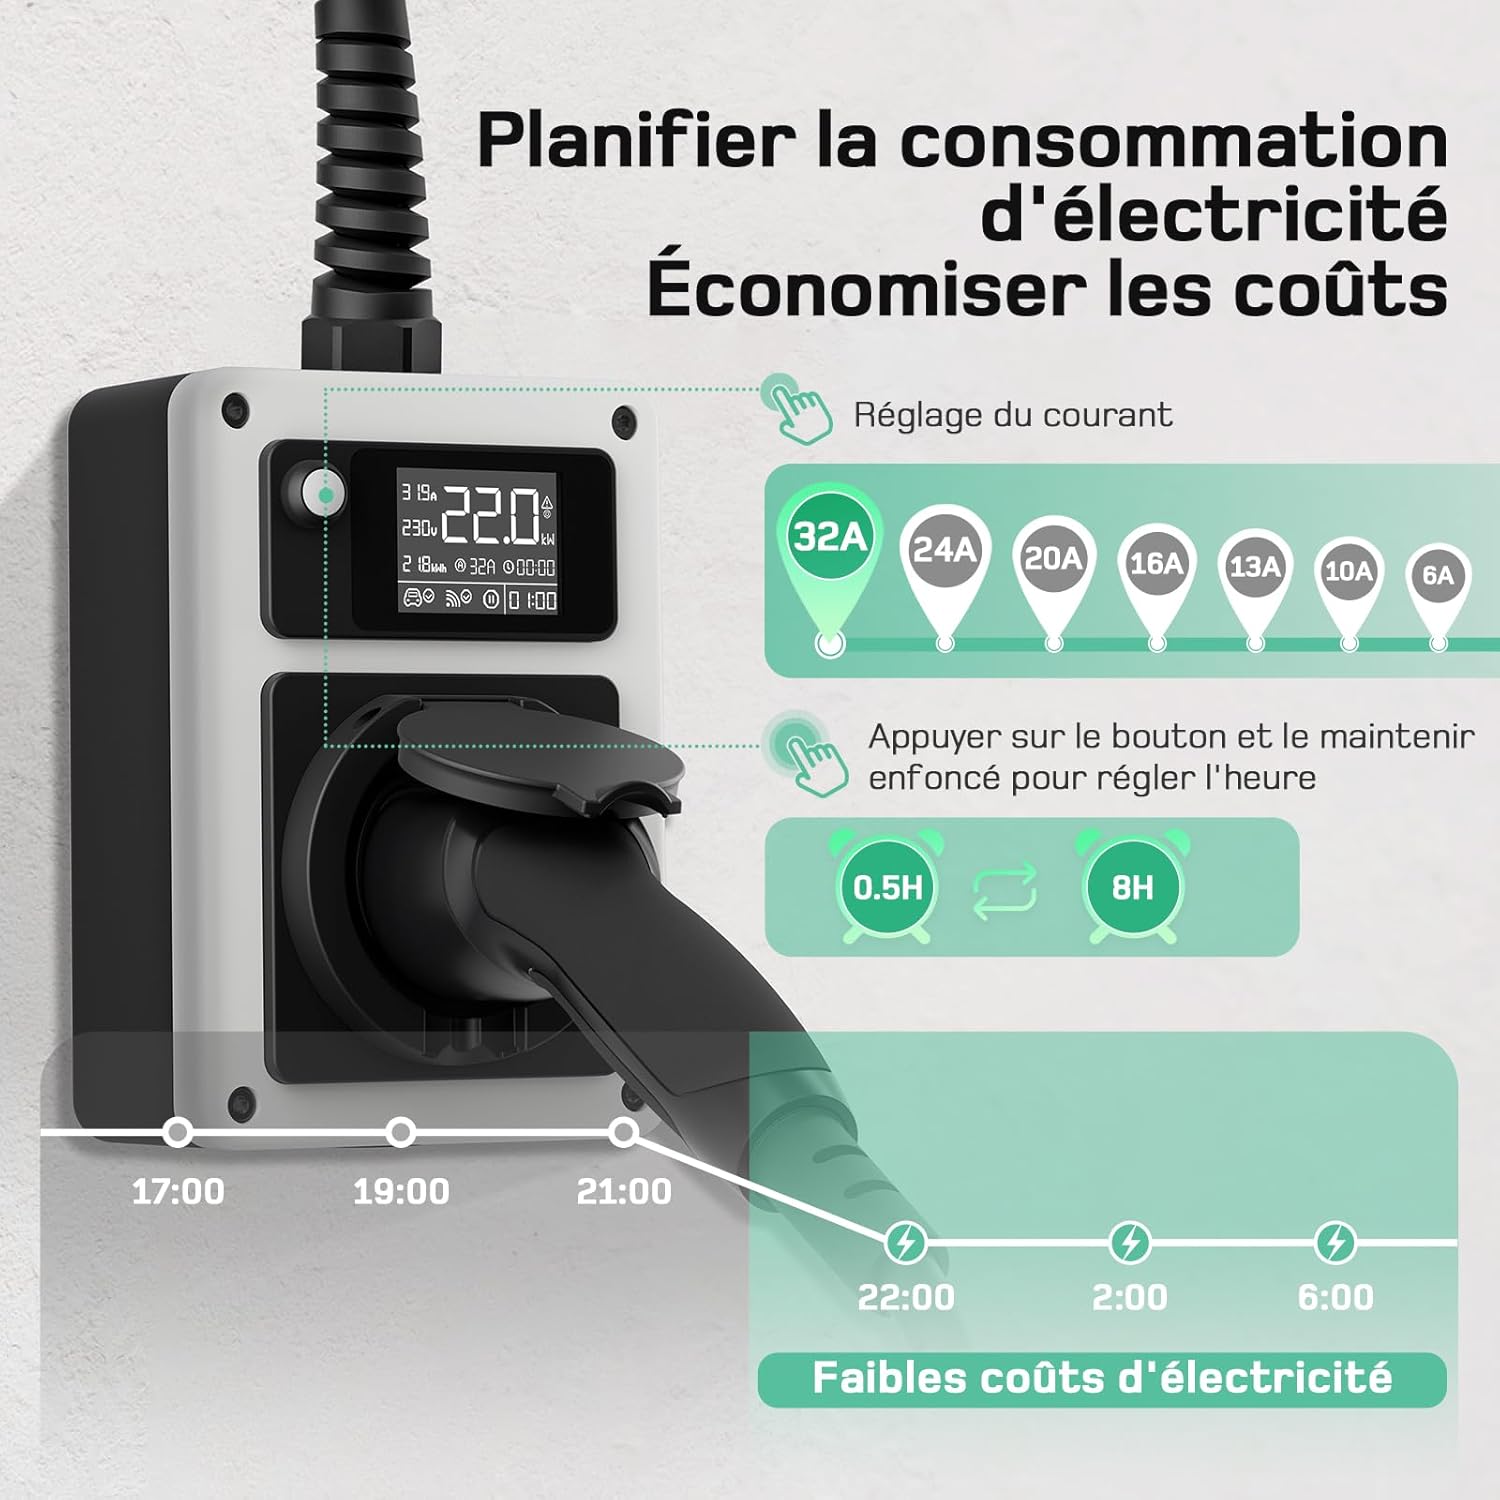
Figure 6.1: Current adjustment and delayed charging settings.
6.3 Setting Delayed Charging
To schedule a delayed start for charging:
- With the Wallbox powered on, press and hold the button on the unit.
- The display will show options for delayed start times (e.g., 0.5h, 1h, ..., 8h).
- Release the button when the desired delay time is displayed. Charging will begin after this period.
6.4 Using RFID Cards for Access Control
The RFID cards provide a secure way to activate and deactivate the charging process, preventing unauthorized use.
- To Activate: When the Wallbox is in standby (display shows "Wallbox deactivated"), tap an RFID card on the designated detection zone on the Wallbox. The display will show "Wallbox activated" and charging can begin.
- To Deactivate RFID Function: Tap an RFID card on the detection zone and hold it for 10 seconds. The RFID function will be deactivated, allowing plug-and-play charging without a card.
- To Reactivate RFID Function: Tap an RFID card on the detection zone and hold it for 10 seconds again. The RFID function will be reactivated.

Figure 6.2: RFID card functions for access control.
6.5 Wi-Fi Control via Application (If applicable)
While the Wallbox offers direct control, some models may support Wi-Fi connectivity for remote monitoring and control via a smartphone application. Refer to the app's instructions for pairing and usage.

Figure 6.3: Wi-Fi control via smartphone application.
7. Maintenance
Regular maintenance ensures the longevity and safe operation of your dé Mobile Wallbox.
- Cleaning: Disconnect the Wallbox from the power source. Use a soft, dry cloth (or the provided cleaning cloth) to wipe the unit. Do not use abrasive cleaners, solvents, or immerse the unit in water.
- Cable Inspection: Periodically inspect the charging cable and plugs for any signs of damage, fraying, cracks, or corrosion. If any damage is found, discontinue use immediately and contact customer support.
- Storage: When not in use, especially during travel, store the Wallbox in its carrying bag in a dry, cool place, away from direct sunlight and extreme temperatures.
8. Troubleshooting
If you encounter issues with your dé Mobile Wallbox, refer to the table below for common problems and solutions.
| Problem | Possible Cause | Solution |
|---|---|---|
| Wallbox display is off. | No power from CEE socket. | Check the CEE socket power supply. Ensure the plug is fully inserted. Check circuit breaker. |
| Charging does not start. | Vehicle not ready for charging; RFID function active; Delayed charging set; Cable not fully connected. | Ensure vehicle is ready to charge. Tap RFID card if function is active. Check delayed charging setting. Re-insert Type 2 plug firmly into vehicle. |
| Charging stops unexpectedly. | Overload/Overheat protection; Vehicle fault; Power interruption. | Check Wallbox display for error codes. Disconnect and reconnect. Allow unit to cool if overheated. Check vehicle's dashboard for charging errors. |
| Cannot adjust charging current. | Button malfunction; Unit locked. | Ensure the unit is not in an error state. Try unplugging and replugging the Wallbox. |
If the problem persists after attempting these solutions, please contact dé customer support.
9. Specifications
| Parameter | Value |
|---|---|
| Model Number | deM3C22FW |
| Maximum Charging Power | 22 kW (Three-phase) |
| Input Voltage | 400V AC (Three-phase) |
| Adjustable Current | 6A / 10A / 13A / 16A / 20A / 24A / 32A |
| Input Plug Type | CEE 32A 5-pin |
| Output Connector Type | Type 2 |
| Safety Features | Type A 30mA AC + DC 6mA RCD, Double Fuse |
| IP Rating (Wallbox) | IP65 |
| IP Rating (CEE Plug) | IP44 |
| Product Dimensions (L x W x H) | 37 x 35 x 10.5 cm |
| Item Weight | 3.17 Kilograms |

Figure 9.1: Charging speed comparison at different power levels.
10. Warranty and Support
For warranty information and customer support, please refer to the documentation provided with your purchase or visit the official dé website. Keep your proof of purchase for warranty claims.
Manufacturer: deAccessories
Brand: dé


