1. Introduction
This manual provides detailed instructions for the assembly, operation, maintenance, and troubleshooting of your Vividwood Sewing Table. Please read this manual thoroughly before assembly and use to ensure proper function and safety.

Image 1.1: The Vividwood Sewing Table, featuring its main tabletop, adjustable platform, and storage shelf.
2. Safety Information
WARNING: Failure to follow these safety instructions may result in injury or damage to the product.
- Always assemble the desk according to the provided instructions.
- Ensure all parts are securely fastened and floor levelers are properly adjusted to maintain stability.
- Do not use the desk until it is fully assembled and stable.
- This desk is heavy and may tip over if not assembled correctly or if items are placed unevenly on the surface.
- Keep small parts away from children during assembly.
3. Package Contents
Please verify that all components are present before beginning assembly. If any parts are missing or damaged, contact customer support.
- Main Tabletop (1)
- Foldable Side Shelf (1)
- Adjustable Platform Shelf (1)
- Lower Storage Shelf (1)
- Leg Frames (2)
- Assembly Hardware (screws, bolts, floor levelers, adjustment knobs)
- Instruction Manual (1)
4. Assembly Instructions
Assembly is required for this product. It is recommended that two people assemble the table for ease and safety. Detailed instructions and an installation video are available to guide you through the process.
4.1. Preparation
- Unpack all components and lay them out on a clean, soft surface to prevent scratches.
- Identify all parts against the package contents list.
- Ensure you have the necessary tools (e.g., screwdriver, wrench) if not included.
4.2. Step-by-Step Assembly
- Attach the leg frames to the main tabletop using the provided hardware. Ensure all screws are tightened securely.
- Install the lower storage shelf between the leg frames.
- Mount the adjustable platform shelf to the designated brackets on the main tabletop. Do not fully tighten the adjustment knobs yet.
- Attach the foldable side shelf to the main tabletop using the hinge mechanisms.
- Once fully assembled, place the table in its desired location and adjust the floor levelers to ensure stability on uneven surfaces.

Image 4.1: Product dimensions for assembly reference.
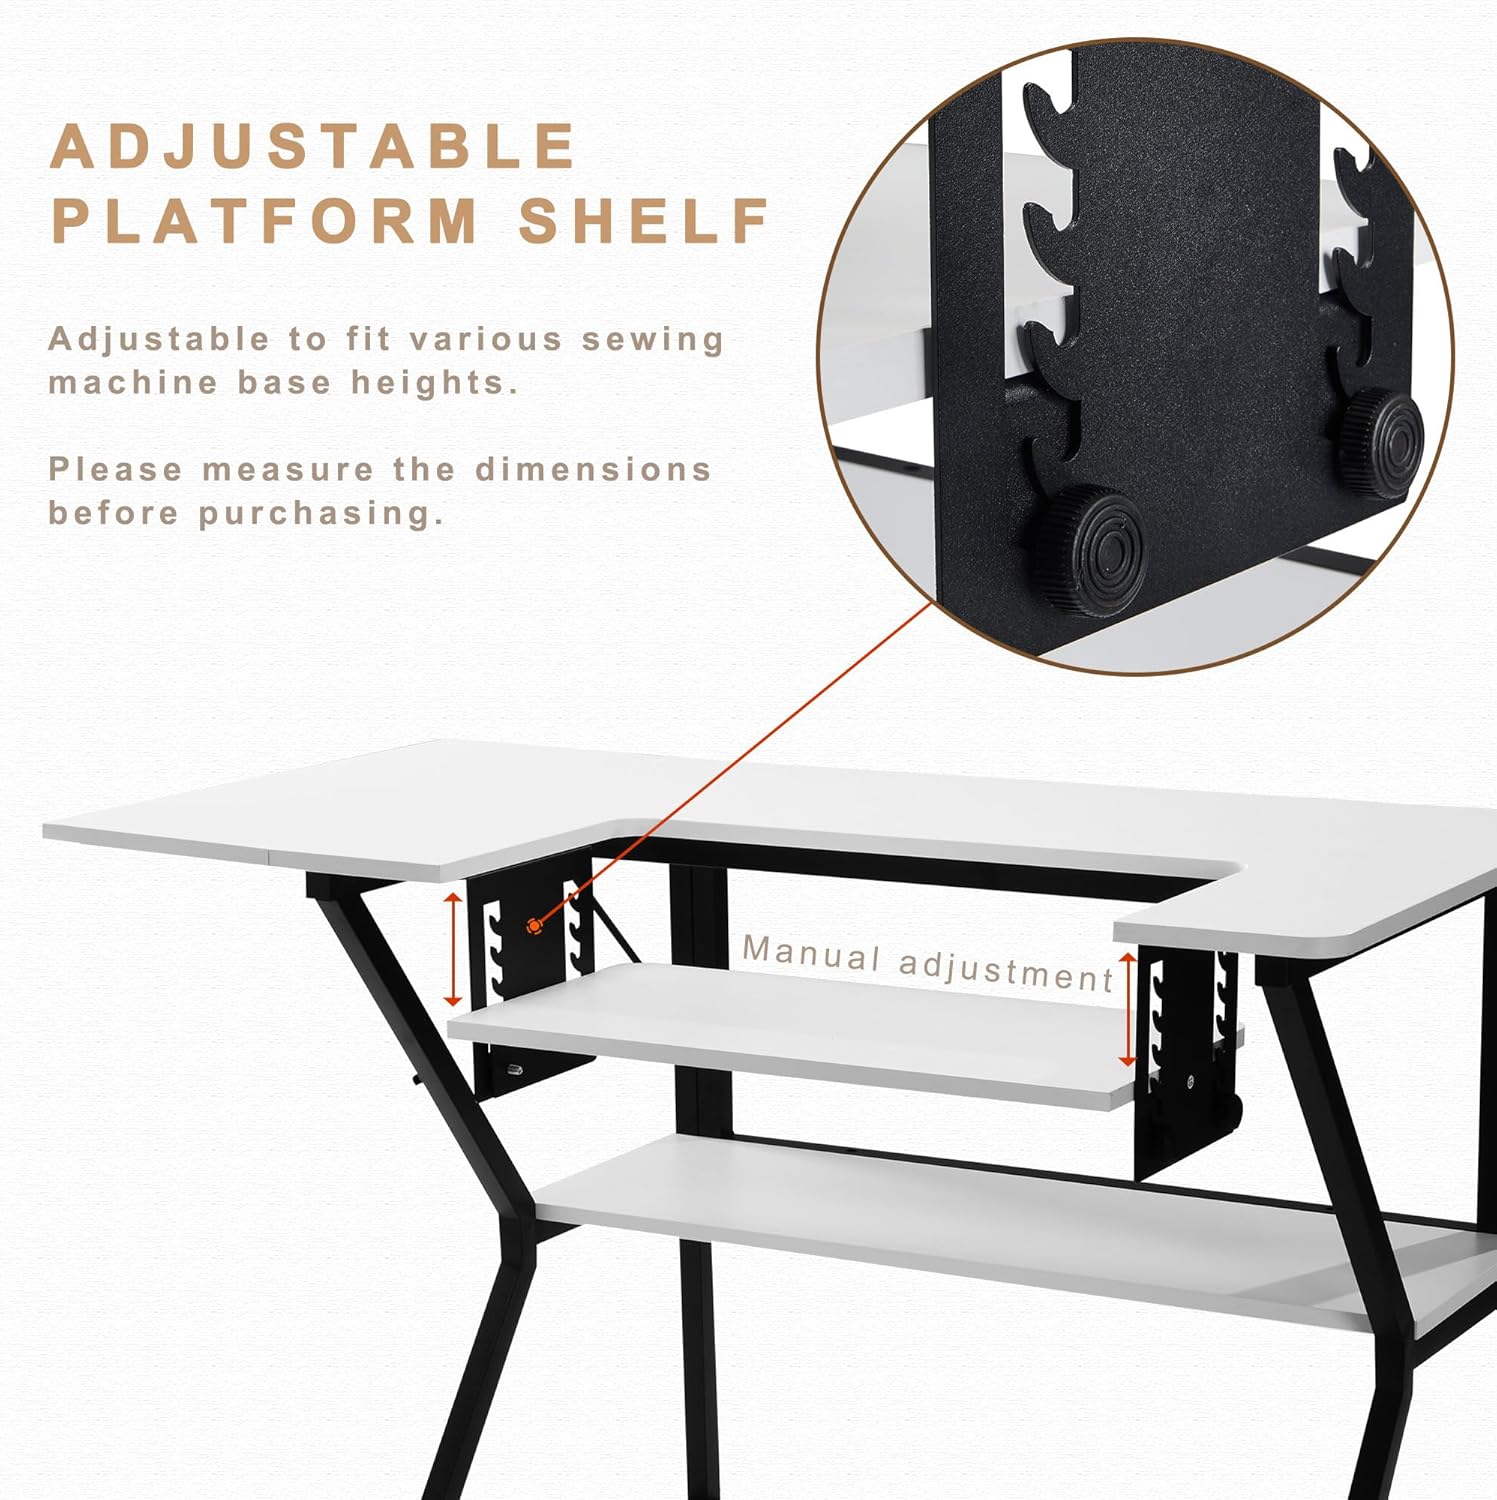
Image 4.2: Detail of the foldable side panel mechanism.
5. Features and Operation
5.1. Adjustable Platform Shelf
The unique adjustable platform (23" W x 10.75" D) is designed to accommodate various sewing machine base heights. It can also serve as a convenient spot for a laptop or other tools. To adjust the height:
- Loosen the adjustment knobs located on the sides of the platform.
- Carefully raise or lower the platform to the desired height.
- Tighten the adjustment knobs firmly to secure the platform in place. The upgraded adjustment structure ensures a better-fixed platform frame, making it less prone to shaking.

Image 5.1: Manual adjustment mechanism for the platform shelf.
5.2. Foldable Side Shelf
The 9.5" foldable side shelf provides additional workspace when needed. It can be extended for larger projects or folded down to save space. To operate:
- To extend: Lift the shelf until it is level with the main tabletop and ensure the support mechanism is locked into place.
- To fold: Release the support mechanism and gently lower the shelf.
5.3. Lower Storage Shelf
The spacious lower storage shelf (31.5" W x 11.75" D) is positioned 15.35" above the floor, offering ample foot space while keeping fabrics, art supplies, and essentials neatly organized and accessible. This helps maintain a clutter-free workspace.

Image 5.2: The sewing table in use, demonstrating its functionality.

Image 5.3: The table's versatility for various crafting activities.
6. Care and Maintenance
To ensure the longevity and appearance of your Vividwood Sewing Table, follow these care instructions:
- Cleaning: The table features a smooth, stain-resistant surface that is easy to clean. Wipe spills immediately with a soft, damp cloth. For general cleaning, use a mild soap solution and dry thoroughly. Avoid abrasive cleaners or harsh chemicals.
- Stability Check: Periodically check all screws and bolts to ensure they remain tight. Re-tighten as necessary to maintain stability.
- Protection: Avoid placing hot items directly on the surface. Use coasters or protective pads when necessary.

Image 6.1: Details on the table's durable construction and safety features.
7. Troubleshooting
If you encounter any issues with your Vividwood Sewing Table, please refer to the following common solutions:
- Table Wobbles: Check that all assembly hardware is securely tightened. Adjust the four floor levelers on the bottom of the legs to compensate for uneven flooring.
- Adjustable Platform Not Stable: Ensure the adjustment knobs are fully tightened after setting the desired height. Verify that the platform is correctly seated in its brackets.
- Difficulty Folding/Unfolding Side Shelf: Check for any obstructions in the hinge mechanism. Ensure the support arm is properly engaged or disengaged.
If the problem persists, please contact customer support for further assistance.
8. Product Specifications
| Feature | Detail |
|---|---|
| Brand | Vividwood |
| Model Number | sewing table |
| Product Dimensions (D x W x H) | 45.5"D x 23.5"W x 30"H |
| Color | White |
| Style | Modern |
| Base Material | Alloy Steel |
| Top Material Type | Engineered Wood |
| Finish Type | Steel |
| Item Weight | 19.5 Kilograms |
| Number Of Shelves | 1 (lower storage shelf) |
| Storage Options | 1 shelf, 1 adjustable platform |
| Required Assembly | Yes |
| Recommended People for Assembly | 2 |
9. Warranty Information
This Vividwood Sewing Table comes with a Limited Warranty. Please refer to the product packaging or contact customer support for specific terms and conditions regarding warranty coverage, duration, and claims process.
10. Customer Support
For any questions, concerns, or assistance with your Vividwood Sewing Table, please do not hesitate to contact our customer support team. We are committed to assisting you within 24 hours.
Contact Information: Please refer to the seller's contact details on your purchase receipt or the product listing page.