Introduction
This manual provides detailed instructions for the installation, operation, and maintenance of your treewell Motion Sensor Outdoor Wall Lights (Model TOLM02D). Please read this manual thoroughly before installation and use to ensure proper function and safety. Keep this manual for future reference.
Safety Information
- Electrical Safety: Always turn off power at the circuit breaker before installing, servicing, or cleaning the fixture. Consult a qualified electrician if you are unsure about wiring procedures.
- Grounding: Ensure the fixture is properly grounded to avoid potential electrical shock.
- Voltage: This fixture is designed for 120 Volts (AC) electrical systems.
- Bulb Type: Use only ST58 LED Dimmable Bulbs (6W 2700K 700LM) or equivalent E26 base bulbs as specified. Do not exceed the maximum wattage.
- Installation Location: Install the fixture in a location suitable for outdoor use, away from flammable materials.
- Handling: Handle glass components with care to prevent breakage.
Package Contents
Verify that all components are present before beginning installation:
- 2 x Motion Sensor Outdoor Wall Lights
- 2 x ST58 LED Light Bulbs
- Mounting Hardware (screws, wire nuts, mounting plate)
- Instruction Manual
Specifications
| Feature | Detail |
|---|---|
| Brand | treewell |
| Model Name | Motion Sensor Exterior Light Fixture |
| Model Number | TOLM02D |
| Dimensions (L x W x H) | 6.96" x 6.96" x 11.1" |
| Material | Aluminum, Seeded Tempered Glass |
| Finish Type | Matte Black |
| Power Source | Corded Electric |
| Voltage | 120 Volts (AC) |
| Light Source Type | LED (ST58 Dimmable Bulb Included) |
| Bulb Base | E26 |
| Brightness | 700 Lumens (per bulb) |
| Color Temperature | 2700K Warm White |
| Special Features | Motion Sensor, Dusk to Dawn Sensor, Waterproof, Anti-Rust, Dimmable |
| Motion Sensor Detection Angle | 140° |
| Motion Sensor Detection Distance | 10-40 feet (Adjustable) |
| Certification | ETL Listed |
Setup and Installation
Before You Begin:
- Turn off power at the circuit breaker.
- Ensure you have all necessary tools (screwdriver, wire strippers, etc.).
- Prepare the Mounting Surface: Ensure the electrical box is securely mounted and accessible.
- Attach Mounting Plate: Secure the universal mounting plate to your electrical box using the provided screws. Ensure the plate is level and stable.
- Wiring Connections:
- Connect the black wire from the fixture to the black (hot) wire from the electrical box using a wire nut.
- Connect the white wire from the fixture to the white (neutral) wire from the electrical box using a wire nut.
- Connect the ground wire (bare copper or green) from the fixture to the ground wire from the electrical box and the mounting plate using a wire nut.
Note: Ensure all connections are secure and insulated.
- Mount the Fixture: Carefully align the fixture with the mounting plate and secure it with the provided cap nuts or screws.
- Install the Bulb: Screw the provided ST58 LED bulb into the E26 socket. Do not overtighten.

Image: Product dimensions, bulb type, and component details. This image illustrates the physical dimensions of the light fixture, specifies the recommended ST58 LED bulb, highlights the seeded glass texture, shows the matte black finish, details the universal mount plate for installation, and displays the standard E26 bulb socket.
- Restore Power: Turn the power back on at the circuit breaker.
Operating Instructions
Your treewell outdoor wall light features an advanced PIR motion sensor and a dusk-to-dawn sensor, offering three adjustable lighting modes. The mode selection switch and adjustment dials are located on the bottom of the sensor unit.
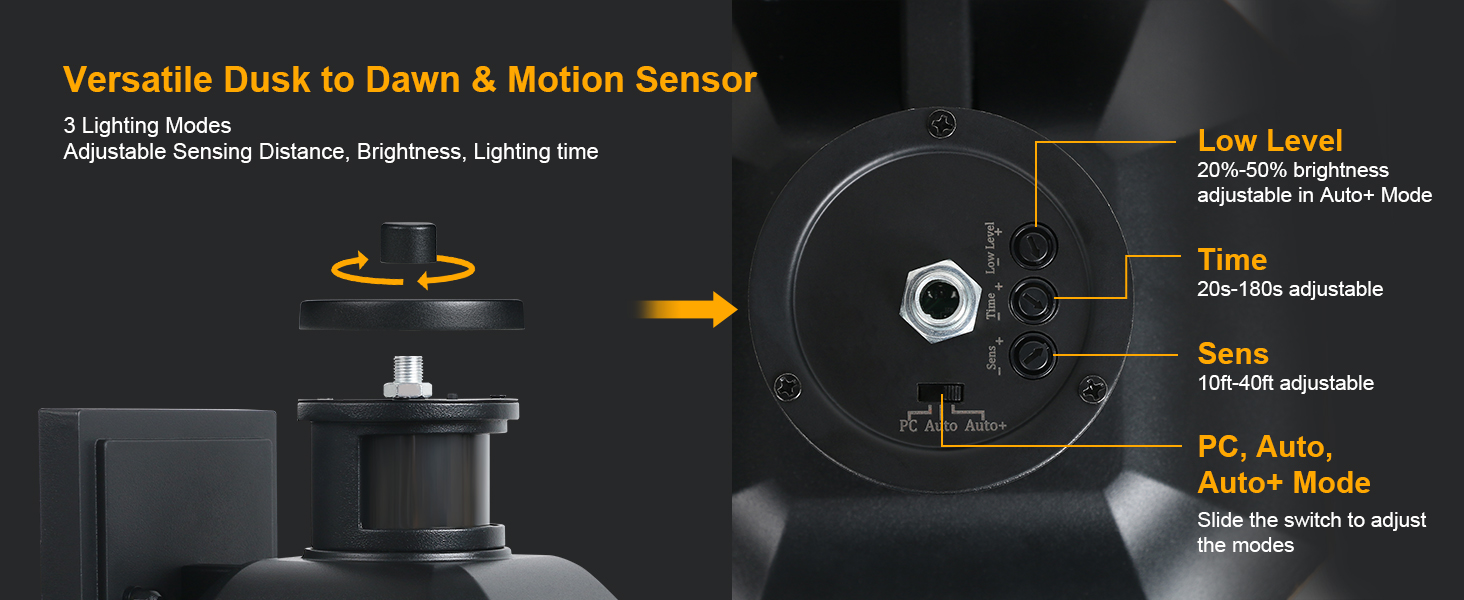
Image: Advanced PIR Motion Sensor controls. This image provides a detailed view of the motion sensor unit, highlighting the adjustment dials for 'Low Level' brightness (20-50% in Auto+ Mode), 'Time' (20s-180s delay), and 'Sens' (10-40ft detection range). It also shows the slide switch for selecting between PC, Auto, and Auto+ modes.
Lighting Modes:
- 1. PC Mode (Dusk to Dawn):
In this mode, the light automatically turns off during the daytime and turns on at night. The motion sensor is inactive. This mode provides continuous illumination throughout the night.

Image: PC Mode (Dusk to Dawn) operation. This illustration demonstrates the functionality of PC Mode, where the light automatically remains off during daylight hours and illuminates continuously once darkness falls.
- 2. Auto Mode:
The light automatically turns on at 100% brightness when motion is detected at night. It will turn off after 20-180 seconds (adjustable lighting time) if no further motion is detected. The light remains off during the day.
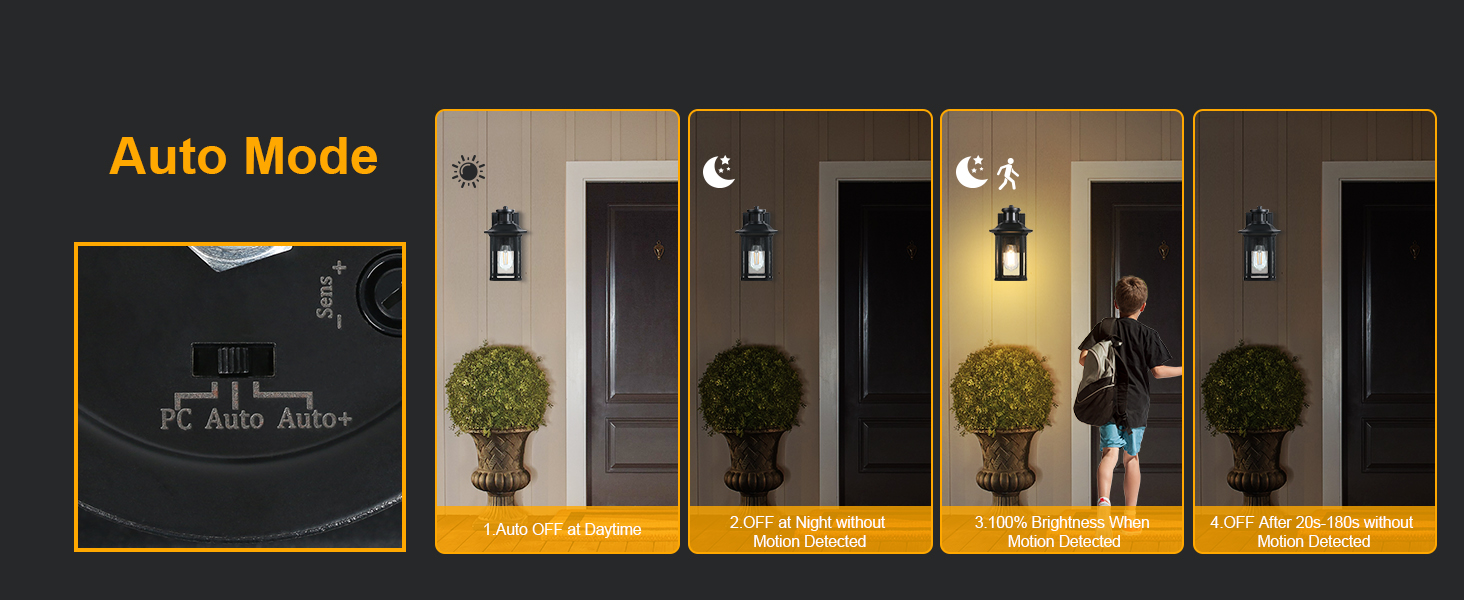
Image: Auto Mode operation. This graphic explains Auto Mode, illustrating that the light is off during the day and at night when no motion is present. It activates to 100% brightness upon motion detection and then turns off after a user-defined delay if no further motion is sensed.
- 3. Auto+ Mode:
The light automatically turns on at a dim brightness (20%-50%, adjustable) at night. When motion is detected, it switches to 100% brightness. After 20-180 seconds (adjustable lighting time) without motion, it returns to the dim light setting. The light remains off during the day.
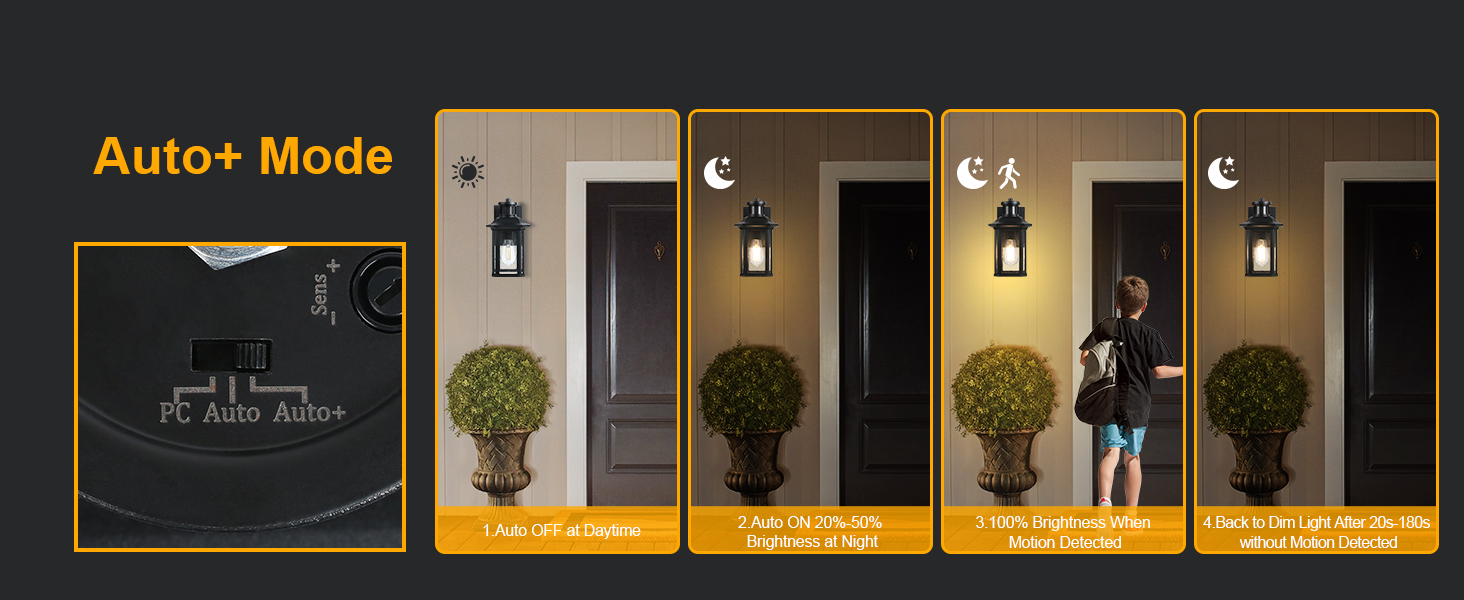
Image: Auto+ Mode operation. This visual guide details Auto+ Mode, showing the light off during the day, illuminating at a dim brightness at night, brightening to 100% upon motion detection, and then reverting to the dim state after a specified period of no motion.
Adjustable Settings:
- Low Level (Brightness): Adjustable from 20%-50% (only in Auto+ mode). Use the 'Low Level' dial to set the desired dim brightness.
- Time (Delay): Adjustable from 20s to 180s. This sets how long the light stays at 100% brightness after motion is detected in Auto or Auto+ modes, or how long it stays off in Auto mode before turning off completely. Use the 'Time' dial to set the duration.
- Sens (Sensitivity): Adjustable sensing coverage from 10ft to 40ft. Use the 'Sens' dial to adjust the motion detection range.
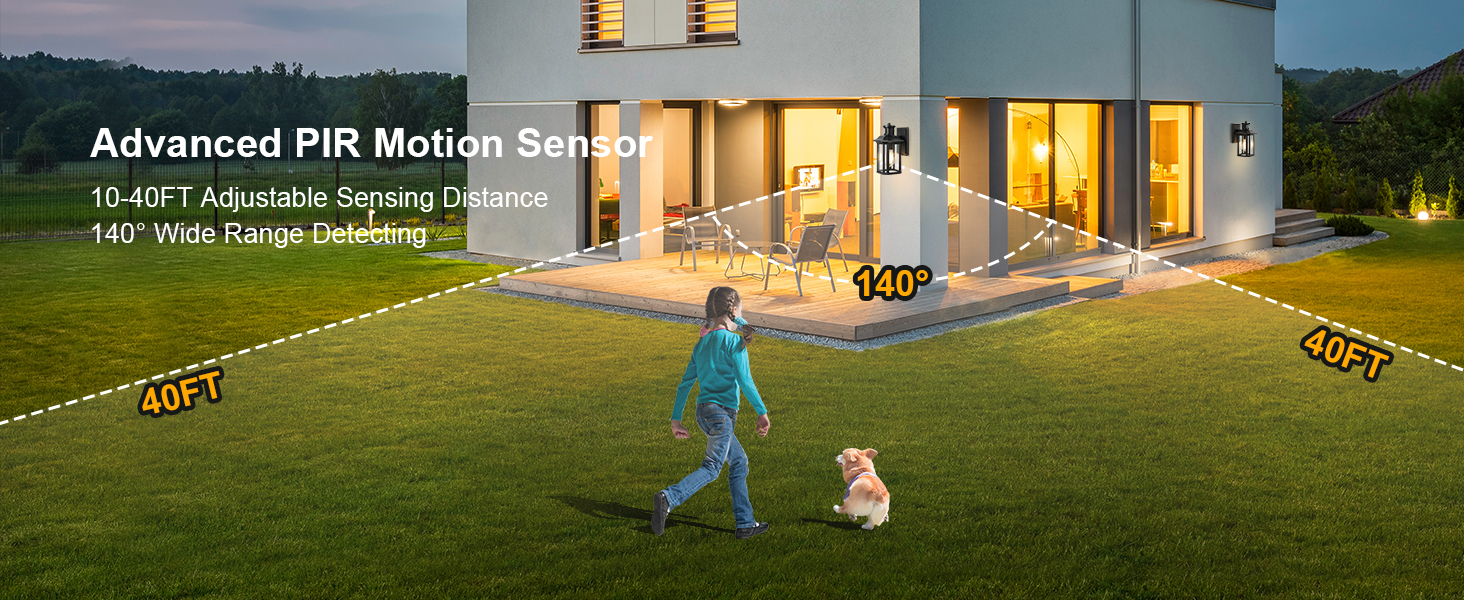
Image: Motion sensor detection range. This image illustrates the 140-degree wide detection angle and the adjustable 10-40 feet sensing distance of the PIR motion sensor, showing its coverage area around a property.
Maintenance
- Cleaning: To clean the fixture, turn off the power, allow it to cool, and wipe with a soft, damp cloth. Do not use abrasive cleaners or solvents.
- Bulb Replacement: Ensure power is off before replacing the bulb. Use only ST58 LED Dimmable Bulbs with an E26 base.
- Weather Resistance: The fixture is constructed with heavy-duty aluminum and solid seeded glass, designed to be waterproof, stormproof, snowproof, and sunproof. Regular inspection for any damage to seals or housing is recommended, especially after severe weather.
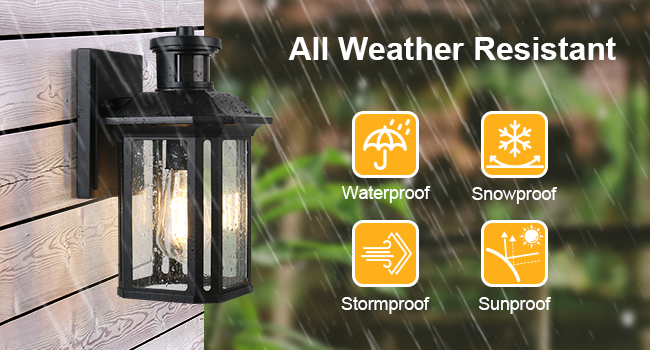
Image: All-Weather Resistant features. This image depicts the outdoor wall light under rainfall, emphasizing its waterproof, stormproof, snowproof, and sunproof capabilities. It also highlights the anti-rust die-cast aluminum construction.
Troubleshooting
| Problem | Possible Cause | Solution |
|---|---|---|
| Light does not turn on at night. | 1. Power is off. 2. Bulb is faulty. 3. Dusk-to-dawn sensor is obstructed or in bright conditions. 4. Wiring issue. | 1. Check circuit breaker. 2. Replace bulb. 3. Ensure sensor is clear and in darkness. 4. Recheck wiring connections (with power off). |
| Motion sensor not detecting. | 1. Sensitivity (Sens) setting is too low. 2. Obstruction in sensor's field of view. 3. Sensor is dirty. 4. Incorrect mode selected. | 1. Adjust 'Sens' dial to a higher setting. 2. Clear any objects blocking the sensor. 3. Clean the sensor lens. 4. Ensure 'Auto' or 'Auto+' mode is selected. |
| Light stays on continuously (not dimming/turning off). | 1. 'PC Mode' selected. 2. Constant motion in detection area. 3. 'Time' setting is too long. 4. Sensor malfunction. | 1. Switch to 'Auto' or 'Auto+' mode. 2. Adjust 'Sens' to reduce detection area or relocate fixture. 3. Adjust 'Time' dial to a shorter duration. 4. Contact customer support. |
| Dim brightness in Auto+ mode is incorrect. | 1. 'Low Level' setting is incorrect. | 1. Adjust 'Low Level' dial to desired brightness (20%-50%). |
Warranty Information
This treewell product comes with a Limited Warranty. For specific details regarding warranty coverage, duration, and claims, please refer to the warranty card included with your purchase or contact treewell customer support.
Support
For technical assistance, replacement parts, or any questions not covered in this manual, please contact treewell customer support. Visit the official treewell store for more information and contact options: