1. Introduction
This manual provides essential information for the safe and efficient operation of your Temank MPPT 100A Solar Charge Controller. Please read this manual thoroughly before installation and use. Keep this manual for future reference.
The Temank MPPT 100A Solar Charge Controller is designed to optimize power harvesting from your solar panels and efficiently charge your battery bank. It supports 12V, 24V, 36V, and 48V battery systems automatically, with a maximum PV input voltage of 150V. Key features include support for up to 12 parallel connections, dual cooling for efficient heat dissipation, compatibility with multiple battery types (lead-acid and lithium), and comprehensive protection mechanisms.
2. Important Safety Instructions
- Read All Instructions: Before installing and operating the controller, read all instructions and cautionary markings in this manual and on the controller.
- Qualified Personnel: Installation and wiring must be performed by qualified personnel.
- Proper Wiring: Ensure all wiring is correctly sized and connections are secure to prevent overheating and damage. Always match polarity.
- Circuit Breakers: Install appropriate DC circuit breakers for both PV input and battery connections to protect against overcurrent.
- Ventilation: Ensure adequate ventilation around the controller to prevent overheating. Do not block cooling vents.
- Battery Safety: Work with batteries carefully. Wear eye protection and remove metal jewelry. Do not short-circuit battery terminals.
- High Voltage: Solar panels can produce high voltages. Exercise extreme caution during installation and maintenance.
- Grounding: Ensure the controller is properly grounded according to local electrical codes.
3. Product Features
- High Efficiency MPPT Technology: Maximizes energy harvest from solar panels.
- System Voltage Auto-Recognition: Automatically detects 12V, 24V, 36V, or 48V battery systems.
- Parallel Connection Capability: Supports up to 12 units in parallel for increased system capacity and power output.
- Advanced Cooling System: Features a die-cast aluminum construction and an upgraded turbofan for efficient and quiet heat dissipation.
- Wide Battery Compatibility: Compatible with Sealed, Gel, Flooded, LiFePO4, and Lithium-Ion batteries. User-customizable charging parameters are available.
- High PV Input: Supports a maximum PV input voltage of 160V. Max PV input power up to 4800W for 48V systems.
- Comprehensive Protections: Includes overcurrent, short circuit, reversed polarity, overvoltage, over-discharge, and over-temperature protection.
- Lithium Battery Activation: Activates lithium batteries using solar panel energy.
- External Temperature Probe: Enhances precision in battery temperature monitoring.
4. Specifications
| Feature | Detail |
|---|---|
| Brand | Temank |
| Model | MPPT 100A Solar Charge Controller |
| Manufacturer | Temank |
| ASIN | B0DB2329DN |
| Color | Gray, Orange |
| Material | Aluminum |
| Display Type | LCD |
| Max. PV Input Voltage | 150V |
| Max. PV Input Power (12V System) | 1200W |
| Max. PV Input Power (24V System) | 2400W |
| Max. PV Input Power (36V System) | 3600W |
| Max. PV Input Power (48V System) | 4800W |
For detailed solar panel specifications, refer to the image below:

Image: Solar Panel Specifications. This image displays a table detailing maximum input power for 80A and 100A models across 12V, 24V, 36V, and 48V systems, with a maximum PV open-circuit voltage of 160VDC.
5. Setup and Installation
Follow these steps for proper installation and wiring of your Temank MPPT 100A Solar Charge Controller. Always ensure all power sources are disconnected before beginning any wiring.
5.1 Mounting the Controller
- Select a suitable mounting location that is dry, well-ventilated, and away from flammable materials. Ensure ample space for heat dissipation.
- Mount the controller securely on a wall or sturdy surface using appropriate screws.

Image: Temank MPPT 100A Solar Charge Controller. This image shows the main unit of the 100 Amp MPPT Solar Charge Controller, highlighting its key features like 12V/24V/36V/48V auto compatibility, parallel support, dual cooling, and external temperature probe configuration.
5.2 Wiring Connections
Important: Always connect the battery first, then the solar panels. Disconnect in reverse order (solar panels first, then battery).
- Battery Connection: Connect the positive and negative battery cables to the corresponding terminals on the controller. Ensure correct polarity. Install a DC circuit breaker between the battery and the controller.
- Solar Panel Connection: Connect the positive and negative solar panel cables to the corresponding PV input terminals on the controller. Ensure correct polarity. Install a DC circuit breaker between the solar panels and the controller.
- Load Connection (Optional): If using the load terminals, connect your DC loads to the designated terminals.
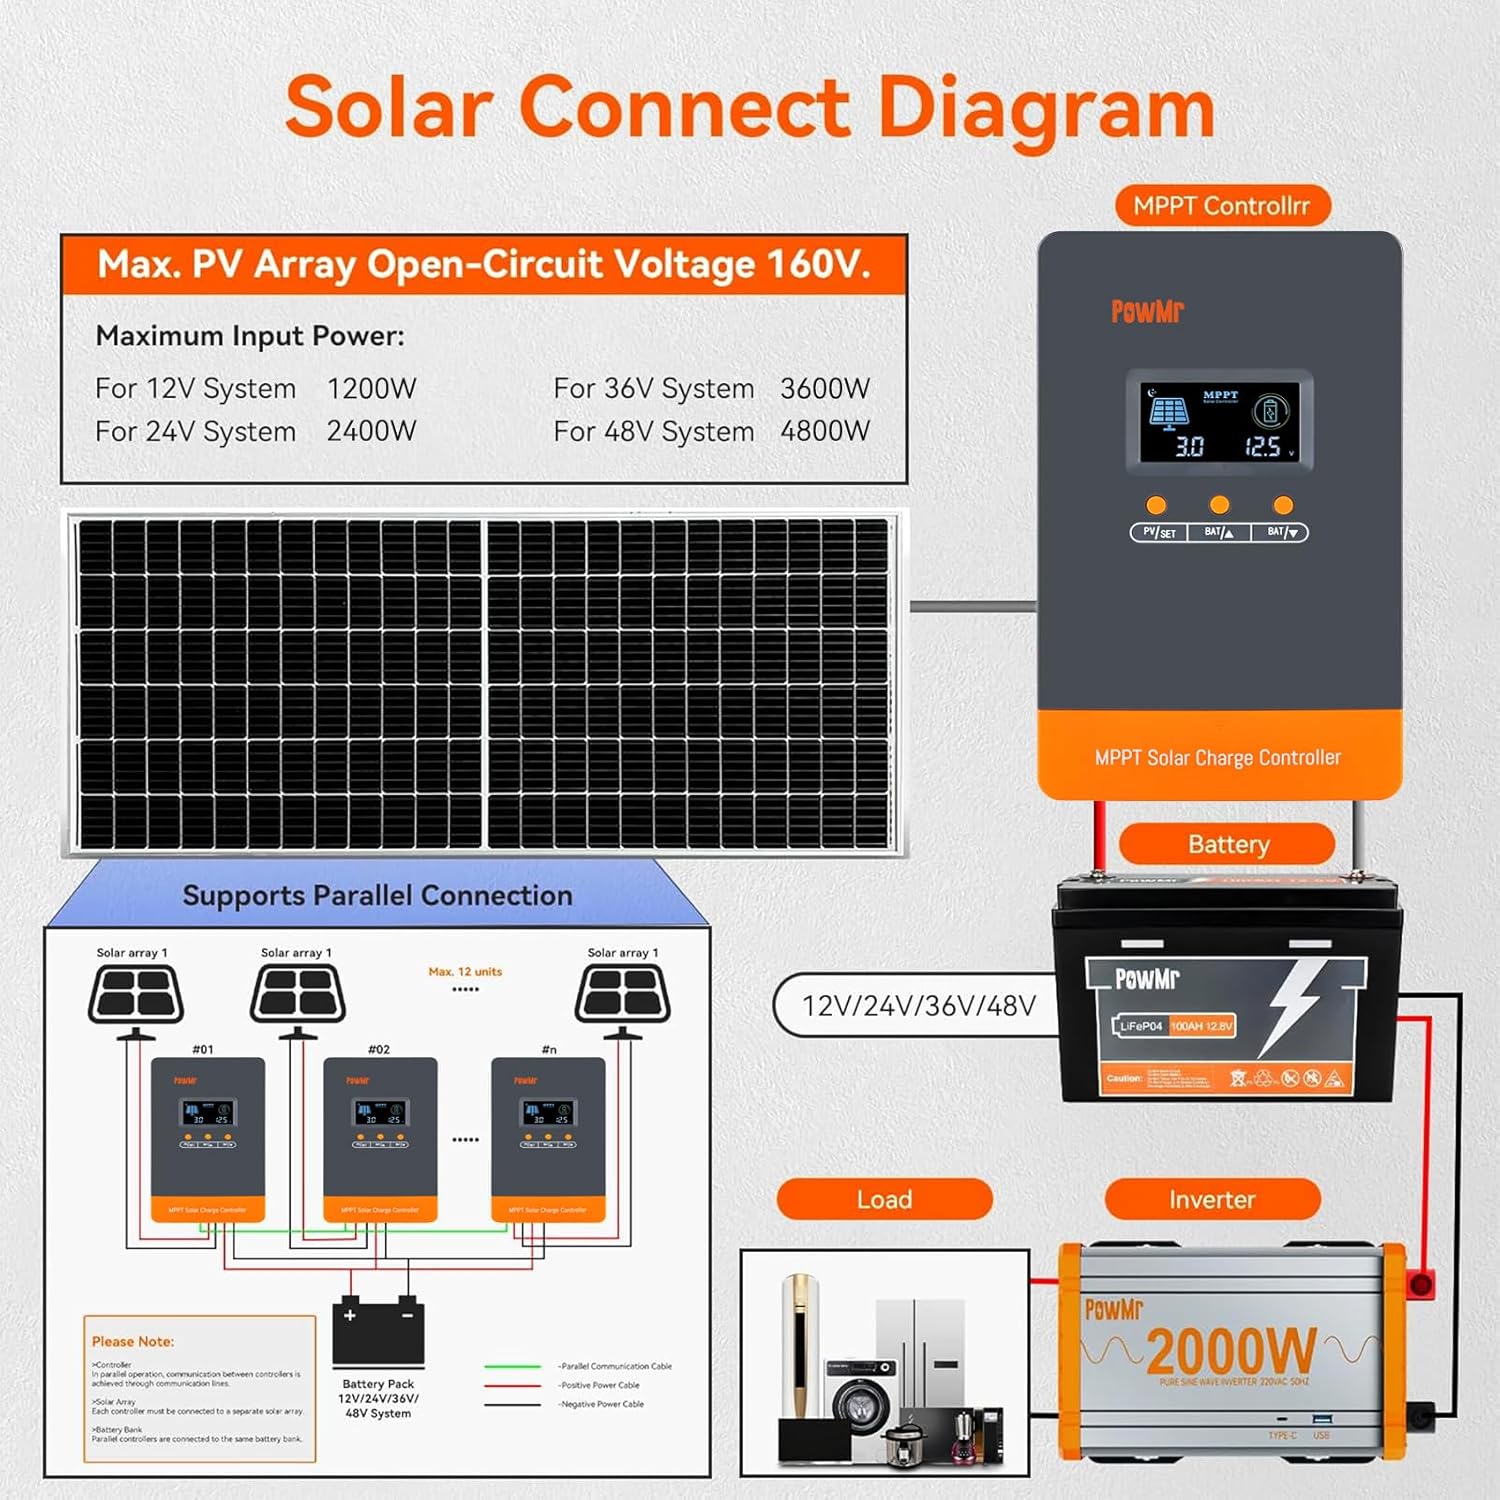
Image: Solar Connect Diagram. This diagram illustrates the complete wiring setup for a solar system including the MPPT controller, solar array, battery pack, load, and inverter, showing positive and negative connections.
5.3 Parallel Connection (Optional)
The controller supports up to 12 units in parallel. For detailed instructions on parallel connection, refer to the video below:
Video: Parallelism Guide for POW-M80/M100-PRO Controllers. This video provides a step-by-step guide on how to connect multiple MPPT controllers in parallel to increase the overall capacity of your solar system.
For a general installation and wiring guide, including parallel setup, watch this video:
Video: POW-M80/M100-PRO Installation and Wiring Guide. This video demonstrates the physical installation and wiring process for the MPPT solar charge controller, including connecting to batteries and solar panels.
For a broader understanding of setting up an off-grid solar system, refer to this video:
Video: How to Set Up Solar System with Solar Controller & Inverter. This video illustrates the complete setup of a typical off-grid solar power system, including the solar charge controller and an inverter.
6. Operating Instructions
The controller features an LCD display and buttons for monitoring and configuring settings. The display shows real-time system status, including PV voltage, battery voltage, charging current, and temperature.
6.1 Display and Buttons
- PV/SET Button: Used to navigate through display screens and enter/save settings.
- BAT▲ / BAT▼ Buttons: Used to adjust values in settings mode.
6.2 Basic Operation and Settings
The controller automatically detects the system voltage. You can configure various charging parameters, especially for custom battery types. For a detailed guide on controller settings, refer to the video below:
Video: POW-48140A MPPT Controller Setting Guide. This video demonstrates how to access and adjust various settings on the MPPT solar charge controller, including battery type and charging parameters.
7. Maintenance
Regular maintenance ensures optimal performance and longevity of your solar charge controller.
- Inspect Connections: Periodically check all wiring connections for tightness and corrosion. Tighten any loose connections.
- Clean Controller: Keep the controller clean and free from dust and debris. Use a dry cloth to wipe the exterior. Ensure cooling vents are unobstructed.
- Battery Inspection: Regularly inspect battery terminals for corrosion and ensure they are clean. For flooded batteries, check electrolyte levels and top up with distilled water if necessary.
- Monitor Performance: Regularly check the display for normal operation and any error codes. Compare actual performance with expected values.
- Environmental Check: Ensure the operating environment remains within the specified temperature and humidity ranges.
8. Troubleshooting
If you encounter issues with your solar charge controller, refer to the following common problems and solutions:
- No Display/No Power: Check battery connections and ensure the battery circuit breaker is closed. Verify battery voltage is within the operating range.
- No Charging: Check solar panel connections and ensure the PV circuit breaker is closed. Verify PV voltage is sufficient for charging. Check for shading on solar panels.
- Error Codes: Refer to the controller's display for specific error codes and consult the full user manual for detailed explanations and solutions.
- Battery Not Working (Lithium): If your lithium battery is not working or charging, it might be in protection mode. Refer to the video below for activation steps.
Video: Battery Not Working What to do. This video provides guidance on how to troubleshoot and reactivate a lithium battery that has entered protection mode and is not functioning or charging.
9. Warranty and Support
For warranty information, technical support, or service inquiries, please contact Temank customer service through your purchase platform or visit the official Temank website. Keep your purchase receipt and product serial number handy for faster service.


