1. Introduction
The PULUZ Magnetic Handheld Light Wand is a versatile LED fill light designed for various photography and videography applications. Its compact size, full-color RGB capabilities, and adjustable settings make it an essential tool for content creators, photographers, and videographers. This manual provides detailed instructions for setup, operation, and maintenance to ensure optimal performance.

Image 1.1: The PULUZ Magnetic Handheld Light Wand, showcasing its full-color RGB spectrum.
2. Package Contents
- PULUZ Magnetic Handheld Light Wand (Model zy9314)
- USB Type-C Charging Cable
- Instruction Manual
3. Product Overview
Familiarize yourself with the components and controls of your light wand.
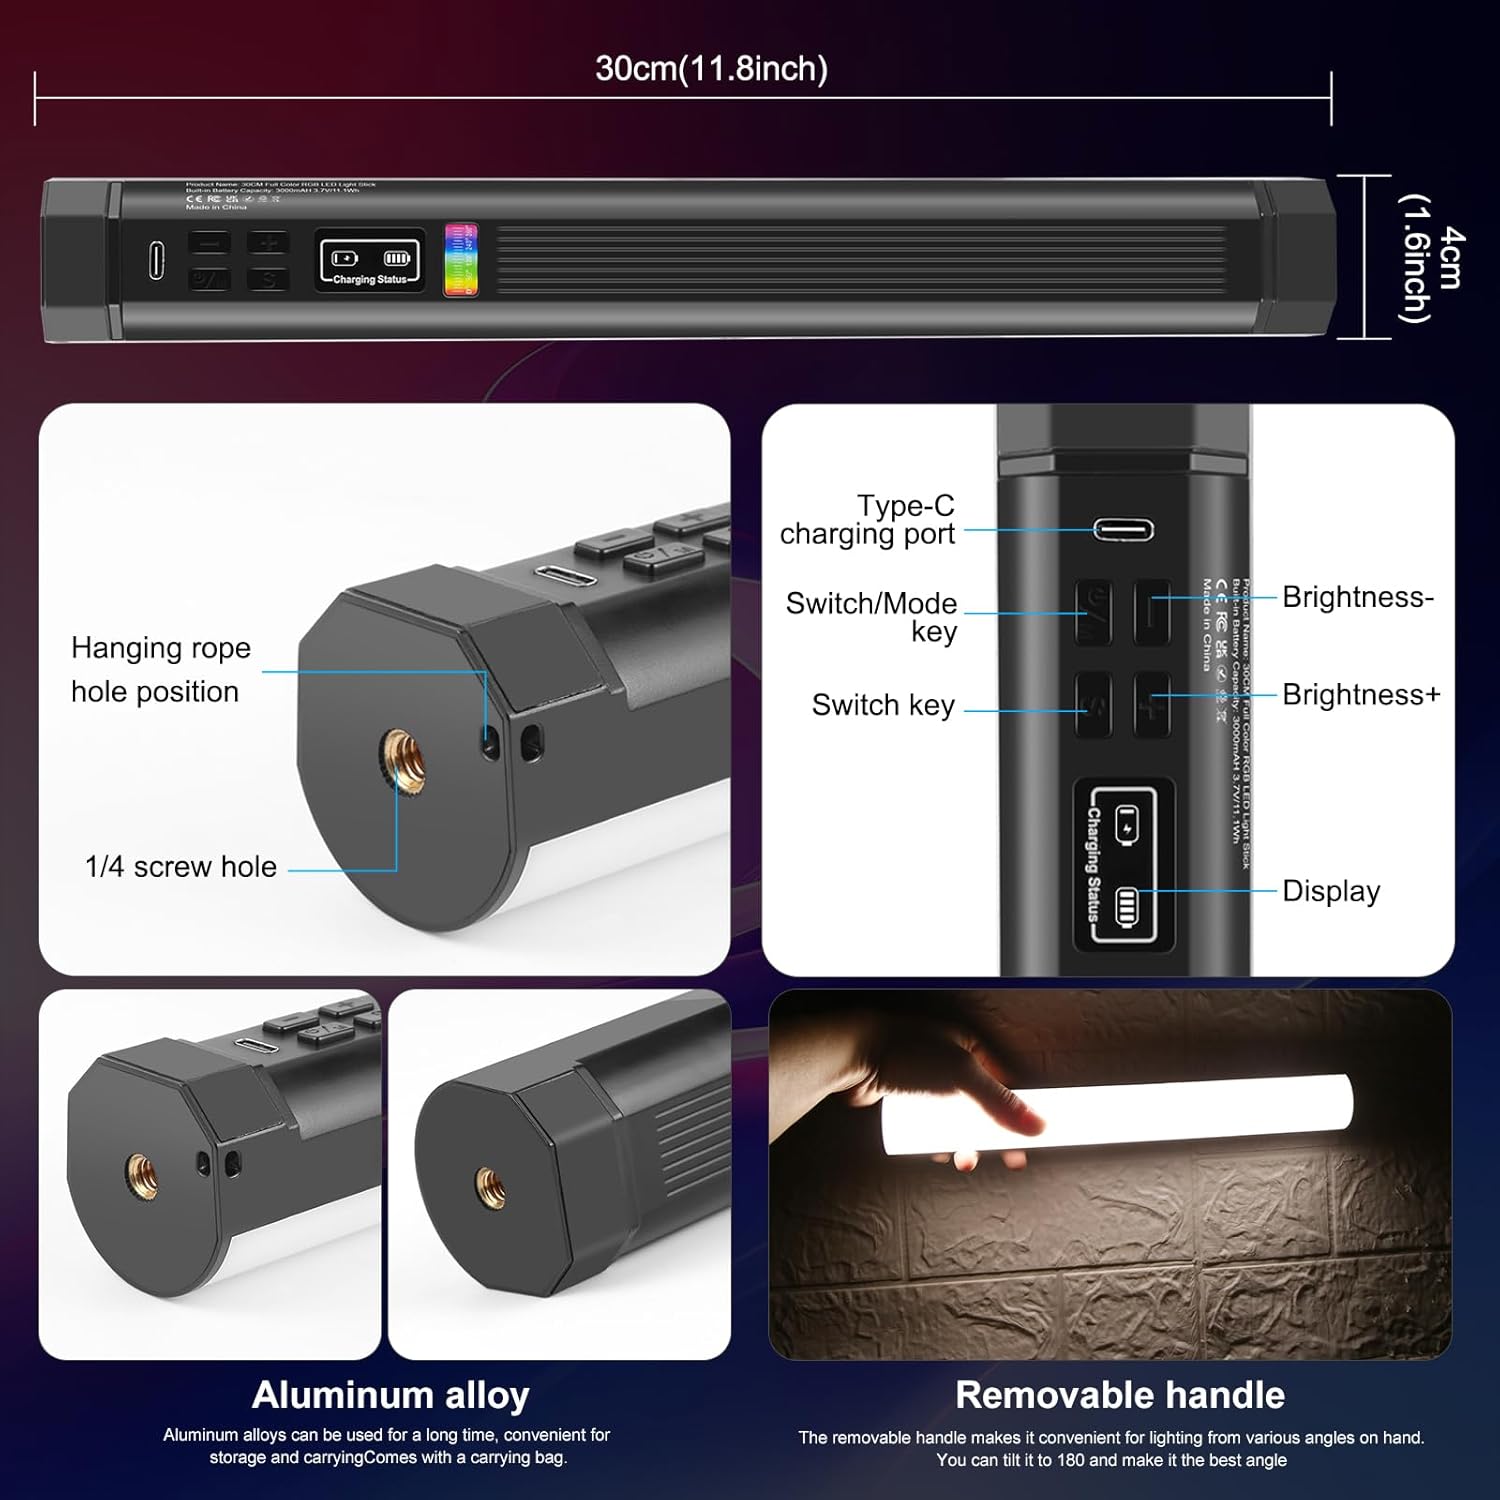
Image 3.1: Overview of the light wand's features including dimensions, control buttons, and mounting options.
3.1. Controls and Indicators
- Power/Mode Key (U/M): Press and hold to power on/off. Short press to switch between lighting modes (CCT, HSI, Scene Effects).
- Brightness +/- Buttons: Adjust brightness levels (0-100%).
- Switch Key (S): In CCT mode, short press to switch between color temperature adjustment and brightness adjustment. In HSI mode, short press to switch between Hue, Saturation, and Intensity adjustment. In Scene mode, short press to cycle through scene effects.
- Display Screen: Shows current settings such as brightness, color temperature, HSI values, and battery status.
- Type-C Charging Port: For charging the internal battery.
3.2. Mounting Options
- 1/4-inch Screw Holes: Located at both ends of the light wand for attachment to tripods, light stands, or other accessories.
- Magnetic Suction: Built-in magnets allow the light wand to be securely attached to metal surfaces for flexible positioning.

Image 3.2: The light wand magnetically attached to a metal surface, illustrating its versatile mounting.
4. Setup
4.1. Charging the Battery
The light wand is equipped with a built-in 3000mAh rechargeable battery. Before first use, fully charge the device.
- Connect the supplied USB Type-C charging cable to the charging port on the light wand.
- Connect the other end of the cable to a 5V/1A USB power source (e.g., USB charger, power bank, laptop, computer).
- The display screen will indicate the charging status. A full charge typically takes approximately 3 hours.
- The light can be used while charging.

Image 4.1: The light wand being charged via its USB Type-C port, with various compatible power sources illustrated.
5. Operating Instructions
5.1. Power On/Off
- To power on, press and hold the Power/Mode (U/M) button for 3 seconds.
- To power off, press and hold the Power/Mode (U/M) button for 3 seconds.
5.2. Switching Modes
After powering on, short press the Power/Mode (U/M) button to cycle through the main lighting modes:
- CCT Mode: Color Correlated Temperature (white light adjustment).
- HSI Mode: Hue, Saturation, Intensity (full RGB color adjustment).
- Scene Mode: Special lighting effects.
5.3. Adjusting Brightness
In any mode, use the Brightness +/- buttons to adjust the light intensity from 0% to 100%.
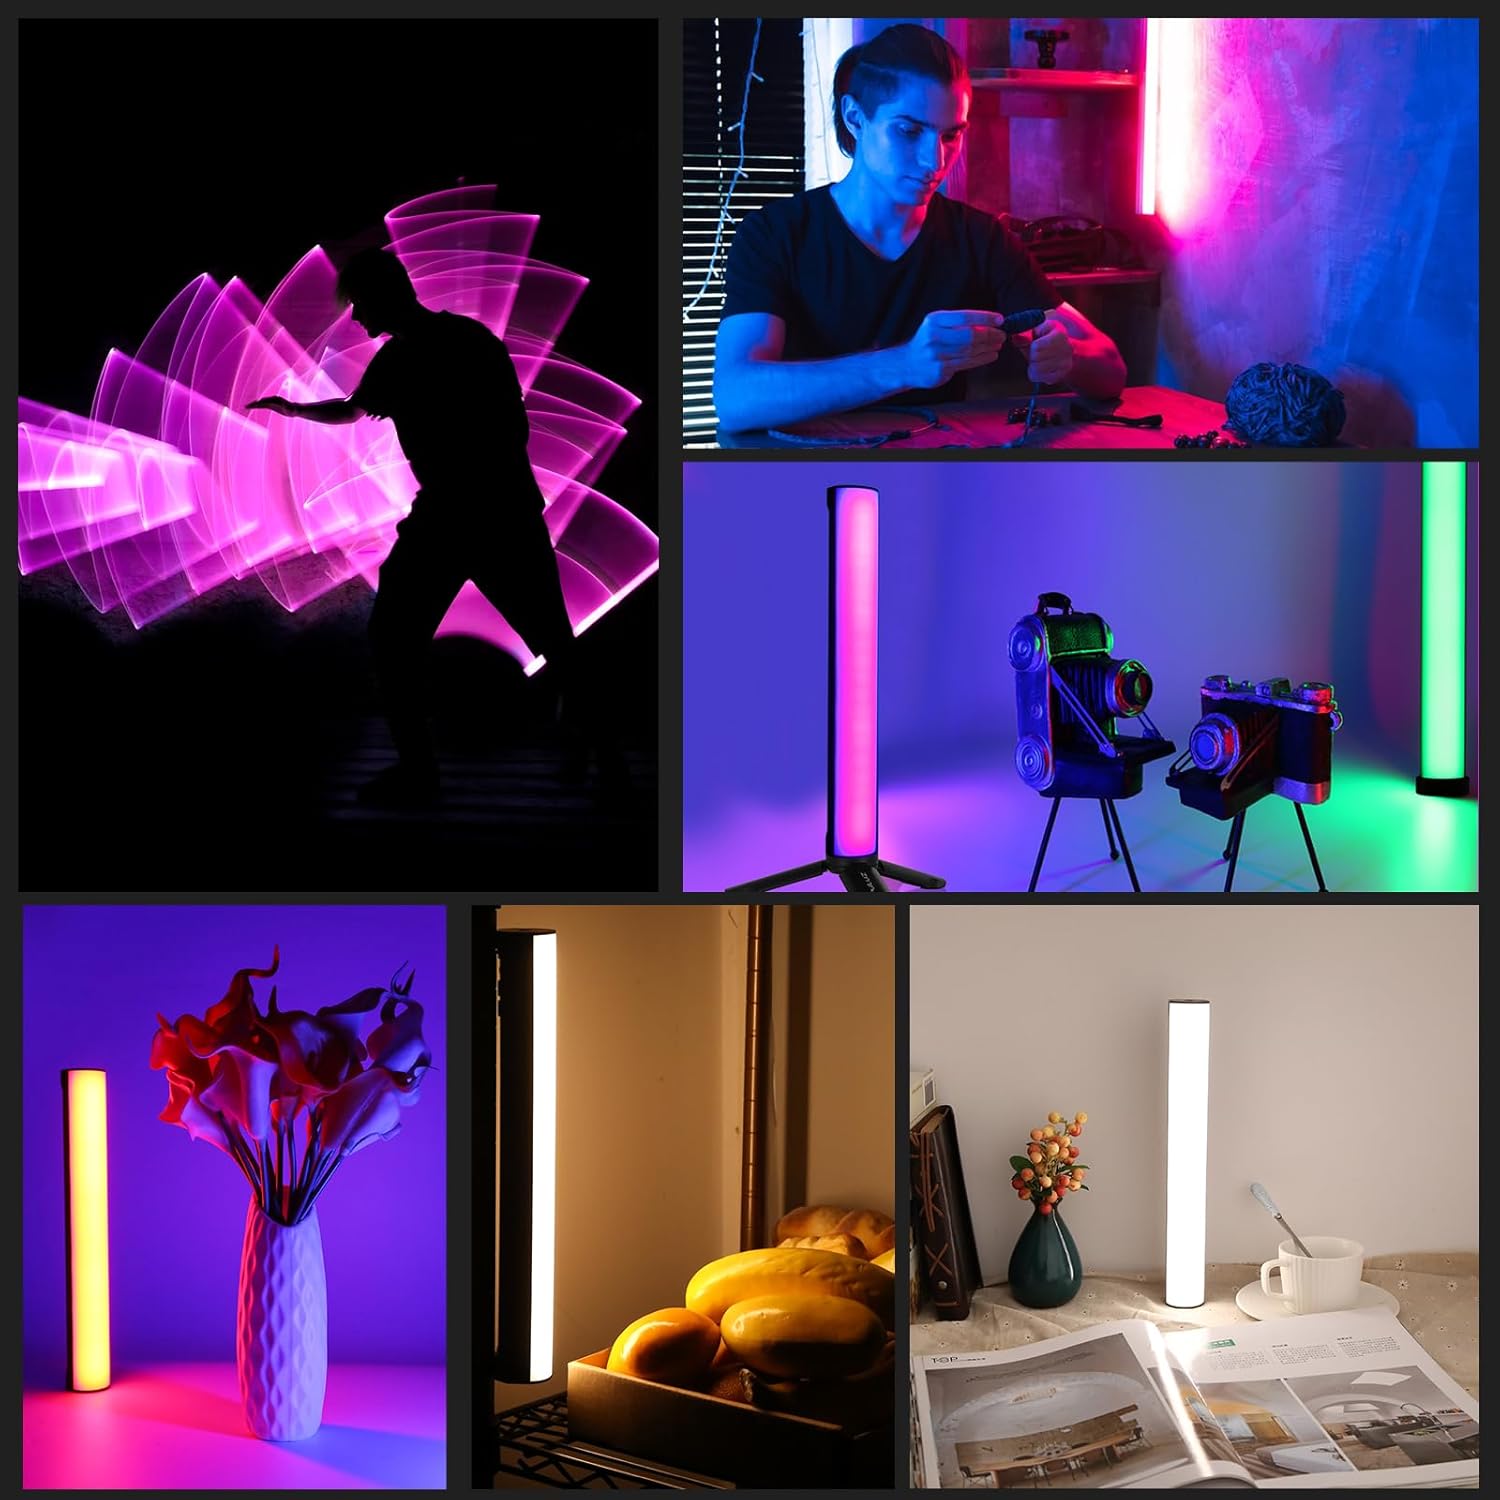
Image 5.1: The light wand's display and controls for adjusting RGB color, brightness (0-100%), and color temperature (2500K-9000K).
5.4. CCT Mode (White Light)
- Enter CCT mode by pressing the Power/Mode (U/M) button until 'CCT' is displayed.
- Short press the Switch (S) button to toggle between adjusting color temperature and brightness.
- Use the Brightness +/- buttons to adjust the color temperature from 2500K (warm) to 9000K (cold).
5.5. HSI Mode (Full Color RGB)
- Enter HSI mode by pressing the Power/Mode (U/M) button until 'HSI' is displayed.
- Short press the Switch (S) button to cycle through Hue (H), Saturation (S), and Intensity (I) adjustments.
- Use the Brightness +/- buttons to modify the selected parameter:
- Hue: Adjusts the color (0-360°).
- Saturation: Adjusts the purity of the color.
- Intensity: Adjusts the brightness of the color.
5.6. Scene Mode (Special Effects)
The light wand features 20 versatile lighting effects to enhance your creative projects.
- Enter Scene mode by pressing the Power/Mode (U/M) button until 'Scene' is displayed.
- Short press the Switch (S) button to cycle through the 20 available scene effects (e.g., Cop car, ambulance, fireworks, TV, candle, strobe, RGB strobe).
- Use the Brightness +/- buttons to adjust the intensity of the selected effect.

Image 5.2: Visual representation of the 20 special scene effects available on the light wand.
Video 5.3: Demonstration of the Full Color RGB Tube Light's various color and effect capabilities.
6. Maintenance
- Keep the device dry. Do not expose it to moisture or rain.
- Clean the light wand with a soft, dry cloth. Avoid using harsh chemicals or abrasive materials.
- Store the light wand in a cool, dry place when not in use.
- Do not attempt to disassemble or repair the device yourself. Contact customer support for assistance.
7. Troubleshooting
7.1. Light does not turn on
- Ensure the battery is charged. Connect the light wand to a power source using the USB Type-C cable.
- Press and hold the Power/Mode (U/M) button for 3 seconds to ensure it is powered on correctly.
7.2. Light is dim or flickers
- Check the battery level and recharge if necessary.
- Adjust the brightness using the Brightness +/- buttons.
7.3. Cannot change color or mode
- Ensure the device is powered on.
- Short press the Power/Mode (U/M) button to switch between CCT, HSI, and Scene modes.
- Within each mode, use the Switch (S) button to cycle through adjustable parameters or scene effects.
8. Specifications
| Feature | Specification |
|---|---|
| Model | zy9314 |
| Dimensions | 1.5 x 1.5 x 11.8 inches (30cm) |
| Item Weight | 9.6 ounces |
| Battery Capacity | 3000mAh |
| Battery Life (Max Brightness) | Up to 3 hours |
| Color Temperature Range | 2500K - 9000K |
| Brightness Adjustment | 0% - 100% |
| RGB Color Adjustment | 0-360° Hue |
| Scene Modes | 20 special effects |
| Maximum Illuminance (0.3m) | 800 Lux |
| CRI (Color Rendering Index) | ≥95 |
| Hardware Interface | USB Type-C |
9. Warranty and Support
For warranty information or technical support, please refer to the product packaging or contact PULUZ customer service directly. Specific warranty terms and contact details may vary by region and purchase location.


