Package Contents
Verify that all items are present in the package:
- Jansite 10.26" Carplay Screen with 4K Front Camera
- Rear View Camera
- Power Cord (for cigarette lighter)
- Camera Power Cord
- AUX Cable
- Suction Cup Mount Bracket
- Self-adhesive Monitor Base Bracket
- Stand Sticker
- 64GB TF Card

Image: The Jansite 10.26-inch Carplay Screen along with its various included accessories, such as power cords, cameras, and mounting brackets.

Image: A detailed diagram illustrating the dimensions of the main unit and listing all components included in the package, such as the screen, power cord, camera power cord, AUX cable, self-adhesive monitor base, suction cup mount bracket, stand sticker, rear camera, and TF card.
Setup and Installation
Mounting the Device
The device offers two primary mounting options: a suction cup bracket for windshield mounting and a self-adhesive bracket for dashboard mounting.
- Choose a Location: Select a position on your dashboard or windshield that does not obstruct your view, airbags, or vehicle controls.
- Clean the Surface: Ensure the chosen surface is clean and dry for optimal adhesion.
- Attach the Bracket:
- Suction Cup Bracket: Press the suction cup firmly against the windshield and engage the lever to secure it.
- Self-adhesive Bracket: Peel off the protective film from the adhesive pad and firmly press the bracket onto the dashboard for at least 30 seconds. Allow sufficient time for the adhesive to bond before attaching the screen.
- Attach the Screen: Slide the main unit onto the chosen bracket until it clicks into place. Adjust the viewing angle as needed.
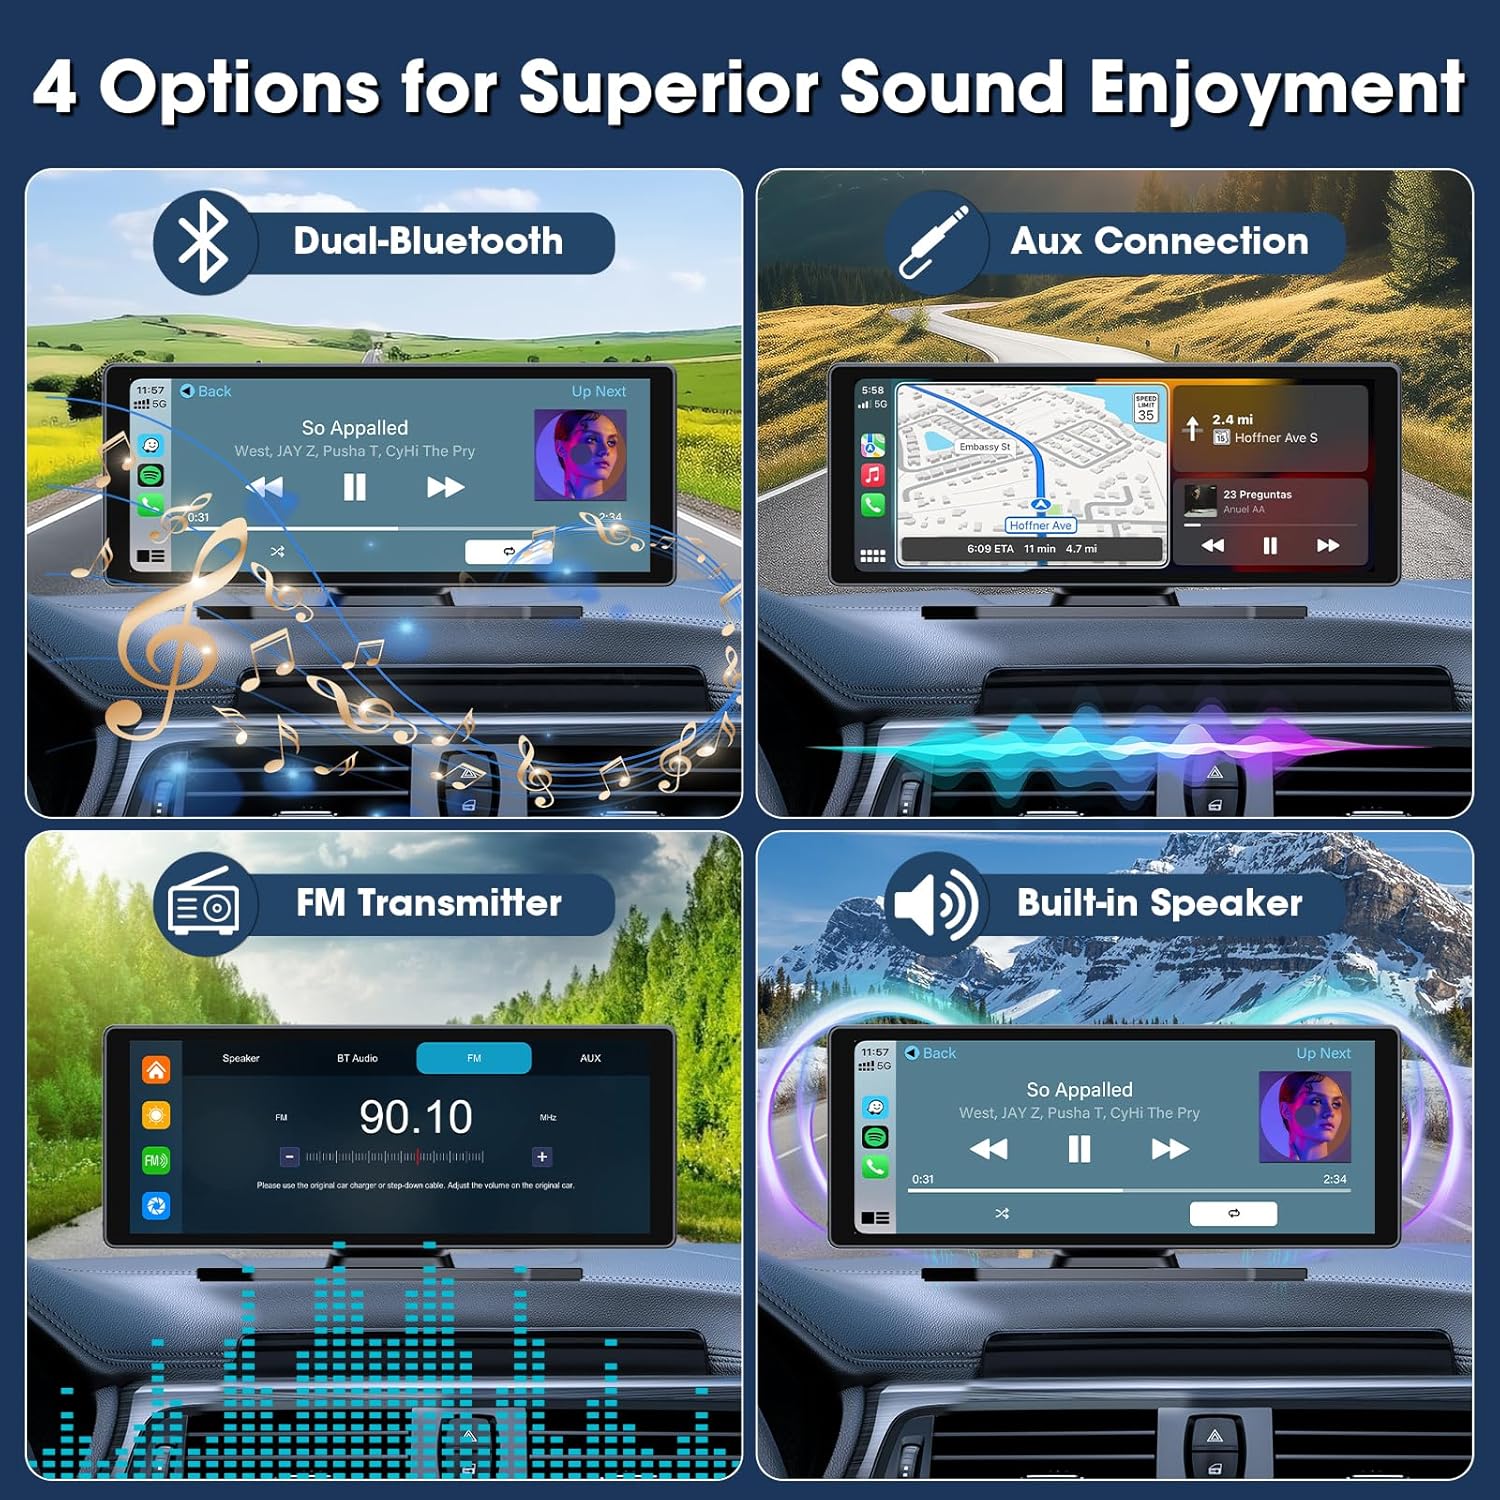
Image: Illustrations demonstrating two installation methods: using a suction cup holder for windshield mounting and a self-adhesive bracket for dashboard mounting, both offering 360-degree adjustability.
Power Connection
- Insert the power cord into the device's power input port.
- Plug the other end of the power cord into your vehicle's cigarette lighter socket. Ensure your car's voltage is between 12-24V.
Rear Camera Installation
For optimal functionality, the rear camera requires professional installation or careful DIY wiring.
- Mount the rear camera at the back of your vehicle, typically near the license plate, ensuring a clear view.
- Route the camera power cord from the rear camera to the main unit.
- Connect the red wire of the rear camera power cord to your vehicle's reverse light power wire. This enables the display of reversing lines when shifting into reverse.
- Connect the video cable from the rear camera to the designated input on the main unit.
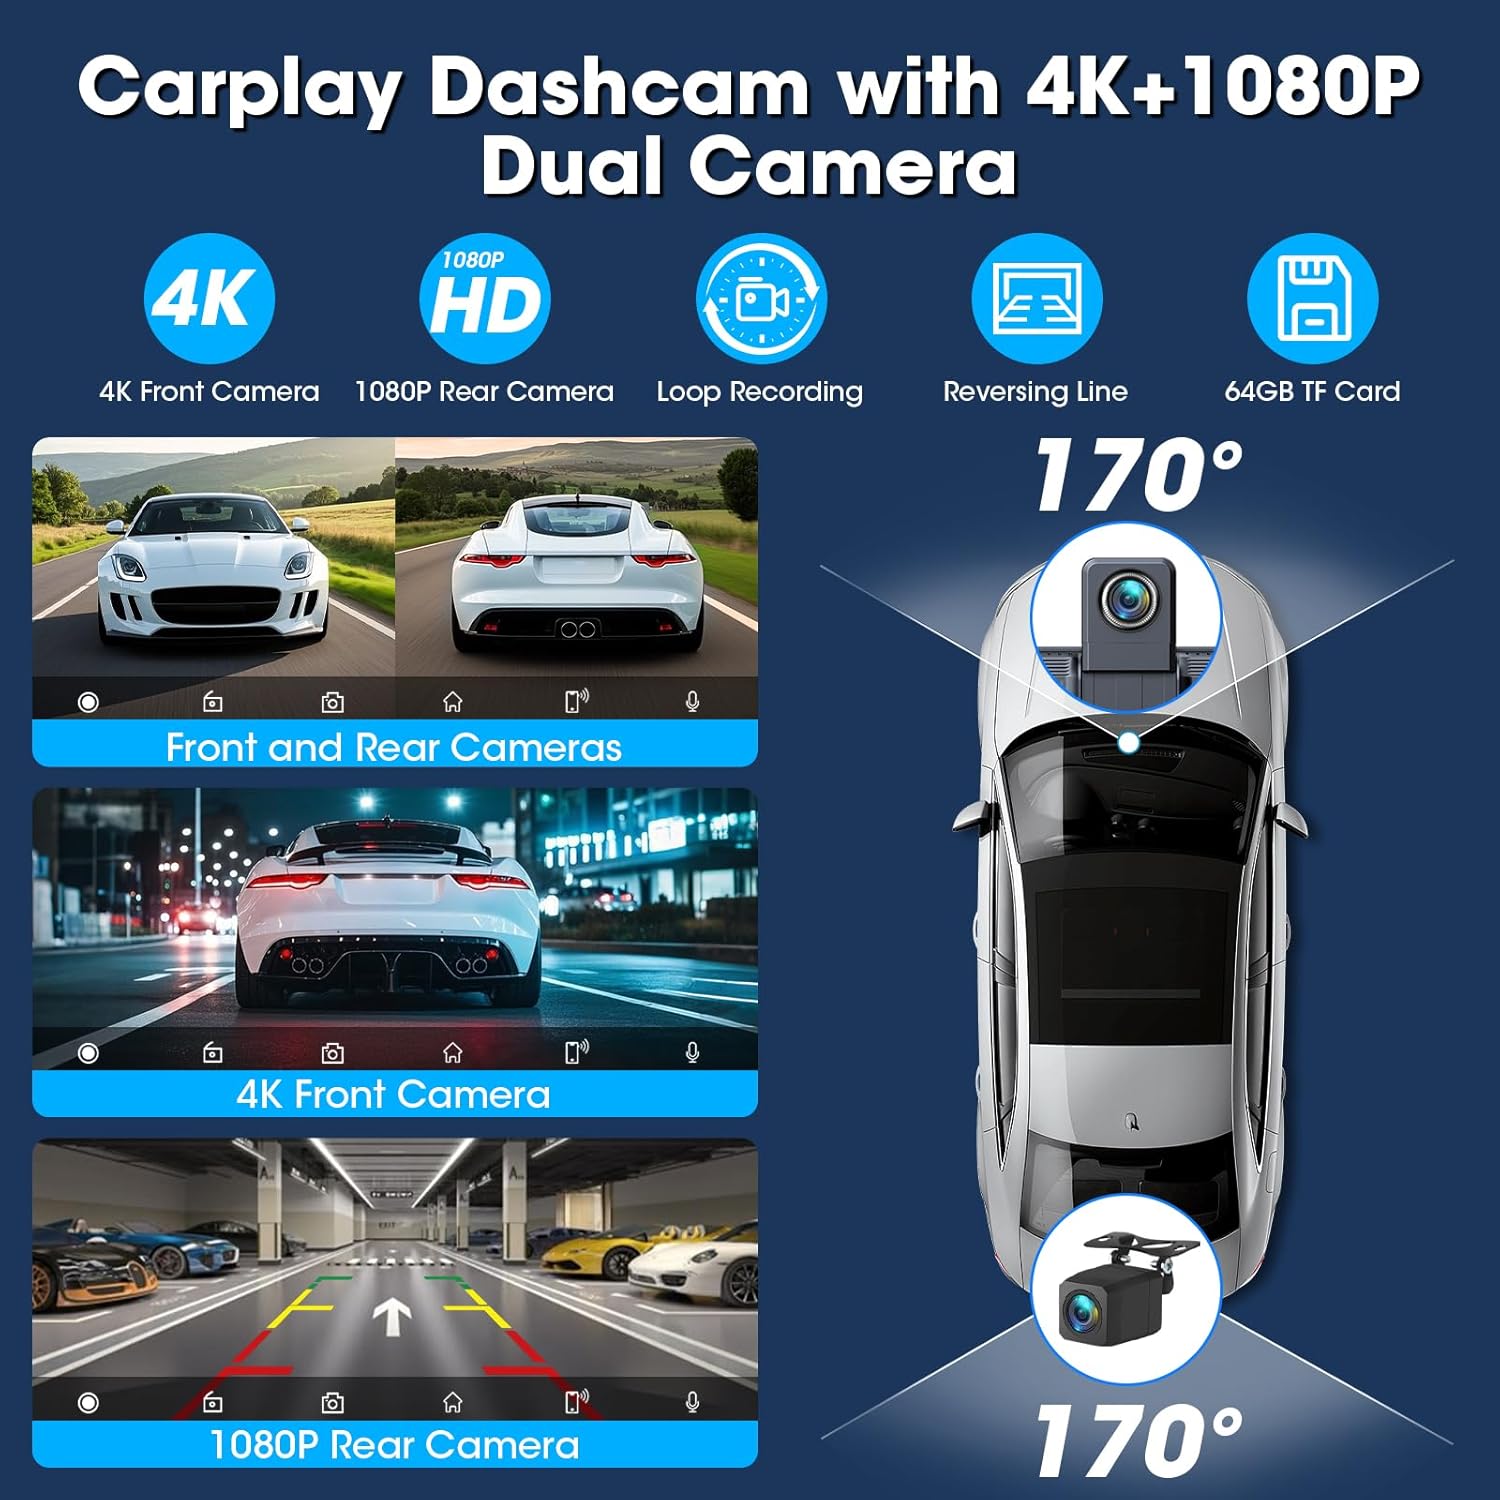
Image: A visual representation of the dual camera system, showing the 4K front camera view and the 1080P rear camera view with a 170-degree wide angle, loop recording, and reversing line functionality.
Operating Instructions
Power On/Off
The device will automatically power on when your vehicle starts and power off when the ignition is turned off. A dedicated power button may also be available for manual control.
Wireless Apple CarPlay / Android Auto
- Ensure Bluetooth and Wi-Fi are enabled on your smartphone.
- On the device, select either "Apple CarPlay" or "Android Auto".
- Search for the device's Bluetooth name on your phone and pair them.
- Confirm the connection prompt on both the device and your phone.
- Once connected, your phone's compatible apps will appear on the screen, allowing access to navigation, music, calls, and more.

Image: The screen displaying the user interface for both Apple CarPlay and Android Auto, showing various app icons and indicating wireless connectivity.
Voice Control (Siri / Google Assistant)
After connecting your smartphone via Apple CarPlay or Android Auto, you can use voice commands for hands-free operation:
- Activate Siri or Google Assistant by saying "Hey Siri" or "Hey Google" (if enabled on your phone) or by tapping the voice control icon on the screen.
- Issue commands such as "Call [Contact Name]", "Play [Song Name]", "Navigate to [Address]", or "Open [App Name]".
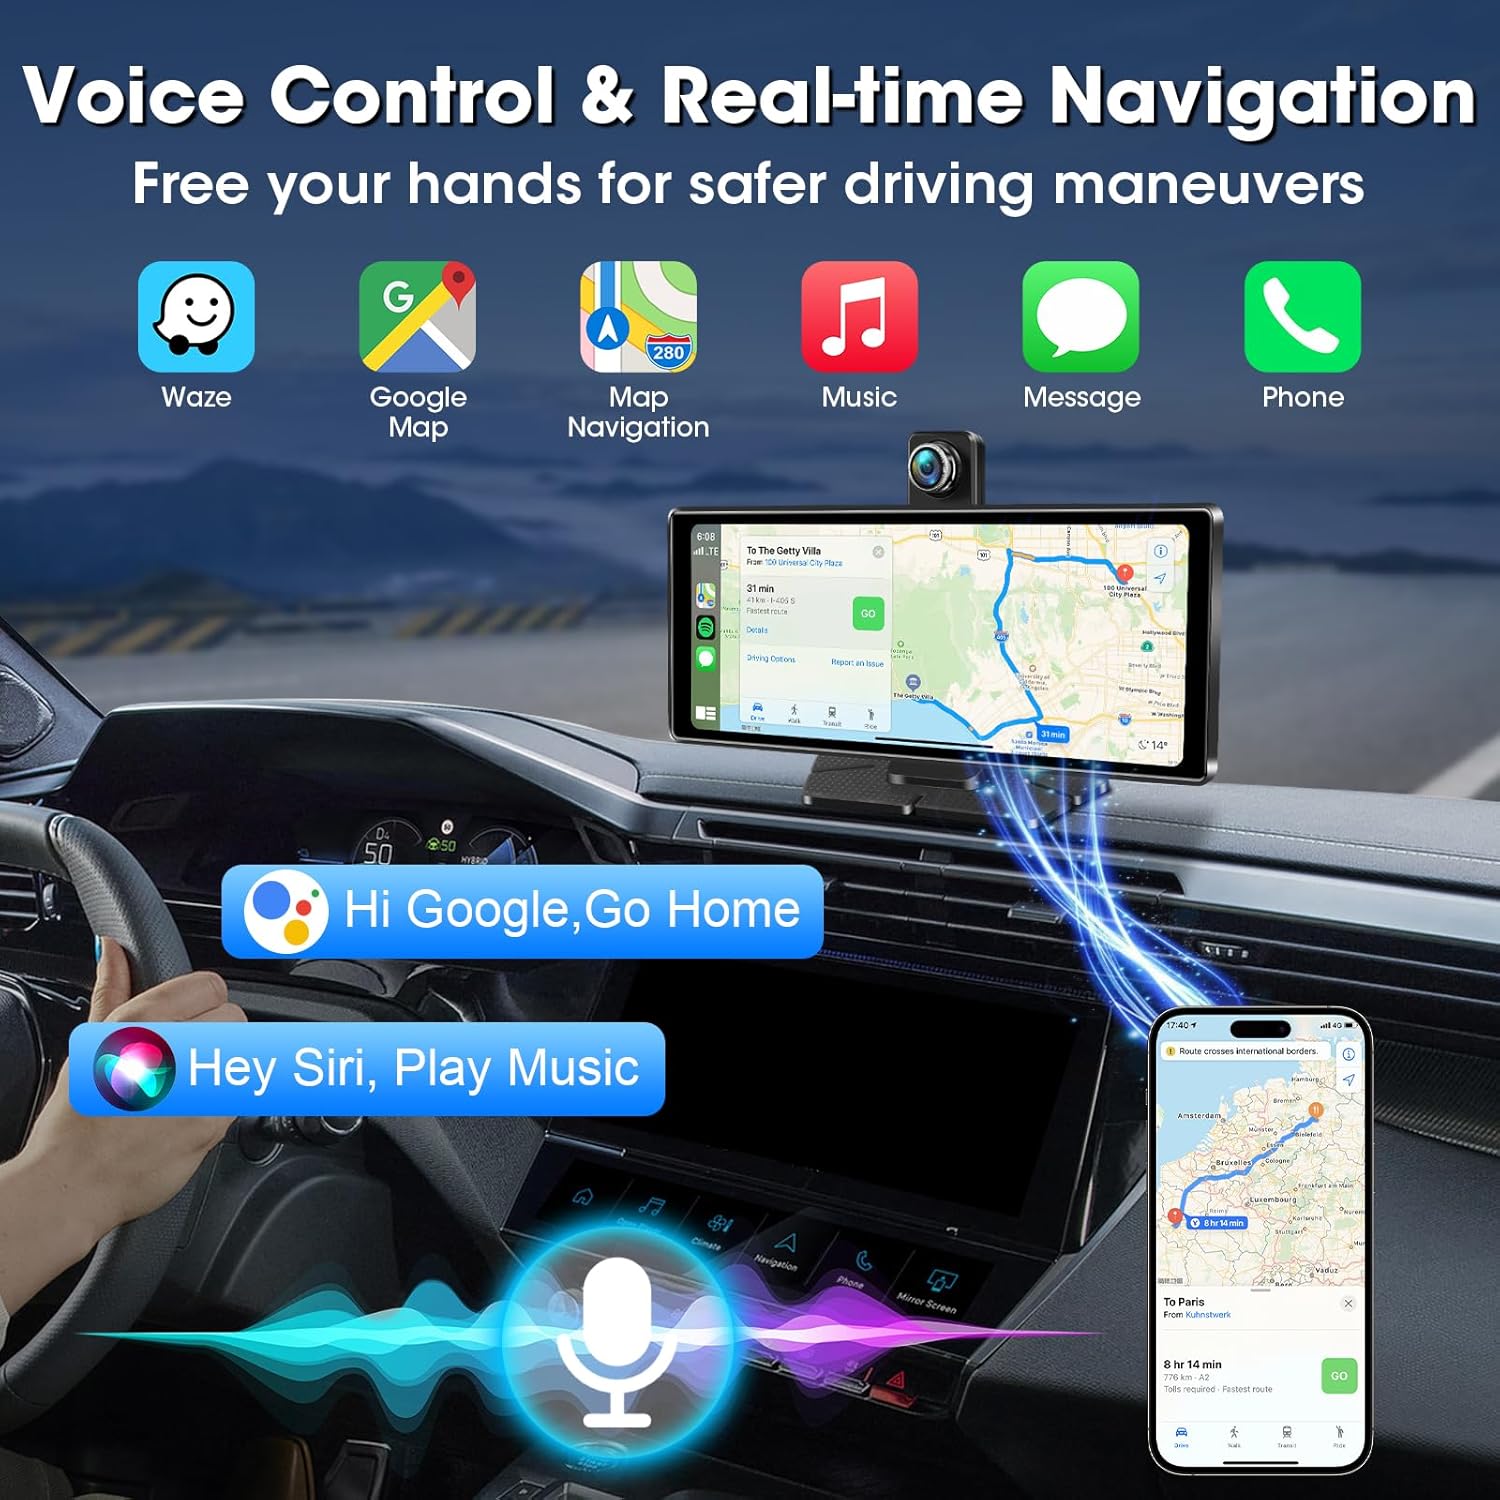
Image: A visual representation of the voice control functionality, showing Siri and Google Assistant prompts for navigation and music playback.
Navigation
Access navigation apps like Google Maps or Apple Maps directly from the CarPlay/Android Auto interface. Use voice commands or touch the screen to input destinations and receive turn-by-turn directions.
Audio Output Options
The device offers multiple ways to output audio to your car's sound system:
- Dual Bluetooth: Connect your iPhone or Android phone to the device via Bluetooth. The device can then connect to your car's Bluetooth system for audio output.
- AUX Connection: Use the included AUX cable to connect the device's AUX output to your car's AUX input port.
- FM Transmitter: Select an unused FM frequency on the device and tune your car's radio to the same frequency to transmit audio wirelessly.
- Built-in Speaker: The device has an integrated speaker for direct audio output.

Image: A graphic illustrating the four available audio output methods: Dual Bluetooth, AUX connection, FM transmitter, and the built-in speaker, allowing users to choose their preferred sound delivery.
Dash Cam Operation (4K Front & 1080P Rear)
- Automatic Recording: The dash cam automatically begins recording when the device powers on.
- Loop Recording: Footage is recorded in a continuous loop onto the included 64GB TF card. When the card is full, the oldest files are overwritten.
- G-Sensor: In case of a sudden impact or collision, the G-sensor will automatically lock and protect the current video file from being overwritten.
- Wi-Fi Connectivity: Connect your smartphone to the device's Wi-Fi to download and share recorded footage via a dedicated app.
- Rotatable Front Camera: The 350° rotatable front camera allows you to adjust the recording angle to capture the road ahead, the car's interior, or side windows.

Image: The 10.26-inch Carplay screen featuring a 350-degree rotatable front camera, demonstrating its ability to record views of the road, inside the car, and the car's side windows.
Mirror Link (AirPlay & Android Cast)
The Mirror Link function allows you to cast your smartphone's screen directly onto the device, enabling video playback during stationary periods.
- Ensure your phone and the device are connected to the same Wi-Fi network.
- Select the "Mirror Link" option on the device.
- Follow the on-screen instructions to initiate AirPlay (for iOS) or Android Cast (for Android) from your smartphone.
Split Screen Display
The device supports split-screen functionality, allowing you to view multiple applications simultaneously, such as navigation and music playback.

Image: A demonstration of the split-screen display feature, showing how the screen can simultaneously display applications like music, GPS navigation, and messages.
Custom Boot Logo
You can personalize the device by setting a custom boot logo. Contact customer support for instructions on how to upload a unique boot animation or image.

Image: An illustration of the custom boot logo feature, showing various car brand logos and a family photo as examples of personalized startup screens.
Warranty and Support
Jansite provides a 1-year after-sales service for this product. For technical support, warranty claims, or any questions regarding your device, please contact our customer service team.
Contact Information: Refer to the contact details provided in your product packaging or visit the official Jansite website for support.
For specific issues like time synchronization or memory card problems, please reach out to the aftermarket email address provided in your product documentation for firmware updates or dedicated memory card replacements.


