
1. Introduction
This manual provides essential information for the proper setup, operation, and maintenance of your ZZA 32-inch FHD 240Hz 1500R Curved Gaming Monitor. Please read this manual thoroughly before using the product to ensure optimal performance and safety.
The ZZA 32-inch curved monitor features a 1920x1080 Full HD resolution, an ultra-fast 240Hz refresh rate, and a 1ms response time, designed to enhance your visual experience. Its 1500R curvature provides an immersive viewing environment, while FreeSync Premium technology minimizes screen tearing and stuttering. The monitor also incorporates flicker-free technology and a blue light filter for eye comfort during extended use.

Image 1.1: Front view of the ZZA 32-inch Curved Gaming Monitor, highlighting its 32-inch size, 240Hz refresh rate, 1500R curvature, and FHD resolution.
2. Setup
2.1 Package Contents
- ZZA 32-inch Curved Gaming Monitor
- Monitor Stand (Base and Neck)
- Power Adapter
- DisplayPort (DP) Cable
- User Manual
2.2 Stand Assembly
- Carefully place the monitor face down on a soft, clean surface to prevent scratches.
- Attach the stand neck to the back of the monitor, ensuring it clicks securely into place or is fastened with screws if provided.
- Connect the stand base to the stand neck and secure it with the provided screw.
- Gently lift the monitor and place it on a stable, flat surface.
2.3 VESA Mounting
The monitor supports VESA 100mm x 100mm mounting standards. To mount the monitor on a wall or an adjustable arm:
- Remove the stand assembly from the monitor.
- Attach your VESA-compatible mount to the four screw holes on the back of the monitor. Ensure the screws are of appropriate length to avoid damaging internal components.
2.4 Connecting to Devices
The monitor offers multiple connectivity options:
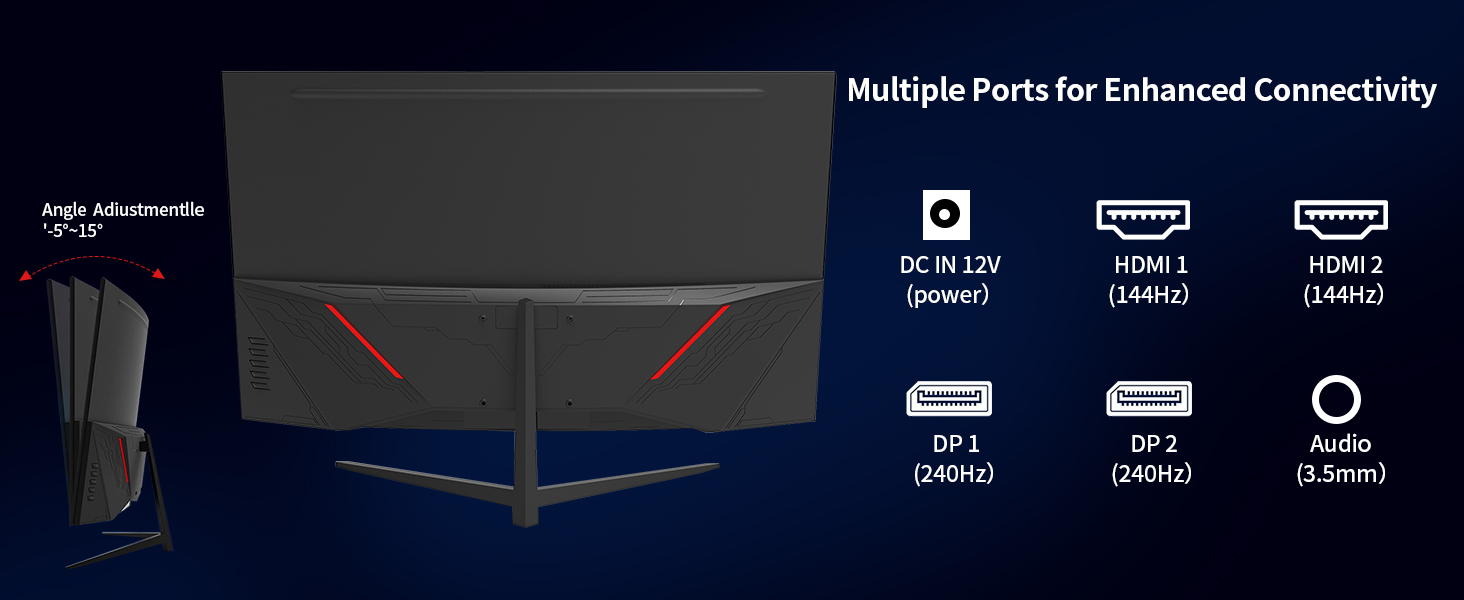
Image 2.1: Rear view of the monitor displaying available input ports and tilt adjustment range.
- Power Input (DC IN 12V): Connect the provided power adapter to this port and then to a power outlet.
- HDMI Ports (HDMI 1, HDMI 2): Connect to devices such as PCs, gaming consoles, or media players using an HDMI cable. Supports up to 120Hz refresh rate.
- DisplayPort (DP 1, DP 2): Connect to devices using a DisplayPort cable for optimal performance, supporting up to 240Hz refresh rate. A DP cable is included.
- Audio Out (3.5mm): Connect external speakers or headphones to this port.
After connecting all necessary cables, press the power button on the monitor to turn it on.
3. Operating Instructions
3.1 Power On/Off
Press the power button, usually located on the bottom or back of the monitor, to turn the monitor on or off. The power indicator light will illuminate when the monitor is on.
3.2 On-Screen Display (OSD) Menu
The OSD menu allows you to adjust various monitor settings. Access the OSD menu by pressing the OSD button (refer to your monitor's specific button layout). Use the navigation buttons to browse through options and adjust settings such as:
- Brightness/Contrast: Adjust image luminance.
- Color Settings: Modify color temperature, gamma, and individual RGB levels.
- Input Source: Manually select between HDMI and DisplayPort inputs.
- Picture Mode: Select predefined display modes (e.g., Standard, Game, Movie).
- Audio: Adjust volume for connected audio devices.
3.3 Refresh Rate and FreeSync Premium
To experience the full 240Hz refresh rate, ensure your graphics card and connection (DisplayPort recommended) support it. Verify the refresh rate setting in your operating system's display settings.

Image 3.1: Visual representation of the smoothness provided by a 240Hz refresh rate compared to 144Hz.
FreeSync Premium technology reduces screen tearing and stuttering by synchronizing the monitor's refresh rate with your graphics card's frame rate. Enable FreeSync in your graphics card's control panel (e.g., AMD Radeon Software) and ensure it is activated in the monitor's OSD menu.

Image 3.2: Illustrates the visual difference between Adaptive Sync (FreeSync) being off and on, showing smoother visuals when active.
3.4 Eye Protection Features
The monitor includes flicker-free technology and a blue light filter to reduce eye strain. The blue light filter can be adjusted or enabled through the OSD menu to soften colors and reduce potentially harmful blue light emissions.

Image 3.3: Demonstrates the effect of the blue light filter, showing a reduction in blue light for more comfortable viewing.
3.5 Tilt Adjustment
The monitor supports tilt adjustment from -5° to -15°. Gently hold the top and bottom edges of the monitor and tilt it to your desired viewing angle. Do not apply excessive force.
4. Maintenance
4.1 Cleaning the Screen
- Turn off the monitor and unplug the power cord.
- Use a soft, lint-free cloth lightly dampened with water or a specialized screen cleaner.
- Wipe the screen gently. Avoid using harsh chemicals, alcohol, or abrasive materials.
4.2 Cleaning the Casing
- Use a soft, dry cloth to wipe the monitor casing.
- Do not allow liquids to enter the monitor's vents or ports.
5. Troubleshooting
If you encounter issues with your monitor, refer to the following common solutions:
| Problem | Possible Solution |
|---|---|
| No image on screen | Ensure the power cable is securely connected and the monitor is turned on. Check that the video cable (HDMI/DP) is firmly connected to both the monitor and the source device. Select the correct input source via the OSD menu. |
| Image flickering or unstable | Check video cable connections. Ensure your graphics card drivers are up to date. Verify the refresh rate setting in your operating system. Enable FreeSync Premium if applicable. |
| Colors appear incorrect | Adjust color settings (brightness, contrast, color temperature) in the OSD menu. Reset display settings to factory defaults if necessary. |
| No audio from audio out port | Ensure external speakers/headphones are properly connected. Check the audio volume in the monitor's OSD menu and your computer's sound settings. |
If the problem persists after trying these solutions, please contact ZZA customer support for further assistance.
6. Specifications
| Feature | Detail |
|---|---|
| Brand | ZZA |
| Model Number | Z32D |
| Screen Size | 32 Inches |
| Resolution | FHD 1080p (1920 x 1080) |
| Refresh Rate | 240Hz (via DisplayPort), 120Hz (via HDMI) |
| Curvature | 1500R |
| Response Time | 1ms (MPRT) |
| Aspect Ratio | 16:9 |
| Screen Surface | Matte |
| Connectivity | 2x HDMI, 2x DisplayPort, 1x Audio Out (3.5mm) |
| VESA Compatibility | 100mm x 100mm |
| Tilt Adjustment | -5° to -15° |
| Product Dimensions (with stand) | 28 x 7 x 19.6 inches |
| Item Weight | 14.3 pounds |
| Voltage | 120 Volts |