Product Overview
The Arondson Electric Wet Dry Mopping Head is a versatile attachment designed to enhance the cleaning capabilities of compatible Dyson vacuum cleaners. It allows for simultaneous dry suction and wet mopping, effectively tackling various types of floor messes on hard surfaces.
- Perfect Compatibility: Designed for Dyson Submarine V7, V8, V10, V11, V15 models. Note: Not compatible with V7 Absolute, V6, V12, DC, Slim, or Ball series.
- Wet & Dry Mop Head: Combines dry vacuuming and wet mopping for efficient cleaning of dust, hair, water stains, and oil stains on marble, wood, and tile floors.
- Flexible & Convenient: Features 60° front/back and 120° side-to-side rotation for easy access to corners and narrow spaces. Built-in LED light illuminates hidden dust.
- Highly Efficient Cleaning: Equipped with two removable water tanks (390ml fresh water, 420ml sewage) and a 9.4-inch wide microfiber roller brush for thorough cleaning without residual water stains.
- High Quality & Customer Friendly: Constructed from wear-resistant ABS plastic, lightweight (2.98 lb), and operates at under 60 dB for quiet use.
Package Contents
Ensure all components are present before proceeding with assembly and operation.
- Electric Wet Dry Mopping Head
- Roller Brush (pre-installed)
- Fresh Water Tank (390ml)
- Sewage Tank (420ml)
- Removable Filter
- Additional Mop Pads (quantity may vary)
Setup and Installation
Follow these steps to correctly assemble and attach the mopping head to your Dyson vacuum.
- Prepare the Water Tank:
Open the clean water tank cover and fill the 390ml fresh water tank with clean water. A small amount of floor cleaner can be added if desired. Close the cover securely.

Image: A person filling the clean water tank of the mopping head with water and cleaning solution.
- Attach Mop Pads (Optional, for pre-wetting):
If desired, wet the mop pads under a faucet and wring out excess water before attaching them to the bottom of the mopping head. This can facilitate initial cleaning.
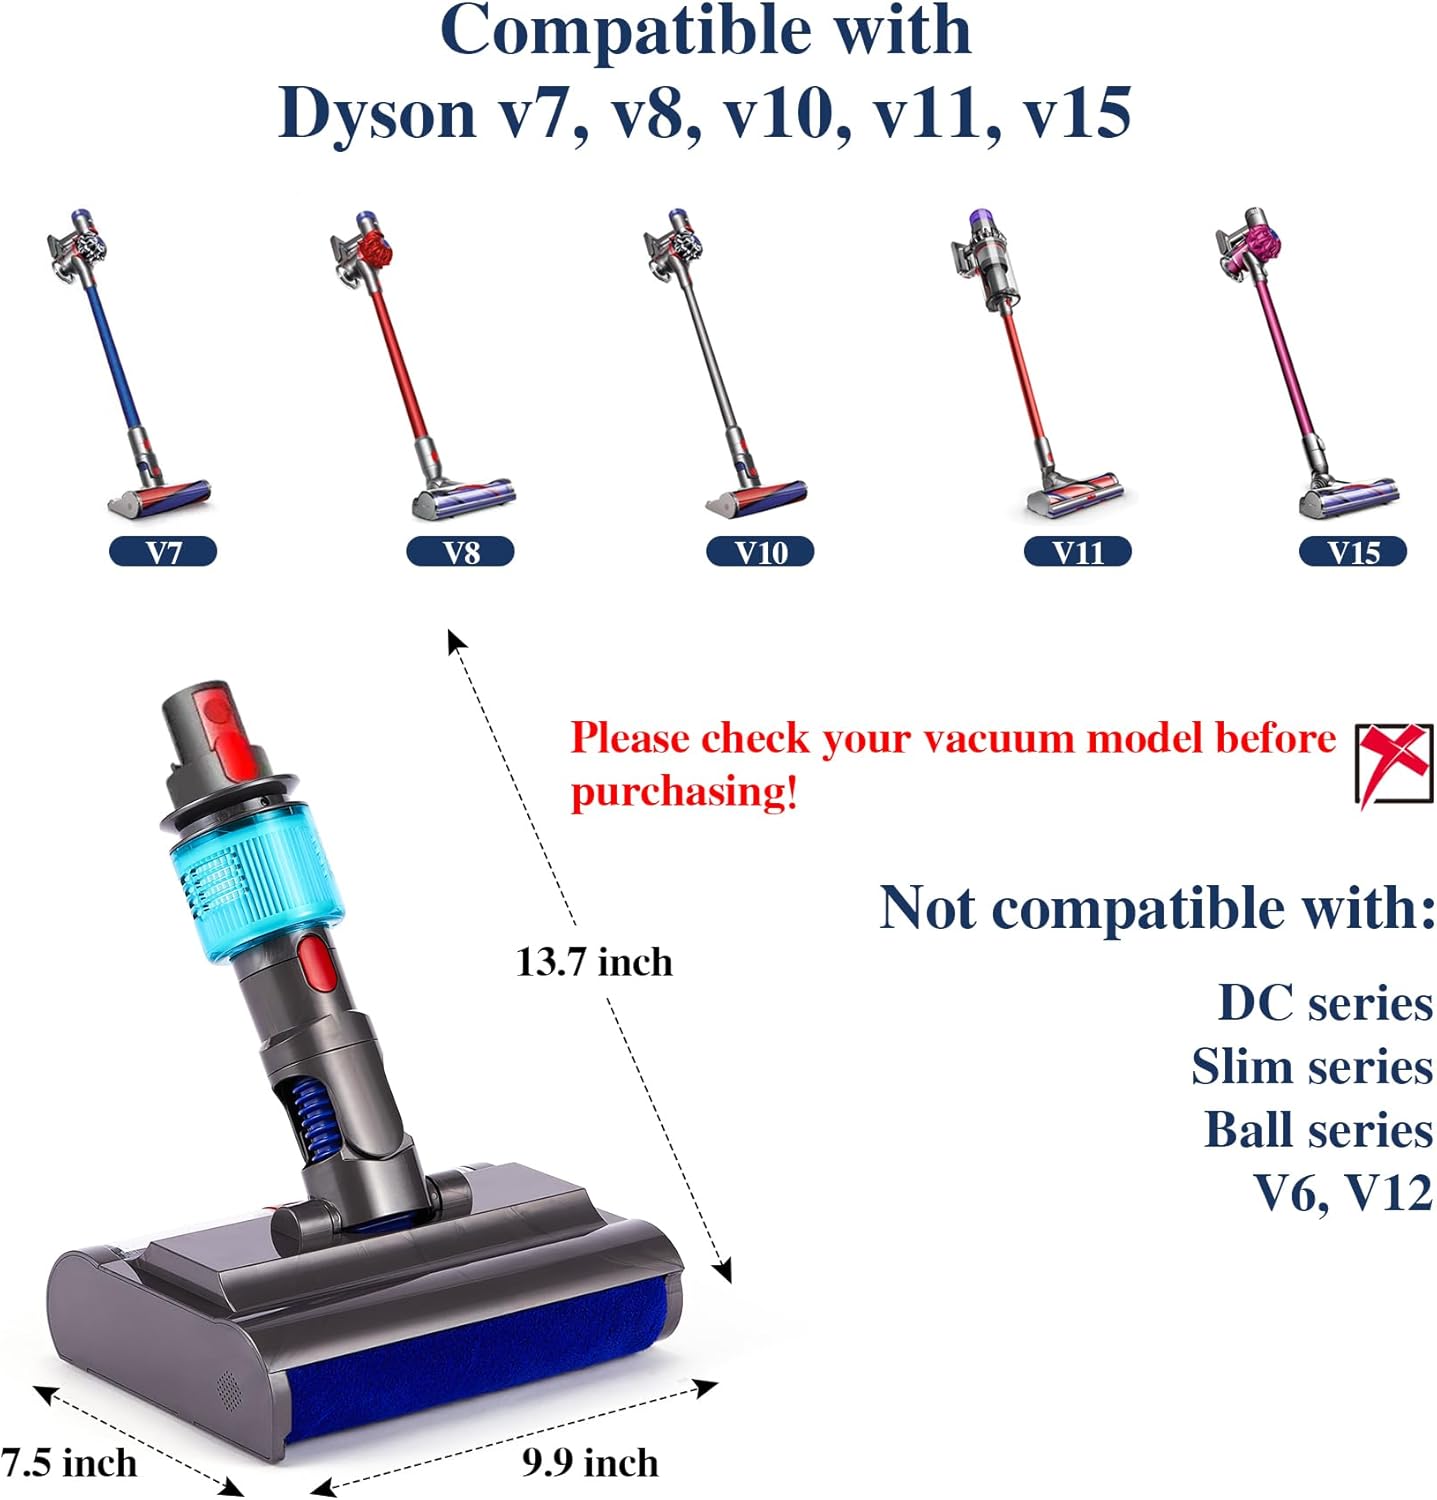
Image: A person attaching wet mop pads to the underside of the mopping head.
- Connect to Dyson Vacuum:
Align the brush joint of the mopping head with the straw joint of your Dyson vacuum. Push until you hear a "click" sound, indicating a secure connection. Ensure the filtered HEPA is inserted under the straw interface and the outer jacket is tightened at about 15 degrees.

Image: Visual instructions for connecting the mopping head to the Dyson vacuum, highlighting the "click" sound for secure attachment.
Operating Instructions
The mopping head is designed for ease of use on various hard floor types.
- Power On:
Once the mopping head is securely attached, turn on your Dyson vacuum. The mopping head will begin to operate simultaneously with the vacuum function.
- Cleaning Motion:
Guide the vacuum across your hard floors. The mop heads rotate in a circular motion to effectively pick up grime and dirt. The attachment's flexible rotation (60° front/back, 120° side-to-side) allows for easy maneuvering around furniture and into tight spaces.

Image: A close-up of the mopping head showing its rotatable joint and the LED light illuminating the floor.
- LED Light Feature:
Utilize the built-in LED light to illuminate dust and debris in dark areas, such as under sofas and beds, ensuring a thorough clean.
- Versatile Cleaning:
The mopping head is effective on various hard floors including living room wooden floors, bathroom tiles, and kitchen marble, tackling water stains, coffee stains, mud stains, greasy dirt, and hair.

Image: The mopping head effectively cleaning different types of stains like water, coffee, mud, and greasy dirt from various floor types.
Video: Demonstration of the Arondson Electric Wet Dry Mopping Head in action, showing its ease of use and effectiveness on various floor types and stains.
Maintenance
Regular maintenance ensures optimal performance and longevity of your mopping head.
- Emptying the Sewage Tank:
Press and hold the red button to pull out the clear waste water tank. Remove the lid and empty the collected dirty water. Clean the tank as needed.
- Cleaning the Roller Brush:
Remove the side roller brush bracket, then remove the roller brush. Clean the microfiber roller brush with water and mild soap. Allow it to dry completely before re-installing.

Image: Visual instructions for disassembling and cleaning the water tanks and roller brush of the mopping head.
- Filter Maintenance:
The mopping head includes a removable filter for secondary filtration. Periodically remove and clean the filter under running water. Ensure it is completely dry before re-inserting to maintain optimal performance.
Troubleshooting
- Water not dispensing to roller:
Ensure the fresh water tank is correctly filled and securely closed. Check for any blockages in the water dispensing mechanism. Verify that the mop pads are adequately damp or pre-wet to facilitate initial water transfer.
- Poor cleaning performance:
Check if the roller brush is clean and free from debris. Ensure the water tanks are properly installed and filled. The filter might need cleaning if suction is reduced.
Specifications
| Brand | Arondson |
| Model Number | a180294a-e1bd-4fb1-ae10-004f581b4a38 |
| Compatibility | Dyson Submarine V7, V8, V10, V11, V15 |
| Material | Acrylonitrile Butadiene Styrene (ABS) |
| Item Weight | 3.53 pounds |
| Product Dimensions | 9.9 x 7.5 x 13.7 inches |
| Roller Brush Width | 9.4 inches |
| Fresh Water Tank Capacity | 390ml |
| Sewage Tank Capacity | 420ml |
| Noise Level | Under 60 dB |
Warranty and Support
For warranty information, technical support, or any inquiries regarding your Arondson Electric Wet Dry Mopping Head, please refer to the manufacturer's official website or contact their customer service directly. Keep your purchase receipt for any warranty claims.


