1. Introduction
This manual provides detailed instructions for setting up, operating, and maintaining your abxylute C6 Wireless PC Controller. Designed for wide compatibility and precision, this controller enhances your gaming experience across multiple platforms.

Figure 1: Front view of the abxylute C6 Wireless PC Controller. The controller is black with a standard gamepad layout, featuring two analog sticks, a D-pad, action buttons (A, B, X, Y), and central function buttons.
2. Product Features
- Wide Compatibility: Seamlessly works with PC (Windows 7/8/10/11), Android 8.0+ (cellphone, tablet, Smart TV), Apple iOS 13+ (iPhone, iPad), Mac, MacOS, Nintendo Switch/Switch 2, Steam OS/Steam Deck, and Tesla (Model 3 & Y).
- Dual Hall Effect Joysticks and Triggers: Experience unparalleled precision with no drifting, no dead zones, and extended lifespan. Triggers provide glitch-free, responsive performance.
- Ultra-Sensitive Response: Achieves 1000Hz polling rate in wired and Bluetooth Dongle modes for minimal input lag.
- 4-Level Vibration & Gyro in Switch: Customize haptic feedback from 30% to 100% intensity. Gyroscope is available for motion sensing in Switch games.
- Dual Turbo Modes: Customize turbo features to any button for rapid-fire actions.
- Long-lasting Gameplay: Equipped with a powerful 600mAh rechargeable battery, providing up to 18 hours of continuous gameplay.

Figure 2: Overview of key features including 1000Hz polling rate, Hall Effect technology, Turbo function, customizable vibration, and long battery life.

Figure 3: Illustration of Hall Effect technology in joysticks and triggers, ensuring precision and durability.
3. Package Contents
Please check the package for the following items:
- abxylute C6 Wireless PC Controller
- USB-C Charging Cable
- USB Wireless Dongle
- User Manual (this document)
4. Setup and Connection
The abxylute C6 controller supports multiple connection modes for various devices. The USB dongle mode is recommended for ultra-low latency and uninterrupted gameplay.

Figure 4: The abxylute C6 controller offers multi-platform connection options.
4.1. Connection Modes
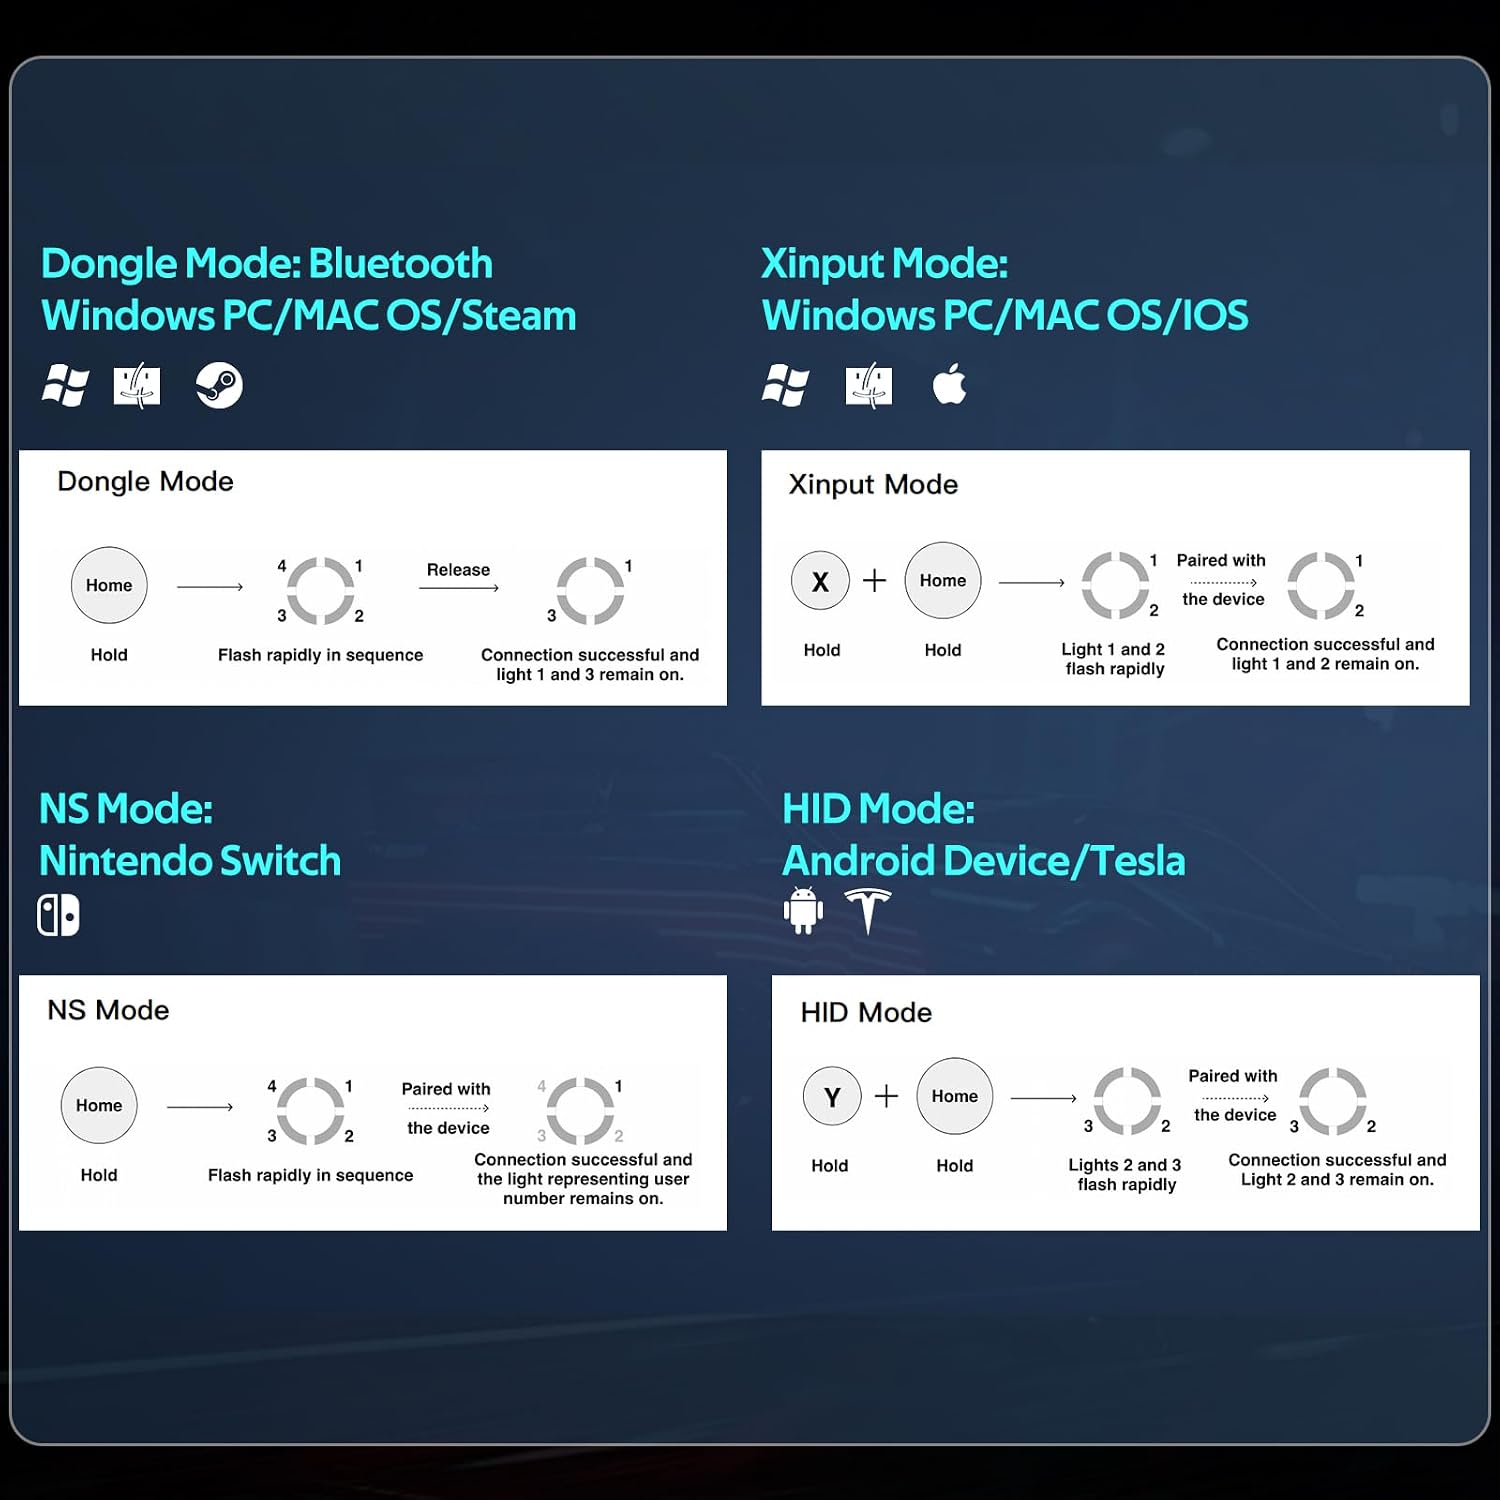
Figure 5: Visual guide for different connection modes and their indicator light patterns.
4.1.1. Dongle Mode (Windows PC/MAC OS/Steam)
- Insert the USB wireless dongle into an available USB port on your device.
- On the controller, Hold the Home button until the indicator lights flash rapidly in sequence.
- Once connected, Light 1 and Light 3 will remain on, indicating a successful connection.
4.1.2. Xinput Mode (Windows PC/MAC OS/iOS)
- On the controller, Hold the X button + Home button simultaneously until Light 1 and Light 2 flash rapidly.
- On your device, go to Bluetooth settings and select the controller for pairing.
- Once connected, Light 1 and Light 2 will remain on.
4.1.3. NS Mode (Nintendo Switch)
- On your Nintendo Switch, navigate to 'Controllers' > 'Change Grip/Order'.
- On the controller, Hold the Home button until the indicator lights flash rapidly in sequence.
- The controller will pair with the Switch, and the light representing the user number will remain on.
4.1.4. HID Mode (Android Device/Tesla)
- On the controller, Hold the Y button + Home button simultaneously until Light 2 and Light 3 flash rapidly.
- On your Android device or Tesla, go to Bluetooth settings and select the controller for pairing.
- Once connected, Light 2 and Light 3 will remain on.
4.1.5. Wired Connection
For PC and Android TV, a wired connection can be used if Bluetooth is not available on the device. Simply connect the controller to your device using the provided USB-C cable.
5. Operating the Controller
5.1. Controller Layout

Figure 6: Detailed layout of the abxylute C6 controller's buttons and joysticks.
5.2. Turbo Function
The Turbo function allows for rapid-fire input by holding down a single button. This can be customized to any button on the controller.
- To activate Turbo: Press and hold the Turbo button, then press the desired action button (e.g., A, B, X, Y, L1, R1, L2, R2). The Turbo function is now assigned to that button.
- To adjust Turbo speed: While holding the Turbo button, move the Right Hall Joystick up or down to cycle through 3 turbo speeds.
- To clear Turbo: Press and hold the Turbo button, then press the same action button again.

Figure 7: The Turbo button allows for simplified setup and enhanced gameplay with three adjustable speeds.
5.3. Vibration Adjustment
The controller features 4 levels of vibration intensity to enhance immersion.
- To adjust vibration: Press and hold the Vibration button (often represented by a small motor icon), then move the Left Hall Joystick up or down to cycle through the 4 levels (0%, 30%, 70%, 100%).

Figure 8: Customize your gaming experience with 4-level vibration feedback.
5.4. Gyroscope Function (Nintendo Switch Only)
The 6-axis gyroscope provides motion sensing capabilities, primarily for Nintendo Switch games.

Figure 9: The high-precision six-axis gyroscope enables motion control in compatible games, specifically on Nintendo Switch.
6. Maintenance
6.1. Battery Charging
When the battery is low, the indicator lights may flash. Connect the controller to a power source using the provided USB-C cable. The lights will indicate charging status and turn off when fully charged.
6.2. Cleaning
Use a soft, dry cloth to clean the controller. Avoid using harsh chemicals or abrasive materials that could damage the surface.
6.3. Joystick and Trigger Calibration (Anti-Drift)
If you experience joystick drift or unresponsive triggers, you can perform a calibration:
- Press the Home button + B button + Select button simultaneously. The 4 LED lights will flash in sequence.
- Rotate both joysticks 3 times to their outermost limits.
- Press both triggers 3 times to their full extent.
- Press the Select button to finish calibration.

Figure 10: Steps for calibrating joysticks and triggers to prevent drift.
6.4. Keylinker APP (Customization)
For advanced customization, download the Keylinker APP. This app allows you to adjust over 10 critical functions, including ABXY button switching, key mappings, vibration intensity, joystick sensitivity, and trigger response. Tailor every setting to your playstyle for maximum comfort and competitive edge.

Figure 11: The Keylinker APP provides extensive customization options for your controller.
7. Troubleshooting
- Controller not connecting: Ensure the controller is charged. Verify you are using the correct connection mode for your device. Try restarting both the controller and your device.
- Input lag/unresponsive: Ensure you are within range of the dongle/Bluetooth receiver. For best performance, use the USB dongle mode or a wired connection. Reduce interference from other wireless devices.
- Joystick drift/inaccurate input: Perform the joystick and trigger calibration as described in Section 6.3.
- Vibration not working: Check the vibration intensity settings (Section 5.3). Ensure the game supports vibration feedback.
- Gyroscope not working (Switch): Ensure the controller is connected in NS Mode. Verify the game supports gyroscope controls.
8. Specifications
| Feature | Detail |
|---|---|
| Model Number | C6 |
| Connectivity | Wired (USB-C), Bluetooth, 2.4GHz Wireless (via dongle) |
| Polling Rate | 1000Hz (Wired & Dongle Mode) |
| Joysticks/Triggers | Hall Effect |
| Vibration | 4-Level Adjustable |
| Gyroscope | 6-axis (Nintendo Switch only) |
| Battery Capacity | 600mAh |
| Battery Life | Up to 18 hours |
| Product Dimensions | 5 x 6 x 2 inches |
| Item Weight | 9.9 ounces (approx. 280g) |
Figure 12: The abxylute C6 is designed to be lightweight (186g) for extended comfortable gameplay. Note: The provided product data lists item weight as 9.9 ounces (approx. 280g), which differs from the image's 186g claim. Please refer to the official product packaging for the most accurate weight.
9. Warranty and Support
9.1. Warranty Information
The abxylute C6 Wireless PC Controller comes with a One-Year After Sales Warranty from the date of purchase. This warranty covers manufacturing defects and ensures reliable performance under normal use. Please retain your proof of purchase for warranty claims.
9.2. Customer Support
For any technical assistance, troubleshooting not covered in this manual, or warranty inquiries, please contact abxylute customer support through the official website or your retailer's support channels. Detailed contact information can typically be found on the product packaging or the abxylute official website.


