
1. Introduction
This manual provides essential instructions for the safe and efficient operation of your ApisQueen U1 Set Underwater Thruster. Please read this manual thoroughly before installation and use to ensure proper functionality and longevity of the product.
2. What's in the Box
The ApisQueen U1 Set includes the following components:
- 1x CW Thruster
- 1x CCW Thruster
- 2x 45A ESC (Electronic Speed Controller)
- 1x Non-waterproof Remote Control
- 1x Receiver
- 1x BEC (Battery Eliminator Circuit)
- 1x XT60 Plug
- 1x Pack of Screws
Note: Batteries are not included and must be purchased separately.

Figure 2.1: Overview of the ApisQueen U1 Set components.
3. Setup
3.1. Thruster Installation
The thrusters are designed for easy installation. Ensure the mounting surface is clean and dry before attachment. The set includes one Clockwise (CW) and one Counter-Clockwise (CCW) thruster. The direction of rotation is crucial for proper boat movement.

Figure 3.1: U1 Thruster dimensions for mounting.
3.2. Wiring Connections
Follow the wiring diagram carefully. Incorrect connections can damage the components.
- ESC Connection: Connect the CW thruster to one 45A ESC and the CCW thruster to the other 45A ESC.
- Power Distribution: Use the XT60 plug to connect both ESCs and the BEC to your battery.
- Receiver & BEC: The BEC provides 5V/3A or 6V/3A output (switchable via jumper caps) to power the receiver. Connect the BEC output to the receiver.
- ESC Signal: Connect the signal wire from each ESC to the appropriate channel on the receiver.

Figure 3.2: Thruster and ESC connection details.
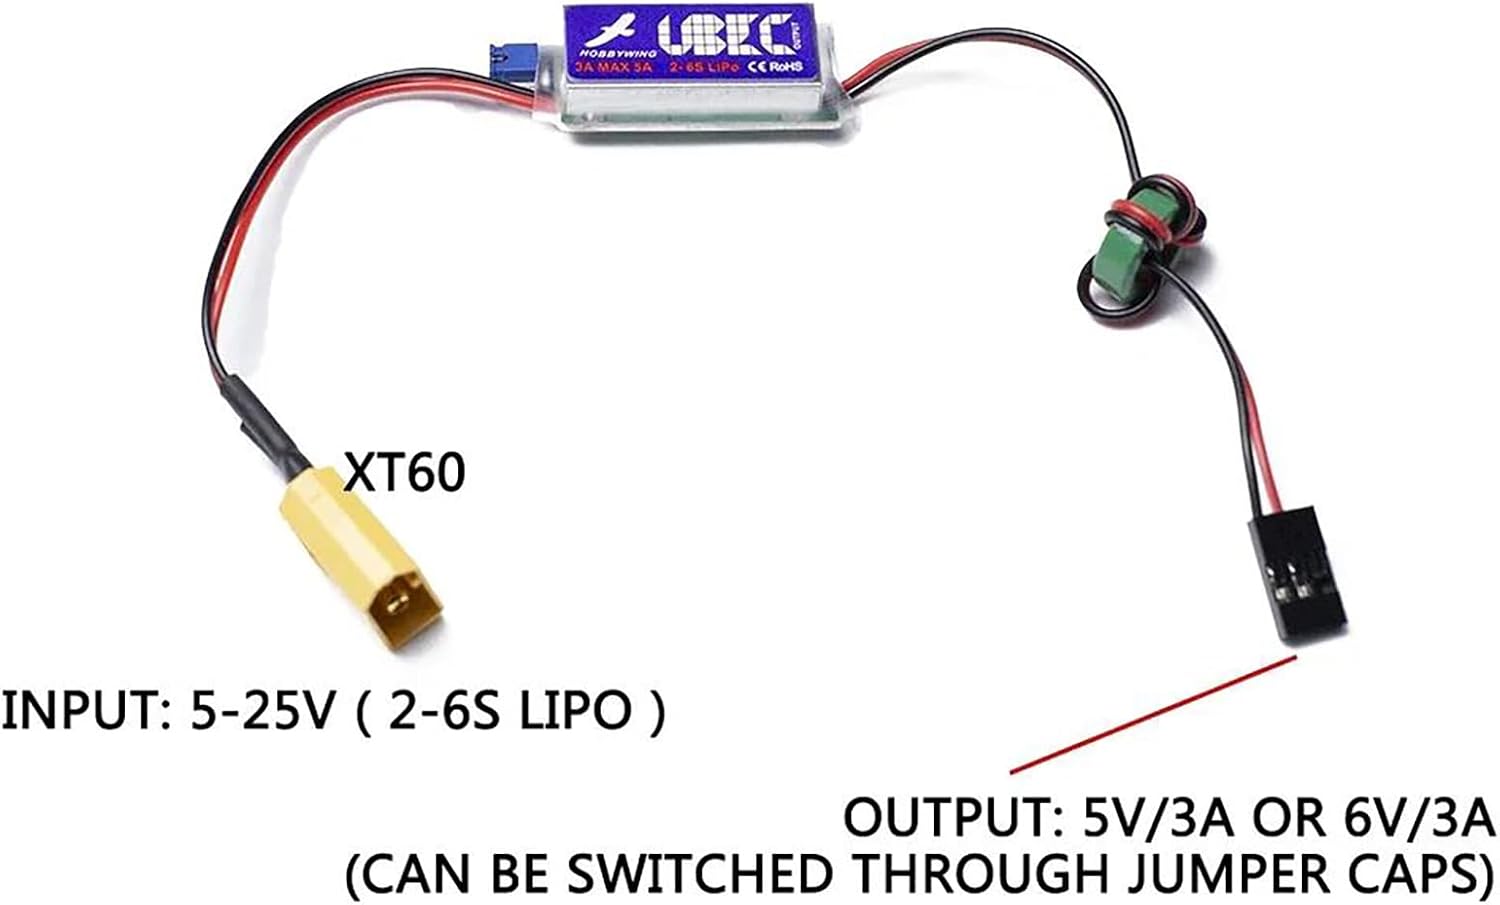
Figure 3.3: BEC wiring for receiver power.

Figure 3.4: XT60 adapter for power distribution.
3.3. Remote Control & Receiver
The remote control is pre-configured. No additional settings are required for basic operation. Simply connect the power to start working. Other channel functions are reserved for DIY enthusiasts.
PWM Signal: The ESCs use Pulse-width modulation (PWM) for control. 1.5ms indicates stop, 1.5-2ms for forward rotation, and 1.5-1ms for reverse rotation.
Video 3.1: This video demonstrates the connection and use of the ApisQueen U1 Set Underwater Thruster, including remote control operation and thruster response.
4. Operating Instructions
4.1. Power On Sequence
- Turn on the remote control. It will beep to indicate successful power-on.
- Connect the main power supply to the ESCs. Wait for the ESCs to complete their self-test (indicated by beeps) before operation.
4.2. Thruster Control
- Forward: Push the remote control joystick forward. Both thrusters will propel water towards the stern, moving the boat forward.
- Backward: Pull the remote control joystick backward. Both thrusters will propel water towards the bow, moving the boat backward.
- Turn Left: Push the joystick to the left. The left thruster will propel water towards the stern, and the right thruster will propel water towards the bow, causing the boat to turn left.
- Turn Right: Push the joystick to the right. The right thruster will propel water towards the stern, and the left thruster will propel water towards the bow, causing the boat to turn right.
4.3. Cruise Control
To activate cruise control, push the throttle rocker to the desired speed, then press the "OK" button. Release the throttle rocker, and the thrusters will maintain the current speed. To adjust speed in cruise control, push the throttle rocker forward to increase speed by 10 units at a time, or backward to decrease speed by 10 units. A "beep" sound will confirm each adjustment. To exit cruise control, press the "OK" button again.
4.4. Battery Voltage Check
The remote control screen displays the current battery voltage, allowing you to monitor power levels during operation.
5. Maintenance
- Usage Environment: The U1 underwater thruster is designed for use exclusively in freshwater environments. Seawater use is not applicable and may cause damage.
- ESC Water Resistance: The 45A ESC features a nano waterproof process, making it splash-proof. However, it is not designed for long-term submersion in water. Avoid prolonged soaking.
- Storage: When not in use, disconnect the power supply and turn off the remote control to prevent accidental activation and conserve battery life.
- Cleaning: After each use, rinse the thrusters with fresh water to remove any debris or sediment.
6. Troubleshooting
If you encounter issues with your ApisQueen U1 Set, please review the following common troubleshooting steps:
- No Power: Ensure all battery connections are secure and the battery is charged. Check the remote control is powered on.
- Thrusters Not Responding: Verify that the ESCs have completed their self-test sequence. Check all signal cable connections between the receiver and ESCs.
- Incorrect Thruster Direction: If a thruster rotates in the wrong direction, you can change its rotation by switching any two of the three-phase wires connecting the thruster to the ESC.
- Remote Control Issues: Ensure the remote control is within range and has sufficient battery power.
- ESC Overheating: Ensure the ESC is not submerged for prolonged periods and has adequate ventilation if used in a confined space.
For persistent issues, please contact ApisQueen customer support.
7. Specifications
| Feature | Specification |
|---|---|
| Brand | ApisQueen |
| Model Name | U1 underwater thruster |
| Item Model Number | U1 |
| Material | Plastic |
| Voltage Range | 12V~16V (Recommended 16V / 4S LiPo for efficiency) |
| Thrust | Up to 7.5 LBS (approx. 3.4 kg) |
| ESC | 45A Bi-directional, Nano waterproof process (splash-proof) |
| Motor Type | Brushless |
| Item Weight | 1.87 Pounds (approx. 0.85 kg) |
| Product Dimensions | 3 x 1.5 x 3 inches (approx. 7.6 x 3.8 x 7.6 cm) |
| UPC | 711258237710 |

Figure 7.1: ApisQueen U1 Underwater Thruster performance data.
8. Warranty and Support
For warranty information and customer support, please refer to the product packaging or contact ApisQueen directly through their official channels. Specific warranty details are not provided in this manual.
Visit the ApisQueen Store for more products and information.