
1. Introduction and Overview
This manual provides essential information for the safe and proper use of your PREXISO Laser Level with Tripod and 2 Plumb Dots, Model P2LC15DG. Please read all instructions carefully before operating the device. Keep this manual for future reference.
The PREXISO Laser Level is a versatile tool designed for various leveling and alignment tasks, featuring multiple laser modes, self-leveling capabilities, and dual power options. It is suitable for construction, home improvement, and professional applications.

Figure 1: PREXISO Laser Level projecting horizontal and vertical green laser lines, demonstrating its wide angle coverage.
2. Safety Information
WARNING: CLASS II LASER PRODUCT
This device emits a Class II laser beam. Maximum laser output is < 1mW. Direct eye exposure to the laser beam should be avoided. Do not stare into the beam. Do not intentionally direct the laser beam at people or animals. Use caution when operating the device around others.
- Always operate the laser level in a safe environment.
- Do not attempt to disassemble or modify the laser level. This can cause hazardous laser radiation exposure.
- Keep the device out of reach of children.
- Ensure the work area is clear of obstructions and potential hazards.
3. Package Contents
Verify that all items are present in your package:
- 1 x PREXISO Laser Level
- 1 x 47-inch Adjustable Tripod
- 1 x Magnetic Base Bracket
- 1 x Storage Bag
- 1 x Type-C Charging Cable
- 1 x Iron Plate (for wall mounting)
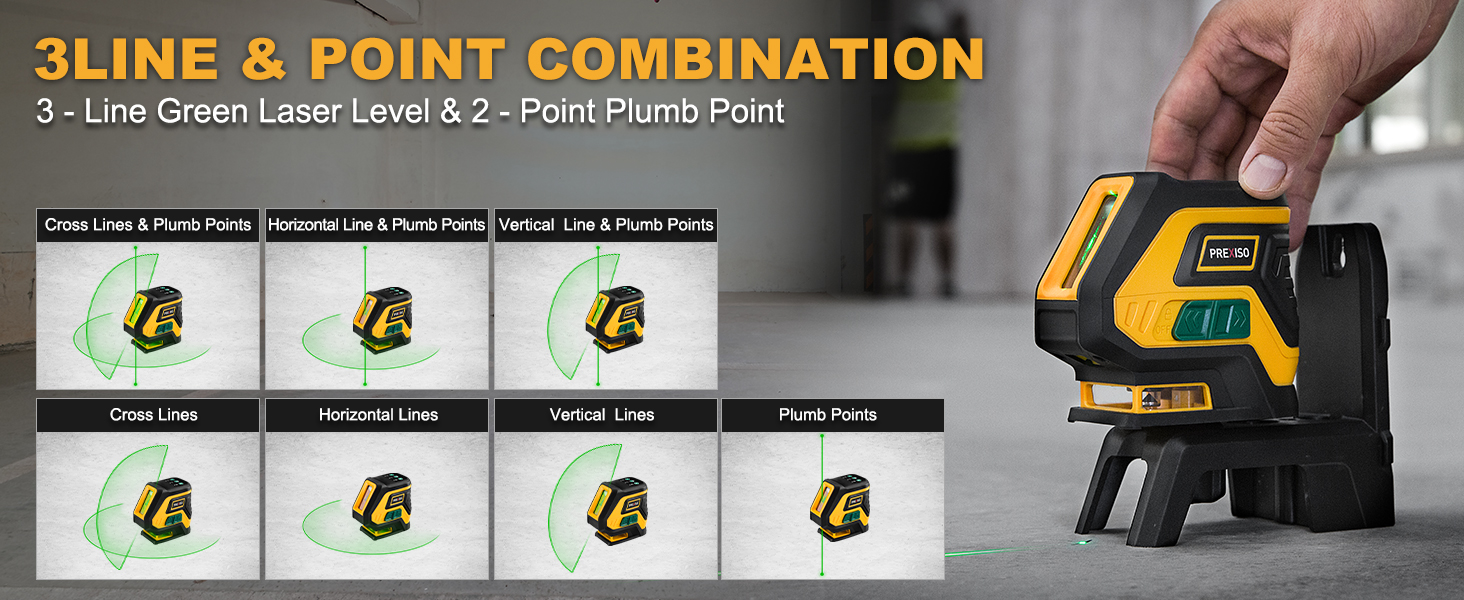
Figure 2: All components included in the PREXISO Laser Level package.
4. Product Features
- Plumb Dots & Wide Angle Laser Lines: The laser tool offers 7 leveling modes, including 2 plumb dots (up and down) and a 360° horizontal line with an expanded vertical beam (over 130°). This allows for comprehensive layout and alignment.
- Dual Power Methods: The device is powered by a rechargeable lithium battery (4400mAh) and features a Type-C charging port. It can also be operated directly by plugging it into a power source, even with the battery removed.
- Outdoor Pulse Mode: For use in bright light or outdoor conditions, activate the pulse mode. This extends the laser range up to 165ft when used with a compatible laser receiver (receiver sold separately). In pulse mode, laser lines may appear less visible to the naked eye but are detectable by the receiver.
- Self-Leveling & Manual Mode:
- Self-Leveling Mode: Slide the lock switch to the "unlocked" position. The tool will automatically level itself within a ±4° range. If the tilt exceeds 4°, the laser lines will blink, and the lock LED indicator will turn red.
- Manual Mode: Slide the lock switch to the "lock" position and press the power button for 3 seconds. This disables the self-leveling feature, allowing you to project laser lines at any desired angle. - Multipurpose Application: Ideal for various tasks such as squaring kitchen tiles, wall tiling, bathroom flooring layout, hanging wall decorations, air conditioning installation, and door/window calibration.
- Included Tripod & Magnetic Bracket: The adjustable tripod extends up to 47 inches (1.2m) for precise height adjustments and collapses to 17 inches for easy storage. The magnetic bracket allows for 360° rotation and easy attachment to metal surfaces, offering 1/4"-20 mount threads for tripod compatibility.
5. Setup
5.1 Charging the Battery
Before first use, fully charge the lithium battery using the provided Type-C charging cable. The charging port is located on the device. The battery can be charged while installed in the unit or separately.

Figure 3: Dual power source options for the laser level, including battery and direct plug-in.
5.2 Mounting the Laser Level
- On the Tripod: Extend the tripod legs and adjust to the desired height. Secure the laser level onto the tripod's 1/4"-20 screw mount.
- Using the Magnetic Bracket: Attach the magnetic bracket to the laser level. The bracket can then be affixed to any metal surface. For non-metal surfaces, use the included iron plate by securing it to the wall or desired location, then attach the magnetic bracket to the iron plate. The bracket allows for 360° rotation of the laser level.

Figure 4: The magnetic bracket allows for versatile mounting on various surfaces.
6. Operating Modes
6.1 Power On/Off
To turn the laser level ON, slide the lock/unlock switch to the "ON" (unlocked) side for self-leveling mode, or to the "LOCK" side and press the power button for 3 seconds for manual mode.
To turn the laser level OFF, slide the lock/unlock switch to the "OFF" (locked) side.
6.2 Switching Laser Modes
The PREXISO Laser Level offers 7 distinct laser line modes. Once powered on, short press the H/V button to cycle through the available modes:
- Horizontal Line
- Vertical Line
- Cross Lines (Horizontal + Vertical)
- Up Plumb Dot
- Down Plumb Dot
- Horizontal Line + Up/Down Plumb Dots
- Vertical Line + Up/Down Plumb Dots

Figure 5: Visual representation of the 7 laser line modes.
6.3 Self-Leveling Mode
When the lock/unlock switch is in the "ON" (unlocked) position, the device will automatically level itself. If the tool is placed on a surface that is tilted more than ±4°, the laser lines will blink rapidly, and the lock LED will turn red, indicating that the device is out of its self-leveling range. Adjust the position of the tool until the lines stop blinking and the LED turns green.
6.4 Manual Mode (Locked Mode)
To use the laser level for projecting lines at an angle (e.g., for stair railings), slide the lock/unlock switch to the "LOCK" position. Then, press and hold the power button for 3 seconds to activate the laser. In this mode, the self-leveling function is disabled, and the laser lines will remain fixed at the angle you set the device.

Figure 6: Operating instructions for Self-Leveling and Manual Modes.
6.5 Pulse Mode
Activate pulse mode by pressing the dedicated pulse mode button (often indicated by a signal icon). This mode is designed for use with an optional laser receiver to extend the working range in bright conditions. The laser lines will flash at a high frequency, which may make them less visible to the naked eye but allows for detection by the receiver.

Figure 7: Extending the working range using Pulse Mode.
6.6 Brightness Setting
The laser level may include a brightness setting button to adjust the intensity of the laser lines for different lighting conditions. Refer to the device's control panel for this feature.
7. Maintenance
- Cleaning: Use a soft, damp cloth to clean the exterior of the laser level. Do not use abrasive cleaners or solvents. Keep the laser apertures clean and free of dust.
- Storage: When not in use, store the laser level and its accessories in the provided storage bag in a dry, cool place, away from direct sunlight.
- Battery Care: For optimal battery life, charge the lithium battery regularly, even if the device is not in frequent use. Avoid fully discharging the battery for extended periods.
- Calibration: If you suspect the laser level is out of calibration, refer to the troubleshooting section or contact customer support. Do not attempt to self-calibrate without proper instructions.
8. Troubleshooting
| Problem | Possible Cause | Solution |
|---|---|---|
| Laser lines are blinking and LED is red. | Device is outside its ±4° self-leveling range. | Place the laser level on a flatter surface or adjust the tripod until the lines stabilize and the LED turns green. |
| Laser lines are dim or not visible outdoors. | Bright ambient light or pulse mode is active without a receiver. | Activate pulse mode and use a laser receiver (sold separately) for outdoor use. Ensure brightness setting is at maximum if available. |
| Device does not power on. | Low battery or incorrect power connection. | Charge the battery or connect the device to a power source using the Type-C cable. Ensure the lock/unlock switch is in the correct position. |
| Laser lines are not level in manual mode. | Manual mode is designed for angled projection. | This is expected behavior. If you require a level line, switch to self-leveling mode by sliding the lock/unlock switch to "ON". |
9. Specifications

Figure 8: Key components and dimensions of the PREXISO Laser Level.
| Specification | Detail |
|---|---|
| Brand | Prexiso |
| Model Number | P2LC15DG |
| Material | Alloy Steel |
| Color | Green |
| Operation Mode | Automatic |
| Laser Class | Class II, < 1mW |
| Self-Leveling Range | ±4° |
| Outdoor Pulse Mode Range | Up to 165 ft (with receiver) |
| Power Source | Rechargeable Lithium Battery (4400mAh) / Type-C direct power |
| Tripod Height (Max) | 47 inches (1.2m) |
| Tripod Height (Closed) | 17 inches |
| Mount Thread | 1/4"-20 |
| UPC | 840128502716 |
| Manufacturer | Hang Zhou Great Star Industrial Co.,LTD |
10. Official Product Video
Video: An overview of the PREXISO Laser Level, demonstrating its features including plumb dots and use with a tripod.
11. Warranty and Support
PREXISO products are manufactured to high-quality standards. For warranty information, technical support, or service inquiries, please refer to the warranty card included with your product or contact the manufacturer directly. Keep your purchase receipt as proof of purchase.
Manufacturer: Hang Zhou Great Star Industrial Co.,LTD