Introduction
Thank you for choosing the MAXLANDER 20V 12-Inch Cordless String Trimmer Edger. This versatile tool is designed for efficient lawn care, offering both string trimming and edging capabilities. Its lightweight design and battery operation provide convenience and portability for various outdoor tasks. Please read this manual thoroughly before operation to ensure safe and effective use of your new tool.
Important Safety Information
Always prioritize safety when operating power tools. Failure to follow these instructions may result in serious injury.
- Always wear eye protection, long pants, closed-toe shoes, and hearing protection when operating the trimmer.
- Keep bystanders and pets at a safe distance (at least 15 meters / 50 feet) from the operating area.
- Do not operate the trimmer if you are tired or under the influence of drugs or alcohol.
- Inspect the work area for debris, rocks, or other objects that could be thrown by the cutting line. Clear the area before starting.
- Ensure all guards and handles are properly installed and secured before use.
- Never operate the trimmer with damaged or missing parts.
- Disconnect the battery pack before making any adjustments, changing accessories, or storing the tool.
- Use only MAXLANDER approved replacement parts and accessories.
Package Contents
Your MAXLANDER Cordless String Trimmer Edger package includes the following components:
- MAXLANDER 20V 12-Inch Cordless String Trimmer Edger Unit
- 2 x 20V Lithium-Ion Batteries
- 1 x Quick Charger
- 8 x Replacement Spools
- Safety Guard
- Edger Wheel
- User Manual

Image: Complete package contents of the MAXLANDER 20V 12-Inch Cordless String Trimmer Edger, including the main unit, two batteries, charger, and eight replacement spools.

Image: Visual representation of the items included in the MAXLANDER product package, showing the main trimmer unit, batteries, charger, and multiple spools.
Setup and Assembly
Follow these steps to assemble your MAXLANDER Cordless String Trimmer Edger:
1. Assemble the Shaft
Connect the two sections of the shaft. Ensure the protruding part on one section aligns and embeds correctly into the depression on the other section. Twist to secure.

Image: Detailed steps for assembling the trimmer shaft, showing how to insert and secure the two parts by twisting the black knob.
2. Attach the Safety Guard
Locate the safety guard. Align it with the mounting points on the trimmer head and secure it using the provided screw and screwdriver. This guard protects against debris during operation.
3. Insert the Edger Wheel
For edging functionality, insert the edger wheel into its designated slot on the trimmer head. Ensure it clicks securely into place.
4. Insert the Battery
Fully charge the battery before first use. Insert the charged 20V Lithium-Ion battery into the battery slot on the handle until it clicks into place. Ensure it is firmly seated.
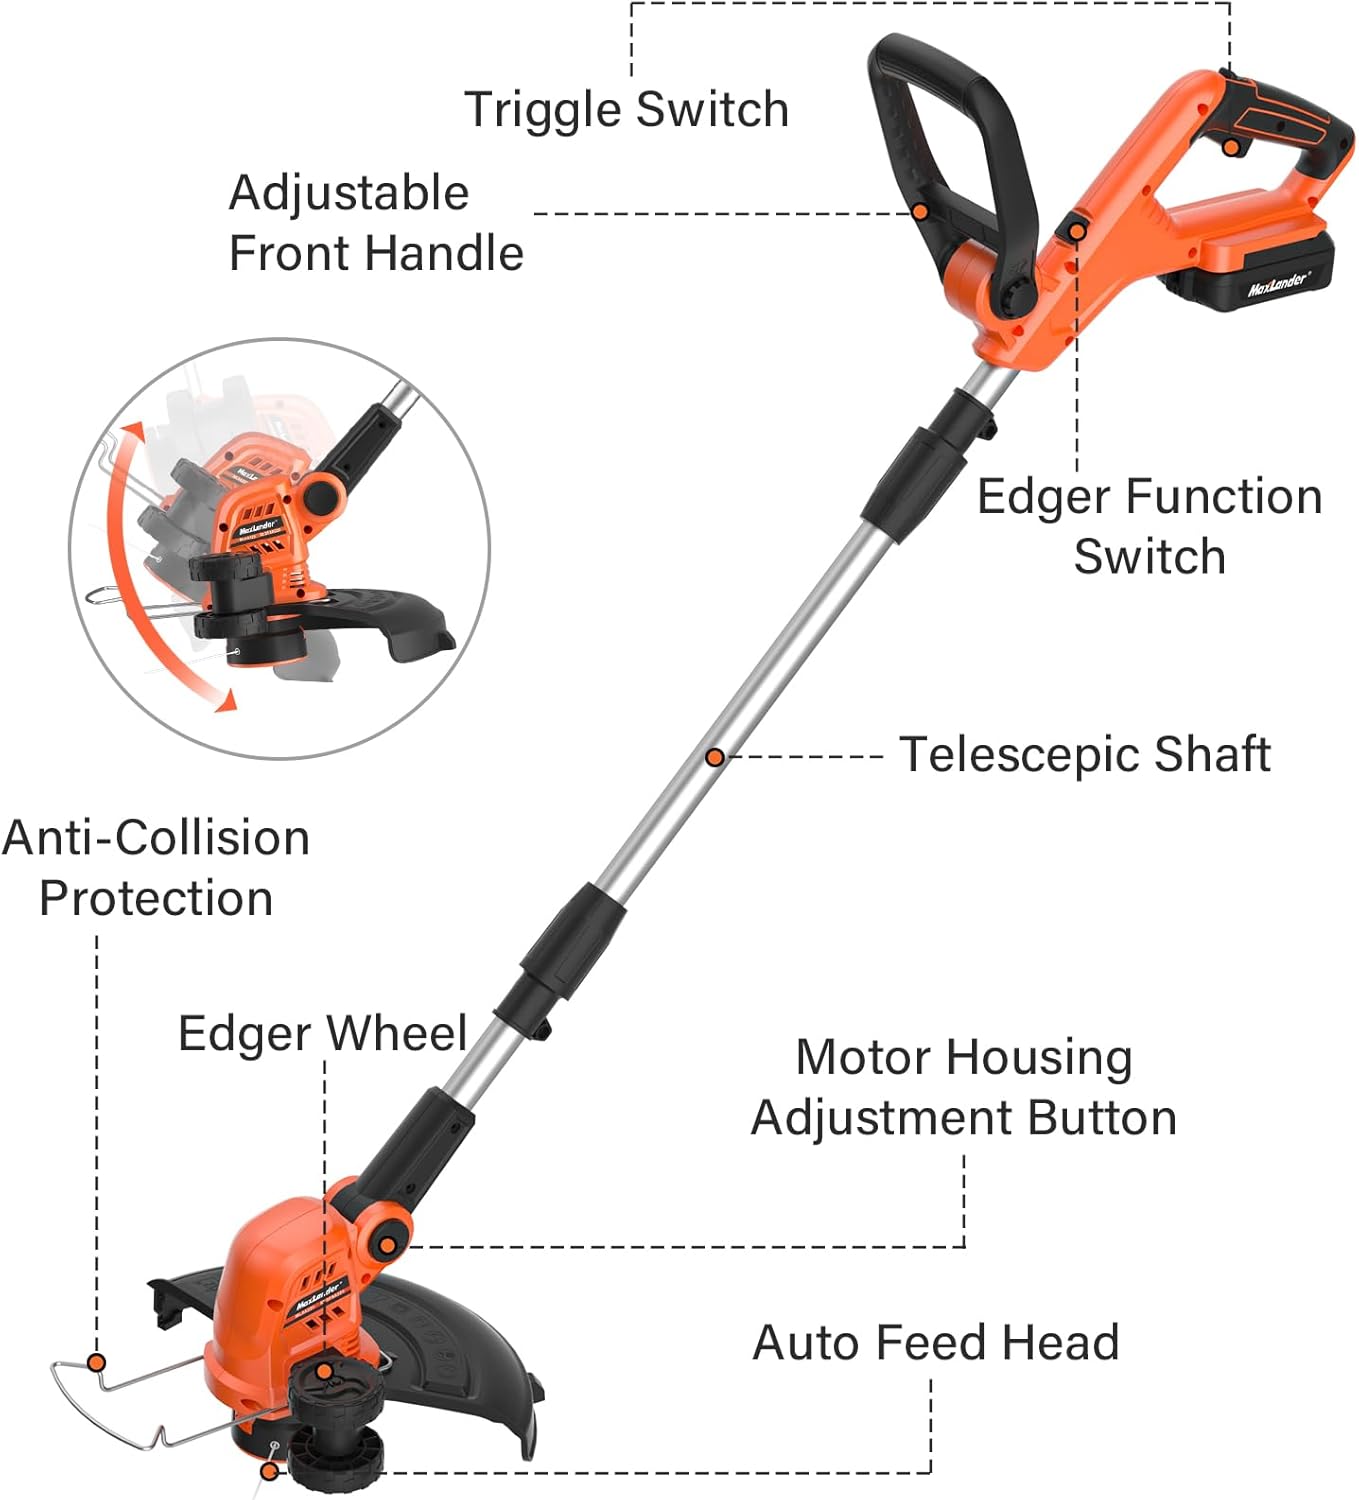
Image: Labeled diagram illustrating various components of the MAXLANDER trimmer, including the trigger switch, adjustable front handle, edger function switch, telescopic shaft, anti-collision protection, edger wheel, motor housing adjustment button, and auto feed head.
Operating Instructions
1. Starting and Stopping
To start the trimmer, press the safety lock button and then squeeze the trigger switch. To stop, release the trigger switch.
2. 2-in-1 Trimmer & Edger Function
The MAXLANDER unit easily converts between a string trimmer and a wheel edger. For trimming, hold the unit with the cutting head parallel to the ground. For edging, rotate the head 90 degrees using the edger function switch and utilize the pre-installed rubberized wheel for guidance along edges.

Image: Demonstration of the 2-in-1 multi-functionality, showing the unit configured as an edger with the wheel on the ground and as a trimmer with the head parallel to the ground.

Image: A user operating the MAXLANDER trimmer in edging mode along a paved path, highlighting its dual functionality.
3. Automatic Line Feed
The trimmer features an innovative push-button command feed spool system. Each time you press the start button, the cutting line will automatically advance approximately 0.5 cm, ensuring a continuous cutting path without manual adjustment.
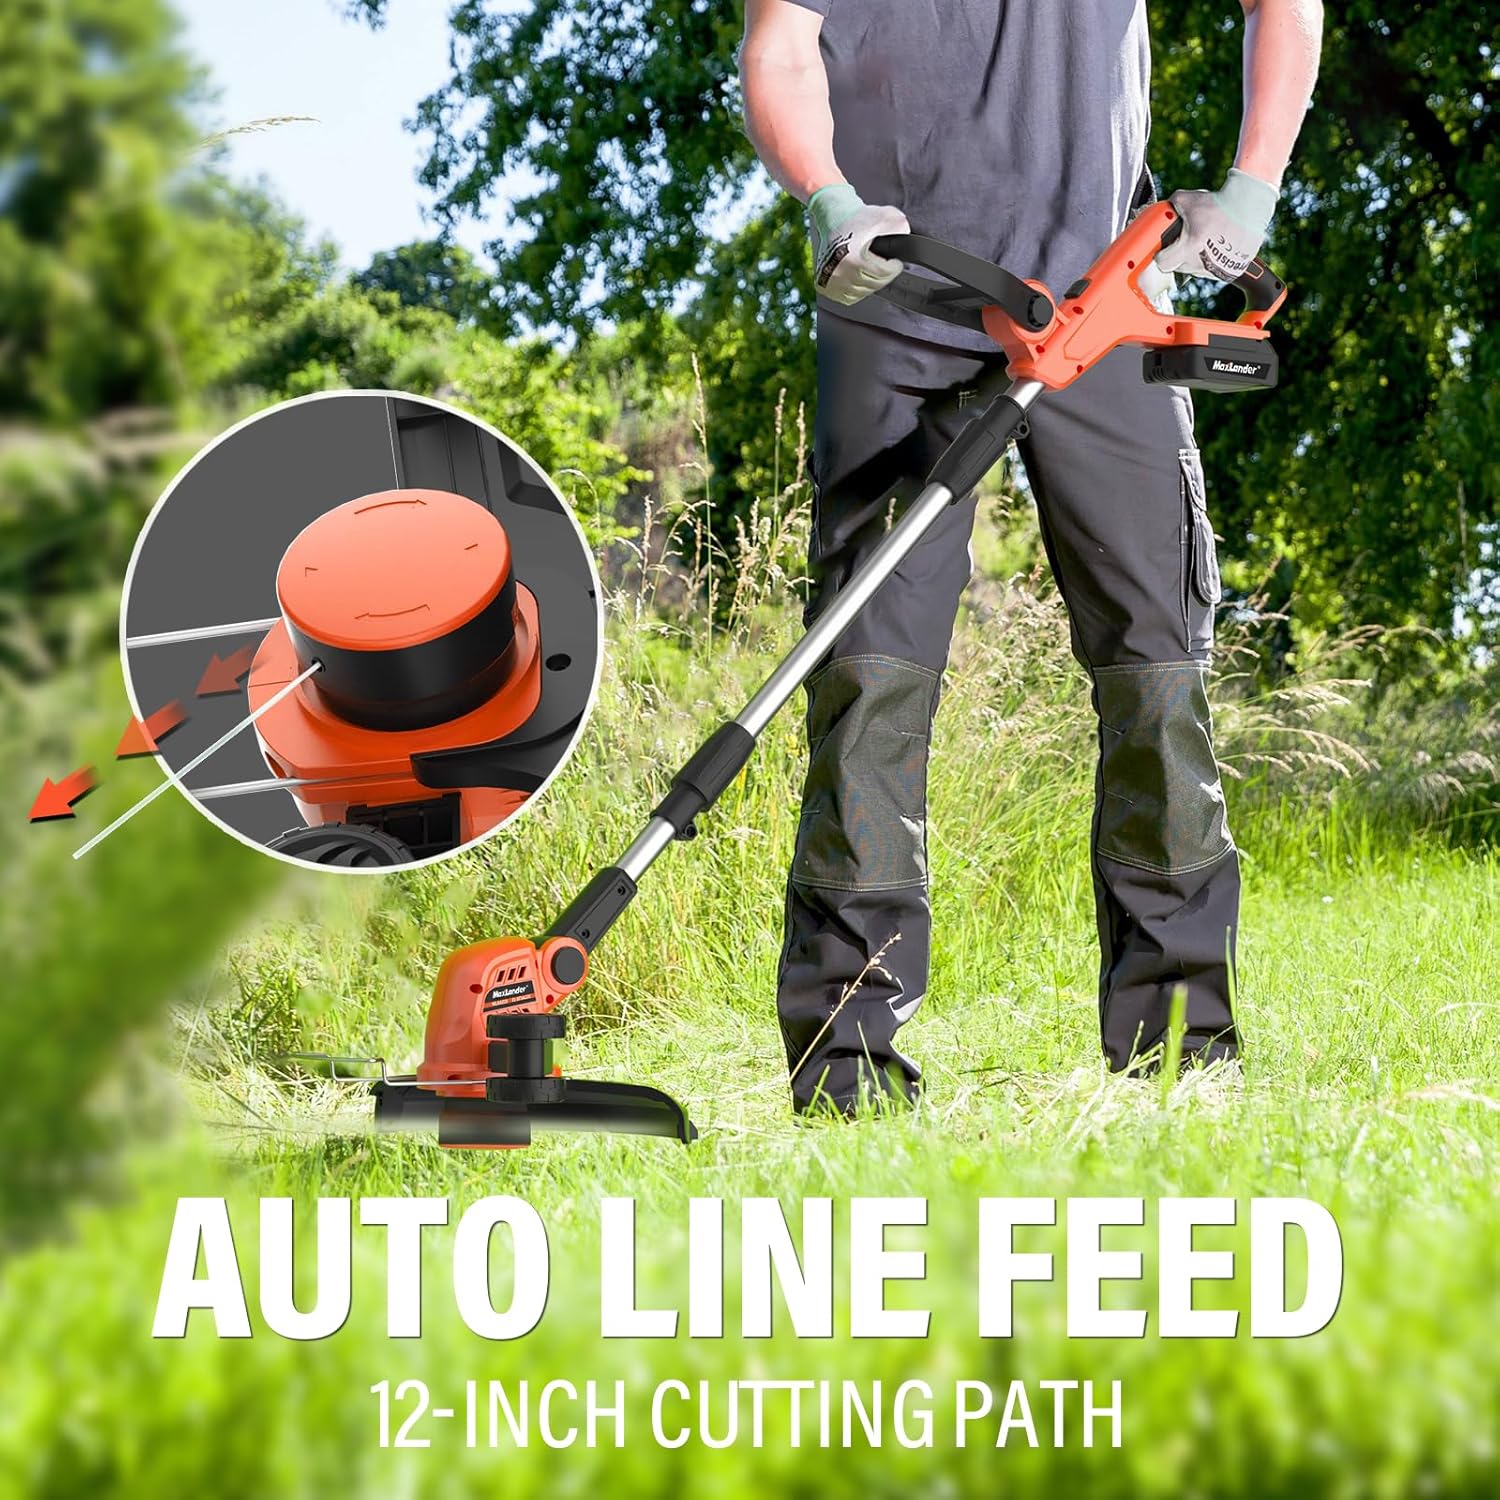
Image: Close-up view of the trimmer head illustrating the auto line feed mechanism and the 12-inch cutting path.
4. Adjustable Handle and Head
Adjust the handle and head angle for optimal comfort and reach. The handle is adjustable for an easy grip, and the head pivots 90 degrees to access tight or awkward spaces, or to edge on uneven terrain. The shaft can also be adjusted based on user preference.

Image: Visual representation of the adjustable handle, showing its range of motion for comfortable operation.

Image: A banner image emphasizing the adjustable handle feature for improved grip and user comfort.

Image: A banner image demonstrating the multiple adjustable angles of the trimmer head for versatile operation in various conditions.
5. Battery Life and Charging
The trimmer is powered by 20V Lithium-Ion batteries. Each fully charged battery provides approximately 30 minutes of runtime. Use the included quick charger to recharge batteries. Always ensure batteries are fully charged before extensive use for optimal performance.
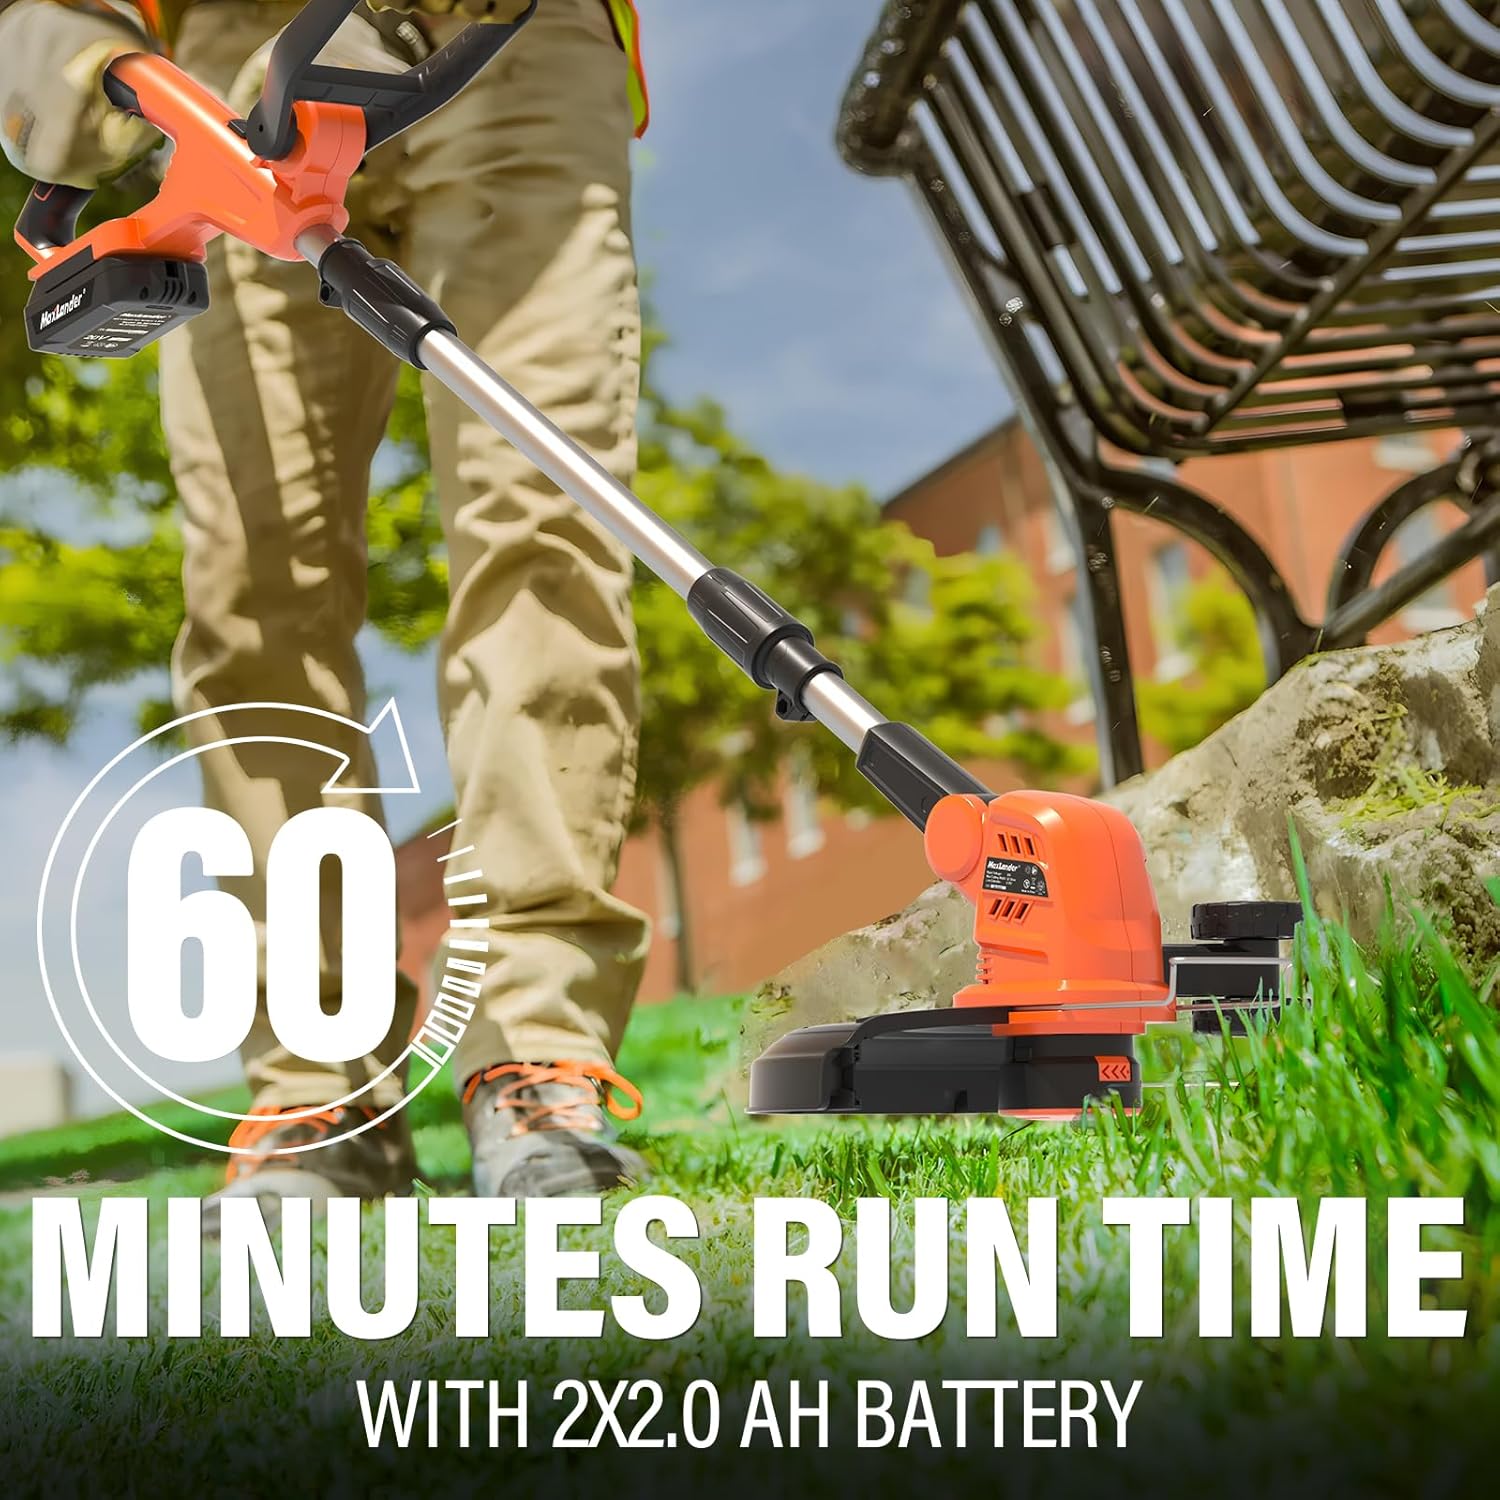
Image: A user operating the trimmer, with an overlay indicating "60 Minutes Run Time With 2x2.0 AH Battery", suggesting combined runtime from two batteries.

Image: A user trimming grass, with a graphic indicating "30 Mins of Runtime Per Charger", referring to the runtime provided by a single battery charge.
Maintenance
Regular maintenance ensures the longevity and optimal performance of your MAXLANDER trimmer.
- Cleaning: After each use, disconnect the battery and clean the trimmer head and guard. Remove any grass clippings, dirt, or debris. Use a damp cloth; do not use harsh chemicals or abrasive cleaners.
- Line Replacement: When the cutting line runs out, replace the spool with a new MAXLANDER replacement spool. Refer to the package contents for the number of included spools.
- Battery Care: Store batteries in a cool, dry place away from direct sunlight. Do not store fully discharged batteries for extended periods. Charge them periodically if not in use.
- Storage: Store the trimmer in a dry, secure location, out of reach of children. The detachable design allows for compact storage.
- Motor: The trimmer features a durable copper motor designed for lower energy consumption and extended lifespan. No user maintenance is required for the motor itself.

Image: An artistic rendering of the copper motor, highlighting its internal components and emphasizing its efficiency and durability.

Image: A banner image detailing the benefits of the copper motor: more power, extended lifespan, longer runtime, and lower energy consumption.
Troubleshooting
If you encounter issues with your MAXLANDER trimmer, refer to the following common problems and solutions:
| Problem | Possible Cause | Solution |
|---|---|---|
| Trimmer does not start. | Battery not inserted correctly or discharged. Safety lock not engaged. | Ensure battery is fully charged and properly inserted. Press the safety lock button before squeezing the trigger. |
| Cutting line does not advance. | Spool is empty or tangled. Debris in the line feed mechanism. | Replace the spool with a new one. Disconnect battery and clear any debris from the line feed area. |
| Reduced cutting performance. | Dull or short cutting line. Overgrown weeds. | Advance the cutting line using the auto-feed feature or replace the spool. Work in smaller sections for dense growth. |
| Tool stops unexpectedly. | Battery overheating or low charge. Loose connection. | Allow battery to cool down and recharge if necessary. Check all connections for tightness. |
If the problem persists after trying these solutions, please contact MAXLANDER customer support.
Specifications
| Feature | Detail |
|---|---|
| Brand | MAXLANDER |
| Model Number | ML8A220 |
| Power Source | Battery Powered (20V Lithium-Ion) |
| Cutting Width | 12 inches |
| Item Weight | 7.48 Pounds (approx. 3.39 kg) |
| Product Dimensions | 109.22 x 20.32 x 12.7 cm |
| Color | Orange & Black |
| Assembly Required | Yes |
| Country of Origin | China |
Warranty and Support
MAXLANDER products are manufactured to high-quality standards. For warranty information, technical support, or replacement parts, please contact MAXLANDER customer service through the retailer where the product was purchased or visit the official MAXLANDER website. Please have your model number (ML8A220) and purchase date available when contacting support.