
1. Introduction
Thank you for choosing the ENDYSHOW PL-P18-RGBW LED Par Lights. This manual provides essential information for the safe and effective operation of your new stage lighting fixtures. These lights feature 18x5W RGBW 4-in-1 LED beads, offering a total power of 90W per unit, and support various control modes including DMX512, Auto, Sound Activated, and Remote Control.

Figure 1.1: ENDYSHOW PL-P18-RGBW LED Par Lights (2-pack) with remote controls.
2. Safety Instructions
- Read all instructions carefully before use.
- Keep this manual for future reference.
- Do not open the housing; there are no user-serviceable parts inside. Refer all servicing to qualified personnel.
- Ensure the power supply voltage matches the rating specified on the unit.
- Disconnect from power before cleaning or performing any maintenance.
- Avoid direct eye exposure to the light source.
- Ensure proper ventilation to prevent overheating. Do not block cooling vents.
- Install the fixture in a stable location, away from flammable materials.
- Use safety cables when hanging the unit overhead.
3. Package Contents
The package typically includes the following items:
- ENDYSHOW PL-P18-RGBW LED Par Light(s)
- Remote Control(s)
- Adjustable Mounting Bracket(s)
- Power Cable(s)
- Instruction Manual
4. Product Overview
The ENDYSHOW PL-P18-RGBW LED Par Light features a robust design with multiple control interfaces.
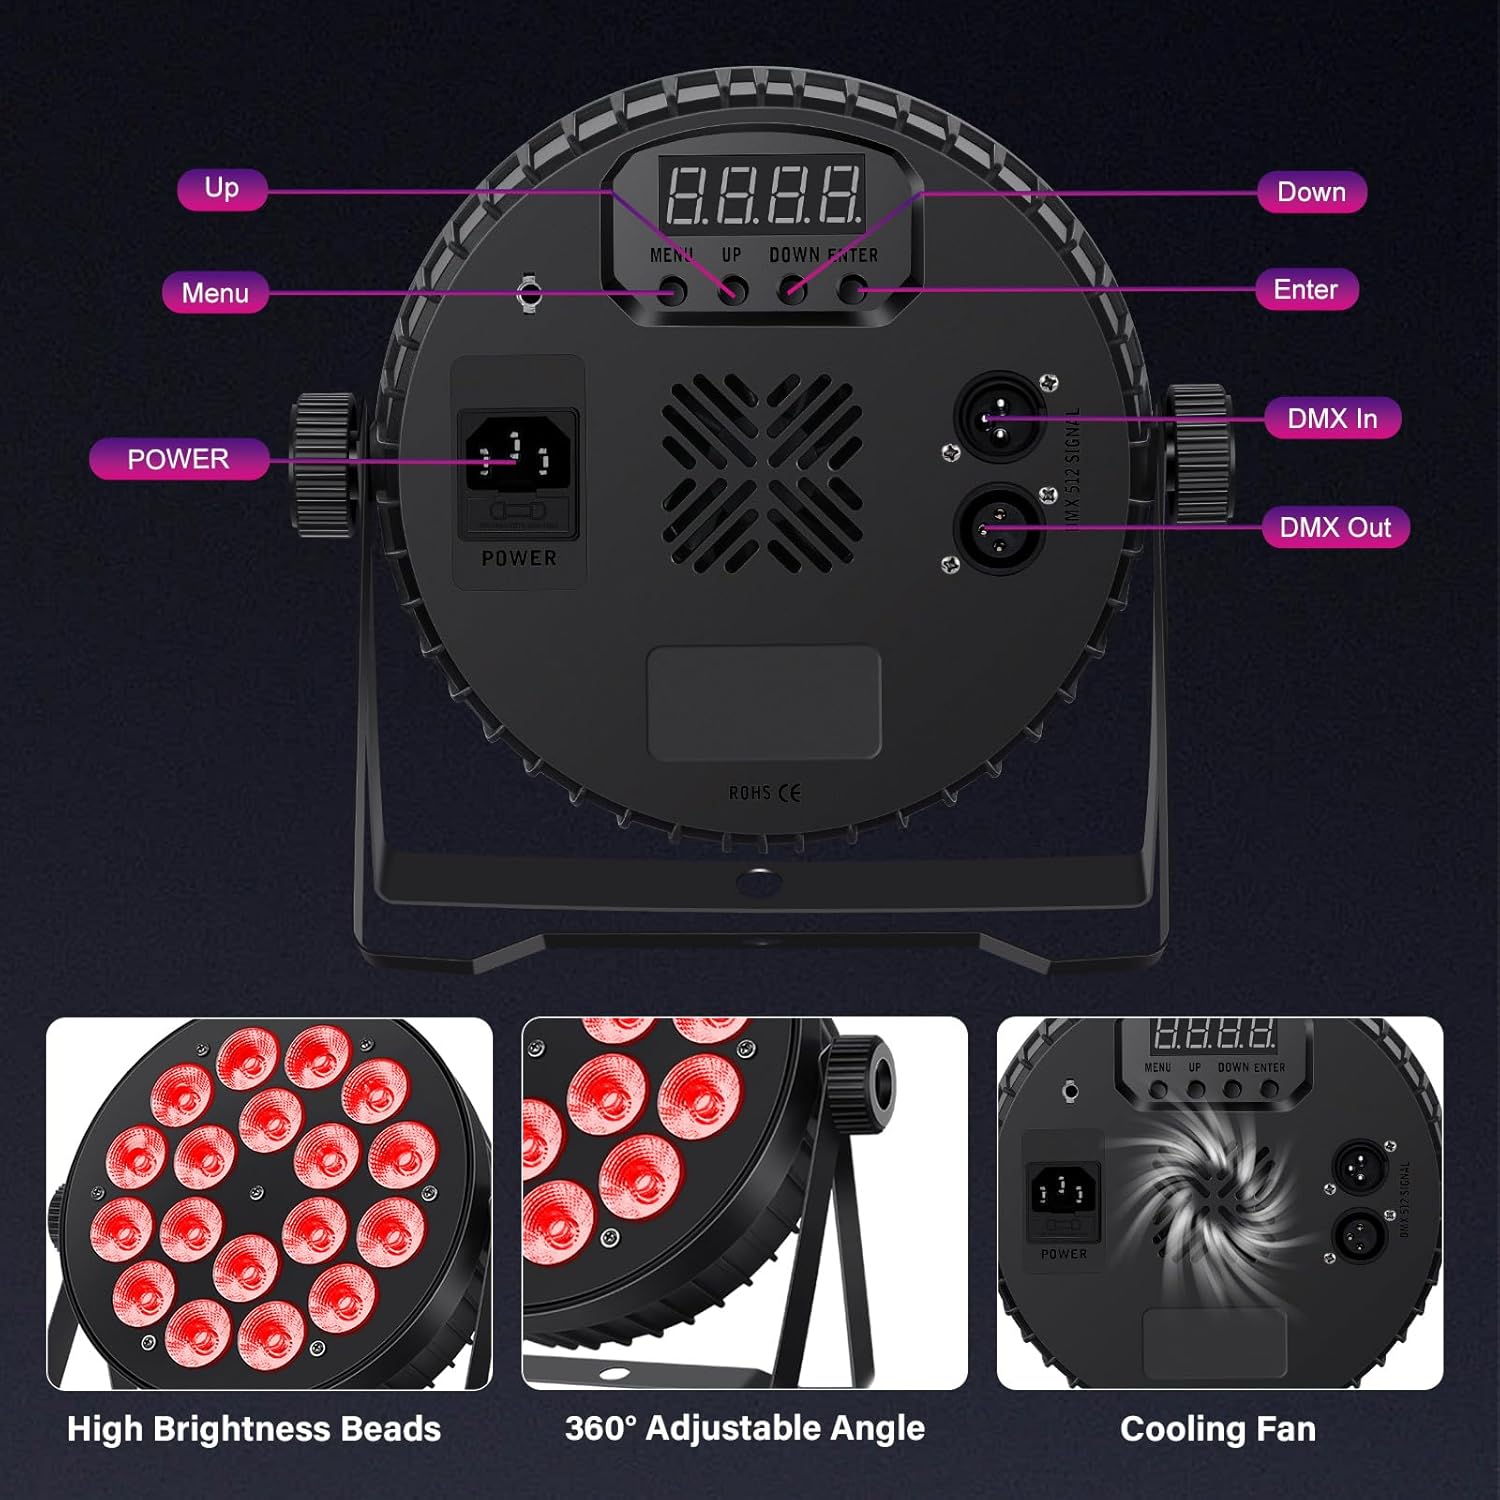
Figure 4.1: Rear Panel and Components
Components:
- High Brightness LED Beads: 18x5W RGBW 4-in-1 LEDs for vibrant color mixing.
- Adjustable Angle Bracket: Allows for 360° positioning for floor, wall, or truss mounting.
- Cooling Fan: Integrated fan for thermal management and extended lifespan.
- LED Display: Digital display for menu navigation and mode selection.
- Control Buttons: Menu, Up, Down, Enter buttons for manual operation.
- Power Input: Standard AC power connection.
- DMX In/Out: 3-pin XLR connectors for DMX512 control.
5. Setup
5.1 Mounting
The fixture can be placed on a flat surface, mounted on a wall, or hung from a truss using the adjustable brackets. Ensure the mounting surface or structure can support the weight of the fixture(s).
- Floor Placement: Position the light on a stable, level surface. Adjust the bracket to achieve the desired angle.
- Wall Mounting: Securely attach the bracket to a wall using appropriate screws and anchors. Adjust the light's angle.
- Truss Mounting: Use a suitable clamp (not included) to attach the bracket to a lighting truss. Always use a safety cable.
5.2 Power Connection
Connect the provided power cable to the power input on the rear of the fixture and then to a compatible AC power outlet (AC110-240V, 50/60Hz).
6. Operating Modes
The ENDYSHOW PL-P18-RGBW LED Par Light offers multiple control modes for versatile lighting effects.

Figure 6.1: Examples of Lighting Effects
- DMX512 Mode: For professional control using a DMX controller. Allows precise control over color, dimming, and effects.
- Auto Play Mode: The light cycles through pre-programmed patterns and color changes automatically.
- Sound Activated Mode: The light reacts to ambient sound or music, changing patterns and colors in sync with the beat. Sensitivity can often be adjusted.
- Remote Control Mode: Use the included wireless remote to select colors, modes, and adjust settings.
- Master-Slave Mode: Link multiple fixtures together. One unit acts as the master, controlling all other slave units to synchronize effects.
- Color Combination Mode: Manually select and mix RGBW colors.
- Color Changing Mode: Smooth transitions between different colors.
- Strobe Mode: Rapid flashing effect.
- Jump Mode: Instantaneous color changes.
- Fade Mode: Gradual fading between colors.
- Pulse Mode: Rhythmic pulsing of light.
- Static Mode: Display a single, constant color.

Figure 6.2: Sound Activated Mode
7. Remote Control
The included wireless remote control provides convenient access to various functions.

Figure 7.1: Remote Control Functions
Remote Button Functions:
- ON/OFF: Power on/off the light.
- +/-: Adjust brightness or speed of effects.
- R, G, B, W: Select Red, Green, Blue, White static colors.
- Color Buttons: Select various pre-mixed static colors.
- AUTO: Activates Auto Play mode.
- STROBE: Activates Strobe mode.
- FADE: Activates Fade mode.
- JUMP: Activates Jump mode.
- SOUND1, SOUND2, SOUND3: Activates Sound Activated mode with different sensitivities or patterns.
8. DMX Control
For advanced control, connect the fixture to a DMX512 controller. The light supports 2 or 7 DMX channels, allowing for detailed programming of colors, dimming, and effects.

Figure 8.1: DMX and Remote Control Options
8.1 DMX Channel Modes
Refer to the DMX channel chart in the full product manual (if provided separately) for specific channel assignments and functions. Typically, channels control:
- Master Dimmer
- Red, Green, Blue, White Intensity
- Strobe Speed
- Mode Selection (Auto, Sound, Color Jump, Color Fade)
8.2 DMX Connection
- Connect a DMX cable from the DMX OUT of your controller to the DMX IN of the first fixture.
- Connect a DMX cable from the DMX OUT of the first fixture to the DMX IN of the next fixture in the chain.
- Set the DMX address for each fixture using the onboard LED display and control buttons. Ensure each fixture has a unique address.
9. Maintenance
Regular maintenance ensures optimal performance and longevity of your LED Par Lights.
- Cleaning: Periodically clean the lens and housing with a soft, lint-free cloth. Do not use abrasive cleaners or solvents.
- Inspection: Regularly check power cables, DMX cables, and mounting hardware for any signs of wear or damage.
- Ventilation: Ensure cooling vents remain clear of dust and debris to prevent overheating.
- Storage: When not in use, store the fixtures in a dry, dust-free environment.
10. Troubleshooting
If you encounter issues, refer to the following common troubleshooting steps:
| Problem | Possible Cause | Solution |
|---|---|---|
| Light does not power on | No power supply; Faulty cable; Blown fuse | Check power connection; Replace cable; Check/replace fuse (if accessible by qualified personnel) |
| No DMX control | Incorrect DMX address; Faulty DMX cable; Incorrect DMX mode selected | Verify DMX address settings; Test DMX cables; Ensure fixture is in DMX mode |
| Remote control not working | Battery depleted; Obstruction; Out of range | Replace remote battery; Remove obstructions; Operate within effective range |
| Light overheats | Blocked ventilation; Insufficient airflow | Clear vents; Ensure adequate space around the fixture for airflow |
| "UALT" error on display | Unknown error state, possibly internal fault | Try power cycling the unit. If persistent, contact customer support. |
11. Specifications
Technical specifications for the ENDYSHOW PL-P18-RGBW LED Par Light.

Figure 11.1: Technical Parameters and Dimensions
| Feature | Detail |
|---|---|
| Model Number | PL-P18-RGBW |
| Light Source | 18 x 5W RGBW 4-in-1 LEDs |
| Total Power | 90W |
| Voltage | AC110-240V, 50/60Hz |
| Color | RGBW (Red, Green, Blue, White) |
| Beam Angle | 25° |
| Control Modes | DMX512, Auto, Sound Activation, Master/Slave, Remote Control |
| DMX Channels | 2/7 CH |
| Dimmer | 0-100% Linear Dimming |
| Lifespan | More than 5000 hours |
| Working Temperature | -20°C to 40°C |
| Material | Metal |
| Product Dimensions | 10.4"L x 2.95"W x 8.7"H (26.4cm L x 7.5cm W x 22.1cm H) |
| Item Weight | 5.57 pounds (2.53 kg) |
12. Warranty and Support
For warranty information or technical support, please contact ENDYSHOW customer service through your purchase platform or the official ENDYSHOW website. Keep your purchase receipt as proof of purchase.