
1. Introduction
Thank you for choosing the Proster T58D Digital Multimeter. This device is a 9999-count, True RMS (TRMS) auto-ranging multimeter designed for accurate measurements in various electrical applications. It features a large LCD display, non-contact voltage (NCV) detection, and a range of functions including AC/DC voltage, AC/DC current, resistance, capacitance, frequency, duty cycle, temperature, diode test, and continuity test.
Please read this manual thoroughly before using the multimeter to ensure safe and proper operation. Keep this manual for future reference.
2. Safety Information
To prevent possible electrical shock, fire, or personal injury, please read all safety information before you use the product. Use the product only as specified, or the protection provided by the product may be impaired.
General Safety Guidelines:
- Always ensure the multimeter is in good working condition before use.
- Do not apply more than the rated voltage, as marked on the meter, between terminals or between any terminal and earth ground.
- Use caution with voltages above 30V AC RMS, 42V peak, or 60V DC. These voltages pose a shock hazard.
- Always connect the common (COM) test lead first and disconnect it last.
- Do not use the meter if the test leads are damaged or if the meter appears damaged.
- Replace the battery as soon as the low battery indicator appears to avoid incorrect readings.
- Do not operate the meter around explosive gas, vapor, or dust.
- Ensure the rotary switch is in the correct position for the desired measurement before connecting test leads.
- When measuring current, ensure the circuit is de-energized before connecting the meter in series.
- Always disconnect test leads from the circuit before changing functions or ranges.
- Observe all local and national safety codes.
3. Product Overview
The Proster T58D Digital Multimeter is designed for versatility and ease of use. Below is an overview of its components and display features.
Multimeter Components:
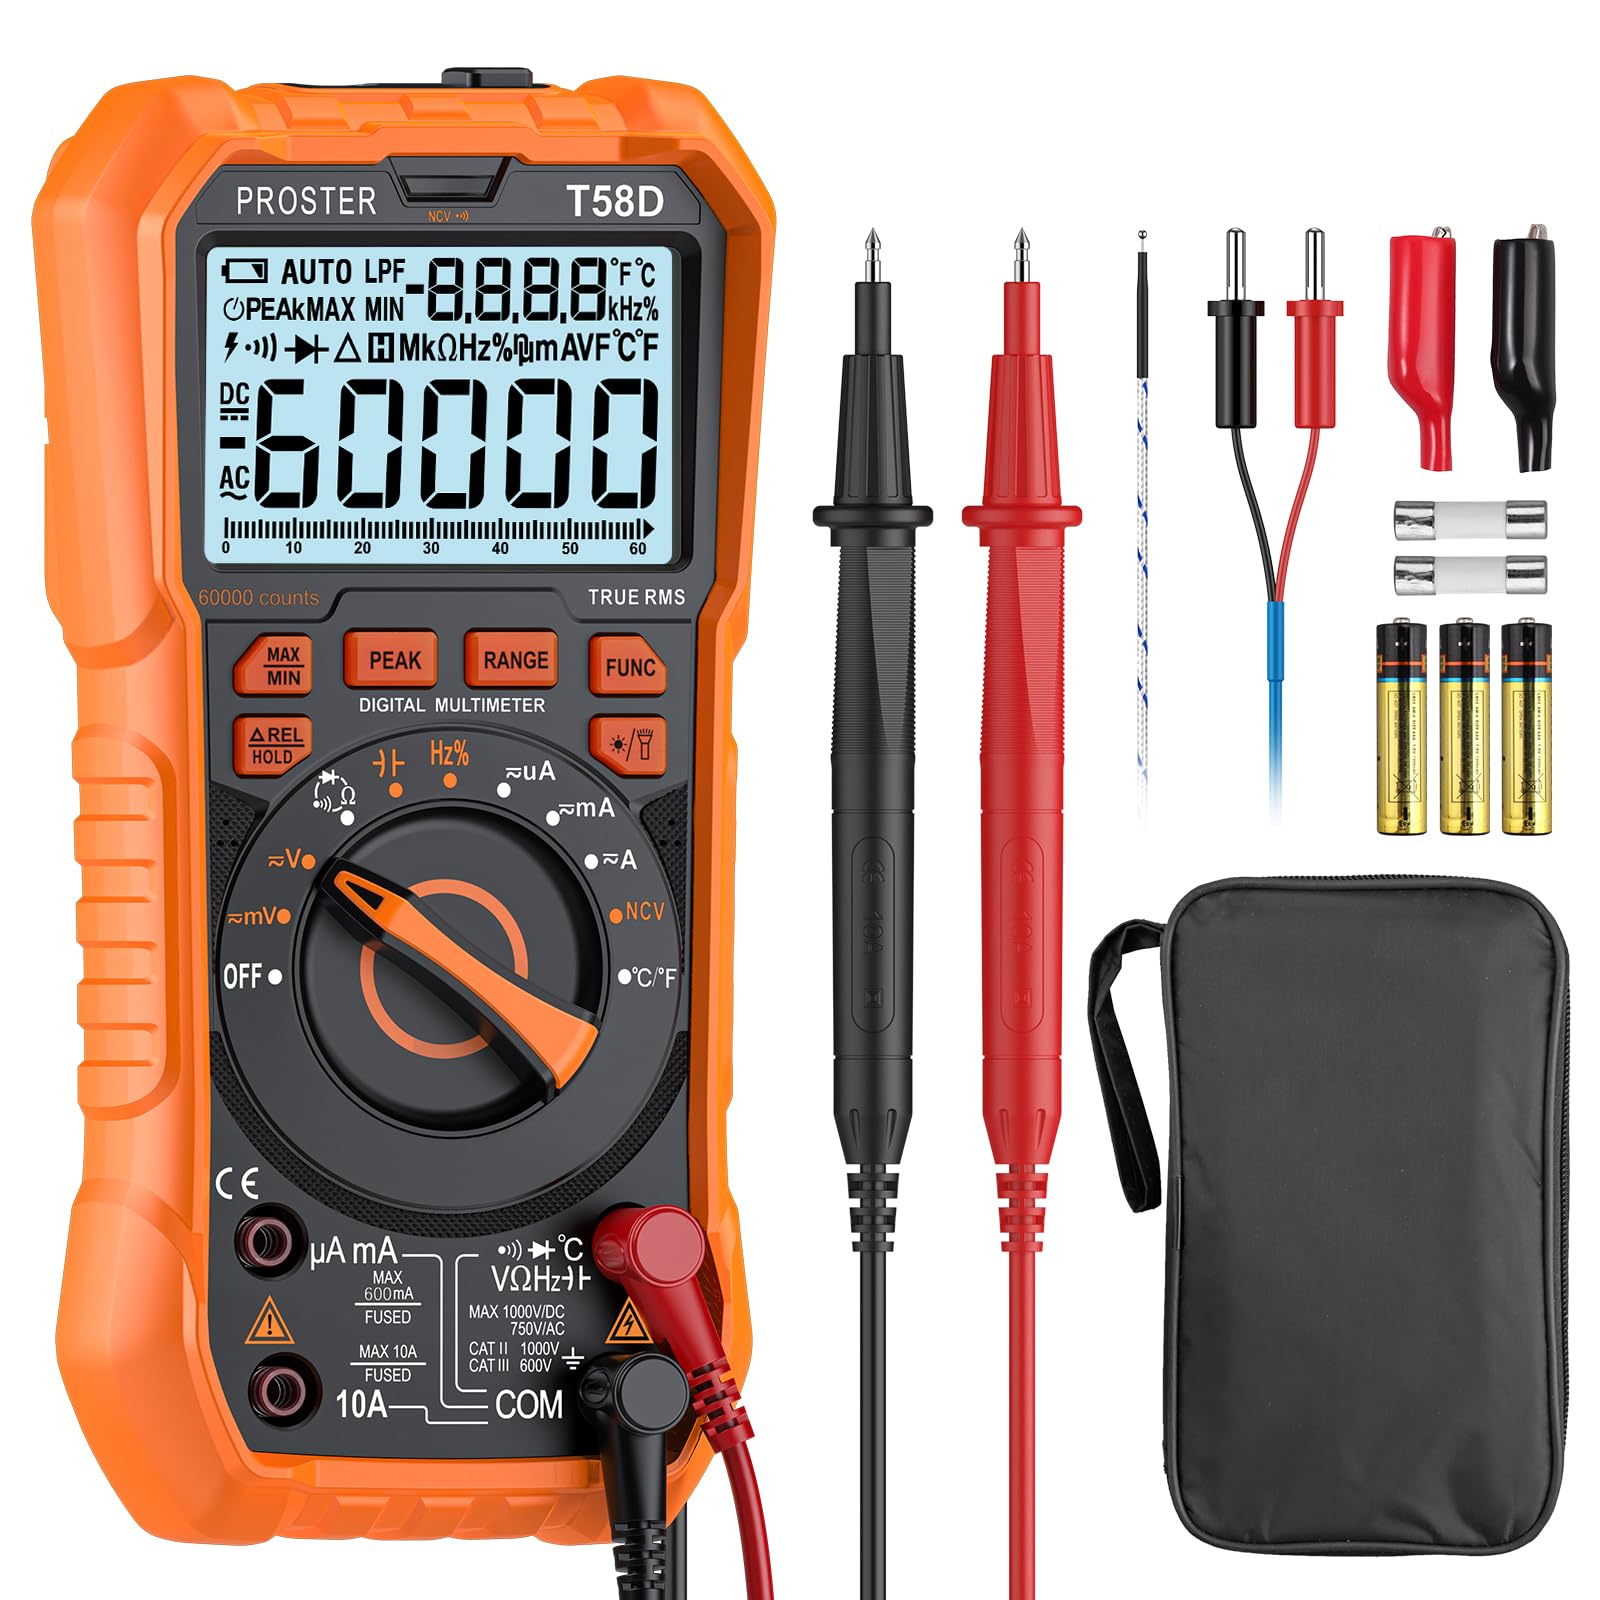
Figure 3.1: Front view of the Proster T58D Digital Multimeter, highlighting the display, function buttons, rotary switch, and input terminals.
- LCD Display: Shows measurement readings, units, and function indicators.
- Function Buttons: MAX/MIN, PEAK, RANGE, FUNC, HOLD, NCV, Backlight/Flashlight.
- Rotary Switch: Used to select measurement functions (Voltage, Current, Resistance, etc.) and turn the meter ON/OFF.
- Input Jacks:
- COM Jack: Common terminal for all measurements (black test lead).
- VΩHzCap°C Jack: Input for voltage, resistance, frequency, capacitance, temperature, diode, and continuity measurements (red test lead).
- mAμA Jack: Input for milliampere and microampere current measurements (red test lead).
- 10A Jack: Input for 10 Ampere current measurements (red test lead).

Figure 3.2: Overview of the Proster T58D's measurement functions and physical features, including the kickstand and test lead storage.
Display Indicators:

Figure 3.3: Detailed view of the multimeter's LCD display, illustrating various icons for measurement modes, units, and status indicators.
- AUTO: Auto-ranging mode.
- DC/AC: Direct Current / Alternating Current.
- mV, V: Millivolts, Volts.
- μA, mA, A: Microamperes, Milliamperes, Amperes.
- Ω, kΩ, MΩ: Ohms, Kilo-ohms, Mega-ohms.
- nF, μF, mF: Nanofarads, Microfarads, Millifarads.
- Hz, kHz, MHz: Hertz, Kilohertz, Megahertz.
- %: Duty Cycle.
- °C, °F: Celsius, Fahrenheit.
- HOLD: Data Hold function active.
- NCV: Non-Contact Voltage detection mode.
- Diode Symbol: Diode test mode.
- Continuity Symbol: Continuity test mode.
- Battery Symbol: Low battery indicator.
4. Setup
4.1 Battery Installation
The Proster T58D Multimeter requires 3 x 1.5V AAA batteries (included). To install or replace batteries:
- Ensure the multimeter is turned OFF and test leads are disconnected.
- Locate the battery compartment on the back of the meter.
- Use a screwdriver to loosen the screw securing the battery cover.
- Remove the battery cover.
- Insert three AAA batteries, observing the correct polarity (+ and -) as indicated inside the compartment.
- Replace the battery cover and tighten the screw.
4.2 Connecting Test Leads
Always ensure test leads are securely plugged into the correct input jacks for the desired measurement.
- Plug the black test lead into the COM (common) jack.
- For most measurements (voltage, resistance, capacitance, frequency, temperature, diode, continuity), plug the red test lead into the VΩHzCap°C jack.
- For current measurements up to 600mA, plug the red test lead into the mAμA jack.
- For current measurements up to 10A, plug the red test lead into the 10A jack.

Figure 4.1: The multimeter features LED-illuminated input jacks that light up according to the selected function, guiding the user to connect test leads correctly.
5. Operating Instructions
This section details how to perform various measurements with your Proster T58D Digital Multimeter.
5.1 General Measurement Procedure
- Turn the rotary switch to the desired function.
- Connect the test leads to the appropriate input jacks.
- Connect the test probes to the circuit or component under test.
- Read the measurement value on the LCD display.
- Disconnect the test probes from the circuit.
- Turn the rotary switch to OFF when finished.
5.2 DC/AC Voltage Measurement
- Plug the red test lead into the VΩHzCap°C jack and the black test lead into the COM jack.
- Turn the rotary switch to the V~ (AC Voltage) or V- (DC Voltage) position. The meter will automatically select AC or DC if in auto-ranging mode, or use the FUNC button to switch between AC/DC if needed.
- Connect the test probes in parallel to the circuit or component to be measured.
- Read the voltage value on the display.
5.3 DC/AC Current Measurement
Caution: Never connect the meter in parallel to a voltage source when measuring current, as this can blow the fuse or damage the meter.
- Plug the red test lead into the mAμA or 10A jack (depending on expected current) and the black test lead into the COM jack.
- Turn the rotary switch to the μA~, mA~, or A~ position. Use the FUNC button to switch between AC/DC if needed.
- Open the circuit where current is to be measured and connect the meter in series.
- Read the current value on the display.
5.4 Resistance Measurement
- Plug the red test lead into the VΩHzCap°C jack and the black test lead into the COM jack.
- Turn the rotary switch to the Ω position.
- Ensure the circuit or component is de-energized before measuring resistance.
- Connect the test probes across the component.
- Read the resistance value on the display.
5.5 Capacitance Measurement
- Plug the red test lead into the VΩHzCap°C jack and the black test lead into the COM jack.
- Turn the rotary switch to the Capacitance symbol position.
- Discharge the capacitor completely before measurement to avoid damage to the meter.
- Connect the test probes across the capacitor.
- Read the capacitance value on the display.
5.6 Frequency and Duty Cycle Measurement
- Plug the red test lead into the VΩHzCap°C jack and the black test lead into the COM jack.
- Turn the rotary switch to the Hz% position.
- Connect the test probes across the signal source.
- The display will show the frequency. Press the FUNC button to toggle to duty cycle measurement.
5.7 Temperature Measurement
- Plug the temperature probe (K-type thermocouple) into the VΩHzCap°C and COM jacks, observing polarity.
- Turn the rotary switch to the °C/°F position.
- Place the tip of the temperature probe on the object to be measured.
- Read the temperature value on the display. Press the FUNC button to switch between Celsius and Fahrenheit.

Figure 5.1: Temperature measurement in progress, showing the display with both Fahrenheit and Celsius readings.
5.8 Diode Test
- Plug the red test lead into the VΩHzCap°C jack and the black test lead into the COM jack.
- Turn the rotary switch to the Diode symbol position.
- Connect the red probe to the anode and the black probe to the cathode of the diode.
- The display will show the forward voltage drop. Reverse the probes; the display should show OL (Open Line) for a good diode.
5.9 Continuity Test
- Plug the red test lead into the VΩHzCap°C jack and the black test lead into the COM jack.
- Turn the rotary switch to the Continuity symbol position.
- Connect the test probes across the circuit or component.
- If the resistance is below approximately 50Ω, the buzzer will sound, indicating continuity.
5.10 Non-Contact Voltage (NCV) Detection
- Turn the rotary switch to the NCV position.
- Move the top part of the meter (NCV sensor) close to the AC voltage source.
- If AC voltage is detected, the meter will beep and the NCV indicator light will flash. The display will show signal strength bars.

Figure 5.2: NCV function in use, detecting AC voltage from a power outlet without direct contact.
5.11 Data Hold
Press the HOLD button to freeze the current reading on the display. Press it again to release the hold function.
5.12 Backlight and Flashlight
Press the Backlight/Flashlight button (often marked with a light bulb symbol) to turn on the display backlight. Press and hold the button to activate the built-in LED flashlight for working in dimly lit areas. Press again to turn off.

Figure 5.3: The integrated LED flashlight provides illumination for working in dark environments, such as inside a computer chassis.
6. Maintenance
6.1 Cleaning
Wipe the case with a damp cloth and mild detergent. Do not use abrasives or solvents. Keep the terminals free from dirt and dust.
6.2 Fuse Replacement
If the current measurement function does not work, the fuse may be blown. To replace the fuse:
- Ensure the multimeter is turned OFF and test leads are disconnected.
- Open the battery compartment cover as described in Section 4.1.
- The fuses are located inside the meter. Carefully remove the old fuse.
- Replace with a fuse of the same type and rating (e.g., F600mA/250V for mA/μA range, F10A/250V for 10A range). Refer to specifications for exact fuse ratings.
- Replace the battery cover and tighten the screw.
6.3 Battery Replacement
Replace the batteries when the low battery indicator appears on the display to ensure accurate readings. Refer to Section 4.1 for battery replacement instructions.
7. Troubleshooting
| Problem | Possible Cause | Solution |
|---|---|---|
| No display or dim display | Low batteries or incorrect battery installation. | Replace batteries or check polarity. |
| Incorrect readings | Wrong function selected, poor test lead connection, or damaged test leads. | Select correct function, ensure secure connections, replace damaged leads. |
| Current measurement not working | Blown fuse. | Replace the fuse (refer to Section 6.2). |
| OL (Overload) displayed | Measurement exceeds the selected range or meter's maximum capability. | Select a higher range (if manual ranging) or ensure the value is within meter limits. |
8. Specifications

Figure 8.1: Detailed measurement ranges and accuracy for various functions of the Proster T58D Multimeter.
| Parameter | Range | Accuracy |
|---|---|---|
| Display | 9999 Counts | |
| DC Voltage | 100mV / 600mV / 1V / 60V / 600V / 1000V | ±(0.5%+5) |
| AC Voltage | 100mV / 600mV / 1V / 60V / 600V / 750V | ±(1.0%+4) |
| DC Current | 600μA / 6mA / 60mA / 600mA / 6A / 10A | ±(1.2%+5) |
| AC Current | 600μA / 6mA / 60mA / 600mA / 6A / 10A | ±(1.5%+5) |
| Resistance | 600Ω / 6kΩ / 60kΩ / 600kΩ / 6MΩ / 60MΩ | ±(0.8%+5) |
| Capacitance | 6nF / 60nF / 600nF / 6μF / 60μF / 600μF / 6mF / 60mF | ±(4.0%+5) |
| Frequency | 100Hz / 999.9Hz / 1kHz / 10kHz / 100kHz / 1MHz / 10MHz / 25MHz | ±(1.5%+5) |
| Temperature | -55~1000°C / -67~1832°F | ±(1.0%+3) |
| Power Source | 3 x 1.5V AAA Batteries | |
| Dimensions | 22.5 x 13 x 7 cm | |
| Weight | 368 Grams | |
| Safety Rating | CE, CAT III 600V | |
9. What's in the Box
The Proster T58D Digital Multimeter package includes the following items:

Figure 9.1: All items included in the Proster T58D Digital Multimeter kit.
- Proster T58D Digital Multimeter x 1
- Test Leads (Pair) x 1
- K-Type Temperature Probe x 1
- Alligator Clips (Pair) x 1
- 1.5V AAA Batteries x 3
- Spare Fuses x 2
- Screwdriver x 1
- Storage Bag x 1
- User Manual x 1
10. Warranty and Support
Proster products are designed and manufactured to high-quality standards. For warranty information or technical support, please refer to the contact details provided with your purchase or visit the official Proster website. Please retain your proof of purchase for warranty claims.