1. Introduction
Thank you for choosing the Craftersmark 10.5-inch Outdoor Ceiling Light. This fixture is designed to provide reliable and efficient outdoor illumination with advanced features including motion sensing, dusk-to-dawn operation, and an always-on mode. This manual provides detailed instructions for installation, operation, and maintenance to ensure optimal performance and longevity of your light fixture.

Image 1.1: Craftersmark 10.5-inch Outdoor Ceiling Light with integrated motion sensor.
2. Important Safety Information
Please read all instructions carefully before installation and use. Retain this manual for future reference.
- Electrical Safety: Always turn off power at the circuit breaker before installing, servicing, or cleaning the fixture. Consult a qualified electrician if you are unsure about wiring procedures.
- Grounding: Ensure the fixture is properly grounded to avoid potential electrical shock.
- Bulb Requirements: Use only E26 base bulbs with a maximum wattage of 40W per socket. LED bulbs are recommended for energy efficiency.
- Outdoor Use: This fixture is designed for outdoor use in covered areas (e.g., porches, patios). While it features a sealed design, it is not rated for direct water immersion.
- Handling: Handle glass components with care to prevent breakage.
3. Package Contents
Verify that all components are present before beginning installation:
- 1 x Craftersmark Outdoor Flush Mount Motion Sensor Ceiling Light
- 1 x Mounting Hardware Kit (screws, wire nuts, mounting bracket)
- 1 x Instruction Manual
Note: Bulbs are not included and must be purchased separately.
4. Specifications
| Feature | Specification |
|---|---|
| Brand | Craftersmark |
| Model Name | CL020 |
| Dimensions | 10.5"L x 10.5"W x 4.5"H |
| Material | Glass, Metal |
| Light Source Type | LED (recommended) |
| Bulb Base | E26 (2 sockets) |
| Max Wattage per Bulb | 40W |
| Voltage | 120 Volts |
| Special Features | Dusk to Dawn, Motion Sensor, Energy Efficient |
| Installation Type | Flush Mount |
| Indoor/Outdoor Usage | Outdoor (covered areas) |
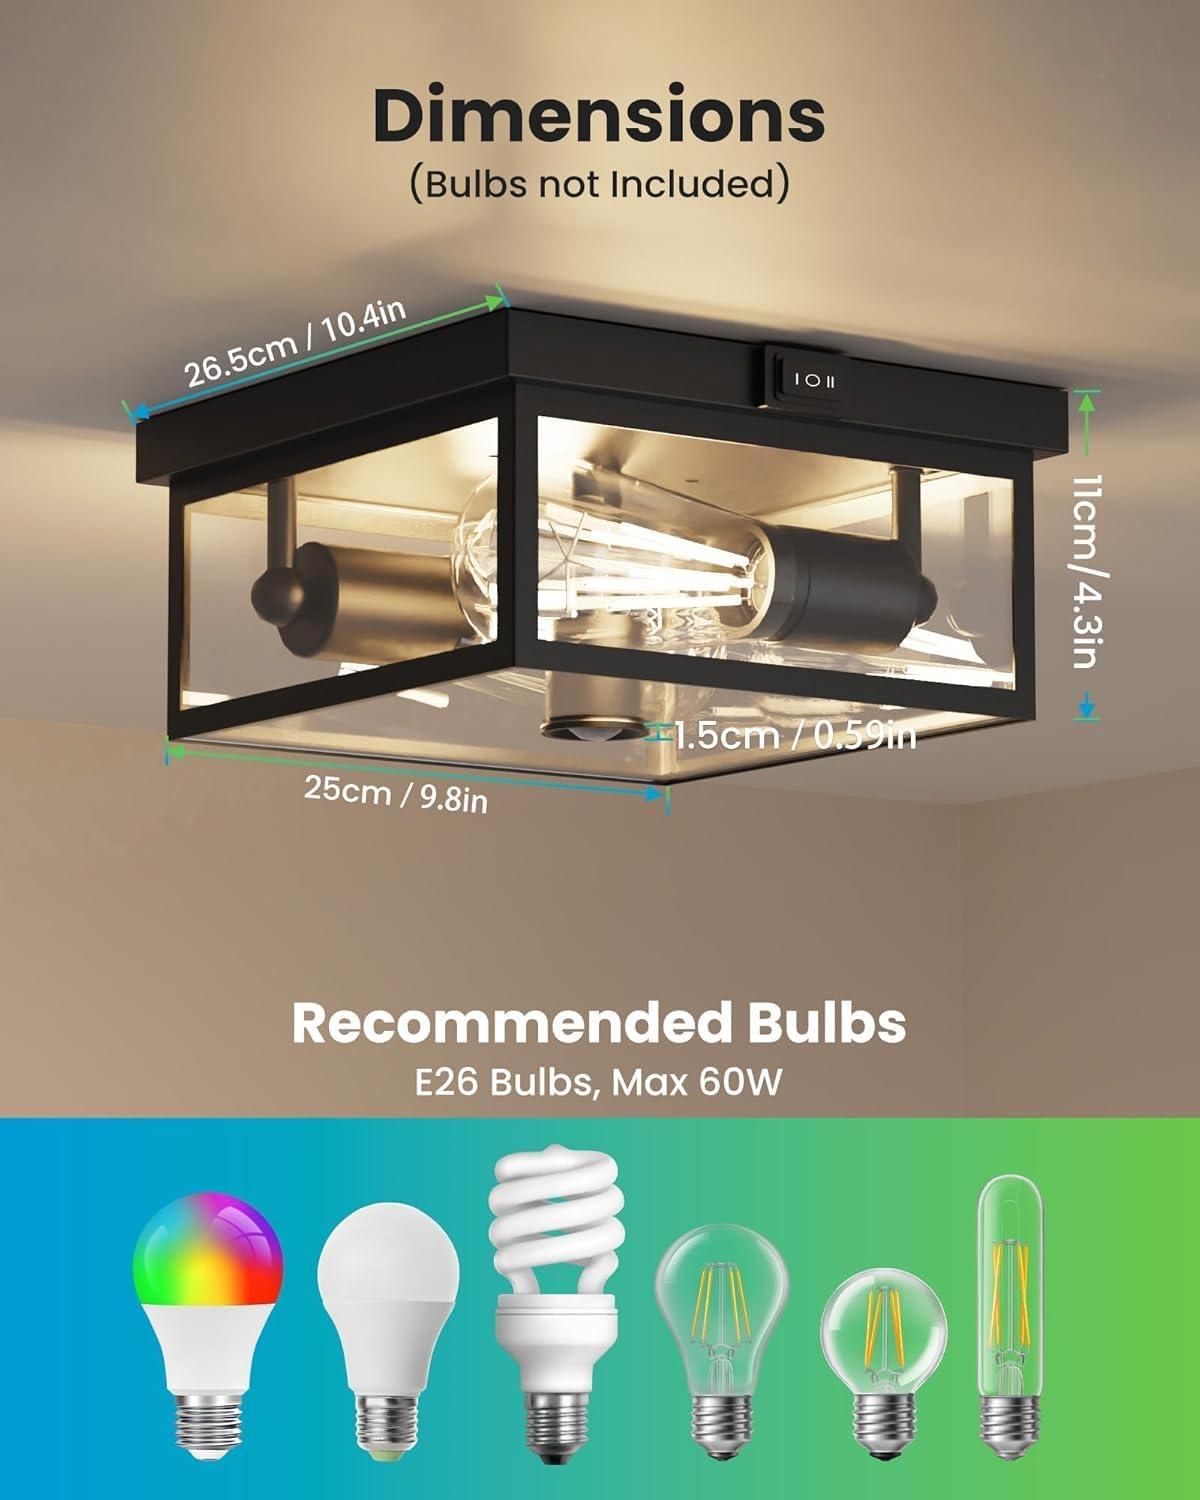
Image 4.1: Product dimensions and recommended bulb types.
5. Installation Guide
Follow these steps to install your Craftersmark Outdoor Ceiling Light. Ensure power is OFF at the circuit breaker before starting.
- Prepare Mounting Surface: Drill two holes on the wall or ceiling where the fixture will be mounted. Secure the hanging plate (mounting bracket) using the provided screws.
- Wire Connections: Connect the fixture's wires to your household wiring. Typically, this involves connecting live to live (black to black), neutral to neutral (white to white), and ground to ground (green or bare copper to green or bare copper). Use wire nuts to secure connections and cover with electrical tape for added safety.
- Mount the Fixture: Carefully align the fixture with the mounting bracket and secure it in place.
- Remove Base Cover: Unscrew the decorative nuts or clips to remove the bottom glass panel (base cover) for bulb access.
- Install Bulbs: Screw two E26 base bulbs (max 40W each, not included) into the sockets.
- Reinstall Base Cover: Carefully place the bottom glass panel back and secure it with the decorative nuts or clips.

Image 5.1: Visual guide for the installation process.
6. Operation
The Craftersmark Outdoor Ceiling Light features three intelligent lighting modes, selectable via a switch located on the fixture. Ensure power is restored after installation.

Image 6.1: Overview of the three selectable lighting modes.
6.1. Lighting Modes
- 'I' - Dusk to Dawn Mode:
The light automatically turns ON at dusk (when ambient light is below 50 lux) and OFF at dawn. This mode provides continuous illumination throughout the night without manual intervention. - 'II' - Motion Sensor Mode:
The light remains OFF during daylight hours. At night, it will automatically turn ON when motion is detected within its 360-degree, 20-30 ft detection range. The light will stay ON for 60 seconds after motion ceases, then turn OFF. - 'O' - Always-on Mode:
The light functions as a standard fixture, turning ON and OFF via your wall switch. This mode bypasses the motion sensor and dusk-to-dawn features.

Image 6.2: Visual representation of Dusk to Dawn operation.

Image 6.3: Motion sensor detection range and functionality.
7. Maintenance
7.1. Cleaning
To maintain the appearance and functionality of your light fixture, clean it periodically:
- Ensure power is OFF at the circuit breaker before cleaning.
- Wipe the exterior surfaces with a soft, damp cloth.
- Do not use abrasive cleaners or solvents, as these can damage the finish or glass.
7.2. Bulb Replacement
The fixture features a detachable bottom glass design for easy bulb replacement:
- Turn off power to the fixture at the circuit breaker.
- Carefully unscrew the decorative nuts or clips securing the bottom glass panel.
- Remove the bottom glass panel.
- Unscrew the old bulbs and replace them with new E26 base bulbs (max 40W each).
- Reattach the bottom glass panel and secure it with the decorative nuts or clips.
- Restore power at the circuit breaker.

Image 7.1: Steps for accessing and replacing bulbs.
8. Troubleshooting
If you encounter issues with your Craftersmark Outdoor Ceiling Light, refer to the following common problems and solutions:
| Problem | Possible Cause | Solution |
|---|---|---|
| Light does not turn ON | No power, loose wiring, faulty bulbs, incorrect mode selection. | Check circuit breaker. Verify all wire connections are secure. Replace bulbs. Ensure switch is in desired mode ('I', 'II', or 'O'). |
| Motion sensor not working | Incorrect mode, sensor obstruction, ambient light too high. | Ensure switch is in 'II' (Motion Sensor) mode. Clear any obstructions from the sensor. Motion detection only works at night. |
| Light stays ON constantly in motion sensor mode | Continuous motion detected, sensor malfunction. | Ensure no continuous motion is within the detection range. If problem persists, contact customer support. |
| Dusk-to-Dawn not working | Incorrect mode, sensor obstruction, ambient light too high. | Ensure switch is in 'I' (Dusk to Dawn) mode. Ensure the light sensor is not obstructed and is exposed to natural ambient light. |

Image 8.1: Checking wiring connections for common issues.
9. Warranty and Customer Support
Craftersmark products come with a limited warranty. For specific warranty details, please refer to the product packaging or contact our customer support.
If you require assistance, have questions, or need to report an issue, please contact Craftersmark customer support. Our team is available to provide quick responses and support.
- Customer Service: Available 7 days a week, 24 hours a day for quick response.
- Warranty: 24-month reliable and guaranteed buying experience for free replacement.

Image 9.1: Craftersmark customer support and warranty details.
