1. Introduction
This manual provides comprehensive instructions for the safe and efficient operation, setup, maintenance, and troubleshooting of the Walfront A-15F Optical Fiber Splicer. Designed for precision and reliability, this device is essential for fiber optic engineering and maintenance across various fields. Please read this manual thoroughly before using the splicer to ensure optimal performance and user safety.
2. Safety Information
Always observe the following safety precautions to prevent injury and damage to the equipment:
- Eye Protection: Always wear appropriate eye protection when working with optical fibers. Invisible laser radiation may be present.
- Electrical Safety: Ensure the power supply is correctly connected and grounded. Do not operate the device with wet hands or in damp environments.
- Hot Surfaces: The heating element can reach high temperatures. Avoid direct contact during and immediately after operation.
- Fiber Shards: Optical fiber shards are extremely sharp and can cause injury. Dispose of all fiber scraps properly in a designated container.
- Ventilation: Ensure adequate ventilation during operation, especially when using the heating function.
- Authorized Personnel: Only trained and authorized personnel should operate and maintain this equipment.
3. Package Contents
Verify that all items listed below are present in your package. If any items are missing or damaged, please contact your supplier.
- Walfront A-15F Optical Fiber Splicer
- Power Adapter and Cable
- Fiber Cleaver
- Fiber Stripper
- Alcohol Dispenser Bottle
- Cleaning Brush
- Tweezers
- Carrying Case
- User Manual (this document)
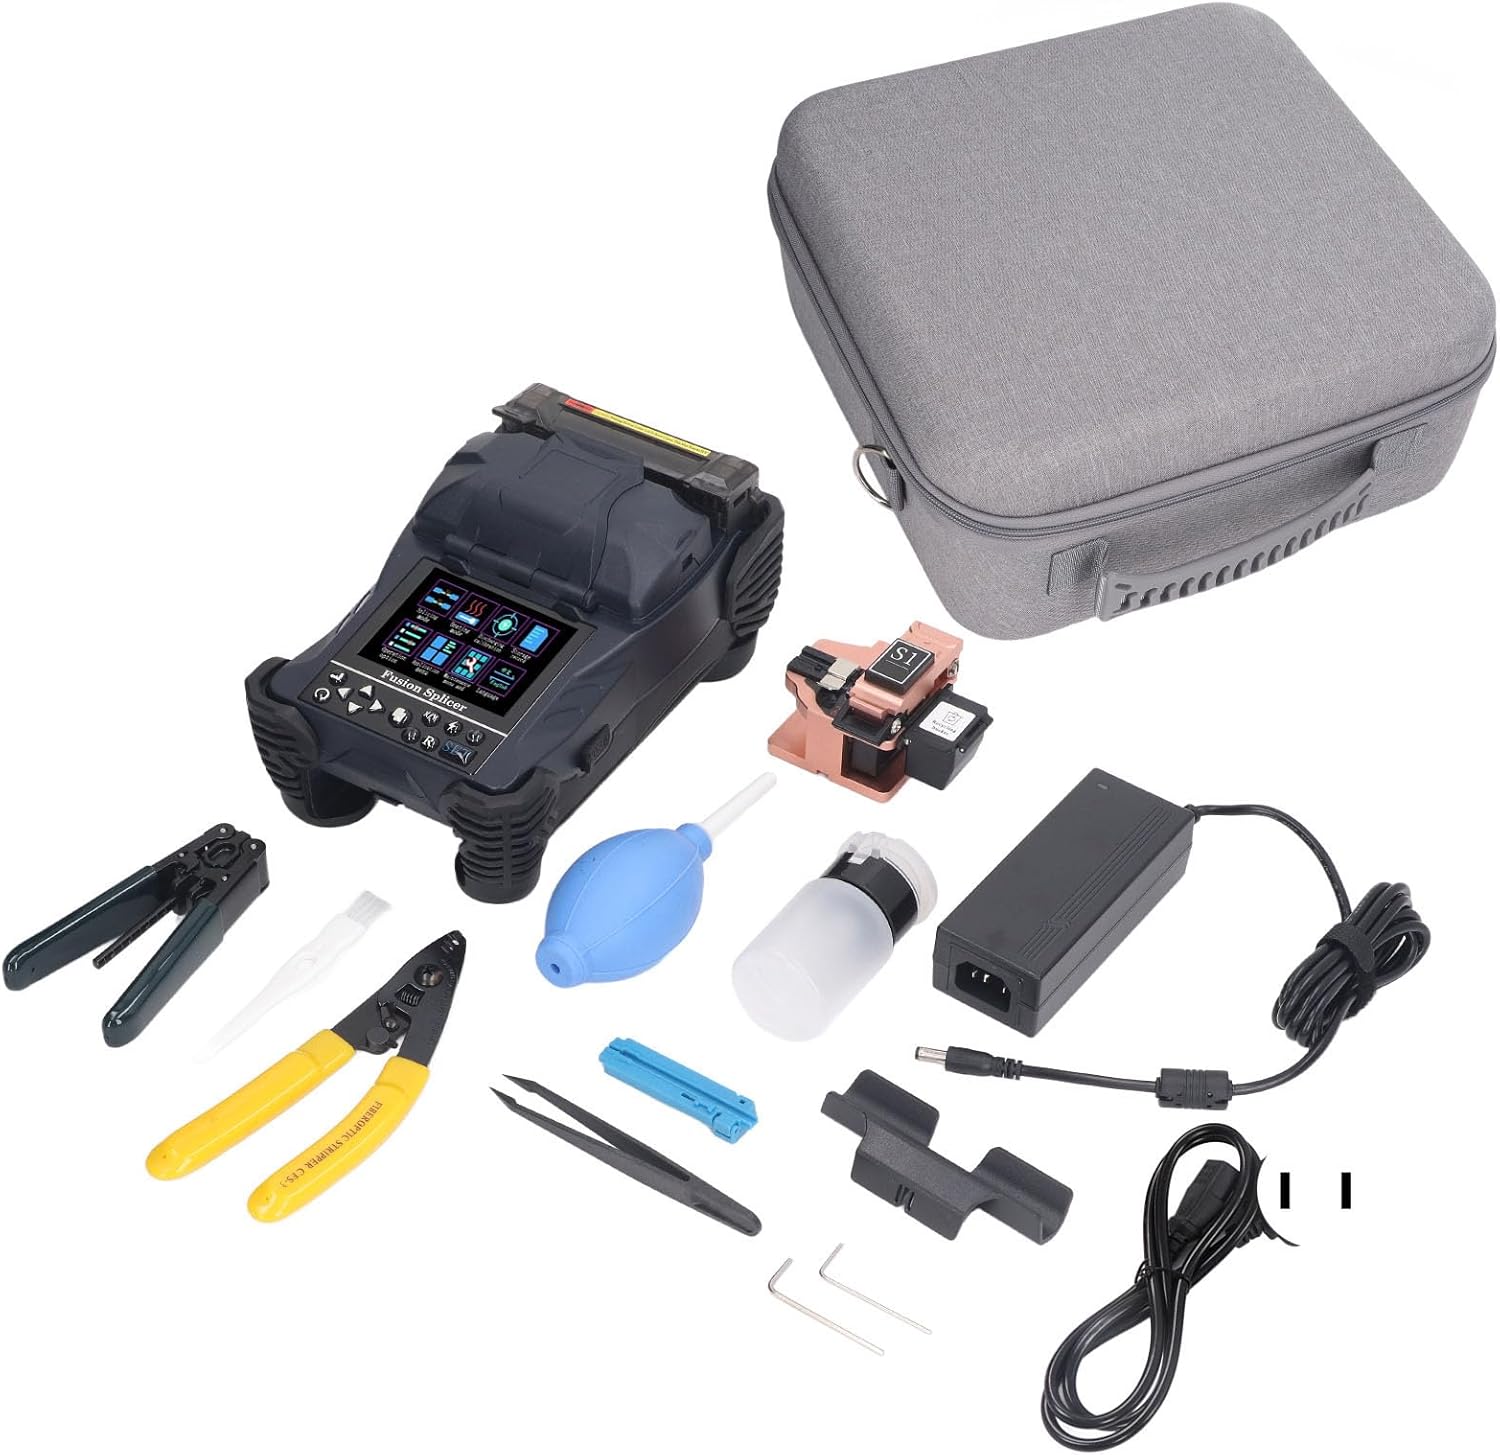
Figure 3.1: Walfront A-15F Optical Fiber Splicer with complete accessory kit and carrying case.
4. Product Overview
The Walfront A-15F is a high-performance optical fiber splicer designed for reliable and efficient fiber fusion. It features a robust design, intuitive interface, and advanced capabilities for various fiber types.
4.1 Key Features
- High Magnification: 400X magnification (X or Y axes) for precise fiber alignment.
- Color LCD Screen: 3.5-inch TFT color LCD display for clear viewing of splicing process and menu navigation. The screen content can be flipped for bidirectional operation.
- Multiple Splicing Modes: 17 sets of usage modes to accommodate different fiber types and splicing requirements.
- Multiple Heating Modes: 9 sets of heating modes with settable heating time and adjustable heating temperature.
- Long Battery Life: Equipped with a 4800mAh lithium battery for extended continuous use.
- Data Storage: Internal memory stores up to 5000 connection results.
- USB Interface: External USB interface for convenient data download and software updates.

Figure 4.1: Walfront A-15F Optical Fiber Splicer.

Figure 4.2: The 400X magnification display and multi-language interface on the LCD screen.

Figure 4.3: The 3.5-inch TFT Color LCD Screen for clear visual feedback.
5. Setup
Follow these steps to prepare your Walfront A-15F Optical Fiber Splicer for operation:
- Unpack the Device: Carefully remove the splicer and all accessories from the carrying case.
- Charge the Battery: Connect the power adapter to the splicer and a suitable power outlet. Allow the battery to fully charge before first use. The charging indicator will show the status.
- Power On: Press and hold the power button until the LCD screen illuminates.
- Language Selection: If necessary, navigate to the settings menu to select your preferred operating language (e.g., English).
- Work Environment: Place the splicer on a stable, clean, and level surface, free from dust and vibrations. Ensure adequate lighting.
6. Operating Instructions
This section details the process of preparing fibers and performing a fusion splice.
6.1 Fiber Preparation
- Strip the Fiber: Use the fiber stripper to remove the outer jacket and coating layer of the optical fiber to the required length.
- Clean the Fiber: Clean the stripped fiber thoroughly with an alcohol wipe (99% isopropyl alcohol recommended) to remove any residue. Allow it to air dry completely.
- Cleave the Fiber: Place the cleaned fiber into the fiber cleaver and perform a precise cleave. A good cleave is crucial for a successful splice.
- Inspect the Cleave: Visually inspect the cleaved end for imperfections. Re-cleave if necessary.
6.2 Splicing Procedure
- Open Wind Protection Cover: Lift the wind protection cover of the splicer.
- Place Fibers: Carefully place the prepared fibers into the V-grooves on the splicer, ensuring the cleaved ends are positioned correctly between the electrodes. Close the fiber clamps.
- Close Cover: Gently close the wind protection cover. The splicer will automatically begin the alignment process.
- Monitor Splicing: Observe the fiber alignment and splicing process on the LCD screen. The splicer will automatically perform the fusion splice.
- Review Splice Loss: After splicing, the estimated splice loss will be displayed on the screen. A low loss value indicates a good splice.
- Open Cover and Remove Fibers: Once the splice is complete, open the wind protection cover and carefully remove the spliced fiber.
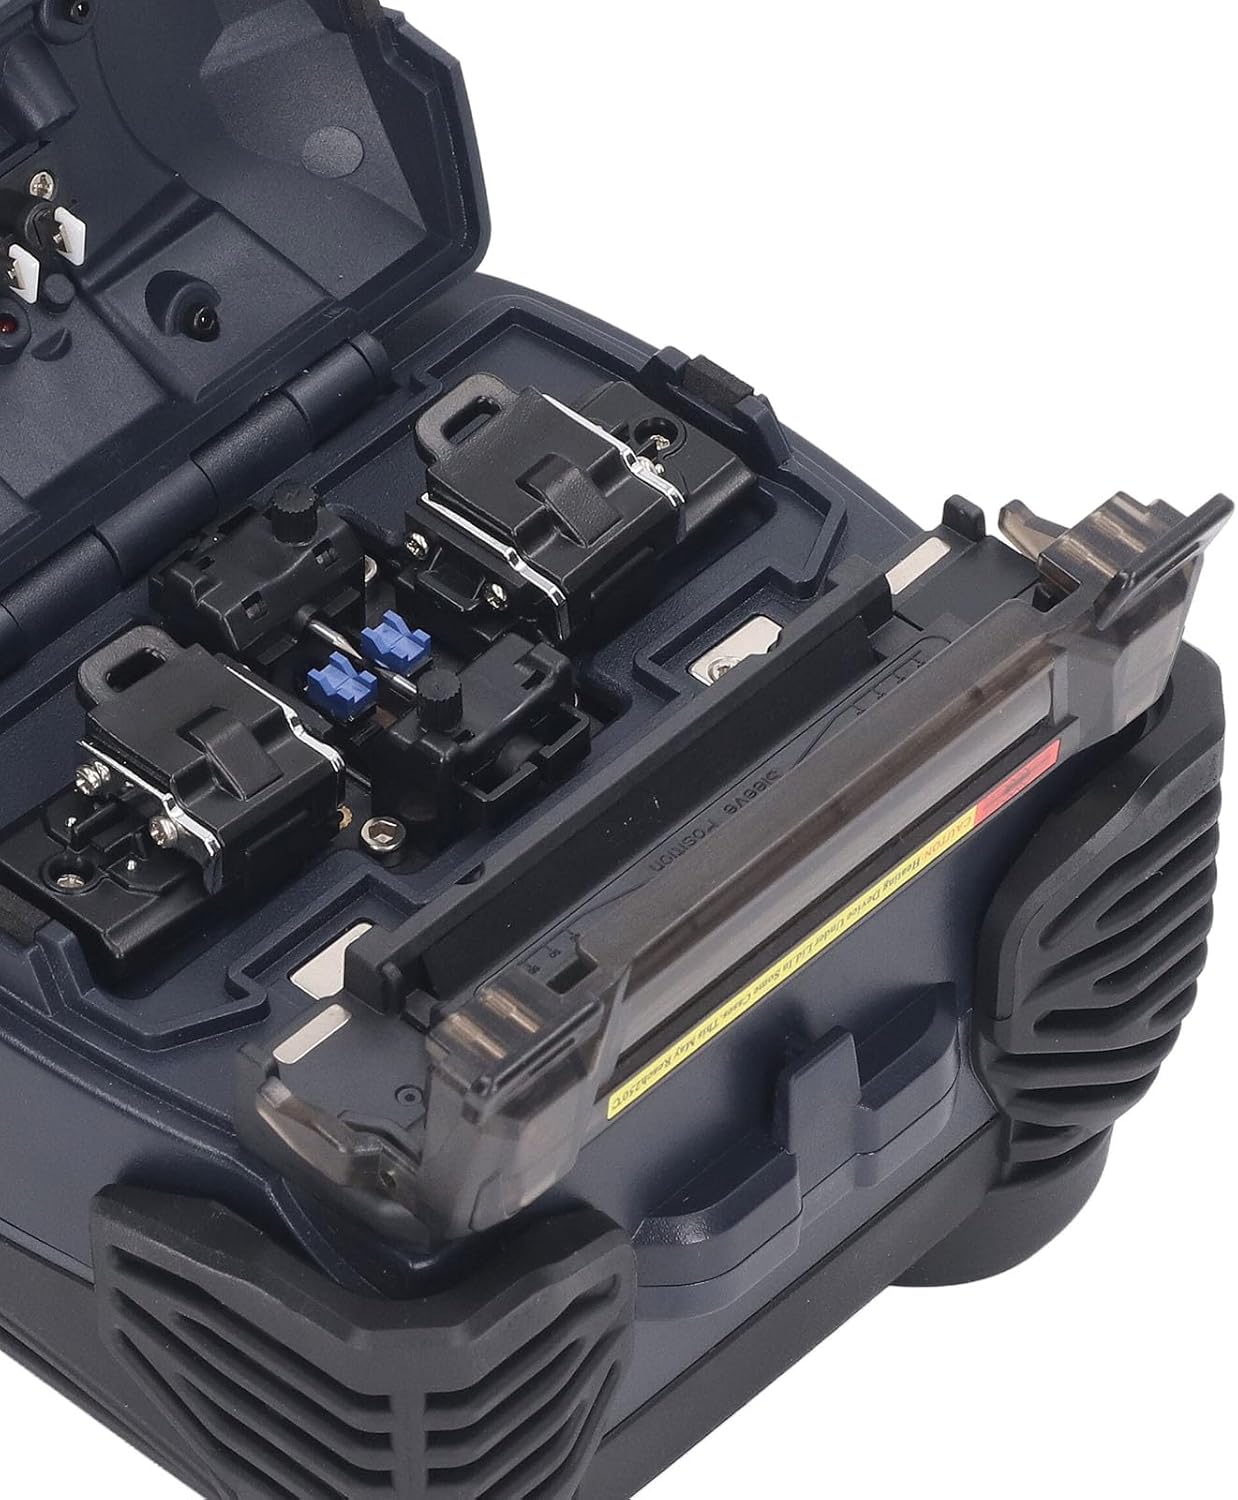
Figure 6.1: Fiber placement area with V-grooves and clamps.
6.3 Heat Shrink Protection
- Slide Protection Sleeve: Before splicing, remember to slide a heat shrink protection sleeve onto one of the fibers.
- Position Sleeve: After splicing, center the protection sleeve over the splice point.
- Heat the Sleeve: Place the spliced fiber with the sleeve into the heating oven of the splicer. Close the oven lid. The splicer will automatically heat the sleeve to shrink it and protect the splice.
- Cool Down: Once heating is complete, carefully remove the fiber and allow the sleeve to cool down before handling.
7. Maintenance
Regular maintenance ensures the longevity and accuracy of your splicer.
- Cleaning: Regularly clean the V-grooves, fiber clamps, and objective lenses with a cotton swab and isopropyl alcohol. Ensure no dust or fiber debris accumulates.
- Electrode Replacement: The electrodes have a limited lifespan. Replace them when prompted by the device or if splice quality degrades significantly. Refer to the maintenance menu for electrode status.
- Battery Care: To prolong battery life, avoid fully discharging the battery frequently. Store the device with a partial charge if not used for extended periods.
- Calibration: Periodically perform arc calibration as instructed in the device's menu to maintain splicing accuracy.
- Software Updates: Check for and install software updates via the USB interface to ensure optimal performance and access to new features.
8. Troubleshooting
This section addresses common issues you may encounter with the Walfront A-15F Optical Fiber Splicer.
| Problem | Possible Cause | Solution |
|---|---|---|
| High Splice Loss | Poor fiber cleave, dirty V-grooves/lenses, worn electrodes, incorrect splicing parameters. | Re-cleave fiber, clean V-grooves/lenses, replace electrodes, check splicing mode settings. |
| Fiber Not Aligning | Dirty V-grooves, damaged fiber clamps, fiber not seated correctly. | Clean V-grooves, ensure fiber is properly seated, check for clamp damage. |
| Splicer Not Powering On | Low battery, faulty power adapter, power button issue. | Charge battery, check power adapter connection, contact support if issue persists. |
| Heating Oven Not Working | Heating element fault, incorrect heating mode. | Check heating mode settings, ensure oven lid is closed properly. Contact support if fault persists. |
9. Specifications
| Feature | Specification |
|---|---|
| Model | A-15F |
| Magnification | 400X (X axes or Y axes) |
| Return Loss | Better than 60dB |
| Typical Connection Time | 9 Seconds |
| Typical Heating Time | 26 Seconds (settable heating time, adjustable heating temperature) |
| Fiber Diameter (Cladding) | 80-150µm |
| Fiber Diameter (Coating) | 100-1000µm |
| Cutting Length (Coating < 250µm) | 8-16mm |
| Cutting Length (Coating 250-1000µm) | 16mm |
| Heat Shrink Tubing | 60mm, 40mm, and a series of micro shrink tubing |
| Display | 3.5 Inch TFT Color LCD Display Screen |
| External Interface | USB interface |
| Usage Modes | 17 sets |
| Heating Modes | 9 sets |
| Power Source | AC/DC (4800mAh lithium battery) |
| Item Weight | 10.12 pounds (approx. 4.59 kg) |
| Package Dimensions | 14.96 x 14.57 x 7.09 inches (approx. 38 x 37 x 18 cm) |
10. Warranty and Support
Walfront products are manufactured to high-quality standards. For specific warranty terms and conditions, please refer to the warranty card included with your product or contact your point of purchase. For technical support, service, or inquiries, please contact Walfront customer service through the official channels provided at the time of purchase.