
1. Introduction
The Ubiquiti U7-PRO-MAX is a high-performance WiFi 7 (802.11be) ceiling-mounted access point designed for demanding, large-scale environments. It features 8 spatial streams, 6 GHz support, and a dedicated spectral scanning engine to ensure interference-free wireless connectivity. This manual provides essential information for the proper installation, configuration, operation, and maintenance of your U7-PRO-MAX access point.
Key features include:
- WiFi 7 (802.11be) with 8 spatial streams for ultra-fast, high-density performance.
- Tri-band connectivity (6 GHz, 5 GHz, 2.4 GHz) with max speeds of 8.6 Gbps on 5 GHz.
- Supports 500+ devices with seamless roaming and AI-powered optimization.
- 2.5 GbE uplink for high-speed networking and efficient data transfer.
- Advanced security features: Guest isolation, Private Pre-Shared Key (PPSK), RADIUS over TLS.
- Dynamic VLAN assignment for enterprise-level network management.
- PoE+ powered with a max consumption of 25W for easy installation.
- Flexible mounting options (ceiling or wall) with durable materials.
- Real-time spectral analysis and AI-driven Radio Resource Management (RRM).
2. Safety Information
Please read, follow, and keep these instructions. Heed all warnings. Only use attachments/accessories specified by the manufacturer.
- Do not use this product near water.
- Clean only with a dry cloth.
- Do not block any ventilation openings. Install in accordance with the manufacturer’s instructions.
- Do not install near any heat sources such as radiators, heat registers, stoves, or other apparatus (including amplifiers) that produce heat.
- Only use power supplies specified by the manufacturer.
- Refer all servicing to qualified service personnel. Servicing is required when the apparatus has been damaged in any way, such as power-supply cord or plug is damaged, liquid has been spilled or objects have fallen into the apparatus, the apparatus has been exposed to rain or moisture, does not operate normally, or has been dropped.
3. Package Contents
Verify that all components are present in your package:
- Ubiquiti U7-PRO-MAX Access Point
- Mounting Bracket
- Ceiling Tile Backing Plate
- Screws and Wall Anchors
- Ethernet Cable
- Quick Start Guide
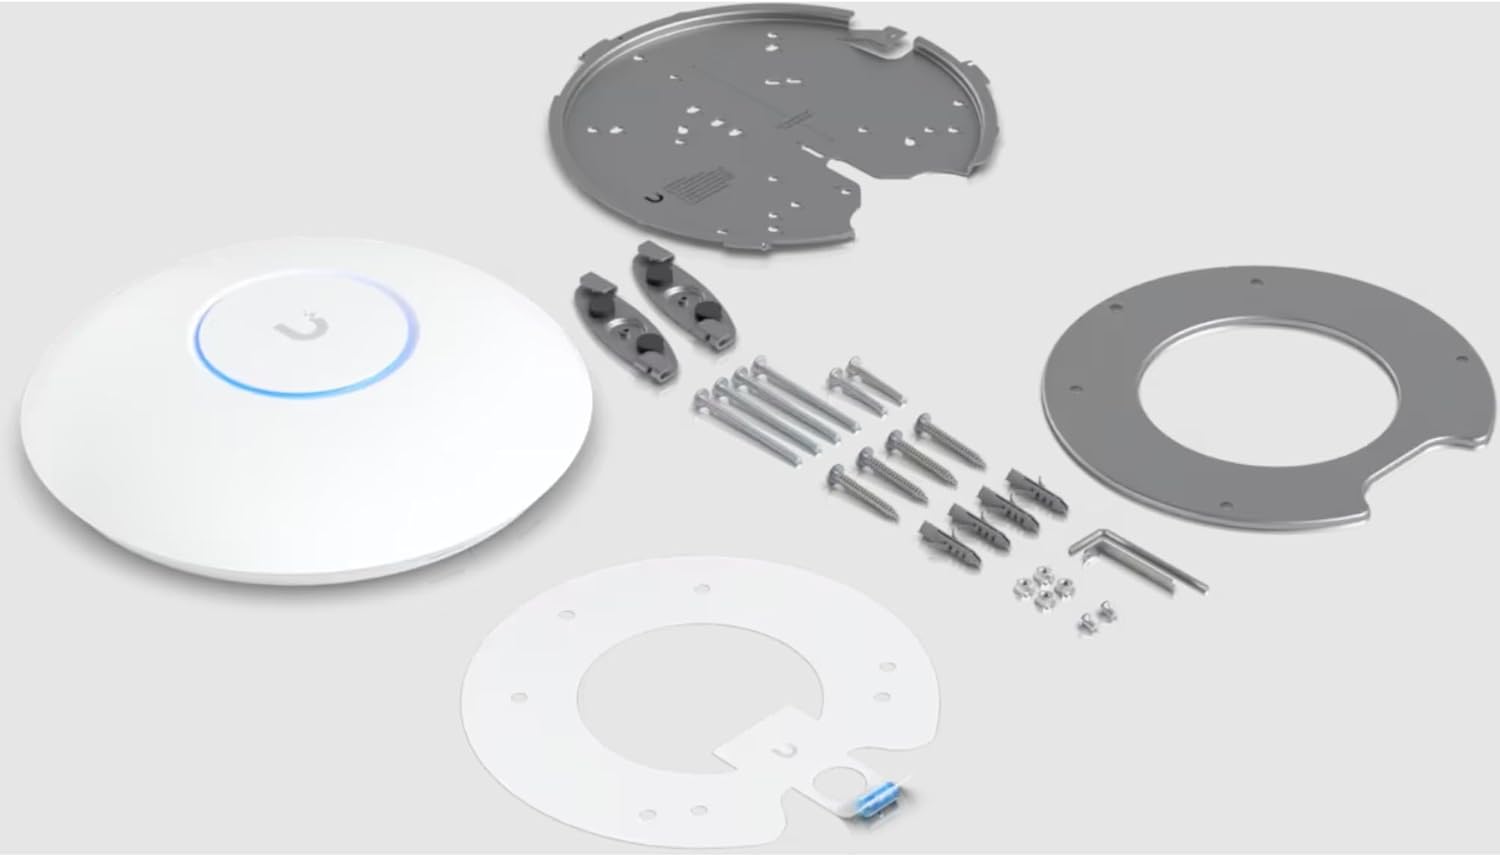
Figure 3.1: Contents of the U7-PRO-MAX package, showing the access point, mounting hardware, and an Ethernet cable.
4. Setup
4.1 Mounting the Access Point
The U7-PRO-MAX is designed for flexible mounting on ceilings or walls. Ensure the mounting location provides optimal Wi-Fi coverage and is near a Power over Ethernet (PoE+) source.
- Prepare the Mounting Surface: For ceiling tile mounting, remove a ceiling tile and attach the backing plate to the mounting bracket. For solid surfaces, mark drill holes using the mounting bracket as a template.
- Secure the Mounting Bracket: Attach the mounting bracket to the ceiling or wall using the provided screws and anchors. Ensure it is firmly secured.

Figure 4.1: Mounting bracket secured to a ceiling, ready for the access point.
- Connect Ethernet Cable: Route an Ethernet cable from your PoE+ switch or injector through the mounting bracket and connect it to the 2.5 GbE uplink port on the access point.

Figure 4.2: Ethernet cable connection to the access point before final mounting.
- Attach the Access Point: Align the access point with the mounting bracket and twist it clockwise until it locks into place.

Figure 4.3: Attaching the access point to the mounting bracket.

Figure 4.4: Fully mounted Ubiquiti U7-PRO-MAX access point on a ceiling.
4.2 Powering the Device
The U7-PRO-MAX is powered via Power over Ethernet Plus (PoE+). Connect the Ethernet cable from a PoE+ compliant switch or a PoE+ injector to the 2.5 GbE uplink port on the access point. The device will power on automatically.
4.3 Initial Configuration
To configure the U7-PRO-MAX, you will need the UniFi Network application or a UniFi Network Controller. Follow these general steps:
- Download UniFi Network Application: Install the UniFi Network application on your mobile device or set up a UniFi Network Controller on a computer.
- Discover the Device: Launch the UniFi Network application/controller. The U7-PRO-MAX should appear as a discoverable device.
- Adopt and Configure: Adopt the access point into your UniFi network. Follow the on-screen prompts to configure Wi-Fi networks (SSIDs), security settings, and other network parameters.
- Firmware Update: Ensure the access point is running the latest firmware for optimal performance and security. Update if prompted.
5. Operating the Access Point
Once configured, the U7-PRO-MAX operates automatically to provide high-speed wireless connectivity. Here are key operational aspects:
- Tri-Band Operation: The access point simultaneously broadcasts on 2.4 GHz, 5 GHz, and 6 GHz bands, optimizing client connections based on device capabilities and network conditions.
- WiFi 7 (802.11be): Leverages advanced WiFi 7 technologies for increased throughput, lower latency, and improved efficiency, especially in high-density environments.
- AI-Powered Optimization: The UniFi Network system utilizes AI to optimize radio resource management (RRM) and spectral analysis, ensuring the best possible channel selection and interference mitigation.
- Client Connectivity: Supports over 500 connected devices, providing seamless roaming between access points within a UniFi network.
- Security: Implements WPA-PSK, Guest Isolation, Private Pre-Shared Key (PPSK), and RADIUS over TLS for robust network security.
6. Maintenance
Regular maintenance ensures the longevity and optimal performance of your U7-PRO-MAX access point.
- Firmware Updates: Periodically check for and apply firmware updates through the UniFi Network application/controller. Updates often include performance enhancements, security patches, and new features.
- Cleaning: Gently wipe the exterior of the access point with a dry, soft cloth to remove dust. Do not use liquid cleaners or aerosols.
- Environmental Conditions: Ensure the operating environment remains within specified temperature and humidity ranges to prevent damage.
7. Troubleshooting
If you encounter issues with your U7-PRO-MAX access point, consider the following troubleshooting steps:
- No Power/LED Off:
- Verify the Ethernet cable is securely connected to both the access point and the PoE+ source.
- Ensure the PoE+ switch or injector is powered on and functioning correctly.
- Check if the PoE+ port on your switch is enabled and providing power.
- Device Not Adopted/Visible in UniFi Controller:
- Confirm the access point is powered on (LED indicator should be lit).
- Ensure the UniFi Network application/controller is on the same network segment as the access point or configured for Layer 3 adoption.
- Try restarting the UniFi Network application/controller.
- Perform a factory reset on the access point (refer to the Quick Start Guide for button location).
- Poor Wi-Fi Performance:
- Check for physical obstructions between client devices and the access point.
- Ensure the access point is mounted in an optimal location for coverage.
- Verify that the 2.5 GbE uplink is operating at its full speed.
- Use the UniFi Network application to analyze channel utilization and adjust Wi-Fi channels if interference is detected.
- Ensure client devices support WiFi 7 for optimal performance.
If issues persist, consult the Ubiquiti support resources or contact technical support.
8. Specifications
| Feature | Detail |
|---|---|
| Brand | Ubiquiti Networks |
| Model Name | Ubiquiti U7-PRO-MAX |
| Wireless Communication Standard | 802.11be (WiFi 7) |
| Frequency Band Class | Tri-Band (2.4 GHz, 5 GHz, 6 GHz) |
| Connectivity Technology | WiFi 7, 2.5 GbE uplink |
| Number of Antennas | 8 (Internal) |
| Coverage | 160 m² (1,750 ft²) |
| Max Connected Devices | 500+ |
| Power Method | PoE+ |
| Max Power Consumption | 25W |
| Uplink Port | 1x 2.5 GbE RJ45 Port |
| Security Protocol | WPA-PSK, Guest Isolation, PPSK, RADIUS over TLS |
| Operating System | UniFi Network |
| Control Method | App |
| Item Weight | 680 Grams |
| Color | White |
| Manufacturer | UbiQuiti |
| Model Number | U7-PRO-MAX |
| UPC | 810010079886, 810084695555 |
9. Warranty and Support
Ubiquiti Networks products are covered by a limited warranty. For detailed warranty information, please refer to the official Ubiquiti website or the warranty card included with your product.
For technical support, documentation, and community forums, visit the official Ubiquiti support portal. You can find resources for troubleshooting, firmware downloads, and product guides.
Online Resources:
- Ubiquiti Official Website: www.ui.com
- Ubiquiti Support: help.ui.com