
1. Product Overview
This manual provides detailed instructions for the installation, operation, and maintenance of your Varstrom Tong-Sheng TSD-Z-2B 48V 500W Mid Drive E-Bike Conversion Kit with Dz40 Display. This kit is designed to transform a standard bicycle into an electric-assisted bicycle, offering enhanced performance and an authentic cycling experience.
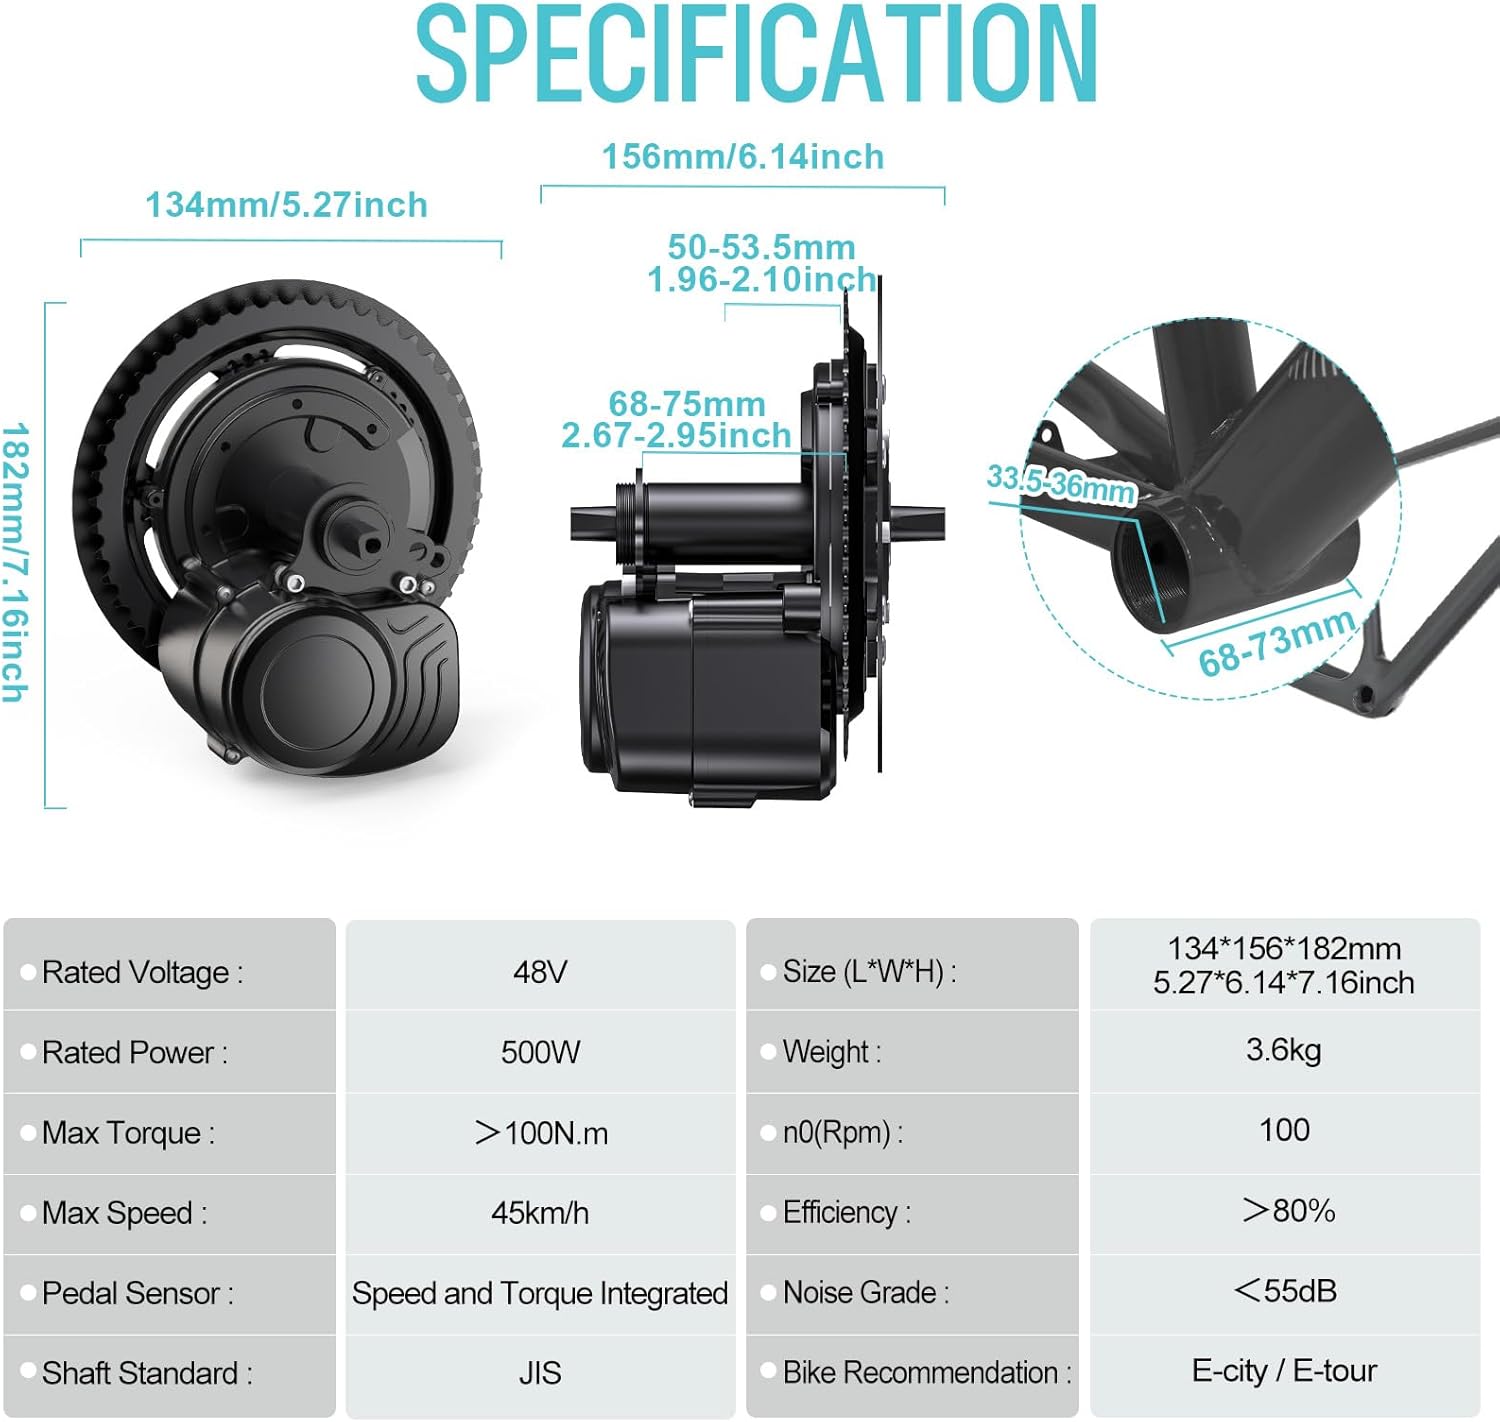
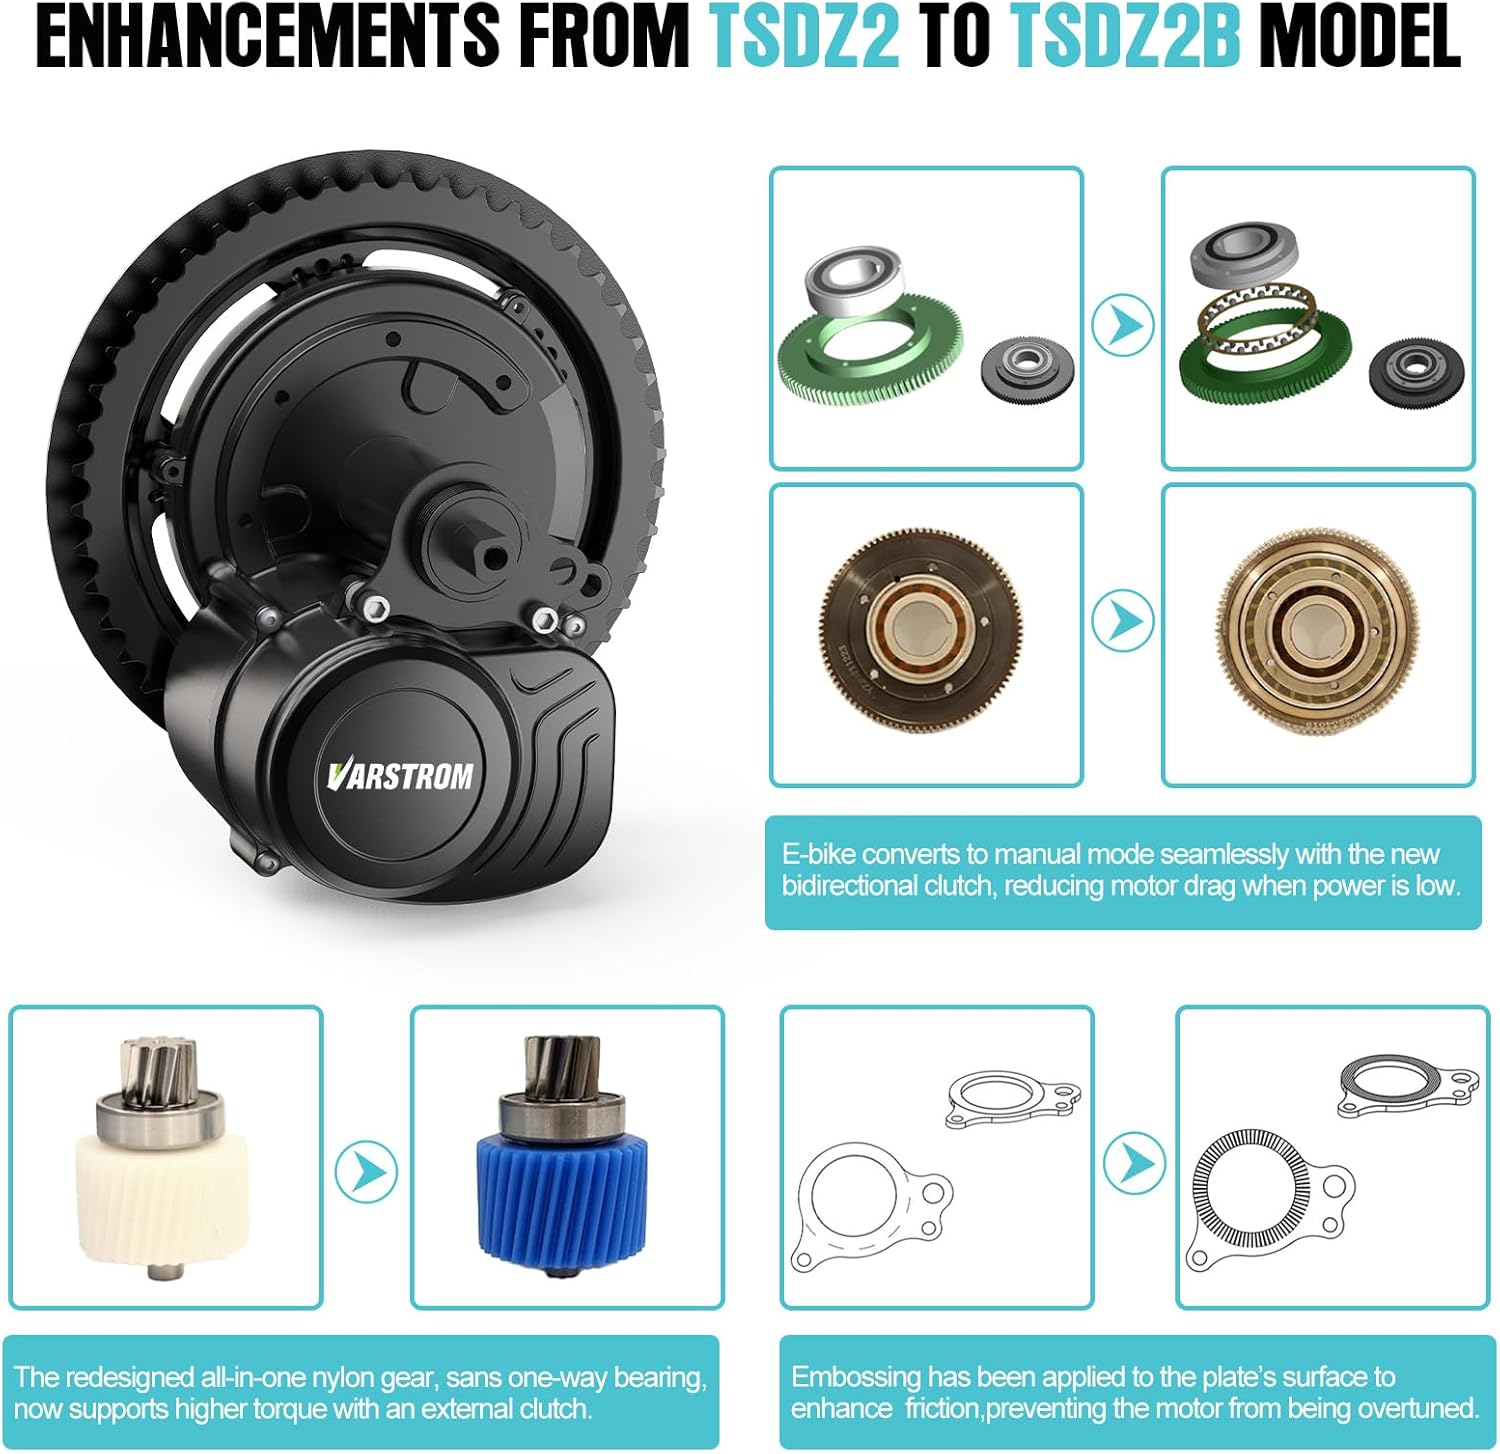
The TSD-Z-2B mid-drive kit features an integrated torque sensor for smooth pedal assistance and is compatible with bicycles equipped with a 68-73mm bottom bracket. It includes a 1T4 cable for simplified wiring and a dual-clutch system for reduced resistance when cycling without electric assistance.
2. Packing List
Verify that all components are present in your package:
- TSD-Z-2B 48V 500W Mid Mount Motor
- Dz40 Display
- Thumb Throttle
- Speed Sensor
- 1T4 Cable
- Screws & Washers
- Wrench
- Motor Extension Cable
- Brake Levers (or Brake Sensors for hydraulic systems)
- Instruction Manual

3. Specifications
| Specification | Value |
|---|---|
| Brand | Varstrom |
| Model Name | 48V 500W Mid Drive Kit |
| Part Number | TS TSD-Z-2B 48V 500W DZ40 |
| Voltage | 48 Volts (DC) |
| Wattage | 500 watts |
| Max Torque | 80 N.m |
| Efficiency | >80% |
| Max Speed | Up to 45 km/h |
| Pedal Sensor | Speed and Torque Integrated |
| Bottom Bracket Compatibility | 68-73mm |
| Display Style | Dz40 Display |
4. Key Features and Upgrades
- Integrated Torque Sensor: Provides a smooth and responsive pedal-assist experience, mimicking the feel of a traditional bicycle.
- Wide Display Compatibility: The updated kit offers compatibility with various displays, enhancing user experience and customization.
- 1T4 Cable Integration: Simplifies and secures the DIY e-bike conversion process with a single, organized cable.
- Dual-Clutch System: Significantly reduces resistance when cycling without electric assistance, improving the overall riding experience.
- Enhanced Durability: The original reduction shaft with one-way roller bearings has been replaced with a new integrated part, extending the motor's lifespan.
5. Setup and Installation
This section guides you through the installation of the Varstrom Tong-Sheng TSD-Z-2B Mid Drive Kit. While the process is generally straightforward, careful attention to detail is crucial for proper function and safety.
5.1. Pre-Installation Check
Ensure your bicycle has a 68-73mm bottom bracket. For bikes with hydraulic brakes or integrated brake lever/thumb shifter setups, contact customer support for appropriate brake sensors.
5.2. Removing the Crankset
Begin by removing the existing crank arms and bottom bracket from your bicycle. You will typically need a crank arm puller and a bottom bracket tool for this step.
5.3. Motor Installation
Attach the 42T chainring to the TSD-Z-2B motor. Carefully insert the motor into the bottom bracket shell. Secure it with the provided fixing nut and bolts, ensuring it is tightly fastened to prevent rotation.

5.4. Speed Sensor Installation
Mount the speed sensor on the rear chainstay, ensuring the magnet passes within 10-15mm of the sensor. Use zip ties to secure the sensor and route the cable neatly along the frame.
5.5. Display and Controls Mounting
Install the Dz40 display, thumb throttle, and brake levers (or brake sensors) on the handlebar. Route all cables carefully and secure them with zip ties to avoid interference with moving parts.

5.6. Cable Management
Connect all cables according to the wiring schematic. Use the provided zip ties to organize and secure the cables along the bicycle frame, ensuring they do not interfere with steering or pedaling.
5.7. Installation Video Guide
For a visual step-by-step guide, please refer to the installation video below. This video demonstrates the complete process of converting a bicycle with a mid-drive motor kit.
Video 5.1: BAFANG BBS Mid Drive Motor for eBike - Installation Video. This video provides a comprehensive guide to installing a mid-drive motor kit, covering crankset removal, motor mounting, and accessory connections.
Video 5.2: Tongsheng Mid Drive Motor Kit Installation. This video demonstrates the installation process specifically for a Tongsheng mid-drive motor kit.
6. Operating Instructions
6.1. Powering On/Off
To power on the system, press and hold the power button on the Dz40 display. To power off, press and hold the power button again.
6.2. Adjusting Assist Levels
Use the '+' and '-' buttons on the display to cycle through the available pedal assist levels. Higher levels provide more motor assistance.
6.3. Using the Thumb Throttle
The thumb throttle provides on-demand power without pedaling. Apply gentle pressure to engage the motor. Release the throttle to disengage. Always use the throttle responsibly.
6.4. Display Functions
The Dz40 display shows real-time information such as current speed, battery level, assist level, trip distance, and ride time. Consult the display's specific manual for advanced settings and customization options.
7. Maintenance
Regular maintenance ensures the longevity and optimal performance of your e-bike kit.
- Cleanliness: Keep the motor, battery, and electrical connections clean and free from dirt and moisture. Use a damp cloth for cleaning.
- Battery Care: Charge the battery regularly, even when not in use, to maintain its health. Avoid fully discharging the battery.
- Cable Inspection: Periodically check all cables and connections for wear, damage, or loose fittings. Secure any loose cables with zip ties.
- Fastener Check: Ensure all bolts and nuts, especially those securing the motor and crank arms, are tight.
- Chain Maintenance: Keep your bicycle chain clean and lubricated for smooth operation and to prevent premature wear.
8. Troubleshooting
If you encounter issues, refer to the following common troubleshooting steps:
| Problem | Possible Cause | Solution |
|---|---|---|
| Motor not assisting | Low battery, loose connection, incorrect assist level, brake sensor engaged | Charge battery, check all cable connections, increase assist level, ensure brake levers are not engaged |
| Display not turning on | Battery not connected, faulty display cable | Check battery connection, inspect display cable for damage |
| Inaccurate speed reading | Speed sensor/magnet misalignment | Adjust speed sensor and magnet to be within 10-15mm of each other |
| Unusual noises from motor | Loose motor mounting, internal issue | Check motor mounting bolts, contact customer support if noise persists |
9. Warranty and Support
Your Varstrom TSD-Z-2B Mid Drive E-Bike Conversion Kit comes with a comprehensive warranty:
- Return Policy: 30 days return
- Repair or Replace: 365 days repair or replace
For technical assistance, warranty claims, or any questions regarding your product, please contact Varstrom customer support through your purchase platform or visit the official Varstrom store.