1. Product Overview
This manual provides instructions for the Bewinner 4K Portable Monitor 17.3 Inch, Model Bewinnerz7brg98kxm. This portable display is designed to extend your screen space for various devices, offering a high-resolution viewing experience.

Image 1.1: Bewinner 4K Portable Monitor 17.3 Inch with its integrated kickstand.
Key Features:
- 17.3-inch 4K Display: Features panel technology with 3840x2160 pixel resolution, providing detailed images suitable for graphic design, photo editing, or video production.
- Portability: Lightweight design allows for easy transport and use in various locations.
- Vibrant Image Quality: Offers 100% sRGB wide color range, 16.7 million colors (8-bit), a 1500:1 contrast ratio, and 400 nits brightness for accurate color reproduction and image clarity.
- Adjustable Stand & VESA Support: Includes an integrated adjustable kickstand and supports VESA mounting (75x75mm) for landscape or portrait orientation.
- Versatile Connectivity: Equipped with full-featured USB-C 3.1 ports, an HDMI port, a Micro USB data transfer port, and a 3.5mm headphone jack. USB-C supports single-cable power and video transmission.

Image 1.2: Illustration of display technologies including IPS, 100% sRGB, 4K HDR, and resolution comparisons.

Image 1.3: The monitor's protective cover functions as a magnetic kickstand, offering scratch protection and water resistance.
2. Package Contents
Verify that all items are present in the package:
- Bewinner 4K Portable Monitor 17.3 Inch
- USB-C to USB-C Cable
- HDMI to Mini HDMI Cable
- USB-A to USB-C Power Cable
- Power Adapter (not explicitly listed but implied for power cable)
- User Manual (this document)

Image 2.1: The various cables included with the monitor for connectivity and power.
3. Physical Components
Ports and Buttons:
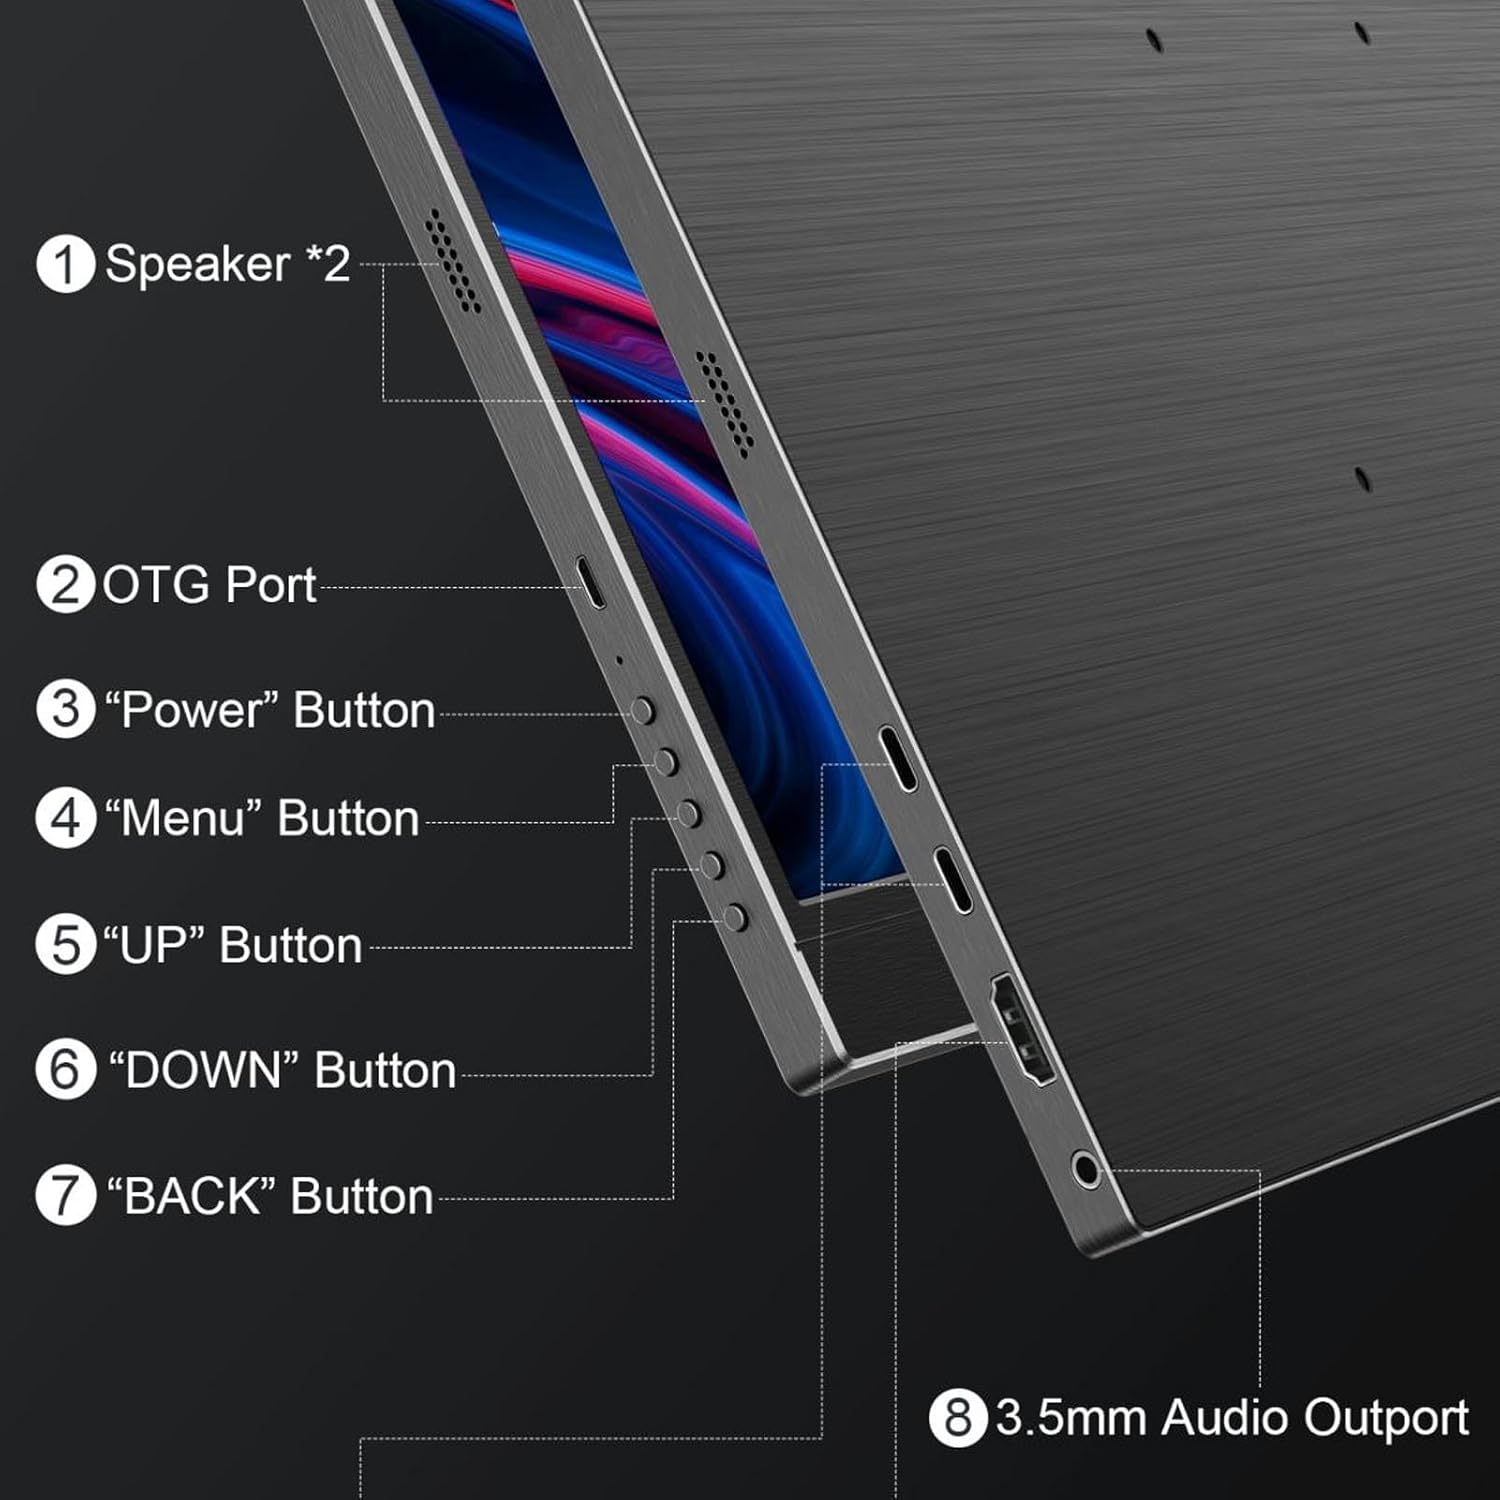
Image 3.1: Side view diagram illustrating the monitor's buttons and audio port.
- Speakers (*2): Integrated stereo speakers for audio output.
- OTG Port: On-The-Go port, typically for connecting USB peripherals.
- Power Button: Used to turn the monitor on or off.
- Menu Button: Accesses the On-Screen Display (OSD) menu.
- UP Button: Navigates up in menus or adjusts settings.
- DOWN Button: Navigates down in menus or adjusts settings.
- BACK Button: Returns to the previous menu level.
- 3.5mm Audio Outport: For connecting headphones or external speakers.

Image 3.2: Close-up of the monitor's USB-C and HDMI input ports.
- Type-C Ports (*2): Full-featured USB-C 3.1 ports for power, video, and data transmission.
- HD (HDMI) Port: For video input from devices supporting HDMI output.
4. Setup Instructions
Follow these steps to connect your portable monitor to various devices.
4.1. Connecting to a Laptop/PC (USB-C)
- Ensure your laptop/PC has a full-featured USB-C port that supports DisplayPort Alternate Mode and power delivery.
- Connect one end of the provided USB-C to USB-C cable to your laptop/PC's USB-C port.
- Connect the other end of the USB-C to USB-C cable to one of the monitor's Type-C ports.
- The monitor should automatically detect the signal and power on. If not, press the Power button.
4.2. Connecting to a Laptop/PC (HDMI)
- Connect one end of the provided HDMI to Mini HDMI cable to your laptop/PC's HDMI output.
- Connect the Mini HDMI end of the cable to the monitor's HD port.
- Connect the USB-A to USB-C power cable from a power adapter (not included) or a USB port on your PC to the other Type-C port on the monitor for power.
- The monitor should display the signal. If not, press the Power button.
4.3. Connecting to a Gaming Console/Phone
- For devices with full-featured USB-C output (e.g., some smartphones, Nintendo Switch), use a single USB-C to USB-C cable for both video and power.
- For devices with HDMI output (e.g., most gaming consoles), use the HDMI to Mini HDMI cable for video and the USB-A to USB-C power cable for power, as described in section 4.2.

Image 4.1: Various connection scenarios for the portable monitor, including direct USB-C, via a USB hub, and with a camera.

Image 4.2: Examples of how the monitor can be used as a secondary display for laptops, smartphones, gaming consoles, and PCs.
5. Operating Instructions
5.1. Power On/Off
- To power on the monitor, press the Power Button.
- To power off the monitor, press and hold the Power Button for a few seconds until the screen turns off.
5.2. On-Screen Display (OSD) Menu Navigation
The OSD menu allows you to adjust various display settings such as brightness, contrast, color temperature, and input source.
- Press the Menu Button to open the OSD menu.
- Use the UP and DOWN buttons to navigate through the menu options.
- Press the Menu Button again to select an option or enter a sub-menu.
- Use the UP and DOWN buttons to adjust values or select sub-options.
- Press the BACK Button to return to the previous menu or exit the OSD menu.
5.3. Display Modes
The monitor can be used in both landscape and portrait orientations, especially when mounted on a VESA arm. Adjust the display settings on your connected device to match the desired orientation.
6. Maintenance
6.1. Cleaning the Monitor
- Always power off the monitor and disconnect it from power before cleaning.
- Use a soft, lint-free cloth slightly dampened with water or a non-abrasive screen cleaner.
- Do not spray cleaner directly onto the screen. Apply it to the cloth first.
- Avoid using harsh chemicals, alcohol, or abrasive materials, as these can damage the screen or casing.
6.2. Storage
- When not in use, store the monitor in a cool, dry place, away from direct sunlight and extreme temperatures.
- Utilize the protective cover to prevent scratches and dust accumulation.
7. Troubleshooting
If you encounter issues with your monitor, refer to the following common problems and solutions:
| Problem | Possible Solution |
|---|---|
| No display/"No Signal" message |
|
| Screen flickering or unstable image |
|
| No sound from speakers/headphone jack |
|
| Monitor does not power on |
|
8. Technical Specifications
| Specification | Detail |
|---|---|
| Brand | Bewinner |
| Model Number | Bewinnerz7brg98kxm |
| Screen Size | 17.3 inches |
| Resolution | 4K (3840x2160) |
| Refresh Rate | 60Hz |
| Color Gamut | 100% sRGB |
| Brightness | 400 nits |
| Contrast Ratio | 1500:1 |
| Color Depth | 16.7M (8-bit) |
| Panel Type | IPS |
| Connectivity | 2x USB-C 3.1 (Full-featured), 1x HDMI, 1x Micro USB (data transfer), 1x 3.5mm Audio Out |
| VESA Mount | 75x75mm |
| Item Weight | 5.3 pounds |
| Package Dimensions | 17.72 x 11.81 x 2.36 inches |

Image 8.1: Side view illustrating the monitor's slim profile.