1. Product Overview
The Navitel R385 is a 2K GPS Front Dash Cam designed to record your journeys with high-quality video. It features a 140-degree wide viewing angle, G-Sensor for emergency recording, Loop Recording, and a GPS Informer function to alert you to road hazards.
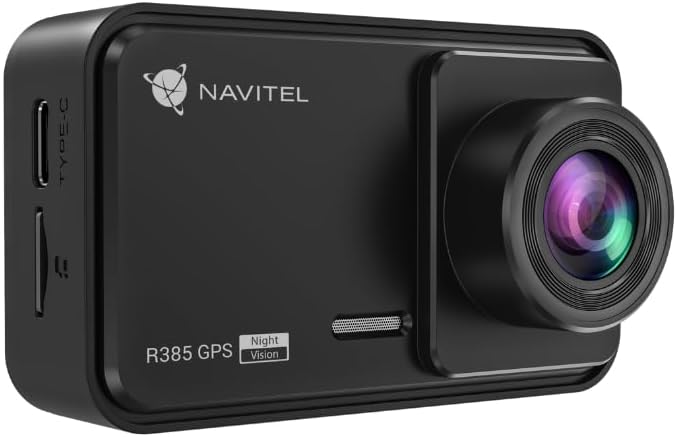
Figure 1.1: Front view of the Navitel R385 Dash Cam. This image displays the compact design of the dash cam, featuring the lens on the right side and the 'R385 GPS' branding on the front.
2. Package Contents
Please ensure all items are present before proceeding with installation:
- Navitel R385 Dash Cam
- Windshield Mount
- Car Charger
- User Manual
3. Setup and Installation
3.1 Inserting a MicroSD Card
The Navitel R385 supports microSD cards up to 256GB. A microSD card is required for recording and is not included with the device.
- Locate the microSD card slot on the side of the dash cam.
- Insert the microSD card with the contacts facing the front of the camera until it clicks into place.
- To remove, gently push the card until it springs out.
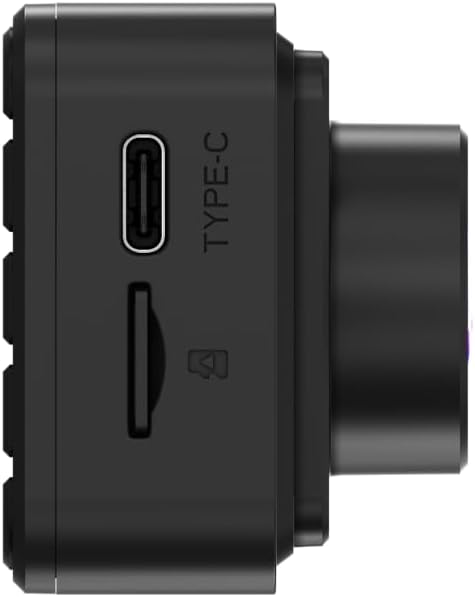
Figure 3.1: Side view of the Navitel R385 showing the Type-C power port and the microSD card slot. This image highlights the connectivity options for power and storage.
3.2 Mounting the Dash Cam
The dash cam is designed for windshield mounting.
- Clean the chosen area on your windshield thoroughly to ensure a strong suction.
- Attach the windshield mount to the dash cam.
- Press the suction cup firmly against the windshield and engage the locking mechanism (if applicable) to secure it.
- Adjust the camera angle to ensure a clear view of the road ahead, avoiding obstruction of your driving view.

Figure 3.2: The Navitel R385 Dash Cam attached to its windshield suction cup mount. This image demonstrates how the device connects to the mount for in-vehicle placement.
3.3 Power Connection
Connect the dash cam to your vehicle's power supply using the provided car charger.
- Plug the car charger into your vehicle's 12V power outlet (cigarette lighter socket).
- Connect the other end of the charger cable to the Type-C port on the dash cam.
- The dash cam will typically power on automatically when the vehicle's ignition is turned on.
4. Operating Instructions
4.1 Basic Operation
Once powered on, the dash cam will typically begin recording automatically. The 2-inch IPS display will show the live view and recording status.
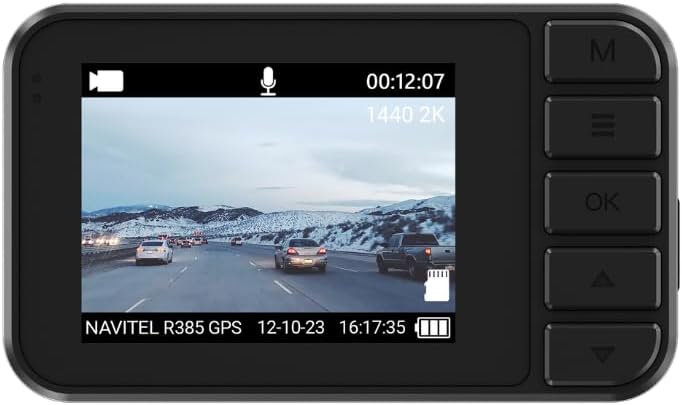
Figure 4.1: The 2-inch IPS display of the Navitel R385 showing a live recording view. The screen displays video footage, current time, date, and recording resolution (1440 2K).
4.2 Loop Recording
The Navitel R385 utilizes cyclic recording. When the microSD card reaches its capacity, the oldest unlocked files will be automatically overwritten by new recordings. This ensures continuous recording without manual intervention.
4.3 G-Sensor (Shock Sensor)
The built-in G-Sensor detects sudden movements, impacts, or rapid acceleration/deceleration. In such events, the current video segment is automatically locked and saved to a secure folder on the microSD card, preventing it from being overwritten by loop recording. The sensitivity of the G-Sensor can usually be adjusted in the device settings.
4.4 Parking Mode
The R385 GPS can detect vibrations and initiate recording even when the vehicle is parked and the engine is off. This feature provides surveillance when you are away from your vehicle. Ensure the dash cam has a continuous power supply for this function to operate effectively.
4.5 GPS Informer
The integrated GPS Informer function provides alerts for upcoming speed enforcement cameras, bus lanes, and other potential road hazards. When approaching a detected hazard, the device will emit an audible warning and display relevant information on the 2-inch screen. The GPS module also allows the device to display the vehicle's current speed.
5. Maintenance
5.1 Cleaning the Device
- Use a soft, dry cloth to clean the dash cam body and screen.
- For the lens, use a specialized lens cleaning cloth to avoid scratches.
- Do not use harsh chemicals or abrasive cleaners.
5.2 MicroSD Card Care
- Regularly format the microSD card (e.g., once a month) within the dash cam's settings to maintain optimal performance and prevent data corruption.
- Use high-quality, reputable brand microSD cards designed for dash cam use (Class 10 or higher, U3 recommended).
6. Troubleshooting
6.1 Device Not Turning On
- Ensure the car charger is properly connected to both the dash cam and the vehicle's 12V power outlet.
- Check if the vehicle's 12V power outlet is functioning (e.g., by testing with another device).
- Try a different car charger if available.
6.2 Recording Issues (e.g., stops recording, corrupted files)
- Format the microSD card using the dash cam's menu.
- Ensure you are using a high-quality microSD card (Class 10, U3 recommended).
- Replace the microSD card if issues persist, as cards can wear out over time.
6.3 GPS Informer Not Working / Inaccurate Speed
- Ensure the dash cam has a clear view of the sky to receive GPS signals. Avoid mounting it behind tinted areas or large obstructions.
- Allow sufficient time for the GPS to acquire a signal after powering on, especially in new locations.
7. Specifications
| Model | R385 |
| Video Resolution | 2560x1440p (2K) @ 30 FPS |
| Sensor | GC4653 |
| Viewing Angle | 140 Degrees |
| Lens Type | 6-Layer Glass Lens |
| Display | 2-Inch IPS Display |
| Storage | MicroSD card up to 256GB (not included) |
| Features | G-Sensor, Loop Recording, Parking Mode, GPS Informer |
| Mounting Type | Windshield Mount |
| Product Dimensions | 2.76"D x 3.54"W x 5.51"H |
| Color | Black |
| Manufacturer | Navitel |
8. Warranty and Support
For warranty information and technical support, please refer to the documentation provided with your purchase or visit the official Navitel website. Keep your proof of purchase for warranty claims.


