1. Introduction
This manual provides essential instructions for the installation, setup, and operation of your TONGOU Wi-Fi Smart Switch 1P+N DIN Rail DIY with Power Monitoring. This device allows you to transform traditional household appliances into smart, connected devices, offering remote control, voice control, and energy consumption monitoring through the Smart Life or Tuya application.

Image 1.1: TONGOU Wi-Fi Smart Switch integrated into a smart home system, showing app control and Wi-Fi connectivity.
2. Safety Information
WARNING: Electrical installation should only be performed by qualified personnel. Incorrect installation can lead to electric shock, fire, or property damage.
- Always disconnect power at the main circuit breaker before installation or maintenance.
- Ensure the device is installed in a dry environment, away from moisture and extreme temperatures.
- Verify that the voltage and current ratings of the switch match your electrical system requirements.
- Do not exceed the maximum current rating of 6A for this model.
- Ensure all wiring connections are secure and properly insulated.
3. Package Contents
Verify that all items are present in the package:
- 1 x TONGOU Wi-Fi Smart Switch (Model: With Power Monitoring 6A)
- 1 x User Manual
4. Specifications
| Feature | Specification |
|---|---|
| Brand | TONGOU |
| Model Number | With Power Monitoring 6A |
| Operating Voltage | AC 90 - 240 V, 50/60 Hz |
| Wireless Type | Wi-Fi 2.4 GHz (5/4 GHz not supported) |
| Current Rating | 6 A |
| Maximum Wiring Capacity | 10 mm² (Power side and Load side) |
| Mounting Type | DIN Rail Mounting |
| Dimensions (L x W x H) | 9 x 2 x 8 cm |
| Weight | 120 grams |
| Contact Material | Silver-plated relay contacts |
| Operating Mode | On/Off |
| Certifications | CE |
| Operating Temperature | Up to 80 Degrees Celsius |
5. Installation
The TONGOU Wi-Fi Smart Switch is designed for DIN rail mounting. Follow these steps for proper installation:
- Power Disconnection: Before starting any electrical work, ensure the main power supply to the circuit is turned off at the circuit breaker.
- Mounting: Mount the smart switch onto a standard 35mm DIN rail. The device occupies one position (18mm width).
- Wiring: Connect the power input (N for Neutral, L for Live) to the top terminals labeled 'Power'. Connect the load output (N for Neutral, L for Live) to the bottom terminals labeled 'Load'. The maximum wiring capacity is 10 mm² for both power and load sides. Ensure correct polarity.
- Circuit Protection: It is recommended to install an upstream residual current circuit breaker (RCBO/A type, 30mA/10kA) to protect the circuit.
- Secure Connections: Use a screwdriver to securely tighten all wire connections.

Image 5.1: Wiring diagram illustrating the connection of the TONGOU Wi-Fi Smart Switch to a circuit with an upstream circuit breaker and a light bulb as a load.
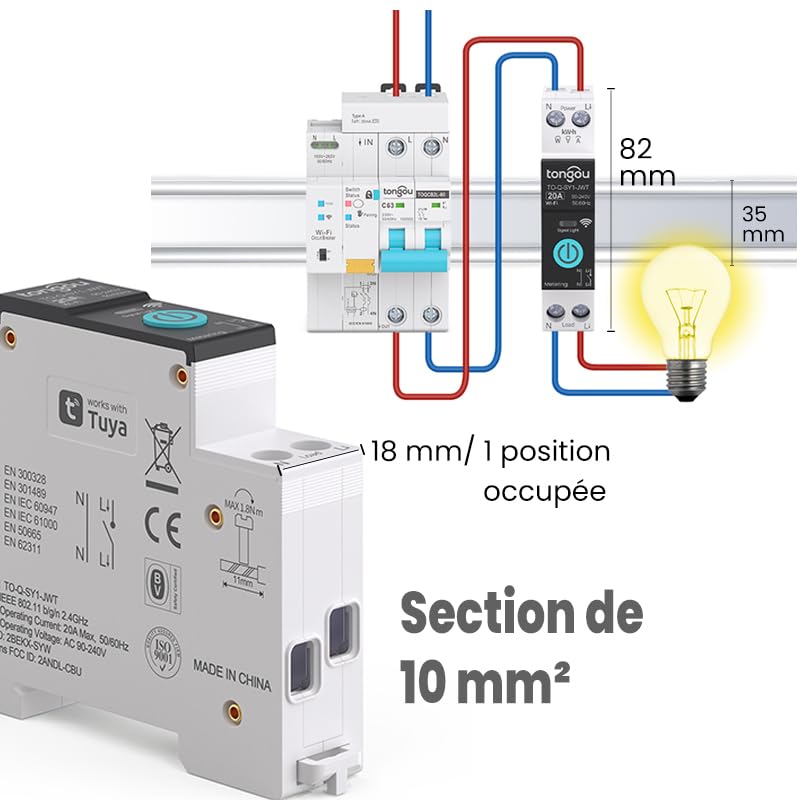
Image 5.2: Close-up of the smart switch showing its dimensions (82mm height, 35mm depth, 18mm width) and indicating a 10 mm² wiring section capacity.
6. Setup
To enable smart functionalities, connect your TONGOU Wi-Fi Smart Switch to the Smart Life or Tuya application.
- Download the App: Download the "Smart Life" or "Tuya Smart" application from the App Store (iOS) or Google Play Store (Android).
- Register/Log In: Open the app and register for a new account or log in with an existing one.
- Enter Pairing Mode: After restoring power to the switch, press and hold the main button on the device for 5 to 10 seconds until the signal light blinks rapidly in blue. This indicates the device is in pairing mode.
- Add Device in App: In the Smart Life/Tuya app, tap the "+" icon (usually in the top right corner) to add a new device. The app should automatically discover the switch. If not, manually select "Electrical" > "Circuit Breaker (Wi-Fi)" or similar.
- Connect to Wi-Fi: Follow the in-app instructions to connect the device to your 2.4 GHz Wi-Fi network. Note: The device only supports 2.4 GHz Wi-Fi; 5 GHz networks are not compatible.
- Rename Device: Once connected, you can rename the device for easier identification (e.g., "Living Room Light").

Image 6.1: Visual guide showing how to press and hold the button for 5-10 seconds until the blue indicator light blinks rapidly, signifying pairing mode.

Image 6.2: Screenshot of the Smart Life/Tuya app showing the login/register screen, a Wi-Fi router, and the process of adding a discovered "WiFi Din Rail Switch" device.
7. Operating
Once the smart switch is successfully paired, you can control it and monitor energy usage through the app or voice commands.
7.1. Remote Control via App
Open the Smart Life or Tuya app. Select your TONGOU Smart Switch from the device list. You can:
- Turn the connected appliance On or Off remotely from anywhere.
- Set up various timer modes:
- Timing Mode: Schedule specific on/off times for daily or weekly routines.
- Countdown Mode: Set a countdown timer for the device to turn off after a specified duration.
- Cyclic Timing Mode: Configure repetitive on/off cycles.
- Astronomical Timing Mode: Automate based on sunrise and sunset times.
7.2. Voice Control
The TONGOU Smart Switch is compatible with Amazon Alexa and Google Assistant. To enable voice control:
- Link your Smart Life/Tuya account to Amazon Alexa or Google Home app.
- Discover new devices.
- Use voice commands such as:
- "Alexa, turn on [Device Name]"
- "Hey Google, turn off [Device Name]"

Image 7.1: An Amazon Echo device displaying a voice waveform, indicating it is processing a command to turn off a lamp.
7.3. Power Monitoring
The smart switch provides real-time and historical energy consumption data:
- View real-time current, voltage, and power consumption of the connected load.
- Access historical data (hourly, daily, monthly, yearly) to track energy usage patterns.
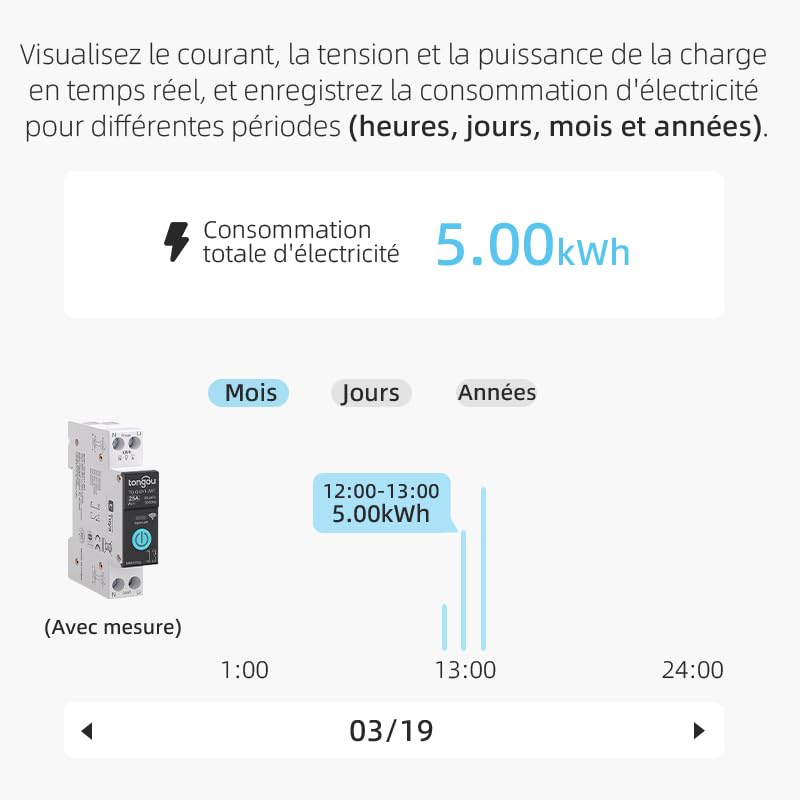
Image 7.2: A graphical representation within the app showing total electricity consumption (5.00 kWh) and a bar chart illustrating hourly consumption data for a specific date.
8. Maintenance
To ensure optimal performance and longevity of your TONGOU Wi-Fi Smart Switch:
- Keep the device clean and free from dust. Use a dry, soft cloth for cleaning.
- Do not use liquid cleaners or solvents.
- Ensure adequate ventilation around the device to prevent overheating.
- Regularly check wiring connections for tightness, especially after initial installation.
9. Troubleshooting
If you encounter issues with your TONGOU Wi-Fi Smart Switch, refer to the following common problems and solutions:
| Problem | Possible Cause | Solution |
|---|---|---|
| Device not connecting to Wi-Fi | Incorrect Wi-Fi band (5GHz), weak signal, incorrect password, device not in pairing mode. | Ensure your Wi-Fi is 2.4 GHz. Move the device closer to the router. Re-enter Wi-Fi password carefully. Put the device back into pairing mode (rapid blue blinking). |
| Device offline in app | Wi-Fi disconnected, power outage, router issues. | Check your Wi-Fi router and internet connection. Verify the device has power. Re-pair if necessary. |
| Voice control not working | Account not linked, device not discovered, incorrect commands. | Ensure Smart Life/Tuya account is linked to Alexa/Google Home. Discover devices in the voice assistant app. Use the exact device name. |
| Power monitoring data is inaccurate or missing | Incorrect wiring, device malfunction. | Double-check wiring according to the installation diagram. Contact support if the issue persists. |
| Device not responding to manual button press | No power, internal fault. | Check power supply to the device. If power is present and the device is unresponsive, contact support. |
10. Warranty and Support
For warranty information and technical support, please refer to the documentation provided with your purchase or contact TONGOU customer service through their official channels. Keep your purchase receipt as proof of purchase.


