1. Introduction
This manual provides essential information for the safe assembly, operation, and maintenance of your ROBOTIME Wooden Play Kitchen, Model WCF3132. Please read all instructions carefully before assembly and use to ensure proper function and safety.
2. Safety Information
Your child's safety is paramount. This play kitchen is designed for children aged 3 and above. Adult supervision is recommended during play.
- Choking Hazard: Contains small parts. Not suitable for children under 3 years.
- Stability: Ensure the product is placed on a flat, stable surface. Utilize the included anti-tip device to secure the kitchen to a wall, preventing accidental tipping.
- Climbing: Do not allow children to climb on the product to prevent falling and injury.
- Assembly: Adult assembly required. Follow all assembly instructions carefully.
- Maintenance: Regularly check all screws and connections to ensure they are tight. Loose parts can pose a hazard.
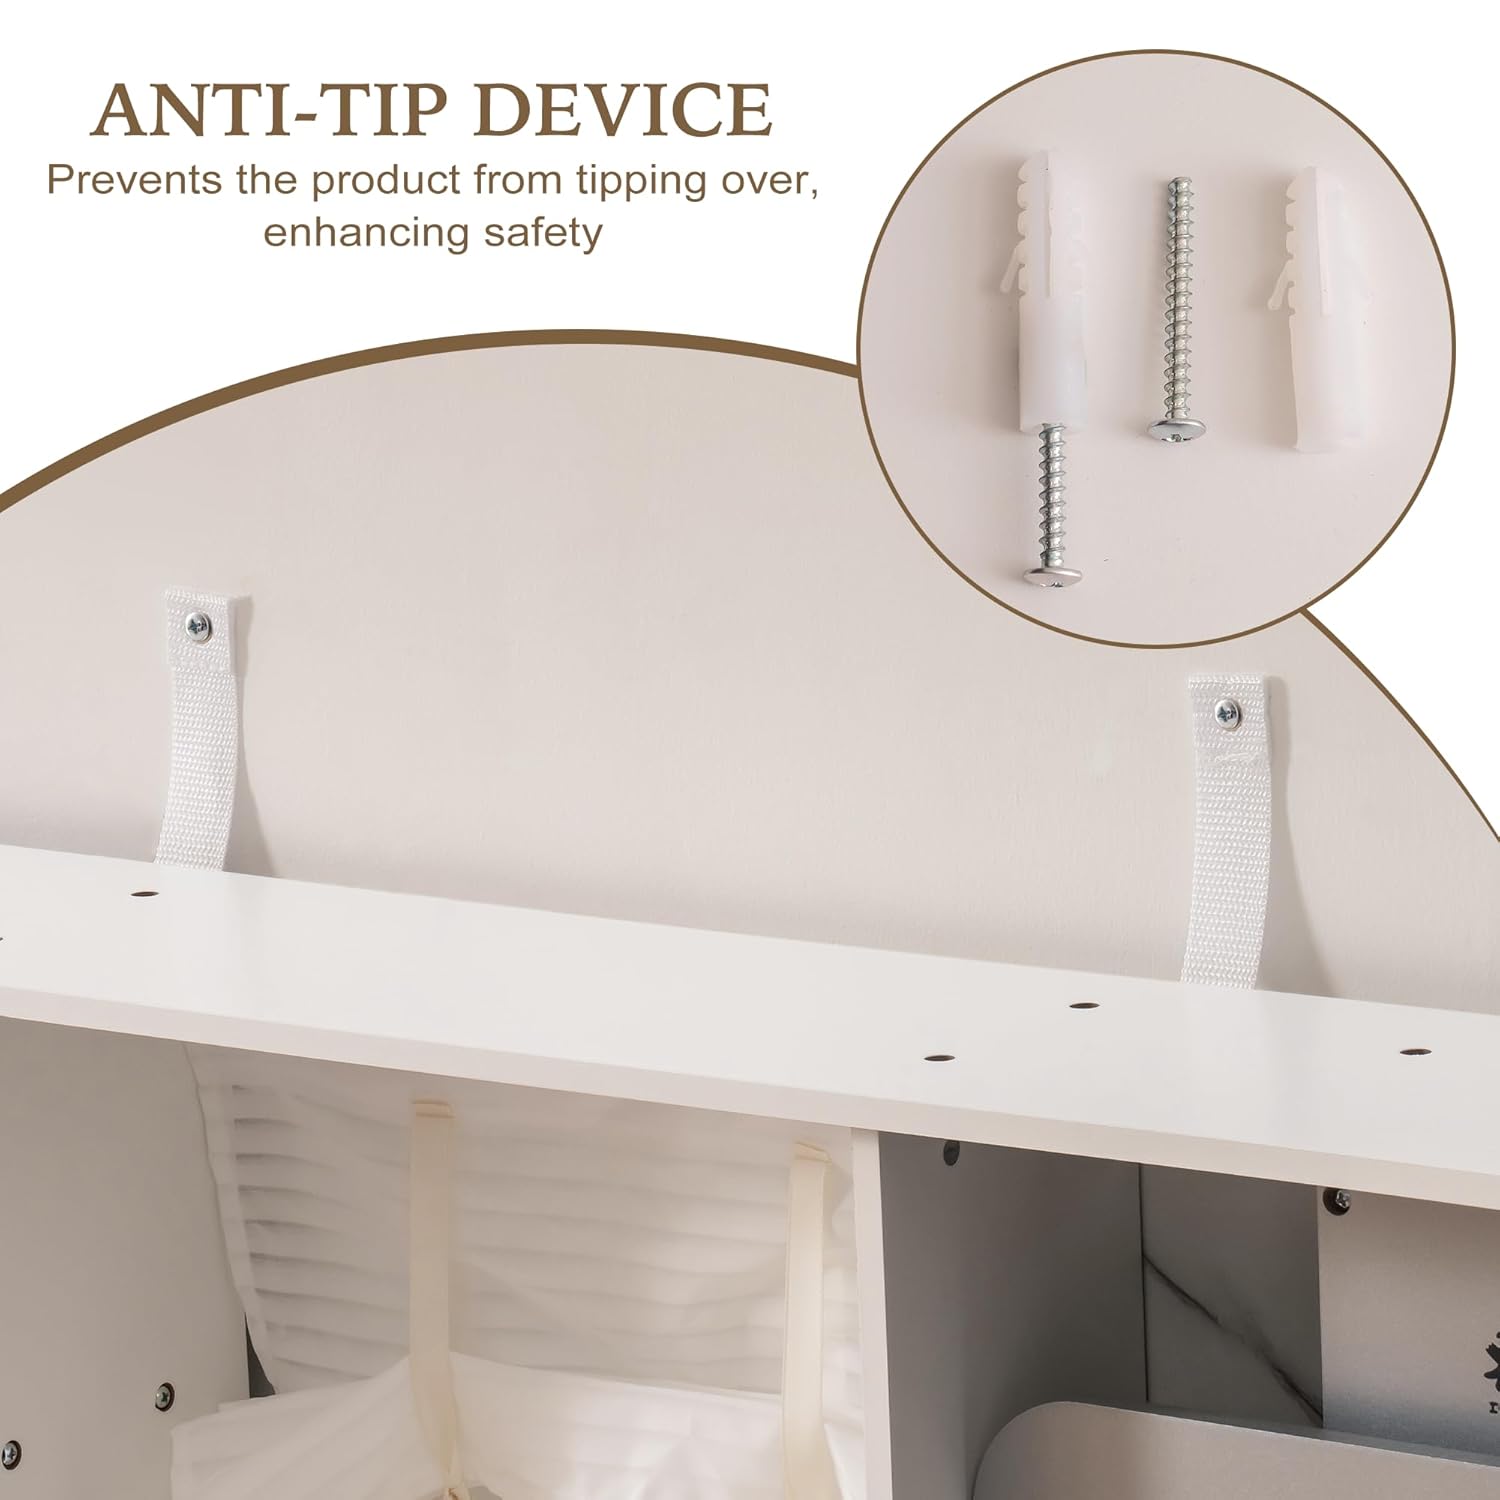
Image: Close-up of the anti-tip device, showing screws and wall anchors for secure installation. This device helps prevent the play kitchen from tipping over.
3. Package Contents
Verify all components are present before beginning assembly. If any parts are missing or damaged, please contact customer support.
3.1. Main Components
- Wooden panels for kitchen structure
- Stove unit with interactive features
- Sink and faucet assembly
- Microwave oven unit
- Coffee machine unit
- Refrigerator unit with ice maker
- Storage cabinets and drawers
3.2. Accessories
- 1x Pot with lid
- 1x Frying pan
- 1x Utensil set (spatula, ladle, tongs)
- 2x Coffee cups
- 1x Coffee portafilter
- 1x Ice cube set
- 1x Coffee bean disc
- 1x Salt shaker
- 1x Pepper shaker
- 6x Hanging hooks
- 1x Oven mitt
- 1x Pot holder

Image: A collection of included play accessories such as a pot, pan, utensils, coffee cups, salt and pepper shakers, and an oven mitt.
4. Assembly Instructions
Follow these step-by-step instructions for assembling your ROBOTIME Wooden Play Kitchen. A manual screwdriver is recommended. If using an electric screwdriver, set it to the minimum torque to prevent damage. Gradually increase torque if necessary.
4.1. Preparation
- Clear a spacious, flat, and clean area for assembly.
- Unpack all components and verify against the parts list.
- Separate hardware by type to streamline the process.
4.2. Step-by-Step Assembly
Refer to the included diagrams for visual guidance. Ensure all screws are tightened securely but avoid over-tightening to prevent cracking the wood.
- Assemble the coffee machine base and attach the rotating handle.
- Secure the microwave unit to the upper left panel.
- Install the sink and faucet assembly into the central countertop.
- Attach the stove unit to the lower right panel.
- Assemble the refrigerator door with the ice maker mechanism.
- Connect the main kitchen sections using the provided hardware.
- Install all cabinet doors and drawer fronts.
- Attach the anti-tip device to the back of the kitchen and secure it to a wall.
Video: Official ROBOTIME product assembly video demonstrating the step-by-step process for constructing the play kitchen.
5. Operating Instructions
5.1. Stove and Oven
- Stove Burners: Turn the golden knobs to activate realistic cooking sounds and lights. The lights will automatically turn off after a short period.
- Oven: Open the oven door by pulling the handle. Place play food inside. The oven features a pull-down door for easy access.

Image: Detailed view of the play kitchen's stove and oven area, highlighting the golden knobs and the pull-down oven door.
5.2. Microwave Oven
- Operation: Turn the knobs on the microwave to set play time and power levels. The microwave door opens for placing play food.

Image: Close-up of the play microwave oven, showing the functional knobs for setting time and power, and the clear door.
5.3. Coffee Machine
- Brewing: Insert the coffee portafilter into the machine. Turn the handle to simulate brewing coffee into the included cups.

Image: Detailed view of the play coffee machine, featuring a rotating handle and space for two play cups.
5.4. Ice Maker
- Dispensing: Place a cup under the ice dispenser. Press the button to release play ice cubes.

Image: Close-up of the play ice maker, showing the mechanism for dispensing play ice cubes.
5.5. Sink and Faucet
- Water Play: The faucet features rotatable dual switches for imaginative water play. The sink basin is removable for easy cleaning.

Image: Detailed view of the play sink and golden faucet with rotatable handles.
6. Maintenance
- Cleaning: Wipe surfaces with a damp cloth and mild soap. Avoid abrasive cleaners or harsh chemicals.
- Inspection: Periodically check all screws and connections for tightness. Re-tighten as needed.
- Storage: Store the play kitchen in a dry environment away from direct sunlight or extreme temperatures to prevent warping or damage to the wood.
7. Troubleshooting
| Problem | Possible Cause | Solution |
|---|---|---|
| Stove lights/sounds not working | Batteries are dead or incorrectly installed. | Replace batteries (if applicable) or ensure they are inserted correctly. |
| Doors/drawers do not close properly | Loose hinges or misaligned panels. | Check and tighten hinge screws. Ensure panels are correctly aligned during assembly. |
| Ice maker not dispensing | Play ice cubes are jammed or missing. | Clear any obstructions. Ensure play ice cubes are correctly loaded. |
8. Specifications
- Model: WCF3132
- Brand: ROBOTIME
- Product Dimensions: 14.2 x 39.4 x 39.8 inches
- Item Weight: 53.6 pounds
- Material: High-quality wood and MDF
- Recommended Age: 3+ years

Image: An overall view of the ROBOTIME Wooden Play Kitchen, providing a visual reference for its size and features.
9. Warranty and Support
For warranty information, missing parts, or technical support, please contact ROBOTIME customer service. Refer to your purchase documentation for specific warranty terms and contact details.
Email: shop@robud.com


