
Benass 13x25 Heavy Duty Carport Canopy
Instruction Manual
Introduction
This manual provides detailed instructions for the assembly, operation, and maintenance of your Benass 13x25 Heavy Duty Carport Canopy. Please read this manual thoroughly before beginning assembly or use to ensure proper installation and safe operation. Retain this manual for future reference.
The Benass 13x25 Carport Canopy is designed to provide a large, portable shelter solution, measuring 25 feet long, 13 feet wide, and 10.5 feet high. It features durable construction with galvanized steel frames and a PE canopy top, equipped with roll-up zipper doors and mesh windows for ventilation.
Safety Information
- Anchoring: Always ensure the carport is securely anchored to the ground using all provided ropes, bindings, and ground nails. Inadequate anchoring can lead to structural failure in adverse weather conditions.
- Weather Conditions: This carport is designed for general weather protection. In severe weather conditions such as heavy winds, snowstorms, or extreme rainfall, it is recommended to disassemble the carport or take additional precautions to secure it. Remove accumulated snow promptly from the canopy to prevent collapse.
- Assembly: Assembly requires at least 2-3 people due to the size and weight of components. Follow all assembly steps carefully.
- Clearance: Ensure adequate clearance around the carport for safe entry, exit, and ventilation.
- Fire Safety: Keep all heat sources and open flames away from the canopy material. The material is not fireproof.
- Children and Pets: Do not allow children or pets to play unsupervised around the carport during assembly or use.
Package Contents
Before beginning assembly, verify that all components listed below are present and undamaged. If any parts are missing or damaged, contact Benass customer service.
- Galvanized Steel Frame Components (1.5" diameter)
- 180gms PE Canopy Top
- 2 Wind Ropes
- 2 Bindings (3.75" PE binding)
- 4 Sandbags
- 2 Sidewalls with mesh roll-up windows
- Roll-up Zipper End Door
- Ground Nails (Ø9 alloy ground nail with hock)
- Screwed Base Nails (Ø6 alloy screwed base nail)
- Highly Extensible Buckles (max 23LBS)
- 1 Solar Light
- 1 Light Strip

Figure 1: Included accessories and components for stable setup.
Setup and Assembly
Assembly of the Benass 13x25 Carport Canopy requires 2-3 people. Follow these steps carefully for proper installation.
- Step 1: Assemble the Top Frame. Connect the horizontal and vertical pipes to form the roof structure.
- Step 2: Install the Top Reinforced Steel Pipes. Add the reinforced support bars to the top frame for increased stability.
- Step 3: Assemble Small Support Beams. Attach any smaller support beams as indicated in the diagrams.
- Step 4: Install the Cover and Secure It. Drape the PE canopy top over the assembled frame and secure it according to the instructions.
- Step 5: Install Steel Pipes at Four Corners. Attach the main vertical support pipes at each corner of the structure.
- Step 6: Install Supporting Legs and Side Fabric. Connect the remaining supporting legs and attach the sidewalls.
- Step 7: Install Base and Fix it with Nails. Secure the base of the carport to the ground using the provided ground nails and screwed base nails.
- Step 8: Secure the Perimeter and Fix the Carport. Use wind ropes, bindings, and sandbags to further secure the entire structure, especially in windy conditions.
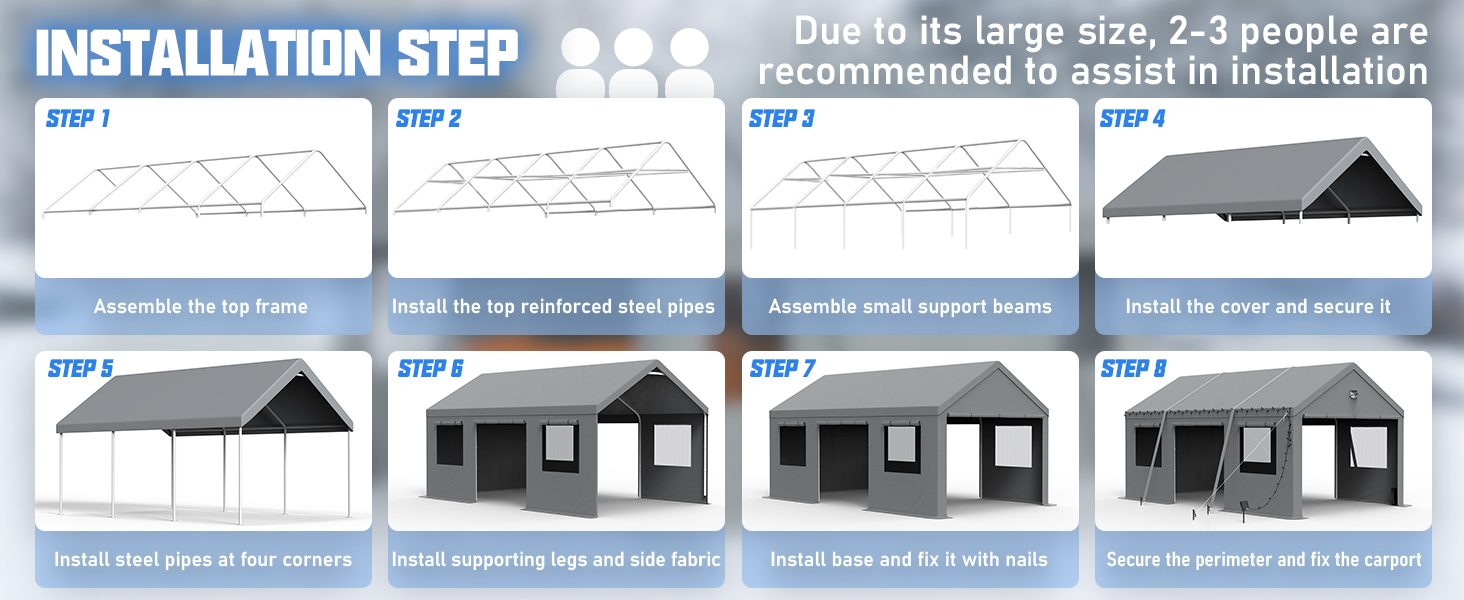
Figure 2: Visual guide for the 8-step installation process. Due to its large size, 2-3 people are recommended to assist in installation.

Figure 3: Internal support bar structure for enhanced stability.
Operating Instructions
- Roll-Up Zipper End Door: The carport features a roll-up zipper door at the end for convenient vehicle access. Unzip and roll up the door panel when entering or exiting, then zip it down to secure the enclosure.
- Side Mesh Roll-Up Windows: The sidewalls are equipped with four mesh roll-up windows. These can be rolled up to ensure air circulation and ventilation, especially during warmer weather, or rolled down for increased protection.
- Side Door Access: A dedicated side door provides convenient access to the interior without needing to open the main end door.
- Solar Light and Light Strip: The included solar light and light strip can be positioned to provide illumination around and within the carport during nighttime. Ensure the solar panel receives adequate sunlight for charging.

Figure 4: Roll-up zipper door for shading and ventilation.

Figure 5: Roll-up and roll-down mesh windows for air circulation.

Figure 6: Solar lights and lamp strip for night indication.
Maintenance
- Cleaning the Canopy: Clean the PE canopy top and sidewalls periodically with mild soap and water. Avoid harsh chemicals or abrasive cleaners that could damage the material. Rinse thoroughly and allow to air dry completely before storage.
- Frame Inspection: Regularly inspect the galvanized steel frame for any signs of rust, bending, or damage. Tighten any loose connections.
- Anchoring Check: Periodically check the ground anchors, ropes, and sandbags to ensure they are still securely fastened, especially after strong winds or heavy rain.
- Snow Removal: In snowy conditions, promptly remove accumulated snow from the canopy to prevent excessive weight and potential collapse.
- Storage: If disassembling for storage, ensure all components are clean and dry. Store the canopy and frame in a dry, protected area to prolong their lifespan.

Figure 7: The 180gms PE tarp offers waterproof and UV protection (80+ UV level).
Troubleshooting
- Carport Instability: Ensure all frame connections are tight and all anchoring points (ground nails, ropes, sandbags) are properly secured. Check for uneven ground.
- Water Pooling on Canopy: Verify that the frame is assembled correctly and the canopy is taut. Ensure proper tensioning to allow water runoff. Remove snow promptly.
- Zipper/Window Malfunction: Check for obstructions in the zipper path. Ensure fabric is not caught. For windows, ensure they roll up and down smoothly without snagging.
- Solar Light Not Working: Ensure the solar panel is clean and exposed to direct sunlight for several hours to charge. Check for any physical damage to the light or wiring.
Specifications
- Brand: Benass
- Model Number: 13x25
- Color: Gray
- Product Dimensions: 300"L x 156"W x 126"H (25'L x 13'W x 10.5'H)
- Frame Material: Alloy Steel (Galvanized Steel, 1.5" diameter)
- Canopy Material: 180gms PE (Polyethylene)
- Water Resistance Level: Waterproof
- Ultraviolet Light Protection: Yes (UV protection level 80+)
- Assembly Required: Yes

Figure 8: Product dimensions of the Benass 13x25 Carport Canopy.

Figure 9: Material comparison highlighting the heavy-duty construction of Benass carports.
Warranty and Support
Benass offers a one-year 100% satisfactory after-sales service. If you encounter any problems with your carport upon receipt or during use, please contact Benass customer service immediately for assistance.
For support, please refer to the contact information provided with your purchase or visit the official Benass website.


