
1. Introduction
Thank you for choosing the LOEFME 12L/Day Dehumidifier. This appliance is designed to efficiently remove excess moisture from the air, helping to prevent dampness, condensation, and mold growth in your home. With its smart features and quiet operation, it provides a comfortable and healthy living environment. Please read this manual thoroughly before operating the dehumidifier to ensure safe and optimal performance.

Figure 1: LOEFME 12L/Day Dehumidifier
2. Important Safety Information
Always follow basic safety precautions when using electrical appliances to reduce the risk of fire, electric shock, and injury.
2.1 Electrical Safety
- Ensure the device is properly grounded.
- Do not use the dehumidifier if the power cord or plug is damaged.
- Do not immerse the unit, cord, or plug in water or other liquids.
- Unplug the dehumidifier before cleaning or performing any maintenance.
2.2 General Use
- Keep the device out of reach of children and pets.
- Do not block the air inlets or outlets. Ensure proper airflow.
- Operate the dehumidifier within the recommended temperature range of 5-35°C.
- Do not use the device for purposes other than intended.
3. Product Overview
Familiarize yourself with the main components and control panel of your LOEFME dehumidifier.
3.1 Main Components
- Air Inlet (with filter)
- Air Outlet
- Control Panel
- Water Tank (2L capacity)
- Continuous Drainage Outlet
- Omnidirectional Casters
- Power Cord
3.2 Control Panel
The smart touch control panel allows for easy operation and monitoring of the dehumidifier's functions.
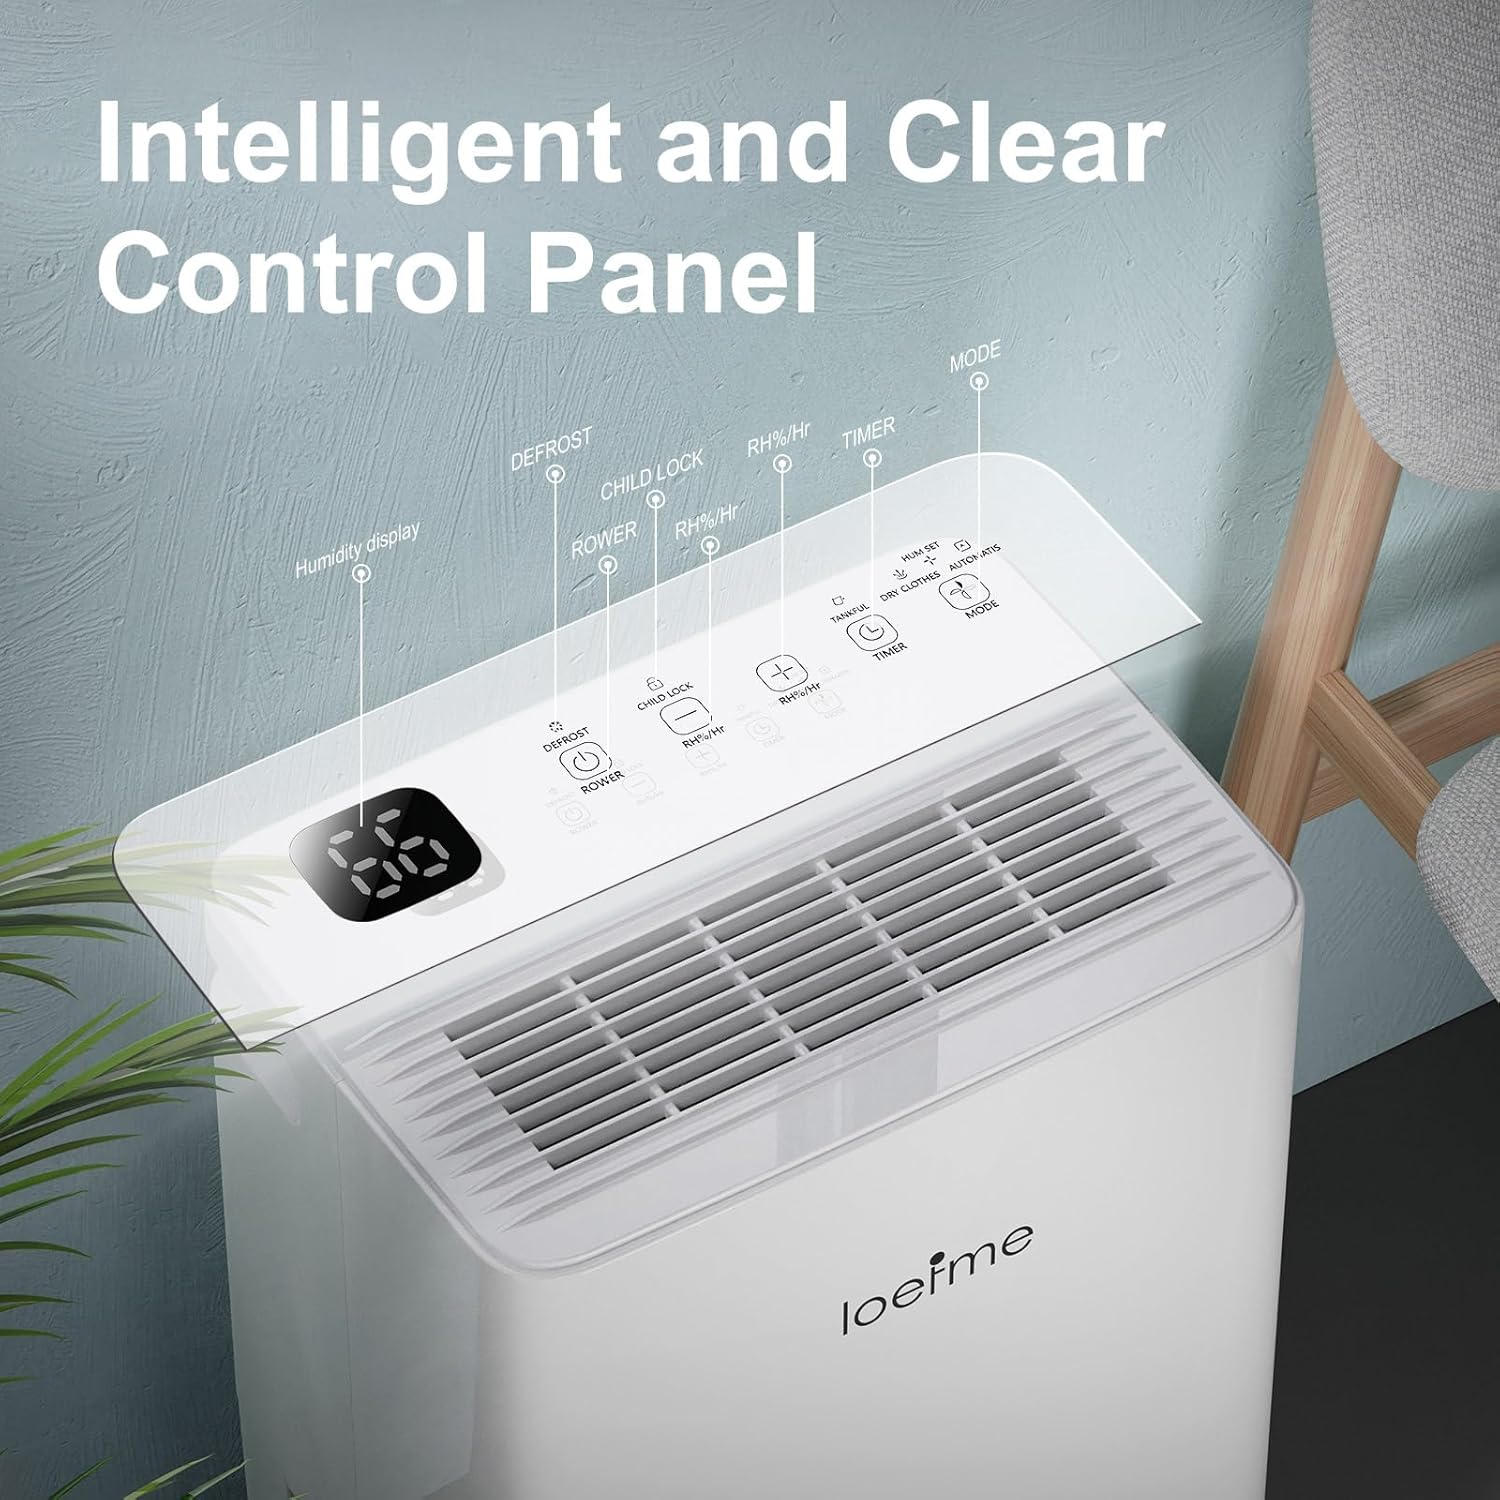
Figure 2: Intelligent and Clear Control Panel
- Humidity Display: Shows current room humidity.
- Power Button: Turns the unit On/Off.
- Defrost Indicator: Illuminates when the unit is in defrost mode.
- Child Lock Button: Activates/deactivates child lock.
- Humidity Adjustment Buttons (+/-): Adjusts target humidity level (40%-80% RH).
- Timer Button: Sets the 24-hour timer for automatic operation.
- Mode Button: Cycles through Dehumidify, Dry Clothes, and Continuous modes.
4. Setup
Follow these steps for initial setup of your dehumidifier.
4.1 Unpacking and Initial Placement
- Carefully remove the dehumidifier from its packaging.
- Locate the user manual and drain pipes inside the water tank.
- Place the machine upright in the desired location.
- Allow the unit to stand still for 6-8 hours before plugging it in. This allows the refrigerant to settle, improving compressor lifespan and performance.
4.2 Caster Installation
The dehumidifier comes with omnidirectional casters for easy mobility. Simply press the casters firmly into the designated holes on the bottom of the unit until they click into place.
4.3 Power Connection
Plug the power cord into a grounded electrical outlet. Ensure the voltage matches the specifications of the unit.
5. Operating Instructions
Learn how to operate your dehumidifier effectively.
5.1 Powering On/Off
- Press the Power button to turn the dehumidifier on. The humidity display will light up.
- Press the Power button again to turn the dehumidifier off.
5.2 Setting Humidity Levels
The dehumidifier can adjust humidity from 80% to 40% Relative Humidity (RH).
- When the unit is on, use the Humidity Adjustment (+/-) buttons to set your desired humidity level.
- The unit will intelligently sense the room humidity and operate to maintain the preset level.

Figure 3: Automatic Humidity Control
5.3 Timer Function
Set the 24-hour timer for scheduled operation.
- Press the Timer button to set the desired operating time (in hours).
- The unit will automatically turn on or off after the set time.
5.4 Mode Selection
The dehumidifier offers three dynamic modes for various spaces.

Figure 4: 3 Dynamic Modes for Various Spaces
- Press the Mode button to cycle through the following options:
- Dehumidify Mode: Provides optimal comfort with automatic dehumidification based on your set humidity level.
- Dry Mode: Keeps your clothes drying efficiently, ideal for rainy days or indoor laundry.
- Continuous Mode: Offers 24-hour continuous dehumidification to keep out moisture, regardless of the set humidity level.
5.5 Child Lock
Activate the child lock to prevent accidental changes to settings.
- Press and hold the Child Lock button for a few seconds to activate or deactivate the child lock.
- When activated, the control panel buttons will be unresponsive.
6. Maintenance
Regular maintenance ensures the longevity and efficiency of your dehumidifier.
6.1 Water Tank Emptying
The dehumidifier features a 2L water tank and an automatic shut-off when full.
- When the water tank is full, the dehumidifier will automatically shut off and an indicator will light up.
- Carefully pull out the water tank from the unit.
- Pour out the collected water.
- Slide the empty water tank back into the unit until it clicks into place. The dehumidifier will resume operation.
6.2 Continuous Drainage Setup
For continuous operation without manually emptying the tank, use the provided drain hoses.
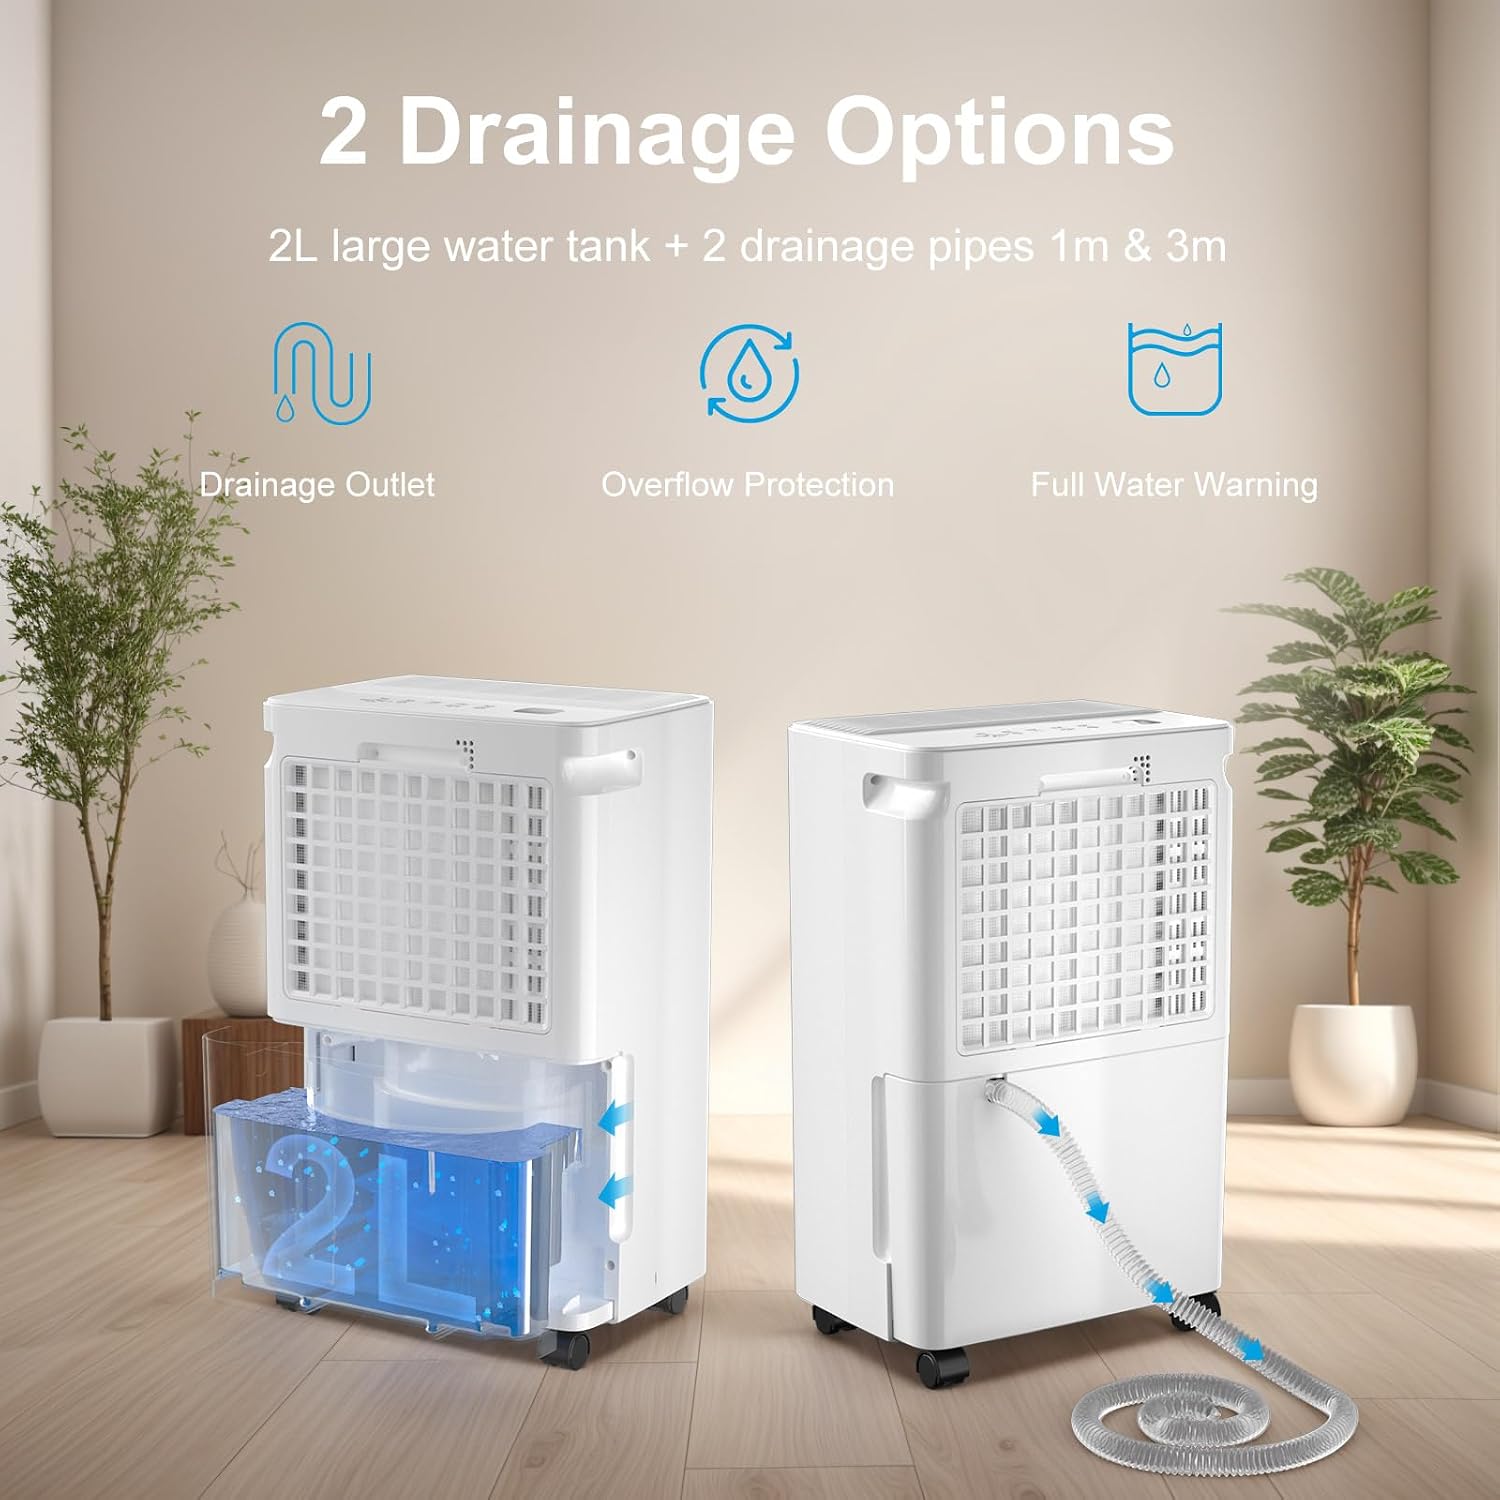
Figure 5: Two Drainage Options
- Locate the continuous drainage outlet on the back of the unit.
- Connect one of the provided drain hoses (1m or 3m) to the outlet.
- Ensure the hose is sloped downwards to allow gravity drainage into a suitable drain or container.
- Once connected, the water will bypass the internal tank and drain continuously.
6.3 Filter Cleaning
The nano-level filter helps maintain air quality and dehumidifier efficiency. Clean it regularly.

Figure 6: Nano-level Filter
- Turn off and unplug the dehumidifier.
- Remove the air filter from its slot (usually located at the back or side).
- Clean the filter using a vacuum cleaner or wash it gently with warm water and mild detergent.
- Allow the filter to air dry completely before reinserting it into the unit.
6.4 Storage
If storing the dehumidifier for an extended period:
- Empty the water tank and ensure it is completely dry.
- Clean the air filter.
- Coil the power cord neatly.
- Store the unit upright in a cool, dry place, away from direct sunlight and extreme temperatures.
7. Troubleshooting
Refer to this table for common issues and their solutions.
| Problem | Possible Cause | Solution |
|---|---|---|
| Dehumidifier does not turn on. | No power; power cord not plugged in; power outage. | Check power connection; ensure outlet is working; check circuit breaker. |
| No dehumidification or low efficiency. | Air filter clogged; room temperature too low; humidity setting too high; unit size too small for area. | Clean air filter; ensure room temperature is within 5-35°C; lower target humidity; consider using in a smaller area. |
| Water tank full indicator is on, but tank is not full. | Water tank not properly inserted; float switch stuck. | Reinsert water tank correctly; gently shake tank to free float switch. |
| Unit is noisy. | Unit not on a level surface; fan obstruction. | Place unit on a flat, stable surface; check for obstructions around air inlets/outlets. |
| Water leaking from unit. | Water tank not properly seated; continuous drainage hose not connected securely or blocked. | Ensure water tank is fully inserted; check continuous drainage hose for secure connection and clear path. |
8. Specifications
Technical specifications for the LOEFME 12L/Day Dehumidifier.
| Feature | Specification |
|---|---|
| Brand | LOEFME |
| Model Number | STS12-1025 |
| Dehumidification Capacity | 12 Litres/Day (at 30°C, 80% RH) |
| Water Tank Capacity | 2 Litres |
| Power / Wattage | 220 Watts |
| Product Dimensions (D x W x H) | 19.5 x 27.5 x 44.5 cm |
| Item Weight | 8.8 kg |
| Recommended Floor Area | Up to 15 m² |
| Noise Level | Below 40dB |
| Operating Temperature Range | 5-35°C |
| Material | Acrylonitrile Butadiene Styrene (ABS) |
| Special Features | Digital Display, Adjustable Humidity Control, Timer, Anti-Spill, Automatic Moisture Removal, Child Lock |
| Included Components | User Manual, LOEFME STS12-1025 Dehumidifier, Drain pipe*2 |
9. Warranty and Support
LOEFME products are manufactured to high-quality standards. For information regarding warranty coverage, technical support, or replacement parts, please refer to the contact details provided with your purchase documentation or visit the official LOEFME website.
Please retain your proof of purchase for any warranty claims.